
User Guide
Page 3
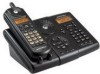
Your Motorola expansion handset at a glance: i Welcome Welcome Congratulations on your purchase of a Motorola product!
Your Motorola expansion handset at a glance: i Welcome Welcome Congratulations on your purchase of a Motorola product!
User Guide
Page 7
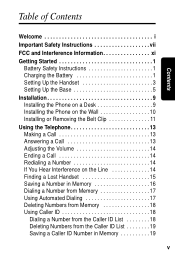
... Safety Instructions vii FCC and Interference Information xi Getting Started 1 Battery Safety Instructions 1 Charging the Battery 1 Setting Up the Handset 3 Setting Up the Base 5 Installation 9 Installing the Phone on a Desk 9 Installing the Phone on the Wall 10 Installing or Removing the Belt Clip 11 Using the Telephone 13 Making a Call 13 Answering a Call...
... Safety Instructions vii FCC and Interference Information xi Getting Started 1 Battery Safety Instructions 1 Charging the Battery 1 Setting Up the Handset 3 Setting Up the Base 5 Installation 9 Installing the Phone on a Desk 9 Installing the Phone on the Wall 10 Installing or Removing the Belt Clip 11 Using the Telephone 13 Making a Call 13 Answering a Call...

User Guide
Page 8
Contents Storing and Calling Emergency Numbers 20 Using the Intercom 20 Conference Calling 21 Transfering a Call 21 Using the Answering Machine 23 Turning the Answering Machine On or Off 23 Setting the Day and Time 23 Setting the Number of Rings 24 Setting Up Your Outgoing Message 25 Recording a Memo 25 Checking Messages from the Base Station 26 Checking Messages from a Handset 26 Checking Messages Remotely 26 Deleting Messages 27 Screening Calls 27 Motorola Limited Warranty 29 vi
Contents Storing and Calling Emergency Numbers 20 Using the Intercom 20 Conference Calling 21 Transfering a Call 21 Using the Answering Machine 23 Turning the Answering Machine On or Off 23 Setting the Day and Time 23 Setting the Number of Rings 24 Setting Up Your Outgoing Message 25 Recording a Memo 25 Checking Messages from the Base Station 26 Checking Messages from a Handset 26 Checking Messages Remotely 26 Deleting Messages 27 Screening Calls 27 Motorola Limited Warranty 29 vi

User Guide
Page 10
... only the power source that are unsure of other controls may fall, causing serious damage to rain or water. Do not install this phone. This product may result in performance. Do not use chemicals or cleaning agents to your dealer or local power company. 5. If you..., stand or table. Safety Info Unplug this cordless phone immediately from the wall. Follow all instructions and save them for future reference. 2. viii Do not place this product with your home, consult with a soft, damp cloth. Do not retrieve the handset or base until after you are covered by ...
... only the power source that are unsure of other controls may fall, causing serious damage to rain or water. Do not install this phone. This product may result in performance. Do not use chemicals or cleaning agents to your dealer or local power company. 5. If you..., stand or table. Safety Info Unplug this cordless phone immediately from the wall. Follow all instructions and save them for future reference. 2. viii Do not place this product with your home, consult with a soft, damp cloth. Do not retrieve the handset or base until after you are covered by ...

User Guide
Page 20
3 Plug the battery connector into the receptacle in the battery compartment and replace the battery door. 4 Plug the power cord into the back of the base and into an outlet. 5 Rest the handset in the base so the charging LED lights. 2 Getting Started
3 Plug the battery connector into the receptacle in the battery compartment and replace the battery door. 4 Plug the power cord into the back of the base and into an outlet. 5 Rest the handset in the base so the charging LED lights. 2 Getting Started

User Guide
Page 21
6 For the initial charge, charge the battery for at least 16 hours. Attention: Do not plug the phone cord into the phone jack until the battery is fully charged. Setting Up the Handset 1 Press flash. 2 Set the language: \ English ] French ^ Spanish 3 Press flash. 4 If you live in an area with 7-digit dialing and you...
6 For the initial charge, charge the battery for at least 16 hours. Attention: Do not plug the phone cord into the phone jack until the battery is fully charged. Setting Up the Handset 1 Press flash. 2 Set the language: \ English ] French ^ Spanish 3 Press flash. 4 If you live in an area with 7-digit dialing and you...

User Guide
Page 29
Snap the wall mount firmly into place. Installing or Removing the Belt Clip To attach the belt clip to the handset, insert the tabs of the clip into the slots on the back of the wall mount. To remove the belt clip, gently release the tabs of the clip. 11 Installation 5 Tuck any extra cord into the back of the wall mount. 6 Line up the tabs on the wall mount bracket with the holes on the back of the handset.
Snap the wall mount firmly into place. Installing or Removing the Belt Clip To attach the belt clip to the handset, insert the tabs of the clip into the slots on the back of the wall mount. To remove the belt clip, gently release the tabs of the clip. 11 Installation 5 Tuck any extra cord into the back of the wall mount. 6 Line up the tabs on the wall mount bracket with the holes on the back of the handset.
User Guide
Page 32
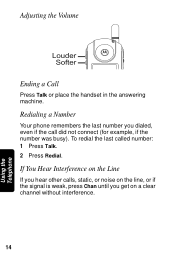
If You Hear Interference on the Line If you hear other calls, static, or noise on a clear channel without interference. 14 Using the Telephone To redial the last called number: 1 Press Talk. 2 Press Redial. Adjusting the Volume Ending a Call Press Talk or place the handset in the answering machine. Redialing a Number Your phone remembers the last number you get on the line, or if the signal is weak, press Chan until you dialed, even if the call did not connect (for example, if the number was busy).
If You Hear Interference on the Line If you hear other calls, static, or noise on a clear channel without interference. 14 Using the Telephone To redial the last called number: 1 Press Talk. 2 Press Redial. Adjusting the Volume Ending a Call Press Talk or place the handset in the answering machine. Redialing a Number Your phone remembers the last number you get on the line, or if the signal is weak, press Chan until you dialed, even if the call did not connect (for example, if the number was busy).

User Guide
Page 33
Note: No need to hurry, the handset will not stop beeping for about two minutes. 3 Press page/intercom again (or press Talk on the answering machine. 2 Follow the sound to stop the beeping. page/intercom 15 Using the Telephone Finding a Lost Handset 1 Press page/intercom on the handset) to locate the handset.
Note: No need to hurry, the handset will not stop beeping for about two minutes. 3 Press page/intercom again (or press Talk on the answering machine. 2 Follow the sound to stop the beeping. page/intercom 15 Using the Telephone Finding a Lost Handset 1 Press page/intercom on the handset) to locate the handset.
User Guide
Page 34
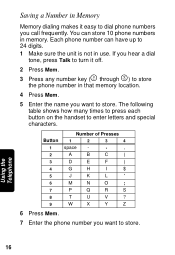
... Talk to turn it easy to enter letters and special characters. W X Y Z 6 Press Mem. 7 Enter the phone number you want to store. The following table shows how many times to press each button on the handset to dial phone numbers you call frequently. Button 1 2 3 4 5 6 7 8 9 Number of Presses 1 2 3 4 space - * , A B C ( D E F ) G H I $ J K L ' M N O ; Using the Telephone 16 Saving a Number...
... Talk to turn it easy to enter letters and special characters. W X Y Z 6 Press Mem. 7 Enter the phone number you want to store. The following table shows how many times to press each button on the handset to dial phone numbers you call frequently. Button 1 2 3 4 5 6 7 8 9 Number of Presses 1 2 3 4 space - * , A B C ( D E F ) G H I $ J K L ' M N O ; Using the Telephone 16 Saving a Number...

User Guide
Page 36
... to dial. 18 Using the Telephone To scroll through the list of the following keys to access your phone service provider. is not in memory. Using Caller ID When you receive a call, the handset display shows one of calls, press ò or ú. Dialing a Number from Memory 1 Press Mem. 2 Using ò and...
... to dial. 18 Using the Telephone To scroll through the list of the following keys to access your phone service provider. is not in memory. Using Caller ID When you receive a call, the handset display shows one of calls, press ò or ú. Dialing a Number from Memory 1 Press Mem. 2 Using ò and...
User Guide
Page 38
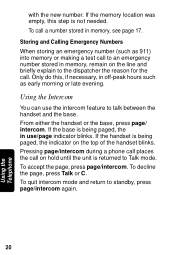
... Talk or C. Storing and Calling Emergency Numbers When storing an emergency number (such as early morning or late evening. Pressing page/intercom during a phone call places the call a number stored in use the intercom feature to standby, press page/intercom again. 20 Using the Telephone with the new ...number. To accept the page, press page/intercom. If the handset is returned to an emergency number stored in off-peak hours such as 911) into memory or making a test call . If the memory ...
... Talk or C. Storing and Calling Emergency Numbers When storing an emergency number (such as early morning or late evening. Pressing page/intercom during a phone call places the call a number stored in use the intercom feature to standby, press page/intercom again. 20 Using the Telephone with the new ...number. To accept the page, press page/intercom. If the handset is returned to an emergency number stored in off-peak hours such as 911) into memory or making a test call . If the memory ...

User Guide
Page 39
A short connection beep will alert the user that another person has joined the call in progress press Talk. To connect to complete the transfer. 21 Using the Telephone Conference Calling Both the handset and the base can participate in a call , press Talk. To disconnect from a conference call at the same time. The call in progress, press page/intercom. Transfering a Call To transfer a call is placed on hold and the other unit is answered, pressing Hold begins a conference between the base, handset, and caller. Press Talk to a call . When the page is paged.
A short connection beep will alert the user that another person has joined the call in progress press Talk. To connect to complete the transfer. 21 Using the Telephone Conference Calling Both the handset and the base can participate in a call , press Talk. To disconnect from a conference call at the same time. The call in progress, press page/intercom. Transfering a Call To transfer a call is placed on hold and the other unit is answered, pressing Hold begins a conference between the base, handset, and caller. Press Talk to a call . When the page is paged.

User Guide
Page 41
You can do so from the handset, or remotely. Setting the Day and Time If you did not set the day and time of messages and/or memos. After you release day/...
You can do so from the handset, or remotely. Setting the Day and Time If you did not set the day and time of messages and/or memos. After you release day/...

User Guide
Page 44
Checking Messages from a Handset 1 Press chan. 2 Scroll to delete the message Checking Messages Remotely If you have a touch-tone phone, you can access your messages remotely. 1 Call your home. 2 When the answering machine picks up the call, press * and then enter your security ID number. ...
Checking Messages from a Handset 1 Press chan. 2 Scroll to delete the message Checking Messages Remotely If you have a touch-tone phone, you can access your messages remotely. 1 Call your home. 2 When the answering machine picks up the call, press * and then enter your security ID number. ...
User Guide
Page 45
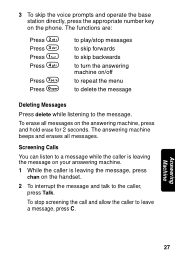
3 To skip the voice prompts and operate the base station directly, press the appropriate number key on the handset. 2 To interrupt the message and talk to leave a message, press C. The answering machine beeps and erases all messages on /off to repeat the menu to ... listen to a message while the caller is leaving the message on your answering machine. 1 While the caller is leaving the message, press chan on the phone.
3 To skip the voice prompts and operate the base station directly, press the appropriate number key on the handset. 2 To interrupt the message and talk to leave a message, press C. The answering machine beeps and erases all messages on /off to repeat the menu to ... listen to a message while the caller is leaving the message on your answering machine. 1 While the caller is leaving the message, press chan on the phone.

