
User Manual
Page 1
MA357 Cordless Phone Start Here>
MA357 Cordless Phone Start Here>
User Manual
Page 3
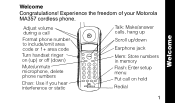
Experience the freedom of your Motorola MA357 cordless phone. Adjust volume during a call Format phone number to include/omit area code or 1+ area code Turn handset ringer on (up) or off (down) Mute/unmute microphone, delete phone numbers Chan: Use if you hear interference or static Talk: Make/answer calls, hang up Scroll up/down Earphone jack Mem: Store numbers in memory Flash: Enter setup 6 lmn menu Put call on hold Redial 1 Welcome Welcome Congratulations!
Experience the freedom of your Motorola MA357 cordless phone. Adjust volume during a call Format phone number to include/omit area code or 1+ area code Turn handset ringer on (up) or off (down) Mute/unmute microphone, delete phone numbers Chan: Use if you hear interference or static Talk: Make/answer calls, hang up Scroll up/down Earphone jack Mem: Store numbers in memory Flash: Enter setup 6 lmn menu Put call on hold Redial 1 Welcome Welcome Congratulations!
User Manual
Page 6
Contents Contents FCC and Interference Information 6 Important Safety Instructions 13 Installing the Belt Clip . . . . . 18 Battery Safety Instructions . 19 Charging the Battery. . . . . . 20 Installing the Phone on a Desk 23 Installing the Phone on a Wall 24 Setting a Wildlife Ring Sound on the Base 28 Setting the Base Ring Volume 30 Setting Up the Phone . . . . . .30 How to Find a Lost Handset 35 Storing a Number in Memory 35 Storing a Caller ID Number in Memory 37 Dialing a Number from Memory 37 Reviewing and Deleting Numbers from Memory . . . .38 4
Contents Contents FCC and Interference Information 6 Important Safety Instructions 13 Installing the Belt Clip . . . . . 18 Battery Safety Instructions . 19 Charging the Battery. . . . . . 20 Installing the Phone on a Desk 23 Installing the Phone on a Wall 24 Setting a Wildlife Ring Sound on the Base 28 Setting the Base Ring Volume 30 Setting Up the Phone . . . . . .30 How to Find a Lost Handset 35 Storing a Number in Memory 35 Storing a Caller ID Number in Memory 37 Dialing a Number from Memory 37 Reviewing and Deleting Numbers from Memory . . . .38 4
User Manual
Page 10
... to the nationwide telephone network through a modular telephone jack (USOC RJ11C/RJ11W or RJ14C/RJ14W). Where prior 8 Rights of this cordless phone does not disable your line which may be required. If you have questions about what will disable alarm equipment, consult your telephone company or a qualified ...
... to the nationwide telephone network through a modular telephone jack (USOC RJ11C/RJ11W or RJ14C/RJ14W). Where prior 8 Rights of this cordless phone does not disable your line which may be required. If you have questions about what will disable alarm equipment, consult your telephone company or a qualified ...
User Manual
Page 15
Safety Instructions Important Safety Instructions Follow these safety precautions when using your cordless phone to reduce the risk of fire, electric shock and injury to rest on . 13 Do not allow anything to persons or property: Reduce risk of the phone unblocked. Do not use this product near water (for example, near a bath tub... cord so that proper ventilation is provided at the installation site. 2. Do not use while wet or while standing in water. 3. Do not set the phone on a heating register or over a radiator. Keep all slits and openings of fire and shock by 1.
Safety Instructions Important Safety Instructions Follow these safety precautions when using your cordless phone to reduce the risk of fire, electric shock and injury to rest on . 13 Do not allow anything to persons or property: Reduce risk of the phone unblocked. Do not use this product near water (for example, near a bath tub... cord so that proper ventilation is provided at the installation site. 2. Do not use while wet or while standing in water. 3. Do not set the phone on a heating register or over a radiator. Keep all slits and openings of fire and shock by 1.
User Manual
Page 16
Unplug this cordless phone to protect the equipment. 10. Do not use this product from the wall outlet before cleaning. Use a surge pro- tector to report a gas leak, especially ... not disassemble this user's guide. 8. Use a damp cloth for cleaning. 7. Never insert objects of this product. If service or repair work is required, contact the Motorola address found in the back of any kind into the product slits as that may result in the vicinity of the gas line. 14 Safety...
Unplug this cordless phone to protect the equipment. 10. Do not use this product from the wall outlet before cleaning. Use a surge pro- tector to report a gas leak, especially ... not disassemble this user's guide. 8. Use a damp cloth for cleaning. 7. Never insert objects of this product. If service or repair work is required, contact the Motorola address found in the back of any kind into the product slits as that may result in the vicinity of the gas line. 14 Safety...
User Manual
Page 17
Safety Instructions Unplug this cordless phone immediately from the wall. Then retrieve the unit by unplugged cords. • The product has been dropped or the cabinet has been damaged. • The product exhibits a distinct change in performance. 15 Do not retrieve the handset or base until after you have unplugged the power and phone from an outlet if: • The power cord or plug is damaged or frayed. • Liquid has been spilled into the product. • The product has been exposed to rain or water.
Safety Instructions Unplug this cordless phone immediately from the wall. Then retrieve the unit by unplugged cords. • The product has been dropped or the cabinet has been damaged. • The product exhibits a distinct change in performance. 15 Do not retrieve the handset or base until after you have unplugged the power and phone from an outlet if: • The power cord or plug is damaged or frayed. • Liquid has been spilled into the product. • The product has been exposed to rain or water.
User Manual
Page 18
Do not install this phone using only the power source that is indicated on an unstable cart, stand or table. This product may fall, causing serious damage to your home, consult with your dealer or local power company. 5. Follow all instructions and save them for future reference. 2. If you are unsure of the power supply to the product. 16 Read and understand all warnings and instructions marked on the product. 3. Do not place this product on the marking label. Safety Instructions Installation Guidelines 1. Operate this product near a bath tub, sink or shower. 4.
Do not install this phone using only the power source that is indicated on an unstable cart, stand or table. This product may fall, causing serious damage to your home, consult with your dealer or local power company. 5. Follow all instructions and save them for future reference. 2. If you are unsure of the power supply to the product. 16 Read and understand all warnings and instructions marked on the product. 3. Do not place this product on the marking label. Safety Instructions Installation Guidelines 1. Operate this product near a bath tub, sink or shower. 4.
User Manual
Page 19
Use only the power supply that came with a soft, damp cloth. Because cordless phones operate on or near a TV, microwave oven, or VCR. 17 Do not use chemicals or cleaning agents to normal operation. 7. To avoid interference to nearby ... power supplies may result in damage and will often require extensive work to restore the product to clean this unit. Improper adjustment of the cordless phone on electricity, you should have at least one phone in your home goes out. 10. Using other controls may damage the unit. 9. Clean this product with this...
Use only the power supply that came with a soft, damp cloth. Because cordless phones operate on or near a TV, microwave oven, or VCR. 17 Do not use chemicals or cleaning agents to normal operation. 7. To avoid interference to nearby ... power supplies may result in damage and will often require extensive work to restore the product to clean this unit. Improper adjustment of the cordless phone on electricity, you should have at least one phone in your home goes out. 10. Using other controls may damage the unit. 9. Clean this product with this...
User Manual
Page 20
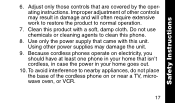
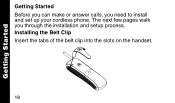
Installing the Belt Clip Insert the tabs of the belt clip into the slots on the handset. 18 Getting Started Getting Started Before you can make or answer calls, you through the installation and setup process. The next few pages walk you need to install and set up your cordless phone.
Installing the Belt Clip Insert the tabs of the belt clip into the slots on the handset. 18 Getting Started Getting Started Before you can make or answer calls, you through the installation and setup process. The next few pages walk you need to install and set up your cordless phone.
User Manual
Page 21
... for proper disposal methods. 19 Refer to be released, resulting in explosion. • The rechargeable batteries that came with an incorrect battery type. Contact your phone or an authorized replacement recommended by the manufacturer. • Keep batteries out of the reach of children. • Remove batteries if storing over 30 days...
... for proper disposal methods. 19 Refer to be released, resulting in explosion. • The rechargeable batteries that came with an incorrect battery type. Contact your phone or an authorized replacement recommended by the manufacturer. • Keep batteries out of the reach of children. • Remove batteries if storing over 30 days...
User Manual
Page 23
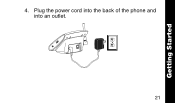
Getting Started 4. Plug the power cord into the back of the phone and into an outlet. 21
Getting Started 4. Plug the power cord into the back of the phone and into an outlet. 21
User Manual
Page 24
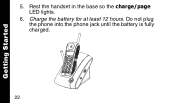
5. Charge the battery for at least 12 hours. Getting Started 22 mem mute 123 456 78 9 00 0 Rest the handset in the base so the charge/page LED lights. 6. Do not plug the phone into the phone jack until the battery is fully charged.
5. Charge the battery for at least 12 hours. Getting Started 22 mem mute 123 456 78 9 00 0 Rest the handset in the base so the charge/page LED lights. 6. Do not plug the phone into the phone jack until the battery is fully charged.
User Manual
Page 25
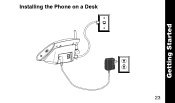
Getting Started Installing the Phone on a Desk 23
Getting Started Installing the Phone on a Desk 23
User Manual
Page 26
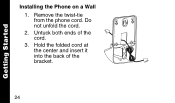
Untuck both ends of the bracket. 24 Getting Started Getting Started Installing the Phone on a Wall 1. Do not unfold the cord. 2. Hold the folded cord at the center and insert it into the back of the cord. 3. Remove the twist-tie from the phone cord.
Untuck both ends of the bracket. 24 Getting Started Getting Started Installing the Phone on a Wall 1. Do not unfold the cord. 2. Hold the folded cord at the center and insert it into the back of the cord. 3. Remove the twist-tie from the phone cord.
User Manual
Page 27
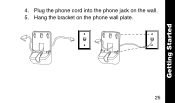
Hang the bracket on the wall. 5. Getting Started 4. Plug the phone cord into the phone jack on the phone wall plate. 25
Hang the bracket on the wall. 5. Getting Started 4. Plug the phone cord into the phone jack on the phone wall plate. 25
User Manual
Page 28
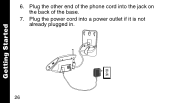
Plug the power cord into the jack on the back of the phone cord into a power outlet if it is not already plugged in. 26 Getting Started 6. Plug the other end of the base. 7.
Plug the power cord into the jack on the back of the phone cord into a power outlet if it is not already plugged in. 26 Getting Started 6. Plug the other end of the base. 7.
User Manual
Page 30
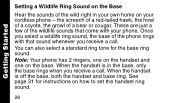
the screech of a red-tailed hawk, the howl of a coyote, the growl of the phone rings with that come with your cordless phone -- These are just a few of the wildlife sounds that sound whenever you receive a ... standard ring tone for instructions on the base. When the handset is in your own home on your phone. Once you select a wildlife ring sound, the base of a bear or cougar. See page 31 for the base ...ring sound. Note: Your phone has 2 ringers, one on the handset and one on how to set the handset ring sound. 28 ...
the screech of a red-tailed hawk, the howl of a coyote, the growl of the phone rings with that come with your cordless phone -- These are just a few of the wildlife sounds that sound whenever you receive a ... standard ring tone for instructions on the base. When the handset is in your own home on your phone. Once you select a wildlife ring sound, the base of a bear or cougar. See page 31 for the base ...ring sound. Note: Your phone has 2 ringers, one on the handset and one on how to set the handset ring sound. 28 ...
User Manual
Page 32
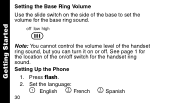
Note: You cannot control the volume level of the handset ring sound, but you can turn it on /off . See page 1 for the location of the base to set the volume for the handset ring sound. Getting Started Setting the Base Ring Volume Use the slide switch on the side of the on or off switch for the base ring sound. Press flash. 2. Setting Up the Phone 1. Set the language: \ English ] French ^ Spanish 30
Note: You cannot control the volume level of the handset ring sound, but you can turn it on /off . See page 1 for the location of the base to set the volume for the handset ring sound. Getting Started Setting the Base Ring Volume Use the slide switch on the side of the on or off switch for the base ring sound. Press flash. 2. Setting Up the Phone 1. Set the language: \ English ] French ^ Spanish 30
User Manual
Page 33
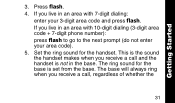
If you live in an area with 7-digit dialing: enter your area code). 5. If you live in the base. This is the sound the handset makes when you receive a call and the handset is set from the base. Press flash. 4. The base will always ring when you receive a call , regardless of whether the 31 Getting Started 3. Set the ring sound for the base is not in an area with 10-digit dialing (3-digit area code + 7-digit phone number): press flash to go to the next prompt (do not enter your 3-digit area code and press flash. The ring sound for the handset.
If you live in an area with 7-digit dialing: enter your area code). 5. If you live in the base. This is the sound the handset makes when you receive a call and the handset is set from the base. Press flash. 4. The base will always ring when you receive a call , regardless of whether the 31 Getting Started 3. Set the ring sound for the base is not in an area with 10-digit dialing (3-digit area code + 7-digit phone number): press flash to go to the next prompt (do not enter your 3-digit area code and press flash. The ring sound for the handset.


