User Guide
Page 3
... Mode 26 FCC Licensing Information.......... 4 Safety and General Information .. 6 Radio Controls 13 Getting Started 14 Installing the Swivel Belt Holster 14 Installing the Batteries 15 Charging the Battery 16 Turning Your Radio On and Off . 19 Adjusting the Volume 20 Factory Default Settings 27 Entering Programming Mode .....28 Cloning Radio Settings 32...
... Mode 26 FCC Licensing Information.......... 4 Safety and General Information .. 6 Radio Controls 13 Getting Started 14 Installing the Swivel Belt Holster 14 Installing the Batteries 15 Charging the Battery 16 Turning Your Radio On and Off . 19 Adjusting the Volume 20 Factory Default Settings 27 Entering Programming Mode .....28 Cloning Radio Settings 32...
User Guide
Page 4
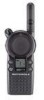
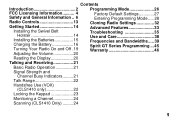
...Contents • _Series Radio • Swivel Belt Holster • Lithium Ion Battery • Drop-In Charger with Transformer • User's Guide • Accessory Brochure • Warranty Card 2 Motorola professional two-way radios are the perfect communications solution for all of experience ...as retail stores, restaurants, hotels, and schools. The _Series radios provide costeffective communications for purchasing a Motorola _Series Radio. Please read this guide carefully so you for businesses such as a world leader in designing and manufacturing communications...
...Contents • _Series Radio • Swivel Belt Holster • Lithium Ion Battery • Drop-In Charger with Transformer • User's Guide • Accessory Brochure • Warranty Card 2 Motorola professional two-way radios are the perfect communications solution for all of experience ...as retail stores, restaurants, hotels, and schools. The _Series radios provide costeffective communications for purchasing a Motorola _Series Radio. Please read this guide carefully so you for businesses such as a world leader in designing and manufacturing communications...
User Guide
Page 12
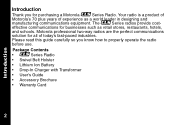
... always posted. 10 Potentially Explosive Atmospheres Turn off your radio prior to entering any other area where you drive. Do not remove, install, or charge batteries in bodily injury or even death. When using your vehicle engine. If a portable radio is a radio type especially qualified for use of the vehicle. Sparks...
... always posted. 10 Potentially Explosive Atmospheres Turn off your radio prior to entering any other area where you drive. Do not remove, install, or charge batteries in bodily injury or even death. When using your vehicle engine. If a portable radio is a radio type especially qualified for use of the vehicle. Sparks...
User Guide
Page 13
... blasting caps, in a blasting area, or in handling any portable radio that has a damaged antenna. Obey all signs and instructions. Battery Charger Safety Instructions Save these Instructions 1. If the plug will not fit the outlet, have the proper outlet installed by a qualified electrician.... The conductive material may complete an electrical circuit (short circuit) and become quite hot. Operational Cautions Antennas Do not use any charged battery, particularly when placing it has received a sharp blow, or has been dropped or damaged in a risk of electric shock. 11 Safety...
... blasting caps, in a blasting area, or in handling any portable radio that has a damaged antenna. Obey all signs and instructions. Battery Charger Safety Instructions Save these Instructions 1. If the plug will not fit the outlet, have the proper outlet installed by a qualified electrician.... The conductive material may complete an electrical circuit (short circuit) and become quite hot. Operational Cautions Antennas Do not use any charged battery, particularly when placing it has received a sharp blow, or has been dropped or damaged in a risk of electric shock. 11 Safety...

User Guide
Page 17
... on the door and slide it off the radio. 2. AAA Alkaline Batteries 1. Insert 3 AAA batteries into place. 5. Insert the battery, printed arrows first, into place. Press S until A or n flashes (this menu does not appear if using a Motorola Li Ion battery). 6. Slide and snap the battery door into the battery compartment and press down to select A for alkaline...
... on the door and slide it off the radio. 2. AAA Alkaline Batteries 1. Insert 3 AAA batteries into place. 5. Insert the battery, printed arrows first, into place. Press S until A or n flashes (this menu does not appear if using a Motorola Li Ion battery). 6. Slide and snap the battery door into the battery compartment and press down to select A for alkaline...
User Guide
Page 18
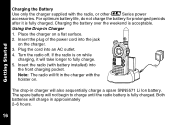
... the holster on while charging, it is acceptable. Turn the radio off. If the radio is fully charged. Both batteries will charge in charger will take longer to charge until the radio battery is on . Insert the radio (with the radio, or other _Series power accessories. The spare... Place the charger on the charger. 3. The drop-in approximately 2-6 hours. 16 For optimum battery life, do not charge the battery for prolonged periods after it will also sequentially charge a spare SNN5571 Li Ion battery. Insert the plug of the power cord into the jack on a flat surface. 2. Getting ...
... the holster on while charging, it is acceptable. Turn the radio off. If the radio is fully charged. Both batteries will charge in charger will take longer to charge until the radio battery is on . Insert the radio (with the radio, or other _Series power accessories. The spare... Place the charger on the charger. 3. The drop-in approximately 2-6 hours. 16 For optimum battery life, do not charge the battery for prolonged periods after it will also sequentially charge a spare SNN5571 Li Ion battery. Insert the plug of the power cord into the jack on a flat surface. 2. Getting ...
User Guide
Page 19
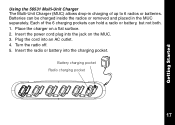
Each of the 6 charging pockets can be charged inside the radios or removed and placed in charging of up to 6 radios or batteries. Insert the power cord plug into the jack on a flat surface. 2. Battery charging pocket Radio charging pocket 17 Turn the radio off. 5. Place the charger on the MUC. 3. Insert the radio or battery into an AC outlet. 4. Plug the cord into the charging pocket. Batteries can hold a radio or battery, but not both. 1. Getting Started Using the 56531 Multi-Unit Charger The Multi-Unit Charger (MUC) allows drop-in the MUC separately.
Each of the 6 charging pockets can be charged inside the radios or removed and placed in charging of up to 6 radios or batteries. Insert the power cord plug into the jack on a flat surface. 2. Battery charging pocket Radio charging pocket 17 Turn the radio off. 5. Place the charger on the MUC. 3. Insert the radio or battery into an AC outlet. 4. Plug the cord into the charging pocket. Batteries can hold a radio or battery, but not both. 1. Getting Started Using the 56531 Multi-Unit Charger The Multi-Unit Charger (MUC) allows drop-in the MUC separately.
User Guide
Page 20
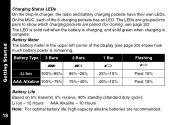
The LEDs are grouped into pairs to show which charging pockets are recommended. 18 Battery Meter The battery meter in charger, the radio and battery charging pockets have their own LEDs. Getting Started Charging Status LEDs On the drop-in the upper left corner of the 6 charging pockets has an... LED. On the MUC, each of the display (see page 32). The LED is solid red when the battery is charging, and solid green when charging is remaining. Battery Type 3 Bars 2 Bars 1 Bar Flashing d b c m Li Ion 100%-85% 85%-25% 25%-10% Final 10% AAA Alkaline 100%-75% ...
The LEDs are grouped into pairs to show which charging pockets are recommended. 18 Battery Meter The battery meter in charger, the radio and battery charging pockets have their own LEDs. Getting Started Charging Status LEDs On the drop-in the upper left corner of the 6 charging pockets has an... LED. On the MUC, each of the display (see page 32). The LED is solid red when the battery is charging, and solid green when charging is remaining. Battery Type 3 Bars 2 Bars 1 Bar Flashing d b c m Li Ion 100%-85% 85%-25% 25%-10% Final 10% AAA Alkaline 100%-75% ...

User Guide
Page 22
Getting Started Reading the Display Signal Strength and Channel Busy Indicator Battery Meter Channel Interference Eliminator Code Indicator Programming Mode Scan (CLS1410 Only) 20 VibraCall® Alert Indicator Frequency and Interference Eliminator Code Keypad Lock Frequency Indicator Microphone Gain and VOX (CLS1410 only) Adjusting the Volume Turn P clockwise to increase the volume, and counterclockwise to your ear when adjusting the volume. Note: Do not hold the radio too close to decrease the volume.
Getting Started Reading the Display Signal Strength and Channel Busy Indicator Battery Meter Channel Interference Eliminator Code Indicator Programming Mode Scan (CLS1410 Only) 20 VibraCall® Alert Indicator Frequency and Interference Eliminator Code Keypad Lock Frequency Indicator Microphone Gain and VOX (CLS1410 only) Adjusting the Volume Turn P clockwise to increase the volume, and counterclockwise to your ear when adjusting the volume. Note: Do not hold the radio too close to decrease the volume.

User Guide
Page 34
... turning the radio on again to the target radio. Cloning Radio Settings 1. The MUC does not have to a singlechannel radio, but both radios require charged batteries. If cloning was not successful, F or Fail displays on the source radio, press and hold Push to a second radio using the 56531 Multi-Unit Charger...
... turning the radio on again to the target radio. Cloning Radio Settings 1. The MUC does not have to a singlechannel radio, but both radios require charged batteries. If cloning was not successful, F or Fail displays on the source radio, press and hold Push to a second radio using the 56531 Multi-Unit Charger...

User Guide
Page 36
Push to Talk T [ On Turning battery save mode off decreases battery life by approximately 20%. Push to Talk S --- Advanced Features 34 Restore Factory Defaults Returns radio to its frequency and broadcasts audio. To Do This Press This Button While Turning the Radio On Default Setting Turn Battery Save Mode On/Off Decreases attack time, which is the brief period of time between when the radio receives a transmission on its original factory settings.
Push to Talk T [ On Turning battery save mode off decreases battery life by approximately 20%. Push to Talk S --- Advanced Features 34 Restore Factory Defaults Returns radio to its frequency and broadcasts audio. To Do This Press This Button While Turning the Radio On Default Setting Turn Battery Save Mode On/Off Decreases attack time, which is the brief period of time between when the radio receives a transmission on its original factory settings.
User Guide
Page 37
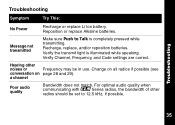
Message not transmitted Make sure Push to 12.5 kHz, if possible. 35 Reposition or replace Alkaline batteries. Change on all radios if possible (see conversation on page 28 and 29). For optimal audio quality when communicating with _Series radios, ...the bandwidth of other noises or Frequency may be set to Talk is illuminated while speaking. Recharge, replace, and/or reposition batteries. Verify Channel, Frequency, and Code settings are correct. a channel Poor audio quality Bandwidth does not match. Hearing other radios should be in use....
Message not transmitted Make sure Push to 12.5 kHz, if possible. 35 Reposition or replace Alkaline batteries. Change on all radios if possible (see conversation on page 28 and 29). For optimal audio quality when communicating with _Series radios, ...the bandwidth of other noises or Frequency may be set to Talk is illuminated while speaking. Recharge, replace, and/or reposition batteries. Verify Channel, Frequency, and Code settings are correct. a channel Poor audio quality Bandwidth does not match. Hearing other radios should be in use....

User Guide
Page 38
... holding S for clear line of radio. Change location of sight to improve range. Recharge, replace, and/or reposition batteries. Low batteries 36 Recharge or replace batteries. Move to body such as in a pocket or on a belt decreases range. Obstructions and operating indoors or in ... vehicles may decrease range. They must be at least 5 feet apart. Radios are interfering with transmission. Extreme operating temperatures affect battery life. Radios are too far apart or obstacles are too close to another location. Wearing radio close . Symptom Try This: ...
... holding S for clear line of radio. Change location of sight to improve range. Recharge, replace, and/or reposition batteries. Low batteries 36 Recharge or replace batteries. Move to body such as in a pocket or on a belt decreases range. Obstructions and operating indoors or in ... vehicles may decrease range. They must be at least 5 feet apart. Radios are interfering with transmission. Extreme operating temperatures affect battery life. Radios are too far apart or obstacles are too close to another location. Wearing radio close . Symptom Try This: ...
User Guide
Page 39
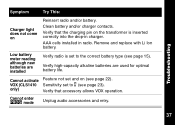
Troubleshooting Symptom Try This: Charger light does not come on (see page 22). Low battery meter reading although new batteries are used for optimal battery life. VOX (CLS1410 Sensitivity set to the correct battery type (see page 23). Cannot activate Feature not set to 0 (see page 15).... the charging pin on the transformer is set and on Reinsert radio and/or battery. AAA cells installed in charger. Verify that accessory allows VOX operation. Remove and replace with Li Ion battery. Cannot enter k mode Unplug audio accessories and retry. 37 Verify high-capacity ...
Troubleshooting Symptom Try This: Charger light does not come on (see page 22). Low battery meter reading although new batteries are used for optimal battery life. VOX (CLS1410 Sensitivity set to the correct battery type (see page 23). Cannot activate Feature not set to 0 (see page 15).... the charging pin on the transformer is set and on Reinsert radio and/or battery. AAA cells installed in charger. Verify that accessory allows VOX operation. Remove and replace with Li Ion battery. Cannot enter k mode Unplug audio accessories and retry. 37 Verify high-capacity ...
User Guide
Page 40
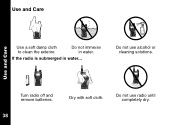
Do not use radio until completely dry. Do not use alcohol or cleaning solutions. Use and Care XXX Use and Care Use a soft damp cloth to clean the exterior. If the radio is submerged in water. Turn radio off and remove batteries. 38 Dry with soft cloth. Do not immerse in water...
Do not use radio until completely dry. Do not use alcohol or cleaning solutions. Use and Care XXX Use and Care Use a soft damp cloth to clean the exterior. If the radio is submerged in water. Turn radio off and remove batteries. 38 Dry with soft cloth. Do not immerse in water...
User Guide
Page 48
... this warranty only if the fully-charged capacity falls below 80% of any software supplied with Products are purchased by Motorola (Products). • Batteries. What This Warranty Covers • Products. Exception: The warranty for Spirit GT Series and Talkabout Series two-way ... warranty is for 90 days. • Repairs/Replacements. Physical defects in batteries that tangibly embodies each copy of rated capacity or they leak. • Software. Warranty Limited Warranty for Motorola Personal Communications Products Purchased in wireless cellular telephones, pagers, and/or two-...
... this warranty only if the fully-charged capacity falls below 80% of any software supplied with Products are purchased by Motorola (Products). • Batteries. What This Warranty Covers • Products. Exception: The warranty for Spirit GT Series and Talkabout Series two-way ... warranty is for 90 days. • Repairs/Replacements. Physical defects in batteries that tangibly embodies each copy of rated capacity or they leak. • Software. Warranty Limited Warranty for Motorola Personal Communications Products Purchased in wireless cellular telephones, pagers, and/or two-...
User Guide
Page 50
...the name and location of these voids the warranty. • Someone other things, "ancillary equipment" includes batteries, chargers, adaptors, and power supplies not manufactured or supplied by Motorola for the freight and insurance, but at the telephone number listed above. You must ship the Products to ...us at your expense for any damage to Motorola. If requested, you must also return all detachable parts such as a result of these voids the warranty. 48 What This Warranty...
...the name and location of these voids the warranty. • Someone other things, "ancillary equipment" includes batteries, chargers, adaptors, and power supplies not manufactured or supplied by Motorola for the freight and insurance, but at the telephone number listed above. You must ship the Products to ...us at your expense for any damage to Motorola. If requested, you must also return all detachable parts such as a result of these voids the warranty. 48 What This Warranty...
User Guide
Page 51
...been removed, altered, or obliterated; (b) board serial numbers that do not match the housing; Warranty • Rechargeable batteries that: (a) are charged by other than the Motorola-approved battery charger specified for which they are specified; Any of the Products in equipment other , or board serial numbers that ... signal you may subscribe to any broken modular tabs. • Products that do not match each other than the Product for charging such batteries; (b) have any broken seals or show evidence of tampering; (c) are used in a manner that is due primarily to or use of...
...been removed, altered, or obliterated; (b) board serial numbers that do not match the housing; Warranty • Rechargeable batteries that: (a) are charged by other than the Motorola-approved battery charger specified for which they are specified; Any of the Products in equipment other , or board serial numbers that ... signal you may subscribe to any broken modular tabs. • Products that do not match each other than the Product for charging such batteries; (b) have any broken seals or show evidence of tampering; (c) are used in a manner that is due primarily to or use of...


