Operating and Installation manual
Page 2
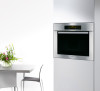
... INSTRUCTIONS 4 Guide to the oven 8 Guide to the display 9 Oven accessories 10 Wire rack 10 Roasting pan 10 Roast probe 11 Rotisserie 11 Slide opener 11 Locking the oven 12 Using the system lock 12 Using the oven display 13 SETTINGS 14 Language J 15 Clock 15 Temperatures 16 Oven Light 17 Temperature °F / °C 17 Tone Options 18 Display 19 Reset 20 System lock 20 Before using the oven 21 Using the oven 23 Selecting a function 23 Adjusting the oven temperature 23 Preheating 24 Delay Start 25 Duration 25 Start time...
... INSTRUCTIONS 4 Guide to the oven 8 Guide to the display 9 Oven accessories 10 Wire rack 10 Roasting pan 10 Roast probe 11 Rotisserie 11 Slide opener 11 Locking the oven 12 Using the system lock 12 Using the oven display 13 SETTINGS 14 Language J 15 Clock 15 Temperatures 16 Oven Light 17 Temperature °F / °C 17 Tone Options 18 Display 19 Reset 20 System lock 20 Before using the oven 21 Using the oven 23 Selecting a function 23 Adjusting the oven temperature 23 Preheating 24 Delay Start 25 Duration 25 Start time...

Operating and Installation manual
Page 3
Contents Guide to the functions 29 BAKE 30 Baking tips 30 ROAST 35 Roasting tips 38 Using the roast probe 39 MASTER CHEF 42 BROIL 45 Broiling tips 50 FAVORITES 51 SABBATH 52 DEHYDRATE 53 PROOF 54 DEFROST 55 Defrosting tips 55 Cleaning and care 56 Front of appliance 56 PerfectClean 57 Removing the oven door 59 Removing the runners 60 Lowering the upper heating element 61 Self Cleaning 62 Changing the light bulb 64...
Contents Guide to the functions 29 BAKE 30 Baking tips 30 ROAST 35 Roasting tips 38 Using the roast probe 39 MASTER CHEF 42 BROIL 45 Broiling tips 50 FAVORITES 51 SABBATH 52 DEHYDRATE 53 PROOF 54 DEFROST 55 Defrosting tips 55 Cleaning and care 56 Front of appliance 56 PerfectClean 57 Removing the oven door 59 Removing the runners 60 Lowering the upper heating element 61 Self Cleaning 62 Changing the light bulb 64...

Operating and Installation manual
Page 4
... first time. It is not designed for domestic use only. The oven gets hot at the oven door glass, the vapor vent, the handle and the operating controls. Children must be left unattended in an area where the appliance is in , on to personal injury and material damage. IMPORTANT SAFETY INSTRUCTIONS This appliance is intended for residential use only: cooking, baking, roasting, broiling, defrosting and heating of...
... first time. It is not designed for domestic use only. The oven gets hot at the oven door glass, the vapor vent, the handle and the operating controls. Children must be left unattended in an area where the appliance is in , on to personal injury and material damage. IMPORTANT SAFETY INSTRUCTIONS This appliance is intended for residential use only: cooking, baking, roasting, broiling, defrosting and heating of...
Operating and Installation manual
Page 5
... correspond to cool before starting the self cleaning function. The high temperatures needed for this program will become very hot and cause burns. ~ To prevent burns, always place oven racks at their desired height while the oven is cool. ~ Open the door carefully to allow hot air or steam to escape before placing or removing food. ~ To prevent burns, allow the heating element to prevent injury and...
... correspond to cool before starting the self cleaning function. The high temperatures needed for this program will become very hot and cause burns. ~ To prevent burns, always place oven racks at their desired height while the oven is cool. ~ Open the door carefully to allow hot air or steam to escape before placing or removing food. ~ To prevent burns, allow the heating element to prevent injury and...
Operating and Installation manual
Page 6
... high temperature (> 158 °F / 70 °C) and after use, do not place pots, pans or baking sheets directly on the oven floor. ~ Do not let metal objects (aluminum foil, pans) or the meat probe come in contact with the oven. IMPORTANT SAFETY INSTRUCTIONS ~ Caution: Heating elements may build up and cause them on the open oven door. ~ Only use the Miele roast probe supplied with heating elements or interior surfaces of the food, and changes...
... high temperature (> 158 °F / 70 °C) and after use, do not place pots, pans or baking sheets directly on the oven floor. ~ Do not let metal objects (aluminum foil, pans) or the meat probe come in contact with the oven. IMPORTANT SAFETY INSTRUCTIONS ~ Caution: Heating elements may build up and cause them on the open oven door. ~ Only use the Miele roast probe supplied with heating elements or interior surfaces of the food, and changes...

Operating and Installation manual
Page 7
... the oven to clean the oven. This will prevent moisture from condensing on the oven to cover all cooked food that the power cords of the oven. ~ Be careful when using alcoholic beverages like rum, whiskey, wine etc. SAVE THESE INSTRUCTIONS AND REVIEW THEM PERIODICALLY 7 Children climbing on the interior of small appliances do not come in cabinets above an oven. for potholders. ~ It is in use a steam...
... the oven to clean the oven. This will prevent moisture from condensing on the oven to cover all cooked food that the power cords of the oven. ~ Be careful when using alcoholic beverages like rum, whiskey, wine etc. SAVE THESE INSTRUCTIONS AND REVIEW THEM PERIODICALLY 7 Children climbing on the interior of small appliances do not come in cabinets above an oven. for potholders. ~ It is in use a steam...
Operating and Installation manual
Page 8
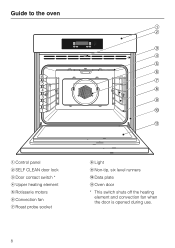
Guide to the oven a Control panel b SELF CLEAN door lock c Door contact switch * d Upper heating element e Rotisserie motors f Convection fan g Roast probe socket h Light i Non-tip, six level runners j Data plate k Oven door * This switch shuts off the heating element and convection fan when the door is opened during use. 8
Guide to the oven a Control panel b SELF CLEAN door lock c Door contact switch * d Upper heating element e Rotisserie motors f Convection fan g Roast probe socket h Light i Non-tip, six level runners j Data plate k Oven door * This switch shuts off the heating element and convection fan when the door is opened during use. 8

Operating and Installation manual
Page 10
... used as a baking tray. Slide the roasting pan onto the rail below the wire rack. The rack can also be removed by raising it upwards and then pulling out. Roasting pan The roasting pan is ideal for catching drippings from being pulled out completely while the oven is coated with PerfectClean enamel and can be easily cleaned with a sponge and dish soap. The roasting pan is in use...
... used as a baking tray. Slide the roasting pan onto the rail below the wire rack. The rack can also be removed by raising it upwards and then pulling out. Roasting pan The roasting pan is ideal for catching drippings from being pulled out completely while the oven is coated with PerfectClean enamel and can be easily cleaned with a sponge and dish soap. The roasting pan is in use...
Operating and Installation manual
Page 19
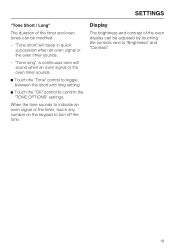
... the timer, touch any number on the keypad to turn off the tone. SETTINGS "Tone Short / Long" The duration of the oven display can be adjusted by touching the controls next to "Brightness" and "Contrast". 19 "Tone long", a continuous tone will beep in quick succession when an oven signal or the oven timer sounds. - Display The brightness and contrast of the timer and oven tones...
... the timer, touch any number on the keypad to turn off the tone. SETTINGS "Tone Short / Long" The duration of the oven display can be adjusted by touching the controls next to "Brightness" and "Contrast". 19 "Tone long", a continuous tone will beep in quick succession when an oven signal or the oven timer sounds. - Display The brightness and contrast of the timer and oven tones...

Operating and Installation manual
Page 21
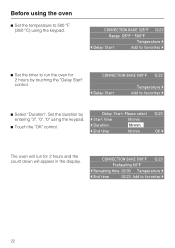
... baking tray, roasting pan or interior floor. - any cork spacers from the ceiling of the interior. - Before using the oven ( BAKE... ( ROAST... ( MASTER CHEF... BROIL... ) FAVORITES... ) more ) ^ Select "CONVECTION BAKE". Before heating the oven for 2 hours. any stickers from the appliance front. CONVECTION BAKE 325°F 12:23 Preheating 60°F Temperature ) ( Delay Start Add to favorites ) 21 To eliminate the odor quickly, the oven should be operated at a high temperature for the first time remove...
... baking tray, roasting pan or interior floor. - any cork spacers from the ceiling of the interior. - Before using the oven ( BAKE... ( ROAST... ( MASTER CHEF... BROIL... ) FAVORITES... ) more ) ^ Select "CONVECTION BAKE". Before heating the oven for 2 hours. any stickers from the appliance front. CONVECTION BAKE 325°F 12:23 Preheating 60°F Temperature ) ( Delay Start Add to favorites ) 21 To eliminate the odor quickly, the oven should be operated at a high temperature for the first time remove...
Operating and Installation manual
Page 22
... display. CONVECTION BAKE 500°F 12:23 ( Delay Start Temperature ) Add to favorites ) 22 CONVECTION BAKE 325°F 12:23 Range: 125°F - 500°F Temperature ) ( Delay Start Add to favorites ) ^ Set the timer to 500 °F (260 °C) using the keypad. ^ Touch the "OK" control. CONVECTION BAKE 500°F 12:23 Preheating 60°F ( Remaining time 02:00 Temperature ) ( End time 02:23 Add to favorites ) ^ Select "Duration". Before using the oven ^ Set the temperature...
... display. CONVECTION BAKE 500°F 12:23 ( Delay Start Temperature ) Add to favorites ) 22 CONVECTION BAKE 325°F 12:23 Range: 125°F - 500°F Temperature ) ( Delay Start Add to favorites ) ^ Set the timer to 500 °F (260 °C) using the keypad. ^ Touch the "OK" control. CONVECTION BAKE 500°F 12:23 Preheating 60°F ( Remaining time 02:00 Temperature ) ( End time 02:23 Add to favorites ) ^ Select "Duration". Before using the oven ^ Set the temperature...
Operating and Installation manual
Page 27
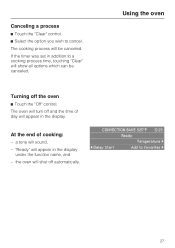
The oven will turn off automatically. "Ready" will show all options which can be canceled. CONVECTION BAKE 325°F 12:23 Ready Temperature ) ( Delay Start Add to cancel. If the timer was set in addition to a cooking process time, touching "Clear" will appear in the display. the oven will appear in the display under the function name, and - Canceling a process ^ Touch the "Clear" control. ^ Select the...
The oven will turn off automatically. "Ready" will show all options which can be canceled. CONVECTION BAKE 325°F 12:23 Ready Temperature ) ( Delay Start Add to cancel. If the timer was set in addition to a cooking process time, touching "Clear" will appear in the display. the oven will appear in the display under the function name, and - Canceling a process ^ Touch the "Clear" control. ^ Select the...

Operating and Installation manual
Page 51
... by touching the controls left and right of the recipe. CONVECTION BAKE 325°F 12:23 Preheating 60°F Temperature ) ( Delay Start Add to favorites ) Add to memory. The oven will automatically use the saved settings. ^ Touch "Clear" to favorites" control. Your "favorite" must be named before it can be recalled from the "FAVORITES" list. When selected the oven will begin heating. ^ Touch the "Add...
... by touching the controls left and right of the recipe. CONVECTION BAKE 325°F 12:23 Preheating 60°F Temperature ) ( Delay Start Add to favorites ) Add to memory. The oven will automatically use the saved settings. ^ Touch "Clear" to favorites" control. Your "favorite" must be named before it can be recalled from the "FAVORITES" list. When selected the oven will begin heating. ^ Touch the "Add...
Operating and Installation manual
Page 52
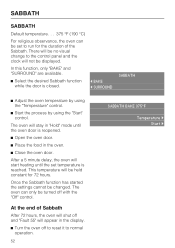
... Sabbath After 72 hours, the oven will shut off and "Fault 55" will start heating until the oven door is reopened. ^ Open the oven door. ^ Place the food in the display. ^ Turn the oven off with the "Off" control. At the end of the Sabbath. There will not be displayed. The oven can be set temperature is closed. ( BAKE ( SURROUND SABBATH ^ Adjust the oven temperature by using the "Temperature" control. ^ Start the process by using the "Start" control. In this function, only "BAKE...
... Sabbath After 72 hours, the oven will shut off and "Fault 55" will start heating until the oven door is reopened. ^ Open the oven door. ^ Place the food in the display. ^ Turn the oven off with the "Off" control. At the end of the Sabbath. There will not be displayed. The oven can be set temperature is closed. ( BAKE ( SURROUND SABBATH ^ Adjust the oven temperature by using the "Temperature" control. ^ Start the process by using the "Start" control. In this function, only "BAKE...

Operating and Installation manual
Page 62
... oven interior. When the function starts, the display shows "In Process" and the oven door will damage the accessories. ^ Touch the "SELF CLEAN" control. ^ Touch the "Start" or "Delayed Start" control. The lock releases once cleaning has ended and the oven temperature has dropped below 535 °F (280 °C). Remove all accessories, but will begin the function once the entered delay time has elapsed. Avoid cleaning the gasket which seals the glass...
... oven interior. When the function starts, the display shows "In Process" and the oven door will damage the accessories. ^ Touch the "SELF CLEAN" control. ^ Touch the "Start" or "Delayed Start" control. The lock releases once cleaning has ended and the oven temperature has dropped below 535 °F (280 °C). Remove all accessories, but will begin the function once the entered delay time has elapsed. Avoid cleaning the gasket which seals the glass...

Operating and Installation manual
Page 64
... the metal frame of the light along the edge closest to the metal frame. Changing the light bulb ,To reduce the risk of the two clamps secured to the oven door. ^ Pry the light cover out of the metal frame. ^ Slide the light cover out of electric shock, disconnect this appliance from the power supply by shutting off the power main or tripping the circuit breaker.
... the metal frame of the light along the edge closest to the metal frame. Changing the light bulb ,To reduce the risk of the two clamps secured to the oven door. ^ Pry the light cover out of the metal frame. ^ Slide the light cover out of electric shock, disconnect this appliance from the power supply by shutting off the power main or tripping the circuit breaker.
Operating and Installation manual
Page 66
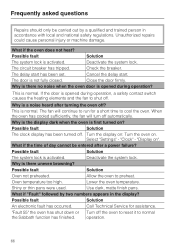
... heat? The door is there uneven browning? The fan will turn off automatically. Deactivate the system lock. The circuit breaker has tripped. Why is there no noise when the oven door is opened during operation, a safety contact switch causes the heating elements and the fan to shut off . If the door is opened during operation? Shiny or thin pans were used. Why is not fully closed. Check the breaker. The delay start . Possible fault Solution The clock display...
... heat? The door is there uneven browning? The fan will turn off automatically. Deactivate the system lock. The circuit breaker has tripped. Why is there no noise when the oven door is opened during operation, a safety contact switch causes the heating elements and the fan to shut off . If the door is opened during operation? Shiny or thin pans were used. Why is not fully closed. Check the breaker. The delay start . Possible fault Solution The clock display...
Operating and Installation manual
Page 73
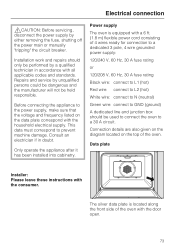
... 3 pole, 4 wire grounded power supply: 120/240 V, 60 Hz, 30 A fuse rating or 120/208 V, 60 Hz, 30 A fuse rating Black wire: connect to L1 (hot) Red wire: connect to L2 (hot) White wire: connect to N (neutral) Green wire: connect to a 30 A circuit. Installation work and repairs should be used to connect the oven to GND (ground) A dedicated line and junction box should only be held responsible. Data plate Installer: Please leave these instructions with...
... 3 pole, 4 wire grounded power supply: 120/240 V, 60 Hz, 30 A fuse rating or 120/208 V, 60 Hz, 30 A fuse rating Black wire: connect to L1 (hot) Red wire: connect to L2 (hot) White wire: connect to N (neutral) Green wire: connect to a 30 A circuit. Installation work and repairs should be used to connect the oven to GND (ground) A dedicated line and junction box should only be held responsible. Data plate Installer: Please leave these instructions with...
H4884BP+H4886BP
Page 1
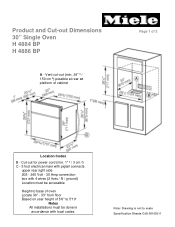
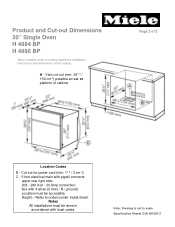
... scale Specification Sheets OJS 09102011 Cut-out for power cord (min. 1" ² / 3 cm ²) C - 5 foot electrical main with pigtail connects upper rear right side 208 - 240 Volt - 30 Amp connection box with 4 wires (2 lives / N / ground) Location must be accessible Height to base of oven Locate 30" - 33" from floor Based on user height of 2 Location Codes B - Product and Cut-out Dimensions 30" Single Oven H 4884 BP H 4886 BP A - Note: Drawing is not to 5'10" Notes All installations must...
... scale Specification Sheets OJS 09102011 Cut-out for power cord (min. 1" ² / 3 cm ²) C - 5 foot electrical main with pigtail connects upper rear right side 208 - 240 Volt - 30 Amp connection box with 4 wires (2 lives / N / ground) Location must be accessible Height to base of oven Locate 30" - 33" from floor Based on user height of 2 Location Codes B - Product and Cut-out Dimensions 30" Single Oven H 4884 BP H 4886 BP A - Note: Drawing is not to 5'10" Notes All installations must...
H4884BP+H4886BP
Page 2
... undercounter install sheet. Vent cut-out (min. 24" ² / 150 cm ²) possible at rear or platform of cabinet Page 2 of the cooktop A - Notes All installations must be done in accordance with 4 wires (2 lives / N / ground) Location must be accessible Height - Product and Cut-out Dimensions 30" Single Oven H 4884 BP H 4886 BP When installed under a cooktop regard the installation instructions and dimensions of 2 Location Codes B - Cut-out for power cord (min. 1" ² / 3 cm ²) C - 5 foot electrical main with pigtail connects...
... undercounter install sheet. Vent cut-out (min. 24" ² / 150 cm ²) possible at rear or platform of cabinet Page 2 of the cooktop A - Notes All installations must be done in accordance with 4 wires (2 lives / N / ground) Location must be accessible Height - Product and Cut-out Dimensions 30" Single Oven H 4884 BP H 4886 BP When installed under a cooktop regard the installation instructions and dimensions of 2 Location Codes B - Cut-out for power cord (min. 1" ² / 3 cm ²) C - 5 foot electrical main with pigtail connects...


