Operating and Installation manual
Page 60
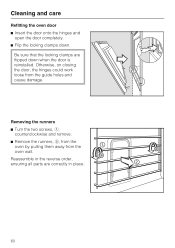
Be sure that the locking clamps are correctly in the reverse order, ensuring all parts are flipped down . Reassemble in place. 60 Removing the runners ^ Turn the two screws, a, counterclockwise and remove. ^ Remove the runners, b, from the oven by pulling them away from the guide holes and cause damage. Cleaning and care Refitting the oven door ^ Insert the door onto the hinges and open the door completely. ^ Flip the locking clamps down when the door is reinstalled. Otherwise, on closing the door, the hinges could work loose from the oven wall.
Be sure that the locking clamps are correctly in the reverse order, ensuring all parts are flipped down . Reassemble in place. 60 Removing the runners ^ Turn the two screws, a, counterclockwise and remove. ^ Remove the runners, b, from the oven by pulling them away from the guide holes and cause damage. Cleaning and care Refitting the oven door ^ Insert the door onto the hinges and open the door completely. ^ Flip the locking clamps down when the door is reinstalled. Otherwise, on closing the door, the hinges could work loose from the oven wall.


