User Guide
Page 2
... installation. PLEASE KEEP ALL PACKAGING MATERIAL FOR AT LEAST 90 DAYS IN CASE YOU NEED TO RETURN THIS PRODUCT TO YOUR PLACE OF PURCHASE OR MEMOREX. SURGE PROTECTORS: It is recommended to use radio frequency energy. Serial Number SAFETY PRECAUTIONS CAUTION RISK OF ELECTRIC SHOCK DO NOT OPEN CAUTION: TO REDUCE THE RISK OF ELECTRIC SHOCK, DO NOT REMOVE COVER...
... installation. PLEASE KEEP ALL PACKAGING MATERIAL FOR AT LEAST 90 DAYS IN CASE YOU NEED TO RETURN THIS PRODUCT TO YOUR PLACE OF PURCHASE OR MEMOREX. SURGE PROTECTORS: It is recommended to use radio frequency energy. Serial Number SAFETY PRECAUTIONS CAUTION RISK OF ELECTRIC SHOCK DO NOT OPEN CAUTION: TO REDUCE THE RISK OF ELECTRIC SHOCK, DO NOT REMOVE COVER...

User Guide
Page 3
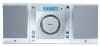
... blaring or distortion-and, most out of your equipment by setting your volume control at a low setting. • Slowly increase the sound until it at a safe level. Dear Customer: Selecting fine audio equipment such as the unit you've just purchased is only the start of your new sound equipment will help to get the most importantly, without affecting your equipment...
... blaring or distortion-and, most out of your equipment by setting your volume control at a low setting. • Slowly increase the sound until it at a safe level. Dear Customer: Selecting fine audio equipment such as the unit you've just purchased is only the start of your new sound equipment will help to get the most importantly, without affecting your equipment...
User Guide
Page 4
... the service technician uses replacement parts specified by a qualified technician to restore the product to insert the plug fully into this indicates a need for ventilation, to ensure reliable operation of the product should follow the manufacturer's instructions, and should still fail to fit, contact your obsolete outlet. For example, this product near a swimming pool. 8. NOTE TO CATV SYSTEM INSTALLER This...
... the service technician uses replacement parts specified by a qualified technician to restore the product to insert the plug fully into this indicates a need for ventilation, to ensure reliable operation of the product should follow the manufacturer's instructions, and should still fail to fit, contact your obsolete outlet. For example, this product near a swimming pool. 8. NOTE TO CATV SYSTEM INSTALLER This...
User Guide
Page 5
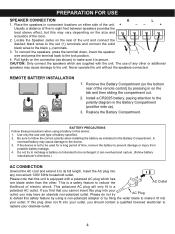
... Never operate the unit without the speakers connected. Install a CR2025 battery, paying attention to the device. 3. Use only the size and type of time, remove the battery to prevent damage or injury from possible battery leakage. ...control) by filing the wider blade to make sure it is a safety feature to reduce the AC Outlet likelihood of the unit and connect the dashed black wires to the red (+) terminals and connect the solid black wires to its full length. To connect the speakers, press the terminal down, insert the speaker wire and press the terminal back to be used...
... Never operate the unit without the speakers connected. Install a CR2025 battery, paying attention to the device. 3. Use only the size and type of time, remove the battery to prevent damage or injury from possible battery leakage. ...control) by filing the wider blade to make sure it is a safety feature to reduce the AC Outlet likelihood of the unit and connect the dashed black wires to the red (+) terminals and connect the solid black wires to its full length. To connect the speakers, press the terminal down, insert the speaker wire and press the terminal back to be used...
User Guide
Page 6
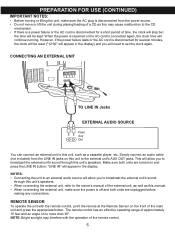
... in the display. The remote control has an effective operating range of approximately 15 feet and an angle of time, the clock will stop but the time will allow you to broadcast the external unit's sound through this unit's speakers. Simply connect an audio cable (not included) from the power source. • Do not move or lift the unit during playing/loading of a CD...
... in the display. The remote control has an effective operating range of approximately 15 feet and an angle of time, the clock will stop but the time will allow you to broadcast the external unit's sound through this unit's speakers. Simply connect an audio cable (not included) from the power source. • Do not move or lift the unit during playing/loading of a CD...
User Guide
Page 7
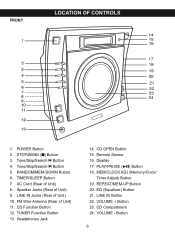
... Function Button 13. Display 17. VOLUME - RANDOM/MEM-DOWN Button 6. Speaker Jacks (Rear of Unit) 10. LINE IN Button 22. Headphones Jack 14. TIMER/SLEEP Button 7. LINE IN Jacks (Rear of Unit) 9. MEM/CLOCK ADJ (Memory/Clock/ Timer Adjust) Button 19. PLAY/PAUSE (®p) Button 18. Tune/Skip/Search o Button 5. CD Function Button 12. CD Compartment 24. EQ (Equalizer) Button 21. CD OPEN Button 15. FRONT LOCATION OF CONTROLS 1. POWER Button 2.
... Function Button 13. Display 17. VOLUME - RANDOM/MEM-DOWN Button 6. Speaker Jacks (Rear of Unit) 10. LINE IN Button 22. Headphones Jack 14. TIMER/SLEEP Button 7. LINE IN Jacks (Rear of Unit) 9. MEM/CLOCK ADJ (Memory/Clock/ Timer Adjust) Button 19. PLAY/PAUSE (®p) Button 18. Tune/Skip/Search o Button 5. CD Function Button 12. CD Compartment 24. EQ (Equalizer) Button 21. CD OPEN Button 15. FRONT LOCATION OF CONTROLS 1. POWER Button 2.
User Guide
Page 8
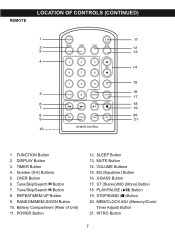
... OF CONTROLS (CONTINUED) 1. Number (0-9) Buttons 5. MUTE Button 14. MEM/CLOCK ADJ (Memory/Clock/ Timer Adjust) Button 21. INTRO Button 7 TIMER Button 4. SLEEP Button 13. PLAY/PAUSE (®p) Button 19. REPEAT/MEM-UP Button 9. Battery Compartment (Rear of Unit) 11. DISPLAY Button 3. OVER Button 6. X-BASS Button 17. ST (Stereo)/MO (Mono) Button 18. STOP/BAND (s) Button 20. RANDOM/MEM-DOWN Button 10. FUNCTION Button 2. Tune/Skip/Search o Button 7. Tune/Skip/Search n Button 8. POWER Button 12. VOLUME Buttons 15. EQ (Equalizer) Button 16...
... OF CONTROLS (CONTINUED) 1. Number (0-9) Buttons 5. MUTE Button 14. MEM/CLOCK ADJ (Memory/Clock/ Timer Adjust) Button 21. INTRO Button 7 TIMER Button 4. SLEEP Button 13. PLAY/PAUSE (®p) Button 19. REPEAT/MEM-UP Button 9. Battery Compartment (Rear of Unit) 11. DISPLAY Button 3. OVER Button 6. X-BASS Button 17. ST (Stereo)/MO (Mono) Button 18. STOP/BAND (s) Button 20. RANDOM/MEM-DOWN Button 10. FUNCTION Button 2. Tune/Skip/Search o Button 7. Tune/Skip/Search n Button 8. POWER Button 12. VOLUME Buttons 15. EQ (Equalizer) Button 16...
User Guide
Page 9
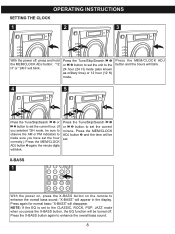
OPERATING INSTRUCTIONS SETTING THE CLOCK 1 2 3 2 1 With the power off . Press the MEM/CLOCK ADJ button and the hours will blink. 4 5 1 1 3 3 2 1 2 1 Press the Tune/Skip/Search o 1 or n 2 button to set . Press the MEM/CLOCK ADJ button „ and the time will be set the current hour. (If you selected 12H mode, be sure to observe the AM or PM indicators to the CLASSIC, ROCK, POP, JAZZ mode when...
OPERATING INSTRUCTIONS SETTING THE CLOCK 1 2 3 2 1 With the power off . Press the MEM/CLOCK ADJ button and the hours will blink. 4 5 1 1 3 3 2 1 2 1 Press the Tune/Skip/Search o 1 or n 2 button to set . Press the MEM/CLOCK ADJ button „ and the time will be set the current hour. (If you selected 12H mode, be sure to observe the AM or PM indicators to the CLASSIC, ROCK, POP, JAZZ mode when...
User Guide
Page 10
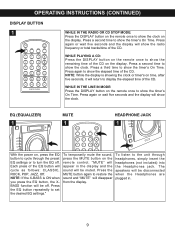
... is showing the clock or timer's on time, after five seconds, it will cycle as follows: CLASSIC, ROCK, POP, JAZZ, Off. OPERATING INSTRUCTIONS (CONTINUED) DISPLAY BUTTON 1 WHILE IN THE RADIO OR CD STOP MODE: Press the DISPLAY button on the remote once to show the timer's On Time. EQ (EQUALIZER1) 1 MUTE 1 HEADPHONE JACK 1 With the power on, press the EQ button to cycle through...
... is showing the clock or timer's on time, after five seconds, it will cycle as follows: CLASSIC, ROCK, POP, JAZZ, Off. OPERATING INSTRUCTIONS (CONTINUED) DISPLAY BUTTON 1 WHILE IN THE RADIO OR CD STOP MODE: Press the DISPLAY button on the remote once to show the timer's On Time. EQ (EQUALIZER1) 1 MUTE 1 HEADPHONE JACK 1 With the power on, press the EQ button to cycle through...
User Guide
Page 11
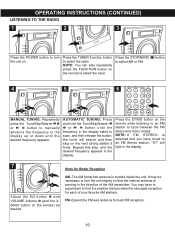
... radio. AUTOMATIC TUNING: Press and hold the Tune/Skip/Search o 1 or n 2 button until the frequency in the display up or down until the desired frequency appears in the direction of your favorite AM stations. Press the STOP/BAND (s) button to select AM or FM. 4 5 2 6 2 2 1 2 1 MANUAL TUNING: Repeatedly press the Tune/Skip/Search o 1 or n 2 button to manually advance the frequency in the display starts...
... radio. AUTOMATIC TUNING: Press and hold the Tune/Skip/Search o 1 or n 2 button until the frequency in the display up or down until the desired frequency appears in the direction of your favorite AM stations. Press the STOP/BAND (s) button to select AM or FM. 4 5 2 6 2 2 1 2 1 MANUAL TUNING: Repeatedly press the Tune/Skip/Search o 1 or n 2 button to manually advance the frequency in the display starts...
User Guide
Page 12
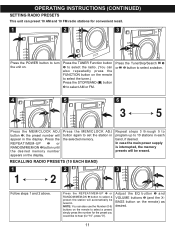
OPERATING INSTRUCTIONS (CONTINUED) SETTING RADIO PRESETS This unit can preset 10 AM and 10 FM radio stations for "10", press "0"). the preset number will appear in each band, if desired. Repeat steps 3 through 5 to program up to turn the unit on the display. In case the main power supply is interrupted, the memory presets will automatically be erased. the station will be tuned in the selected memory. Press the REPEAT/MEM-UP 2 or...
OPERATING INSTRUCTIONS (CONTINUED) SETTING RADIO PRESETS This unit can preset 10 AM and 10 FM radio stations for "10", press "0"). the preset number will appear in each band, if desired. Repeat steps 3 through 5 to program up to turn the unit on the display. In case the main power supply is interrupted, the memory presets will automatically be erased. the station will be tuned in the selected memory. Press the REPEAT/MEM-UP 2 or...

User Guide
Page 13
... CD-RW CDs. 1 2 3 Press the POWER button to select CD. CD PAUSE CONTROL 1 2 2 2 During CD playback, if you wish to release pause and resume normal CD playback. 12 OPERATING INSTRUCTIONS (CONTINUED) PLAYING COMPACT DISCS This unit can be used with the label side facing forward and close the CD compartment. NOTE: You can also repeatedly press the FUNCTION butto2n on...
... CD-RW CDs. 1 2 3 Press the POWER button to select CD. CD PAUSE CONTROL 1 2 2 2 During CD playback, if you wish to release pause and resume normal CD playback. 12 OPERATING INSTRUCTIONS (CONTINUED) PLAYING COMPACT DISCS This unit can be used with the label side facing forward and close the CD compartment. NOTE: You can also repeatedly press the FUNCTION butto2n on...
User Guide
Page 14
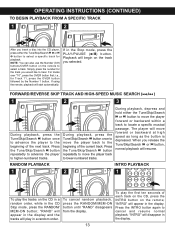
... the remote; Playback will begin on the remote to locate a specific musical passage. "RAND" will appear in a random order. Press the Tune/Skip/Search n button repeatedly to advance the player to higher-numbered tracks. For tracks over "10", press the OVER button first; "INTRO" will start automatically. If using the remote, playback will disappear in the Stop mode, press the PLAY/PAUSE (®...
... the remote; Playback will begin on the remote to locate a specific musical passage. "RAND" will appear in a random order. Press the Tune/Skip/Search n button repeatedly to advance the player to higher-numbered tracks. For tracks over "10", press the OVER button first; "INTRO" will start automatically. If using the remote, playback will disappear in the Stop mode, press the PLAY/PAUSE (®...
User Guide
Page 15
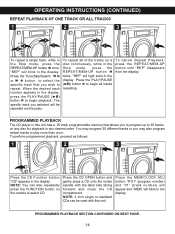
... mode, press the REPEAT/MEM-UP button ‚ twice; OPERATING INSTRUCTIONS (CONTINUED) REPEAT PLAYBACK OF ONE TRACK OR ALL TRACKS 1 2 3 3 2 4 1 2 1 To repeat a single track, while in the display. "REP" will blink in this unit. PROGRAMMED PLAYBACK The CD player in the display. 1 PROGRAMMED PLAYBACK SECTION CONTINUED ON NEXT PAGE. 2 14 The specific track you wish to begin playback. Press the PLAY/PAUSE (®p) button ƒ to repeat. "REP" will be used...
... mode, press the REPEAT/MEM-UP button ‚ twice; OPERATING INSTRUCTIONS (CONTINUED) REPEAT PLAYBACK OF ONE TRACK OR ALL TRACKS 1 2 3 3 2 4 1 2 1 To repeat a single track, while in the display. "REP" will blink in this unit. PROGRAMMED PLAYBACK The CD player in the display. 1 PROGRAMMED PLAYBACK SECTION CONTINUED ON NEXT PAGE. 2 14 The specific track you wish to begin playback. Press the PLAY/PAUSE (®p) button ƒ to repeat. "REP" will be used...
User Guide
Page 16
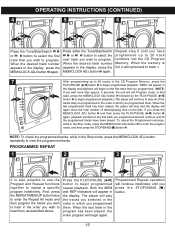
... the memory is also possible to use the Program and Repeat functions together to repeat a specific program indefinitely. If you programmed and will continue until all of tracks/playing time on the first track you press the MEM/CLOCK ADJ button ƒ and then press the PLAY/PAUSE (®p) button 1 again, playback will continue indefinitely until you programmed them , as described above. Programmed Repeat operation will start on the disc. OPERATING INSTRUCTIONS...
... the memory is also possible to use the Program and Repeat functions together to repeat a specific program indefinitely. If you programmed and will continue until all of tracks/playing time on the first track you press the MEM/CLOCK ADJ button ƒ and then press the PLAY/PAUSE (®p) button 1 again, playback will continue indefinitely until you programmed them , as described above. Programmed Repeat operation will start on the disc. OPERATING INSTRUCTIONS...
User Guide
Page 17
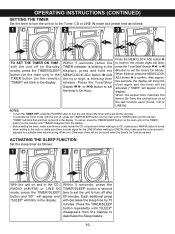
... station is tuned when waking to the radio or make sure the volume level is reached. After approx. five seconds, the display will show the clock again and the timer will blink first and then remain lit in the display. OPERATING INSTRUCTIONS (CONTINUED) SETTING THE TIMER Set the timer to turn the unit on to the Tuner, CD or LINE IN mode at a preset time...
... station is tuned when waking to the radio or make sure the volume level is reached. After approx. five seconds, the display will show the clock again and the timer will blink first and then remain lit in the display. OPERATING INSTRUCTIONS (CONTINUED) SETTING THE TIMER Set the timer to turn the unit on to the Tuner, CD or LINE IN mode at a preset time...
User Guide
Page 18
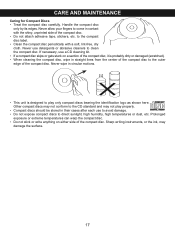
...direct sunlight, high humidity, high temperatures or dust, etc. Never wipe in straight lines from the center of the compact disc to clean the compact disc. Never allow your fingers to come in their cases after each use... or the ink, may not play only compact discs bearing the identification logo as shown here. CARE AND MAINTENANCE Caring for Compact Discs • Treat the compact disc carefully. If necessary, use a CD cleaning kit. •... shiny, unprinted side of the compact disc. to play properly. • Compact discs should be stored in contact with a soft, lint...
...direct sunlight, high humidity, high temperatures or dust, etc. Never wipe in straight lines from the center of the compact disc to clean the compact disc. Never allow your fingers to come in their cases after each use... or the ink, may not play only compact discs bearing the identification logo as shown here. CARE AND MAINTENANCE Caring for Compact Discs • Treat the compact disc carefully. If necessary, use a CD cleaning kit. •... shiny, unprinted side of the compact disc. to play properly. • Compact discs should be stored in contact with a soft, lint...
User Guide
Page 19
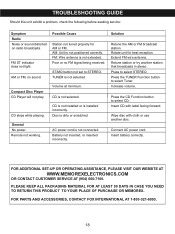
... power cord is not connected. Wipe disc with label facing forward. FOR ADDITIONAL SET-UP OR OPERATING ASSISTANCE, PLEASE VISIT OUR WEBSITE AT WWW.MEMOREXELECTRONICS.COM OR CONTACT CUSTOMER SERVICE AT (954) 660-7100. FOR PARTS AND ACCESSORIES, CONTACT FOX INTERNATIONAL AT 1-800-321-6993. 18 TROUBLESHOOTING GUIDE Should this unit exhibit a problem, check the following before seeking service: Symptom Radio Noise or sound...
... power cord is not connected. Wipe disc with label facing forward. FOR ADDITIONAL SET-UP OR OPERATING ASSISTANCE, PLEASE VISIT OUR WEBSITE AT WWW.MEMOREXELECTRONICS.COM OR CONTACT CUSTOMER SERVICE AT (954) 660-7100. FOR PARTS AND ACCESSORIES, CONTACT FOX INTERNATIONAL AT 1-800-321-6993. 18 TROUBLESHOOTING GUIDE Should this unit exhibit a problem, check the following before seeking service: Symptom Radio Noise or sound...
User Guide
Page 20
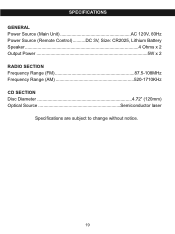
SPECIFICATIONS GENERAL Power Source (Main Unit AC 120V, 60Hz Power Source (Remote Control) ..........DC 3V, Size: CR2025, Lithium Battery Speaker 4 Ohms x 2 Output Power 5W x 2 RADIO SECTION Frequency Range (FM 87.5-108MHz Frequency Range (AM 520-1710KHz CD SECTION Disc Diameter 4.72" (120mm) Optical Source Semiconductor laser Specifications are subject to change without notice. 19
SPECIFICATIONS GENERAL Power Source (Main Unit AC 120V, 60Hz Power Source (Remote Control) ..........DC 3V, Size: CR2025, Lithium Battery Speaker 4 Ohms x 2 Output Power 5W x 2 RADIO SECTION Frequency Range (FM 87.5-108MHz Frequency Range (AM 520-1710KHz CD SECTION Disc Diameter 4.72" (120mm) Optical Source Semiconductor laser Specifications are subject to change without notice. 19


