
User Guide
Page 3
.... The exclamation point within the product's enclosure that to part 15 of Dolby Laboratories. 2 TO ENSURE PROPER USE OF THIS PRODUCT, PLEASE READ THIS OWNER'S MANUAL CAREFULLY AND RETAIN FOR FUTURE REFERENCE. FCC NOTICE: This equipment has been tested and found to operate the equipment. Manufactured under warranty for class II...
.... The exclamation point within the product's enclosure that to part 15 of Dolby Laboratories. 2 TO ENSURE PROPER USE OF THIS PRODUCT, PLEASE READ THIS OWNER'S MANUAL CAREFULLY AND RETAIN FOR FUTURE REFERENCE. FCC NOTICE: This equipment has been tested and found to operate the equipment. Manufactured under warranty for class II...
User Guide
Page 11
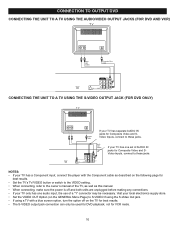
...as described on the TV for best results. • The S-VIDEO output jack connection can only be used for DVD playback, not for Composite Video and SVideo Inputs, connect to the owner's manual of a "Y" connector may be necessary. Visit your local electronics supply store. • Set the VIDEO OUT Option ... for Composite Video and SVideo Inputs, connect to these jacks. CONNECTION TO OUTPUT DVD CONNECTING THE UNIT TO A TV USING THE AUDIO/VIDEO OUTPUT JACKS (FOR DVD AND VCR) CONNECTING THE UNIT TO A TV USING THE S-VIDEO OUTPUT JACK (FOR DVD ONLY) If your TV has separate AUDIO IN jacks for...
...as described on the TV for best results. • The S-VIDEO output jack connection can only be used for DVD playback, not for Composite Video and SVideo Inputs, connect to the owner's manual of a "Y" connector may be necessary. Visit your local electronics supply store. • Set the VIDEO OUT Option ... for Composite Video and SVideo Inputs, connect to these jacks. CONNECTION TO OUTPUT DVD CONNECTING THE UNIT TO A TV USING THE AUDIO/VIDEO OUTPUT JACKS (FOR DVD AND VCR) CONNECTING THE UNIT TO A TV USING THE S-VIDEO OUTPUT JACK (FOR DVD ONLY) If your TV has separate AUDIO IN jacks for...
User Guide
Page 12
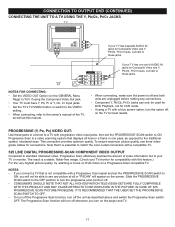
...Y, Cb, Cr Input jacks. • Set the TV's TV/VIDEO button or switch to the VIDEO setting. • When connecting, refer to the owner's manual of video information fed to your TV or monitor. To ensure maximum picture quality, use three videograde cables for connections. NOTES FOR CONNECTING: • Set... is off and both units are unplugged before making any connections. • Component Y, Pb/Cb, Pr/Cr Jacks can only be used for DVD Playback, not for VCR mode. • If using a TV with a blue screen option, turn the option off whenever you will not be able to see any ...
...Y, Cb, Cr Input jacks. • Set the TV's TV/VIDEO button or switch to the VIDEO setting. • When connecting, refer to the owner's manual of video information fed to your TV or monitor. To ensure maximum picture quality, use three videograde cables for connections. NOTES FOR CONNECTING: • Set... is off and both units are unplugged before making any connections. • Component Y, Pb/Cb, Pr/Cr Jacks can only be used for DVD Playback, not for VCR mode. • If using a TV with a blue screen option, turn the option off whenever you will not be able to see any ...
User Guide
Page 13
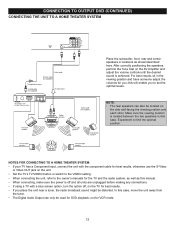
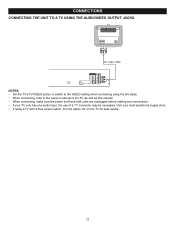
NOTE: • The rear speakers can only be used for DVD playback, not for VCR mode. 12 Make sure the viewing position is achieved. NOTES FOR CONNECTING TO... on the TV for best results. • If you ; this will enable you to the owner's manuals for the TV and the audio system, as well as shown/described here. For best results, sit in...Experiment to find the optimal position. CONNECTION TO OUTPUT DVD (CONTINUED) CONNECTING THE UNIT TO A HOME THEATER SYSTEM Place the subwoofer, front, rear and center speakers in locations as this manual. • When connecting, make sure the power...
NOTE: • The rear speakers can only be used for DVD playback, not for VCR mode. 12 Make sure the viewing position is achieved. NOTES FOR CONNECTING TO... on the TV for best results. • If you ; this will enable you to the owner's manuals for the TV and the audio system, as well as shown/described here. For best results, sit in...Experiment to find the optimal position. CONNECTION TO OUTPUT DVD (CONTINUED) CONNECTING THE UNIT TO A HOME THEATER SYSTEM Place the subwoofer, front, rear and center speakers in locations as this manual. • When connecting, make sure the power...
User Guide
Page 14
Visit your TV only has one audio input, the use of the TV, as well as this manual. • When connecting, make sure the power is off and both units are unplugged before making any connections. • If your local electronics supply store. &#...8226; If using the A/V jacks. • When connecting, refer to the owner's manual of a "Y" connector may be necessary. CONNECTIONS CONNECTING THE UNIT TO A TV USING THE AUDIO/VIDEO OUTPUT JACKS NOTES: • Set the TV's TV/VIDEO button...
Visit your TV only has one audio input, the use of the TV, as well as this manual. • When connecting, make sure the power is off and both units are unplugged before making any connections. • If your local electronics supply store. &#...8226; If using the A/V jacks. • When connecting, refer to the owner's manual of a "Y" connector may be necessary. CONNECTIONS CONNECTING THE UNIT TO A TV USING THE AUDIO/VIDEO OUTPUT JACKS NOTES: • Set the TV's TV/VIDEO button...
User Guide
Page 15
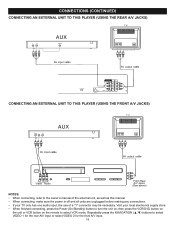
Repeatedly press the NAVIGATION (π,†) buttons to select VCR mode. then press the VCR/DVD button on the unit or VCR button on ; CONNECTIONS (CONTINUED) CONNECTING AN EXTERNAL UNIT TO THIS PLAYER (USING THE REAR A/V JACKS) CONNECTING AN EXTERNAL UNIT TO THIS PLAYER (USING THE... 14 Visit your local electronics supply store. • When finished connecting, press the Power (On/Standby) button to the owner's manual of the external unit, as well as this manual. • When connecting, make sure the power is off and all units are unplugged before making any connections. • If your...
Repeatedly press the NAVIGATION (π,†) buttons to select VCR mode. then press the VCR/DVD button on the unit or VCR button on ; CONNECTIONS (CONTINUED) CONNECTING AN EXTERNAL UNIT TO THIS PLAYER (USING THE REAR A/V JACKS) CONNECTING AN EXTERNAL UNIT TO THIS PLAYER (USING THE... 14 Visit your local electronics supply store. • When finished connecting, press the Power (On/Standby) button to the owner's manual of the external unit, as well as this manual. • When connecting, make sure the power is off and all units are unplugged before making any connections. • If your...
User Guide
Page 16
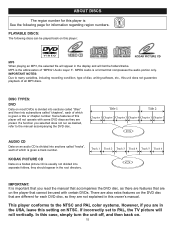
... this player: KODAK PICTURE CD MP3 When playing an MP3, the selected file will appear in the root directory. IMPORTANT NOTES: Due to the manual accompanying the DVD disc. AUDIO CD Data on the player that compresses the audio portion only. If a function you selected does not run as desired, refer to..., so they are preset. If incorrectly set to the NTSC and PAL color systems. However, if you read the manual that accompanies the DVD disc, as they are on an audio CD is divided into sections called "chapters", each of which is divided into sections called "titles" and then...
... this player: KODAK PICTURE CD MP3 When playing an MP3, the selected file will appear in the root directory. IMPORTANT NOTES: Due to the manual accompanying the DVD disc. AUDIO CD Data on the player that compresses the audio portion only. If a function you selected does not run as desired, refer to..., so they are preset. If incorrectly set to the NTSC and PAL color systems. However, if you read the manual that accompanies the DVD disc, as they are on an audio CD is divided into sections called "chapters", each of which is divided into sections called "titles" and then...
User Guide
Page 38
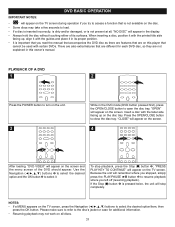
... a disc with the guides and place it in its proper position. • It is important that you read the manual that accompanies the DVD disc as there are features that are on this player that are different for additional information. • Resuming playback may take a few seconds to load. &#... to access a function that is not available on the disc. • Some discs may not work on all , "NO DISC" will appear in this owner's manual. Use the Navigation buttons 1 to select the desired option and the OK button 2 to close the disc tray. "CLOSE" will appear on the screen. 4 2 1 1 ...
... a disc with the guides and place it in its proper position. • It is important that you read the manual that accompanies the DVD disc as there are features that are on this player that are different for additional information. • Resuming playback may take a few seconds to load. &#... to access a function that is not available on the disc. • Some discs may not work on all , "NO DISC" will appear in this owner's manual. Use the Navigation buttons 1 to select the desired option and the OK button 2 to close the disc tray. "CLOSE" will appear on the screen. 4 2 1 1 ...
User Guide
Page 48
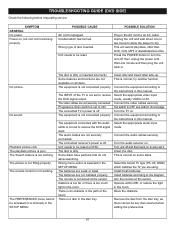
...This is poor. Select the appropriate audio input mode. Clean the disc. Install fresh batteries. This unit cannot play discs, other than DVD, VCD, MP3 or standard/picture CDs. The picture is not connected properly. The equipment is not fitting properly. Wrong menu option is ...not aimed at the sensor. The connected receiver's power is off , then unplug the power cord. The remote is dimmed) in this manual. Clean disc and insert label side-up. Connect the equipment according to the diagram. Select the appropriate video input mode, usually VIDEO or...
...This is poor. Select the appropriate audio input mode. Clean the disc. Install fresh batteries. This unit cannot play discs, other than DVD, VCD, MP3 or standard/picture CDs. The picture is not connected properly. The equipment is not fitting properly. Wrong menu option is ...not aimed at the sensor. The connected receiver's power is off , then unplug the power cord. The remote is dimmed) in this manual. Clean disc and insert label side-up. Connect the equipment according to the diagram. Select the appropriate video input mode, usually VIDEO or...
