
User Guide
Page 1
... of Controls 6 Charging the Battery 7 Downloading and Transferring Files 8 Installing MP3 Player Utilities 5.10 12 Using MP3 Player Utilities 5.10 (Video Converter 14 General Operation 16 • Turning the Power On/Off 16 • MENU/Lock Button 16 • Headphones Jack 17 &#...• Music Contextual Menu-Play Mode. . . . 23 • Music Contextual Menu-Color Theme . . 24 Operation-Video Playback Mode 25 • To Watch Videos 25 • High-Speed Video Search 26 • Forward/Reverse Skip 26 Operation-Photo Playback Mode 27 • To View Photos 27 • Thumbnail...
... of Controls 6 Charging the Battery 7 Downloading and Transferring Files 8 Installing MP3 Player Utilities 5.10 12 Using MP3 Player Utilities 5.10 (Video Converter 14 General Operation 16 • Turning the Power On/Off 16 • MENU/Lock Button 16 • Headphones Jack 17 &#...• Music Contextual Menu-Play Mode. . . . 23 • Music Contextual Menu-Color Theme . . 24 Operation-Video Playback Mode 25 • To Watch Videos 25 • High-Speed Video Search 26 • Forward/Reverse Skip 26 Operation-Photo Playback Mode 27 • To View Photos 27 • Thumbnail...

User Guide
Page 8
... a bit rate up to 320 kbps. IMPORTANT! NOTE: Visit www.Microsoft.com to be played. 8 PHOTO FORMATS: Baseline JPEGs. otherwise, the video file will not be able to download the corresponding Windows Media Player for your computer. WMV support (decoder complexity: simple profile, size 128 x 128...kbps max, Frequency Range: 8-48kHz, Audio Format: 128kbps, 48kHz, Stereo CBR); Please refer to the following pages to learn how to: transfer video, music and photo files, convert music on an audio CD into MP3 or WMA format using Windows Media Player 10. DOWNLOADING AND TRANSFERRING FILES ...
... a bit rate up to 320 kbps. IMPORTANT! NOTE: Visit www.Microsoft.com to be played. 8 PHOTO FORMATS: Baseline JPEGs. otherwise, the video file will not be able to download the corresponding Windows Media Player for your computer. WMV support (decoder complexity: simple profile, size 128 x 128...kbps max, Frequency Range: 8-48kHz, Audio Format: 128kbps, 48kHz, Stereo CBR); Please refer to the following pages to learn how to: transfer video, music and photo files, convert music on an audio CD into MP3 or WMA format using Windows Media Player 10. DOWNLOADING AND TRANSFERRING FILES ...

User Guide
Page 10
... FILES AND WMA FILES WITH DRM 9 OR DRM 10 USING WINDOWS MEDIA PLAYER 10 (FOR WINDOWS XP ONLY) To transfer MP3/WMA/VIDEO/PHOTO/WMA files with DRM 9 or 10 to the computer as previously described. 1. Before beginning the procedure, please connect the unit to the player, follow ...
... FILES AND WMA FILES WITH DRM 9 OR DRM 10 USING WINDOWS MEDIA PLAYER 10 (FOR WINDOWS XP ONLY) To transfer MP3/WMA/VIDEO/PHOTO/WMA files with DRM 9 or 10 to the computer as previously described. 1. Before beginning the procedure, please connect the unit to the player, follow ...

User Guide
Page 14
... location of "Input File" to convert. Click the red arrow to add other files for conversion. 3. USING MP3 PLAYER UTILITIES 5.10 (Video Converter) Click to add files for conversion Click to select location of output file Setting Icon In this procedure if you want to convert.... click the "OK" button. Help Icon Begin Icon You can use the previously installed MP3 Player Utilities 5.10 (Video Converter) to convert your computer under start > All Programs > MP3 Player Utilities 5.10 > Video Converter). 2. Open the previously installed MP3 Player Utilities 5.10 program (located on your...
... location of "Input File" to convert. Click the red arrow to add other files for conversion. 3. USING MP3 PLAYER UTILITIES 5.10 (Video Converter) Click to add files for conversion Click to select location of output file Setting Icon In this procedure if you want to convert.... click the "OK" button. Help Icon Begin Icon You can use the previously installed MP3 Player Utilities 5.10 (Video Converter) to convert your computer under start > All Programs > MP3 Player Utilities 5.10 > Video Converter). 2. Open the previously installed MP3 Player Utilities 5.10 program (located on your...

User Guide
Page 15
... or Same Ratio), most of any files that you can convert additional files according to select "AVI" under "Video Type". Now you would like to begin the conversion. 7. USING MP3 PLAYER UTILITIES 5.10 (Video Converter) 4. Then, click on the "Setting" icon (see illustration on using this program. 15 However, make sure to...
... or Same Ratio), most of any files that you can convert additional files according to select "AVI" under "Video Type". Now you would like to begin the conversion. 7. USING MP3 PLAYER UTILITIES 5.10 (Video Converter) 4. Then, click on the "Setting" icon (see illustration on using this program. 15 However, make sure to...

User Guide
Page 23
... button or waiting three seconds without any activity will close the Music Contextual menu. • The "Play Mode" setting will also set the mode for Video playback. 23
... button or waiting three seconds without any activity will close the Music Contextual menu. • The "Play Mode" setting will also set the mode for Video playback. 23
User Guide
Page 25
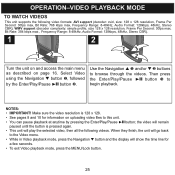
...display will show the time line for information on page 16. Then press the Enter/Play/Pause ®p button 3 to browse through the videos. Select Video using the Navigation w button 1, followed by pressing the Enter/Play/Pause ®p button; When they finish, the unit will go back...by the Enter/Play/Pause ®p button 2. NOTES: • IMPORTANT! Use the Navigation v 1 and/or w 2 buttons to begin playback. Make sure the video resolution is pressed again. • This unit will remain paused until the button is 128 x 128. • See pages 8 and 10 for a few seconds...
...display will show the time line for information on page 16. Then press the Enter/Play/Pause ®p button 3 to browse through the videos. Select Video using the Navigation w button 1, followed by pressing the Enter/Play/Pause ®p button; When they finish, the unit will go back...by the Enter/Play/Pause ®p button 2. NOTES: • IMPORTANT! Use the Navigation v 1 and/or w 2 buttons to begin playback. Make sure the video resolution is pressed again. • This unit will remain paused until the button is 128 x 128. • See pages 8 and 10 for a few seconds...
User Guide
Page 26
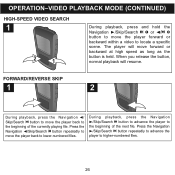
... 1 2 1 During playback, press and hold the Navigation ®/Skip/Search n 1 or √/o 2 button to move the player forward or backward within a video to the beginning of the next file. The player will resume. Press the Navigation √/Skip/Search o button repeatedly to move forward or backward at ...
... 1 2 1 During playback, press and hold the Navigation ®/Skip/Search n 1 or √/o 2 button to move the player forward or backward within a video to the beginning of the next file. The player will resume. Press the Navigation √/Skip/Search o button repeatedly to move forward or backward at ...

User Guide
Page 31
Press the MENU/Lock button to go back to confirm. NOTE: The "Play Mode" setting will also set the mode for Video playback. 31 SETTINGS MENU (CONTINUED) SETTING THE PLAY MODE 1 2 12 13 2 Turn the unit on and access the main menu as described on page 16. ...
Press the MENU/Lock button to go back to confirm. NOTE: The "Play Mode" setting will also set the mode for Video playback. 31 SETTINGS MENU (CONTINUED) SETTING THE PLAY MODE 1 2 12 13 2 Turn the unit on and access the main menu as described on page 16. ...
User Guide
Page 34
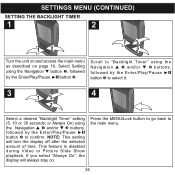
... stay on page 16. Select Setting using the Navigation w button 1, followed by the Enter/Play/Pause ®p button 3 to confirm. This feature is disabled during Video or Picture Slide Show playback. Press the MENU/Lock button to go back to select it. 3 13 4 2 Select a desired "Backlight Timer" setting (5, 10 or 30...
... stay on page 16. Select Setting using the Navigation w button 1, followed by the Enter/Play/Pause ®p button 3 to confirm. This feature is disabled during Video or Picture Slide Show playback. Press the MENU/Lock button to go back to select it. 3 13 4 2 Select a desired "Backlight Timer" setting (5, 10 or 30...