User Guide
Page 2
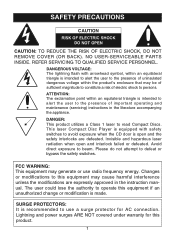
... approved in the literature accompanying the appliance. DANGEROUS VOLTAGE: The lightning flash with safety switches to avoid exposure when the CD door is intended to alert the user to the presence of important operating and maintenance (servicing) instructions in the instruction manual.... Lightning and power surges ARE NOT covered under warranty for AC connection. NO USER-SERVICEABLE PARTS INSIDE. This laser Compact Disc Player is equipped with arrowhead symbol, within an equilateral triangle is intended to alert the user to use radio frequency energy. SAFETY ...
... approved in the literature accompanying the appliance. DANGEROUS VOLTAGE: The lightning flash with safety switches to avoid exposure when the CD door is intended to alert the user to the presence of important operating and maintenance (servicing) instructions in the instruction manual.... Lightning and power surges ARE NOT covered under warranty for AC connection. NO USER-SERVICEABLE PARTS INSIDE. This laser Compact Disc Player is equipped with arrowhead symbol, within an equilateral triangle is intended to alert the user to use radio frequency energy. SAFETY ...
User Guide
Page 3
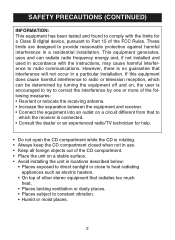
... and used in accordance with the limits for help. • Do not open the CD compartment while the CD is rotating. • Always keep the CD compartment closed when not in use. • Keep all foreign objects out of the CD compartment. • Place the unit on a stable surface. • Avoid installing the unit...
... and used in accordance with the limits for help. • Do not open the CD compartment while the CD is rotating. • Always keep the CD compartment closed when not in use. • Keep all foreign objects out of the CD compartment. • Place the unit on a stable surface. • Avoid installing the unit...
User Guide
Page 5
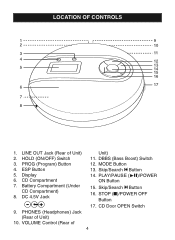
PHONES (Headphones) Jack (Rear of Unit) 2. MODE Button 13. Skip/Search o Button 16. CD Door OPEN Switch 4 LINE OUT Jack (Rear of Unit) 10. STOP (I)/POWER OFF Button 17. Display 6. CD Compartment 7. PLAY/PAUSE (®p)/POWER ON Button 15. PROG (Program) Button 4. ESP Button 5. DBBS (Bass Boost) Switch 12. Battery Compartment (Under CD Compartment) 8. Skip/Search n Button 14. DC 4.5V Jack z 9. LOCATION OF CONTROLS 1 9 2 10 3 11 4 12 5 13 14 15 16 6 17 7 8 1. VOLUME Control (Rear of Unit) 11. HOLD (ON/OFF) Switch 3.
PHONES (Headphones) Jack (Rear of Unit) 2. MODE Button 13. Skip/Search o Button 16. CD Door OPEN Switch 4 LINE OUT Jack (Rear of Unit) 10. STOP (I)/POWER OFF Button 17. Display 6. CD Compartment 7. PLAY/PAUSE (®p)/POWER ON Button 15. PROG (Program) Button 4. ESP Button 5. DBBS (Bass Boost) Switch 12. Battery Compartment (Under CD Compartment) 8. Skip/Search n Button 14. DC 4.5V Jack z 9. LOCATION OF CONTROLS 1 9 2 10 3 11 4 12 5 13 14 15 16 6 17 7 8 1. VOLUME Control (Rear of Unit) 11. HOLD (ON/OFF) Switch 3.
User Guide
Page 6
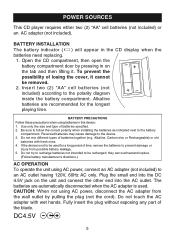
... CAUTION: When not using AC power, connect an AC adapter (not included) to an AC outlet having 120V, 60Hz AC only. POWER SOURCES This CD player requires either two (2) "AA" cell batteries (not included) or an AC adapter (not included). BATTERY INSTALLATION The battery indicator ( ) will appear ... batteries with wet hands. To prevent the possibility of losing the cover, it . BATTERY PRECAUTIONS Follow these precautions when using batteries in the CD display when the batteries need replacing. 1. The batteries are recommended for a long period of the blade. DC4.5V z 5 If the device...
... CAUTION: When not using AC power, connect an AC adapter (not included) to an AC outlet having 120V, 60Hz AC only. POWER SOURCES This CD player requires either two (2) "AA" cell batteries (not included) or an AC adapter (not included). BATTERY INSTALLATION The battery indicator ( ) will appear ... batteries with wet hands. To prevent the possibility of losing the cover, it . BATTERY PRECAUTIONS Follow these precautions when using batteries in the CD display when the batteries need replacing. 1. The batteries are recommended for a long period of the blade. DC4.5V z 5 If the device...
User Guide
Page 7
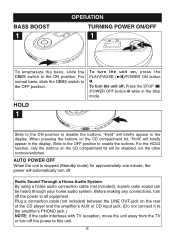
...while in the display. Plug a connection cable (not included) between the LINE OUT jack on the CD c1ompartment lid will briefly appear in the Stop mode. "Hold" will be heard through your home audio system.... To turn the unit on the CD compartment lid, "Hold" will automatically turn off . When pressing the buttons on , press the PLAY...unit. 6 For the HOLD function, only the buttons on the rear of the CD player and the amplifier's AUX or CD input jack. (Do not connect it to the amplifier's PHONO jack.)...
...while in the display. Plug a connection cable (not included) between the LINE OUT jack on the CD c1ompartment lid will briefly appear in the Stop mode. "Hold" will be heard through your home audio system.... To turn the unit on the CD compartment lid, "Hold" will automatically turn off . When pressing the buttons on , press the PLAY...unit. 6 For the HOLD function, only the buttons on the rear of the CD player and the amplifier's AUX or CD input jack. (Do not connect it to the amplifier's PHONO jack.)...
User Guide
Page 8
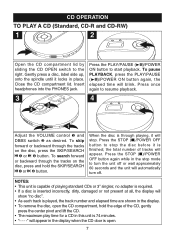
... will show "no disc". • As each track is played, the track number and elapsed time are shown in the display when the CD door is open the CD compartment, hold the SKIP/SEARCH o 3 or n 4 button. Insert headphones into the PHONES jack. 3 3 4 Press the PLAY/PAUSE (®p)/POWER ON button to ... the disc before it locks in this unit is through the tracks on the disc, press and hold the edge of playing standard CDs or 3" singles; Close the CD compartment lid. Press once again to start playback. When the disc is 74 minutes will blink. Press the STOP (I)/POWER OFF button ...
... will show "no disc". • As each track is played, the track number and elapsed time are shown in the display when the CD door is open the CD compartment, hold the SKIP/SEARCH o 3 or n 4 button. Insert headphones into the PHONES jack. 3 3 4 Press the PLAY/PAUSE (®p)/POWER ON button to ... the disc before it locks in this unit is through the tracks on the disc, press and hold the edge of playing standard CDs or 3" singles; Close the CD compartment lid. Press once again to start playback. When the disc is 74 minutes will blink. Press the STOP (I)/POWER OFF button ...
User Guide
Page 9
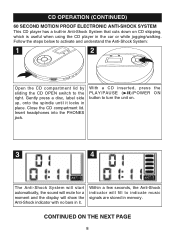
...in it locks in place. Insert headphones into the PHONES jack. With a CD inserted, press the PLAY/PAUSE (®p)/POWER ON button to turn the unit on CD skipping, which is useful when using the CD player in the car or while jogging/walking. CONTINUED ON THE NEXT PAGE 8 ...Follow the steps below to activate and understand the Anti-Shock System: 1 2 Open the CD compartment lid by sliding the CD OPEN switch to the right. CD OPERATION (CONTINUED) 60 SECOND MOTION PROOF ELECTRONIC ANTI-SHOCK SYSTEM This CD player has a built-in Anti-Shock System that cuts down on . 2 3 4 The Anti...
...in it locks in place. Insert headphones into the PHONES jack. With a CD inserted, press the PLAY/PAUSE (®p)/POWER ON button to turn the unit on CD skipping, which is useful when using the CD player in the car or while jogging/walking. CONTINUED ON THE NEXT PAGE 8 ...Follow the steps below to activate and understand the Anti-Shock System: 1 2 Open the CD compartment lid by sliding the CD OPEN switch to the right. CD OPERATION (CONTINUED) 60 SECOND MOTION PROOF ELECTRONIC ANTI-SHOCK SYSTEM This CD player has a built-in Anti-Shock System that cuts down on . 2 3 4 The Anti...
User Guide
Page 10
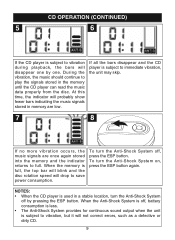
...the music should continue to save power consumption. To turn the Anti-Shock System on, press the ESP button again. 1 NOTES: • When the CD player is used in memory are once again stored into the memory and the indicator returns to full. When the Anti-Shock System is off , press... the ESP button. CD OPERATION (CONTINUED) 5 6 If the CD player is subject to vibration during playback, the bars will disappear one by pressing the ESP button. At this time, the indicator will probably...
...the music should continue to save power consumption. To turn the Anti-Shock System on, press the ESP button again. 1 NOTES: • When the CD player is used in memory are once again stored into the memory and the indicator returns to full. When the Anti-Shock System is off , press... the ESP button. CD OPERATION (CONTINUED) 5 6 If the CD player is subject to vibration during playback, the bars will disappear one by pressing the ESP button. At this time, the indicator will probably...
User Guide
Page 11
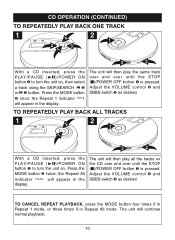
...;p)/POWER ON button ‚ to turn the unit on . Press the MODE button … once; ALL TO REPEATEDLY PLAY BACK ALL TRACKS 1 2 1 1 2 3 2 With a CD inserted, press the PLAY/PAUSE (®p)/POWER ON button ‚ to turn the unit on , then select a track using the SKIP/SEARCH o 2 or n 3 button. The... unit will appear in the display. The unit will then play all the tracks on the CD over and over until the STOP (I )/POWER OFF button ‚ is pressed. Press the MODE button ƒ twice; Adjust the VOLUME control ƒ and ...
...;p)/POWER ON button ‚ to turn the unit on . Press the MODE button … once; ALL TO REPEATEDLY PLAY BACK ALL TRACKS 1 2 1 1 2 3 2 With a CD inserted, press the PLAY/PAUSE (®p)/POWER ON button ‚ to turn the unit on , then select a track using the SKIP/SEARCH o 2 or n 3 button. The... unit will appear in the display. The unit will then play all the tracks on the CD over and over until the STOP (I )/POWER OFF button ‚ is pressed. Press the MODE button ƒ twice; Adjust the VOLUME control ƒ and ...
User Guide
Page 12
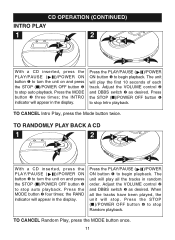
.../PAUSE ( )/POWER ON button ‚ to begin playback. the INTRO indicator will appear in the display. TO RANDOMLY PLAY BACK A CD 1 2 4 1 1 2 3 3 2 With a CD inserted, press the PLAY/PAUSE ( )/POWER ON button ‚ to turn the unit on and press the STOP (I)/POWER OFF button...play the first 10 seconds of each track. Press the PLAY/PAUSE ( )/POWER ON button ‚ to begin playback. CD OPERATION (CONTINUED) INTRO PLAY 1 2 4 1 1 2 3 3 2 With a CD inserted, press the PLAY/PAUSE ( )/POWER ON button ‚ to turn the unit on and press the STOP (I)/POWER...
.../PAUSE ( )/POWER ON button ‚ to begin playback. the INTRO indicator will appear in the display. TO RANDOMLY PLAY BACK A CD 1 2 4 1 1 2 3 3 2 With a CD inserted, press the PLAY/PAUSE ( )/POWER ON button ‚ to turn the unit on and press the STOP (I)/POWER OFF button...play the first 10 seconds of each track. Press the PLAY/PAUSE ( )/POWER ON button ‚ to begin playback. CD OPERATION (CONTINUED) INTRO PLAY 1 2 4 1 1 2 3 3 2 With a CD inserted, press the PLAY/PAUSE ( )/POWER ON button ‚ to turn the unit on and press the STOP (I)/POWER...
User Guide
Page 13
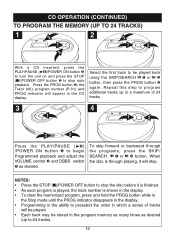
... as many times as desired. When the disc is through the programs, press the SKIP/ SEARCH o 1 or n ƒ button. CD OPERATION (CONTINUED) TO PROGRAM THE MEMORY (UP TO 24 TRACKS) 1 3 1 2 3 1 2 2 With a CD inserted, press the PLAY/PAUSE (®p)/POWER ON button 1 to turn the unit on and press the STOP (I )/POWER OFF... button while in the Stop mode until the PROG indicator disappears in the display. • Programming is the ability to preselect the order in the CD display.
... as many times as desired. When the disc is through the programs, press the SKIP/ SEARCH o 1 or n ƒ button. CD OPERATION (CONTINUED) TO PROGRAM THE MEMORY (UP TO 24 TRACKS) 1 3 1 2 3 1 2 2 With a CD inserted, press the PLAY/PAUSE (®p)/POWER ON button 1 to turn the unit on and press the STOP (I )/POWER OFF... button while in the Stop mode until the PROG indicator disappears in the display. • Programming is the ability to preselect the order in the CD display.
User Guide
Page 14
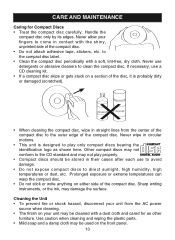
If necessary, use a CD cleaning kit. • If a compact disc skips or gets stuck on either side of the disc, it is designed to direct sunlight, high humidity, high ... lines from the AC power source when cleaning. • The finish on the front panel. 13 Other compact discs may not conform to the CD standard and may damage the surface. CARE AND MAINTENANCE Caring for as shown here. Never wipe in their cases after each use detergents or abrasive...
If necessary, use a CD cleaning kit. • If a compact disc skips or gets stuck on either side of the disc, it is designed to direct sunlight, high humidity, high ... lines from the AC power source when cleaning. • The finish on the front panel. 13 Other compact discs may not conform to the CD standard and may damage the surface. CARE AND MAINTENANCE Caring for as shown here. Never wipe in their cases after each use detergents or abrasive...
User Guide
Page 15
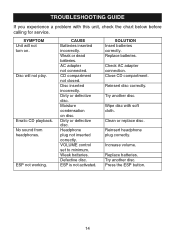
..., check the chart below before calling for service. Replace batteries. TROUBLESHOOTING GUIDE If you experience a problem with soft cloth. CD compartment not closed. Disc inserted incorrectly. Weak batteries. Reinsert disc correctly. Increase volume. Weak or dead batteries. Dirty or defective... disc. ESP is not activated. SOLUTION Insert batteries correctly. Try another disc. Clean or replace disc. Replace batteries. Erratic CD playback. CAUSE Batteries inserted incorrectly. SYMPTOM Unit will not play. ESP not working. AC adapter not connected. Headphone plug not...
..., check the chart below before calling for service. Replace batteries. TROUBLESHOOTING GUIDE If you experience a problem with soft cloth. CD compartment not closed. Disc inserted incorrectly. Weak batteries. Reinsert disc correctly. Increase volume. Weak or dead batteries. Dirty or defective... disc. ESP is not activated. SOLUTION Insert batteries correctly. Try another disc. Clean or replace disc. Replace batteries. Erratic CD playback. CAUSE Batteries inserted incorrectly. SYMPTOM Unit will not play. ESP not working. AC adapter not connected. Headphone plug not...


