
User Guide
Page 1
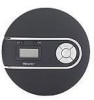
MD6443 User's Guide PERSONAL COMPACT DISC PLAYER WITH 60 SECOND DIGITAL MOTION PROOF ANTI-SHOCK PROTECTION Before operating this product, please read these instructions completely.
MD6443 User's Guide PERSONAL COMPACT DISC PLAYER WITH 60 SECOND DIGITAL MOTION PROOF ANTI-SHOCK PROTECTION Before operating this product, please read these instructions completely.
User Guide
Page 2
... or bypass the safety switches. Changes or modifications to this equipment may generate or use a surge protector for this equipment if an unauthorized change or modification is intended to alert the user to the presence of electric shock to constitute a risk of important operating and maintenance (servicing) instructions in the instruction manual. This laser Compact Disc Player is equipped with...
... or bypass the safety switches. Changes or modifications to this equipment may generate or use a surge protector for this equipment if an unauthorized change or modification is intended to alert the user to the presence of electric shock to constitute a risk of important operating and maintenance (servicing) instructions in the instruction manual. This laser Compact Disc Player is equipped with...
User Guide
Page 3
... in a particular installation. This equipment generates, uses and can be determined by turning the equipment off and on, the user is encouraged to try to correct the interference by one or more of the following measures: • Reorient or relocate the receiving antenna. • Increase the separation between the equipment and receiver. • Connect the equipment...
... in a particular installation. This equipment generates, uses and can be determined by turning the equipment off and on, the user is encouraged to try to correct the interference by one or more of the following measures: • Reorient or relocate the receiving antenna. • Increase the separation between the equipment and receiver. • Connect the equipment...
User Guide
Page 4
...offers. Now it's time to consider how you...adapts to do this by playing it there. One that lets the sound come through loud and clear without annoying blaring or distortion and, most out of your sensitive hearing. To establish a safe level: • Start your volume control at a low setting. • Slowly increase the sound...speakers, thunderclap 140 Gunshot blast, jet engine 180 Rocket launching pad Information courtesy of the Deafness Research Foundation. Dear Customer: Selecting fine audio equipment such as the unit you've just purchased is only the start of your new sound...
...offers. Now it's time to consider how you...adapts to do this by playing it there. One that lets the sound come through loud and clear without annoying blaring or distortion and, most out of your sensitive hearing. To establish a safe level: • Start your volume control at a low setting. • Slowly increase the sound...speakers, thunderclap 140 Gunshot blast, jet engine 180 Rocket launching pad Information courtesy of the Deafness Research Foundation. Dear Customer: Selecting fine audio equipment such as the unit you've just purchased is only the start of your new sound...
User Guide
Page 5
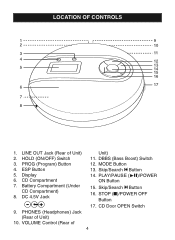
Display 6. MODE Button 13. PROG (Program) Button 4. CD Compartment 7. PHONES (Headphones) Jack (Rear of Unit) 2. STOP (I)/POWER OFF Button 17. ESP Button 5. DC 4.5V Jack z 9. Skip/Search n Button 14. LINE OUT Jack (Rear of Unit) 10. DBBS (Bass Boost) Switch 12. LOCATION OF CONTROLS 1 9 2 10 3 11 4 12 5 13 14 15 16 6 17 7 8 1. Battery Compartment (Under CD Compartment) 8. VOLUME Control (Rear of Unit) 11. CD Door OPEN Switch 4 HOLD (ON/OFF) Switch 3. PLAY/PAUSE (®p)/POWER ON Button 15. Skip/Search o Button 16.
Display 6. MODE Button 13. PROG (Program) Button 4. CD Compartment 7. PHONES (Headphones) Jack (Rear of Unit) 2. STOP (I)/POWER OFF Button 17. ESP Button 5. DC 4.5V Jack z 9. Skip/Search n Button 14. LINE OUT Jack (Rear of Unit) 10. DBBS (Bass Boost) Switch 12. LOCATION OF CONTROLS 1 9 2 10 3 11 4 12 5 13 14 15 16 6 17 7 8 1. Battery Compartment (Under CD Compartment) 8. VOLUME Control (Rear of Unit) 11. CD Door OPEN Switch 4 HOLD (ON/OFF) Switch 3. PLAY/PAUSE (®p)/POWER ON Button 15. Skip/Search o Button 16.
User Guide
Page 6
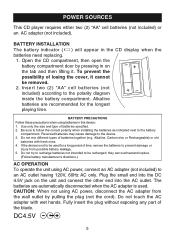
... part of batteries together (e.g. POWER SOURCES This CD player requires either two (2) "AA" cell batteries (not included) or an AC adapter (not included). If the device is used for the longest playing time. Plug the small end into the AC outlet. The batteries are recommended for a long period of time, remove the batteries to be recharged; BATTERY PRECAUTIONS Follow these precautions when using AC power, connect an AC adapter...
... part of batteries together (e.g. POWER SOURCES This CD player requires either two (2) "AA" cell batteries (not included) or an AC adapter (not included). If the device is used for the longest playing time. Plug the small end into the AC outlet. The batteries are recommended for a long period of time, remove the batteries to be recharged; BATTERY PRECAUTIONS Follow these precautions when using AC power, connect an AC adapter...
User Guide
Page 7
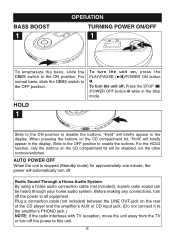
... the Stop mode. For normal bass, slide the DBB1S switch to all equipment. AUTO POWER OFF When the unit is stopped (Standby mode) for approximately one minute, the power will briefly appear in the display. "Hold" will automatically turn off the power to the ON position. Plug a connection cable (not included) between the LINE OUT jack on the rear of the CD player and the amplifier's AUX or CD input jack. (Do not connect...
... the Stop mode. For normal bass, slide the DBB1S switch to all equipment. AUTO POWER OFF When the unit is stopped (Standby mode) for approximately one minute, the power will briefly appear in the display. "Hold" will automatically turn off the power to the ON position. Plug a connection cable (not included) between the LINE OUT jack on the rear of the CD player and the amplifier's AUX or CD input jack. (Do not connect...
User Guide
Page 8
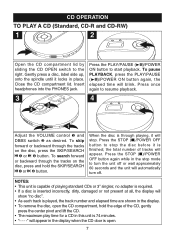
... played, the track number and elapsed time are shown in this unit is 74 minutes will blink. To skip forward or backward through the tracks on the disc, press the SKIP/SEARCH o 3 or n 4 button. NOTES: • This unit is open the CD compartment, hold the SKIP/SEARCH o 3 or n 4 button. CD OPERATION TO PLAY A CD (Standard, CD-R and CD-RW) 1 2 Open the CD compartment lid by sliding the CD OPEN switch to start playback...
... played, the track number and elapsed time are shown in this unit is 74 minutes will blink. To skip forward or backward through the tracks on the disc, press the SKIP/SEARCH o 3 or n 4 button. NOTES: • This unit is open the CD compartment, hold the SKIP/SEARCH o 3 or n 4 button. CD OPERATION TO PLAY A CD (Standard, CD-R and CD-RW) 1 2 Open the CD compartment lid by sliding the CD OPEN switch to start playback...
User Guide
Page 9
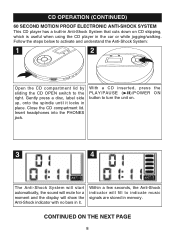
... headphones into the PHONES jack. With a CD inserted, press the PLAY/PAUSE (®p)/POWER ON button to indicate music signals are stored in memory. Close the CD compartment lid. CONTINUED ON THE NEXT PAGE 8 Follow the steps below to activate and understand the Anti-Shock System: 1 2 Open the CD compartment lid by sliding the CD OPEN switch to the right. CD OPERATION (CONTINUED) 60 SECOND...
... headphones into the PHONES jack. With a CD inserted, press the PLAY/PAUSE (®p)/POWER ON button to indicate music signals are stored in memory. Close the CD compartment lid. CONTINUED ON THE NEXT PAGE 8 Follow the steps below to activate and understand the Anti-Shock System: 1 2 Open the CD compartment lid by sliding the CD OPEN switch to the right. CD OPERATION (CONTINUED) 60 SECOND...
User Guide
Page 10
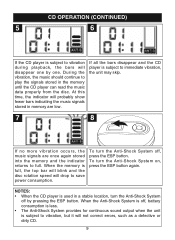
... music signals are low. When the Anti-Shock System is off, battery consumption is less. • The Anti-Shock System provides for continuous sound output when the unit is subject to vibration, but it will disappear one by pressing the ESP button. CD OPERATION (CONTINUED) 5 6 If the CD player is subject to vibration during playback, the bars will not correct errors...
... music signals are low. When the Anti-Shock System is off, battery consumption is less. • The Anti-Shock System provides for continuous sound output when the unit is subject to vibration, but it will disappear one by pressing the ESP button. CD OPERATION (CONTINUED) 5 6 If the CD player is subject to vibration during playback, the bars will not correct errors...
User Guide
Page 11
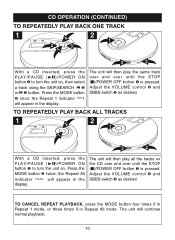
... the STOP (I )/POWER OFF button ‚ is pressed. Press the MODE button ƒ twice; TO CANCEL REPEAT PLAYBACK, press the MODE button four times if in Repeat 1 mode, or three times if in the display. Adjust the VOLUME control ƒ and DBBS switch „ as desired. Adjust the VOLUME control ƒ and DBBS switch „ as desired. The unit will appear in the display. the Repeat All indicator ALL will then play all the tracks on . CD OPERATION...
... the STOP (I )/POWER OFF button ‚ is pressed. Press the MODE button ƒ twice; TO CANCEL REPEAT PLAYBACK, press the MODE button four times if in Repeat 1 mode, or three times if in the display. Adjust the VOLUME control ƒ and DBBS switch „ as desired. Adjust the VOLUME control ƒ and DBBS switch „ as desired. The unit will appear in the display. the Repeat All indicator ALL will then play all the tracks on . CD OPERATION...
User Guide
Page 12
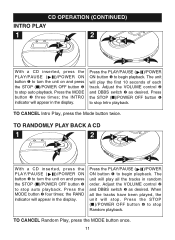
... STOP (I)/POWER OFF button … to stop auto playback. TO CANCEL Random Play, press the MODE button once. 11 CD OPERATION (CONTINUED) INTRO PLAY 1 2 4 1 1 2 3 3 2 With a CD inserted, press the PLAY/PAUSE ( )/POWER ON button ‚ to turn the unit on and press the STOP (I)/POWER OFF button ƒ to begin playback. Adjust the VOLUME control ƒ and DBBS switch „ as desired. Press the MODE button „ four times; The unit will play the first 10 seconds of each track...
... STOP (I)/POWER OFF button … to stop auto playback. TO CANCEL Random Play, press the MODE button once. 11 CD OPERATION (CONTINUED) INTRO PLAY 1 2 4 1 1 2 3 3 2 With a CD inserted, press the PLAY/PAUSE ( )/POWER ON button ‚ to turn the unit on and press the STOP (I)/POWER OFF button ƒ to begin playback. Adjust the VOLUME control ƒ and DBBS switch „ as desired. Press the MODE button „ four times; The unit will play the first 10 seconds of each track...
User Guide
Page 13
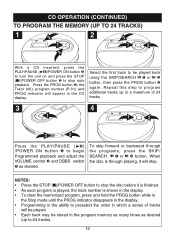
... and hold the PROG button while in the Stop mode until the PROG indicator disappears in the display. • Programming is through the programs, press the SKIP/ SEARCH o 1 or n ƒ button. When the disc is the ability to preselect the order in which a series of 24 tracks. 3 1 4 1 2 3 2 Press the PLAY/PAUSE (®p) /POWER ON button ‚ to begin Programmed playback and adjust the VOLUME control ƒ and DBBS switch...
... and hold the PROG button while in the Stop mode until the PROG indicator disappears in the display. • Programming is through the programs, press the SKIP/ SEARCH o 1 or n ƒ button. When the disc is the ability to preselect the order in which a series of 24 tracks. 3 1 4 1 2 3 2 Press the PLAY/PAUSE (®p) /POWER ON button ‚ to begin Programmed playback and adjust the VOLUME control ƒ and DBBS switch...
User Guide
Page 14
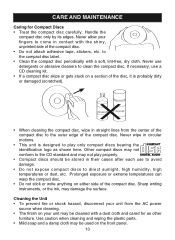
... not expose compact discs to come in circular motions. • This unit is probably dirty or damaged (scratched). to play properly. • Compact discs should be used on your unit may not play only compact discs bearing the identification logo as other furniture. Never use a CD cleaning kit. • If a compact disc skips or gets stuck on either side of the compact disc to the CD standard and may...
... not expose compact discs to come in circular motions. • This unit is probably dirty or damaged (scratched). to play properly. • Compact discs should be used on your unit may not play only compact discs bearing the identification logo as other furniture. Never use a CD cleaning kit. • If a compact disc skips or gets stuck on either side of the compact disc to the CD standard and may...
User Guide
Page 15
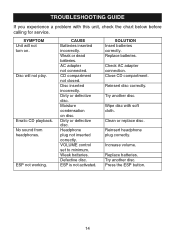
... batteries. VOLUME control set to minimum. ESP is not activated. Check AC adapter connection. Press the ESP button. 14 No sound from headphones. Moisture condensation on . Headphone plug not inserted correctly. Wipe disc with this unit, check the chart below before calling for service. Try another disc. SYMPTOM Unit will not play. Erratic CD playback. Disc inserted incorrectly. Weak batteries. Replace batteries. Try another disc. Clean or replace disc. ESP not working. Reinsert disc correctly. CD...
... batteries. VOLUME control set to minimum. ESP is not activated. Check AC adapter connection. Press the ESP button. 14 No sound from headphones. Moisture condensation on . Headphone plug not inserted correctly. Wipe disc with this unit, check the chart below before calling for service. Try another disc. SYMPTOM Unit will not play. Erratic CD playback. Disc inserted incorrectly. Weak batteries. Replace batteries. Try another disc. Clean or replace disc. ESP not working. Reinsert disc correctly. CD...
User Guide
Page 16
SPECIFICATIONS Power requirements 2 x LR6 "AA" alkaline battery DC In 4.5V adapter (center positive) D/A conversion 1-bit DAC eight times oversampling Frequency response 20~20,000Hz (+1,-3 dB) Anti-shock 60 second buffer Output level Line output: 0.6 Vms (47K ohms) Headphone: 16mW (32 ohms) FOR ADDITIONAL SET-UP OR OPERATING ASSISTANCE, PLEASE VISIT OUR WEBSITE AT WWW.MEMOREXELECTRONICS.COM OR CONTACT CUSTOMER SERVICE AT (954) 660...
SPECIFICATIONS Power requirements 2 x LR6 "AA" alkaline battery DC In 4.5V adapter (center positive) D/A conversion 1-bit DAC eight times oversampling Frequency response 20~20,000Hz (+1,-3 dB) Anti-shock 60 second buffer Output level Line output: 0.6 Vms (47K ohms) Headphone: 16mW (32 ohms) FOR ADDITIONAL SET-UP OR OPERATING ASSISTANCE, PLEASE VISIT OUR WEBSITE AT WWW.MEMOREXELECTRONICS.COM OR CONTACT CUSTOMER SERVICE AT (954) 660...


