
User Guide
Page 13
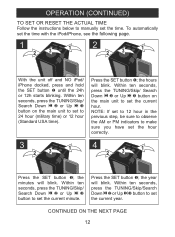
..., press the TUNING/Skip/ Search Down o 2 or Up n 3 button on the main unit to 24 hour (military time) or 12 hour (Standard USA time). the hours will blink. NOTE: If set to 12 hour in the previous step, be sure to observe the AM or PM indicators to manually... set the time. OPERATION (CONTINUED) TO SET OR RESET THE ACTUAL TIME Follow the instructions below to make sure you have set the hour correctly. 3 2 3 1 4 23 1 Press the SET button 1; Within ten seconds, press the TUNING/Skip/ Search Down o 2 or...
..., press the TUNING/Skip/ Search Down o 2 or Up n 3 button on the main unit to 24 hour (military time) or 12 hour (Standard USA time). the hours will blink. NOTE: If set to 12 hour in the previous step, be sure to observe the AM or PM indicators to manually... set the time. OPERATION (CONTINUED) TO SET OR RESET THE ACTUAL TIME Follow the instructions below to make sure you have set the hour correctly. 3 2 3 1 4 23 1 Press the SET button 1; Within ten seconds, press the TUNING/Skip/ Search Down o 2 or...
User Guide
Page 14
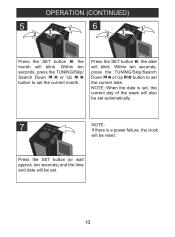
... ten seconds, press the TUNING/Skip/ Search Down o 2 or Up n 3 button to set the current month. NOTE: When the date is set, the correct day of the week will also be set . 13 ten seconds) and the time and date will be set automatically. 7 NOTE: If there is a power failure, the clock will be reset...
... ten seconds, press the TUNING/Skip/ Search Down o 2 or Up n 3 button to set the current month. NOTE: When the date is set, the correct day of the week will also be set . 13 ten seconds) and the time and date will be set automatically. 7 NOTE: If there is a power failure, the clock will be reset...
User Guide
Page 15
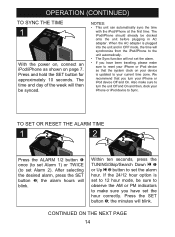
... will blink. NOTES: • This unit can automatically sync the time with the iPod/iPhone at the first time. TO SET OR RESET THE ALARM TIME 1 2 1 2 12 3 Press the ALARM 1/2 button 1 once (to set Alarm 1) or TWICE (to make sure you have set the alarm. • If you have been traveling, please make ...press the TUNING/Skip/Search Down o 1 or Up n 2 button to your iPhone or iPod device to Sync. After selecting the desired alarm, press the SET button 2; Press the SET button 3; The time and day of the week will then be docked onto the unit before plugging in OFF mode, the...
... will blink. NOTES: • This unit can automatically sync the time with the iPod/iPhone at the first time. TO SET OR RESET THE ALARM TIME 1 2 1 2 12 3 Press the ALARM 1/2 button 1 once (to set Alarm 1) or TWICE (to make sure you have set the alarm. • If you have been traveling, please make ...press the TUNING/Skip/Search Down o 1 or Up n 2 button to your iPhone or iPod device to Sync. After selecting the desired alarm, press the SET button 2; Press the SET button 3; The time and day of the week will then be docked onto the unit before plugging in OFF mode, the...
User Guide
Page 17
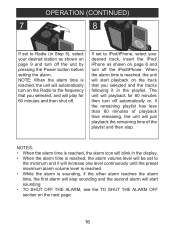
...(CONTINUED) 7 8 If set to Radio (in Step 5), select your desired track, insert the iPod/ iPhone as shown on the next page. 16 NOTES: • When the alarm time is reached, the alarm icon will blink in the playlist. The unit will stop . NOTE: When the alarm time is sounding, if the ..., the unit will automatically turn off automatically or, if the remaining playlist has less than 60 minutes of playback time remaining, the unit will just playback the remaining time of the playlist and then stop sounding and the second alarm will start playback on the Radio to the minimum...
...(CONTINUED) 7 8 If set to Radio (in Step 5), select your desired track, insert the iPod/ iPhone as shown on the next page. 16 NOTES: • When the alarm time is reached, the alarm icon will blink in the playlist. The unit will stop . NOTE: When the alarm time is sounding, if the ..., the unit will automatically turn off automatically or, if the remaining playlist has less than 60 minutes of playback time remaining, the unit will just playback the remaining time of the playlist and then stop sounding and the second alarm will start playback on the Radio to the minimum...
User Guide
Page 18
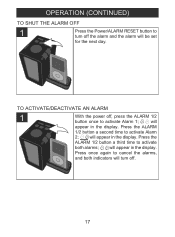
OPERATION (CONTINUED) TO SHUT THE ALARM OFF 1 Press the Power/ALARM RESET button to turn off the alarm and the alarm will be set for the next day. will appear in the display. Press once again to activate Alarm 1; will appear in the display. Press the ALARM 1/2 button a second time to activate both indicators will appear in the display. Press the ALARM 1/2 button a third time to activate Alarm 2; TO ACTIVATE/DEACTIVATE AN ALARM 1 With the power off, press the ALARM 1/2 button once to cancel the alarms, and both alarms; will turn off . 17
OPERATION (CONTINUED) TO SHUT THE ALARM OFF 1 Press the Power/ALARM RESET button to turn off the alarm and the alarm will be set for the next day. will appear in the display. Press once again to activate Alarm 1; will appear in the display. Press the ALARM 1/2 button a second time to activate both indicators will appear in the display. Press the ALARM 1/2 button a third time to activate Alarm 2; TO ACTIVATE/DEACTIVATE AN ALARM 1 With the power off, press the ALARM 1/2 button once to cancel the alarms, and both alarms; will turn off . 17
User Guide
Page 19
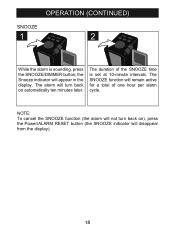
OPERATION (CONTINUED) SNOOZE 1 2 While the alarm is set at 10-minute intervals. The SNOOZE function will turn back on automatically ten minutes later. NOTE: To cancel the SNOOZE function (the alarm will not turn back on ), press the Power/ALARM RESET button (the SNOOZE indicator will appear in the display. the Snooze indicator will disappear from the display). 18 The duration of one hour per alarm cycle. The alarm will remain active for a total of the SNOOZE time is sounding, press the SNOOZE/DIMMER button;
OPERATION (CONTINUED) SNOOZE 1 2 While the alarm is set at 10-minute intervals. The SNOOZE function will turn back on automatically ten minutes later. NOTE: To cancel the SNOOZE function (the alarm will not turn back on ), press the Power/ALARM RESET button (the SNOOZE indicator will appear in the display. the Snooze indicator will disappear from the display). 18 The duration of one hour per alarm cycle. The alarm will remain active for a total of the SNOOZE time is sounding, press the SNOOZE/DIMMER button;
User Guide
Page 21
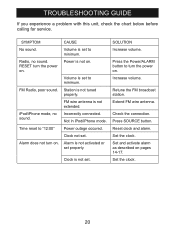
Volume is set to minimum. Time reset to turn the power on . Extend FM wire antenna. Volume is set . FM wire antenna is not set to minimum. Alarm does not turn on pages 14-17. Clock is not extended. Increase volume. Set and activate alarm as described on . SYMPTOM...turn the power on . Press SOURCE button. Power is not tuned properly. Not in iPod/iPhone mode. Set the clock. Check the connection. Alarm is not activated or set . FM Radio, poor sound. Incorrectly connected. TROUBLESHOOTING GUIDE If you experience a problem with this unit, check...
Volume is set to minimum. Time reset to turn the power on . Extend FM wire antenna. Volume is set . FM wire antenna is not set to minimum. Alarm does not turn on pages 14-17. Clock is not extended. Increase volume. Set and activate alarm as described on . SYMPTOM...turn the power on . Press SOURCE button. Power is not tuned properly. Not in iPod/iPhone mode. Set the clock. Check the connection. Alarm is not activated or set . FM Radio, poor sound. Incorrectly connected. TROUBLESHOOTING GUIDE If you experience a problem with this unit, check...


