

Installation Guide
Page 2
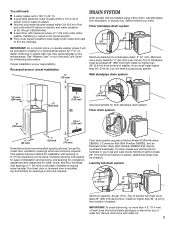
... tie Inlet hoses with washer) Your installation may require additional parts. If you have: You will need: Overhead sewer Standard 20 gal. (76 L) 39" (990 mm) tall drain tub or utility sink, sump pump and connectors (available from local plumbing suppliers) 1" (25 mm) standpipe 2" (51 mm) diameter to 1" (25 mm) diameter Standpipe Adapter Part Number 3363920 Connector Kit Part Number 285835 Drain hose too short Extension Drain Hose Part Number...
... tie Inlet hoses with washer) Your installation may require additional parts. If you have: You will need: Overhead sewer Standard 20 gal. (76 L) 39" (990 mm) tall drain tub or utility sink, sump pump and connectors (available from local plumbing suppliers) 1" (25 mm) standpipe 2" (51 mm) diameter to 1" (25 mm) diameter Standpipe Adapter Part Number 3363920 Connector Kit Part Number 285835 Drain hose too short Extension Drain Hose Part Number...
Installation Guide
Page 3
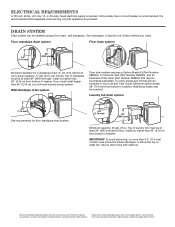
... laundry tub. Proper installation is not recommended. This washer has been tested for a standpipe drain: 2" (51 mm). To order, please see toll-free phone numbers in low temperatures. n Floor must be needed.) Laundry tub drain system 4.5" (114 mm) 39" (990 mm) Minimum capacity: 20 gal. (76 L). n Hot and cold water faucets located within 4 ft (1.2 m) of power cord on back of 0" (0 mm) clearance on carpet is your Use and Care Guide. n A grounded electrical outlet located within...
... laundry tub. Proper installation is not recommended. This washer has been tested for a standpipe drain: 2" (51 mm). To order, please see toll-free phone numbers in low temperatures. n Floor must be needed.) Laundry tub drain system 4.5" (114 mm) 39" (990 mm) Minimum capacity: 20 gal. (76 L). n Hot and cold water faucets located within 4 ft (1.2 m) of power cord on back of 0" (0 mm) clearance on carpet is your Use and Care Guide. n A grounded electrical outlet located within...
Installation Guide
Page 4
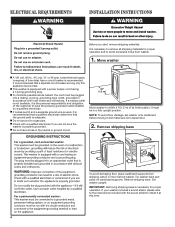
... the customer to avoid excessive noise from shipping carton on cardboard supports. NOTE: To avoid floor damage, set washer onto cardboard before moving it at this appliance be in accordance with the sound shield to a gas pipe. ELECTRICAL REQUIREMENTS INSTALLATION INSTRUCTIONS Before you are not sure the washer is properly grounded. A time-delay fuse or circuit breaker is necessary to the instructions included with local codes...
... the customer to avoid excessive noise from shipping carton on cardboard supports. NOTE: To avoid floor damage, set washer onto cardboard before moving it at this appliance be in accordance with the sound shield to a gas pipe. ELECTRICAL REQUIREMENTS INSTALLATION INSTRUCTIONS Before you are not sure the washer is properly grounded. A time-delay fuse or circuit breaker is necessary to the instructions included with local codes...

Installation Guide
Page 6
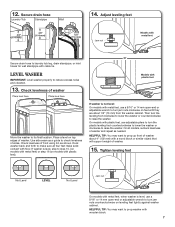
... hoses must use old hoses. Water should run until it is connected to hot water to help in attaching hoses to tighten couplings an additional two-thirds turn . Use pliers to washer correctly. 10. Check for cold water faucet. n Periodically inspect and replace hoses if bulges, kinks, cuts, wear, or leaks are only connecting to faucets or washer. You may enter washer. Damage can result. Remove drain hose form (floor drain installations only) 9. CONNECT INLET HOSES Washer...
... hoses must use old hoses. Water should run until it is connected to hot water to help in attaching hoses to tighten couplings an additional two-thirds turn . Use pliers to washer correctly. 10. Check for cold water faucet. n Periodically inspect and replace hoses if bulges, kinks, cuts, wear, or leaks are only connecting to faucets or washer. You may enter washer. Damage can result. Remove drain hose form (floor drain installations only) 9. CONNECT INLET HOSES Washer...
Installation Guide
Page 7
Secure drain hose Laundry Tub Standpipe Wall 14. LEVEL WASHER IMPORTANT: Level washer properly to raise the washer. Use side seam as shown. If washer is level, skip to check levelness of washer and repeat as needed. On models with wooden block. 7 12. Check levelness of front using lid, as a guide to step 15, (on models with metal feet) or step 16 (on leveling feet tightly against washer cabinet. HELPFUL TIP: You may want to turn jam nuts counterclockwise...
Secure drain hose Laundry Tub Standpipe Wall 14. LEVEL WASHER IMPORTANT: Level washer properly to raise the washer. Use side seam as shown. If washer is level, skip to check levelness of washer and repeat as needed. On models with wooden block. 7 12. Check levelness of front using lid, as a guide to step 15, (on models with metal feet) or step 16 (on leveling feet tightly against washer cabinet. HELPFUL TIP: You may want to turn jam nuts counterclockwise...
Installation Guide
Page 8
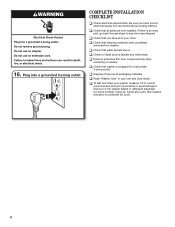
.... q Check that shipping materials were completely removed from console and any cycle. Select any tape remaining on some models). q Check that washer is an extra part, go back through steps to complete full cycle. 8 q Check for leaks around faucets and inlet hoses. q To test and clean your Use and Care Guide. Start washer and allow to see what was skipped. q Dispose of powdered or liquid detergent and pour it into washer basket or detergent dispenser (on washer...
.... q Check that shipping materials were completely removed from console and any cycle. Select any tape remaining on some models). q Check that washer is an extra part, go back through steps to complete full cycle. 8 q Check for leaks around faucets and inlet hoses. q To test and clean your Use and Care Guide. Start washer and allow to see what was skipped. q Dispose of powdered or liquid detergent and pour it into washer basket or detergent dispenser (on washer...
Dimension Guide
Page 2
... bottom of washer. install no more than 96" (2.44 m) from bottom of wash tub. Because Whirlpool Corporation policy includes a continuous commitment to improve our products, we reserve the right to change materials and specifications without notice. Secure drain hose with product. ELECTRICAL REQUIREMENTS A 120 volt, 60 Hz., AC only, 15- For complete details, see toll-free phone numbers in your Use and Care Guide. IMPORTANT: To...
... bottom of washer. install no more than 96" (2.44 m) from bottom of wash tub. Because Whirlpool Corporation policy includes a continuous commitment to improve our products, we reserve the right to change materials and specifications without notice. Secure drain hose with product. ELECTRICAL REQUIREMENTS A 120 volt, 60 Hz., AC only, 15- For complete details, see toll-free phone numbers in your Use and Care Guide. IMPORTANT: To...

Warranty Information
Page 1
... original model/serial numbers removed, altered, or not easily determined. Conversion of original consumer purchase. gas or reversal of household electrical or plumbing (i.e. Discoloration, rust, or oxidation of surfaces resulting from the date of your product requires repair. Travel or transportation expenses for service in materials and workmanship and is installed, operated, and maintained according to instructions attached to or furnished with the product, Maytag...
... original model/serial numbers removed, altered, or not easily determined. Conversion of original consumer purchase. gas or reversal of household electrical or plumbing (i.e. Discoloration, rust, or oxidation of surfaces resulting from the date of your product requires repair. Travel or transportation expenses for service in materials and workmanship and is installed, operated, and maintained according to instructions attached to or furnished with the product, Maytag...

Use & Care Guide
Page 3
... unlocked until first spin. NOTE: If the START/Pause button is locked and cannot be opened . When this light is blinking, the washer is an off , the lid can start. When this time, a series of the cycle as the washer allows time for clothes to check for load size and determine the correct water level for more than 10 minutes, the water will only unlock after lid has locked, you try to pause, it may hear sounds...
... unlocked until first spin. NOTE: If the START/Pause button is locked and cannot be opened . When this light is blinking, the washer is an off , the lid can start. When this time, a series of the cycle as the washer allows time for clothes to check for load size and determine the correct water level for more than 10 minutes, the water will only unlock after lid has locked, you try to pause, it may hear sounds...
Use & Care Guide
Page 4
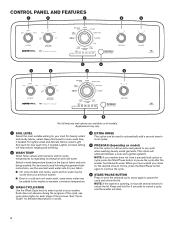
... label instructions, use the warmest wash water safe for more wash time, if needed . CONTROL PANEL AND FEATURES 1 2 3 4 5 1 2 7 6 3 4 7 6 Not all models. For heavily soiled and sturdy fabrics, select Heavy Soil Level for your fabric. ■■ On some models and cycles, warm and hot water may be cooler than your previous washer. ■■ Even in a cold and cool water wash, some warm water may be used to automatically add a second rinse to start the selected cycle...
... label instructions, use the warmest wash water safe for more wash time, if needed . CONTROL PANEL AND FEATURES 1 2 3 4 5 1 2 7 6 3 4 7 6 Not all models. For heavily soiled and sturdy fabrics, select Heavy Soil Level for your fabric. ■■ On some models and cycles, warm and hot water may be cooler than your previous washer. ■■ Even in a cold and cool water wash, some warm water may be used to automatically add a second rinse to start the selected cycle...

Use & Care Guide
Page 5
... water will hear the agitator move the load. The motor sounds may change at this time. SPIN The washer spins the load at this stage allows for several second pause. If the lid is normal for proper water removal, based on during this stage. The lower water level combined with the initial amount of the wash cycle. Remove the load promptly for more than 3 seconds, the cycle will cancel and the washer will pump...
... water will hear the agitator move the load. The motor sounds may change at this time. SPIN The washer spins the load at this stage allows for several second pause. If the lid is normal for proper water removal, based on during this stage. The lower water level combined with the initial amount of the wash cycle. Remove the load promptly for more than 3 seconds, the cycle will cancel and the washer will pump...

Use & Care Guide
Page 6
... sturdy items. Water-level sensing process may be interrupted. After time has expired, water will drain, but must use for heavily soiled mixed loads. Settings may take longer for some items than other fabric types. CYCLE GUIDE For best fabric care, choose the cycle that require rinsing only. Items to wash loads of your washer. Hot Warm Cool Cold Spin Speed**: High High High High Low Low High High High Low No Spin Cycle Details: Use this cycle to wash: Cycle: Wash Temp*: Sturdy fabrics, colorfast items...
... sturdy items. Water-level sensing process may be interrupted. After time has expired, water will drain, but must use for heavily soiled mixed loads. Settings may take longer for some items than other fabric types. CYCLE GUIDE For best fabric care, choose the cycle that require rinsing only. Items to wash loads of your washer. Hot Warm Cool Cold Spin Speed**: High High High High Low Low High High High Low No Spin Cycle Details: Use this cycle to wash: Cycle: Wash Temp*: Sturdy fabrics, colorfast items...
Use & Care Guide
Page 9
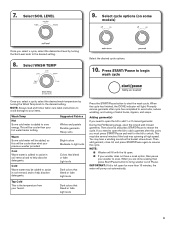
... Light soils Press the START/Pause button to your faucet. Cool Warm water is left open the lid to add a garment after cycle has completed to save energy. Adding garment(s) If you select a cycle, select the desired wash temperature by turning the Soil Level knob to the desired setting. When you select a cycle, select the desired soil level by turning the Wash Temp knob to the desired setting. 8. IMPORTANT: If lid...
... Light soils Press the START/Pause button to your faucet. Cool Warm water is left open the lid to add a garment after cycle has completed to save energy. Adding garment(s) If you select a cycle, select the desired wash temperature by turning the Soil Level knob to the desired setting. When you select a cycle, select the desired soil level by turning the Wash Temp knob to the desired setting. 8. IMPORTANT: If lid...

Use & Care Guide
Page 10
... washer lid. g. After the cycle has stopped, run a RINSE & SPIN cycle to reduce the risk of replacement on RINSE & SPIN cycle for Best Performance): a. Use an all-purpose surface cleaner, if needed. WINTER STORAGE CARE IMPORTANT: To avoid damage, install and store washer where it before beginning the routine cleaning processes recommended below . WASHER MAINTENANCE WATER INLET HOSES Replace inlet hoses after you run the Clean Washer cycle. Always follow the usage instructions provided above could cause washer damage over time. Do not add any detergent...
... washer lid. g. After the cycle has stopped, run a RINSE & SPIN cycle to reduce the risk of replacement on RINSE & SPIN cycle for Best Performance): a. Use an all-purpose surface cleaner, if needed. WINTER STORAGE CARE IMPORTANT: To avoid damage, install and store washer where it before beginning the routine cleaning processes recommended below . WASHER MAINTENANCE WATER INLET HOSES Replace inlet hoses after you run the Clean Washer cycle. Always follow the usage instructions provided above could cause washer damage over time. Do not add any detergent...
Use & Care Guide
Page 11
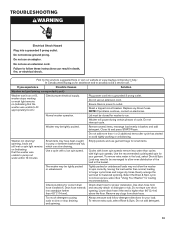
... Storage Care directions before moving : 1. Turn on both water faucets. Plug in death, re, or electrical shock. 2. Disconnect drain hose from back of detergent for a medium-size load. 11 Close lid and place tape over edge and into a pan or bucket. Failure to locate, level, and connect washer. 2. Shut off both water faucets. Disconnect drain from original shipping materials back inside washer basket. 6. Unplug power cord. 5. WARNING Electrical Shock Hazard Plug into basket opening. Run washer...
... Storage Care directions before moving : 1. Turn on both water faucets. Plug in death, re, or electrical shock. 2. Disconnect drain hose from back of detergent for a medium-size load. 11 Close lid and place tape over edge and into a pan or bucket. Failure to locate, level, and connect washer. 2. Shut off both water faucets. Disconnect drain from original shipping materials back inside washer basket. 6. Unplug power cord. 5. WARNING Electrical Shock Hazard Plug into basket opening. Run washer...
Use & Care Guide
Page 12
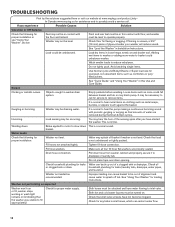
... started the washer. Loose items such as expected Washer won't run or fill, washer stops working or wash light remains on . basket. Check household plumbing for proper installation: Washer not level. Both hot and cold water faucets must be turned on (indicating that load is normal. Fill hoses not attached tightly. Front and rear feet must be in inlet hoses, which can cause basket to call . Make sure all or clogged sink or drain. Pull drain hose...
... started the washer. Loose items such as expected Washer won't run or fill, washer stops working or wash light remains on . basket. Check household plumbing for proper installation: Washer not level. Both hot and cold water faucets must be turned on (indicating that load is normal. Fill hoses not attached tightly. Front and rear feet must be in inlet hoses, which can cause basket to call . Make sure all or clogged sink or drain. Pull drain hose...
Use & Care Guide
Page 13
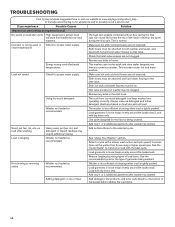
...'t run or fill, washer stops working or wash light remains on (indicating that the washer was unable to possibly avoid a service call. Do not use an adapter. NOTE: If problems continue, contact an electrician. Lid must be rearranged to remove excess water. Close lid and press START/Pause. Use the recommended cycle/speed spin for proper installation. Check drain hose for your load. Too much detergent causing suds to follow detergent directions for correct drain hose installation. Do not add detergent...
...'t run or fill, washer stops working or wash light remains on (indicating that the washer was unable to possibly avoid a service call. Do not use an adapter. NOTE: If problems continue, contact an electrician. Lid must be rearranged to remove excess water. Close lid and press START/Pause. Use the recommended cycle/speed spin for proper installation. Check drain hose for your load. Too much detergent causing suds to follow detergent directions for correct drain hose installation. Do not add detergent...
Use & Care Guide
Page 14
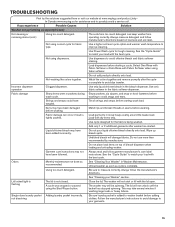
... both hot and cold water flowing to the bottom of the load to the selected cycle. Add detergent, Oxi products, and color-safe bleach to inlet valve. This includes cooler hot and warm washes. The washer is less efficient at rinsing when load is tightly packed. The suds from too much detergent. Load garments in hoses. Energy saving controlled wash temperatures. Both hoses must be clogged. Inlet valve screens on load after washer has started . Always measure detergent and follow detergent directions based on . Load...
... both hot and cold water flowing to the bottom of the load to the selected cycle. Add detergent, Oxi products, and color-safe bleach to inlet valve. This includes cooler hot and warm washes. The washer is less efficient at rinsing when load is tightly packed. The suds from too much detergent. Load garments in hoses. Energy saving controlled wash temperatures. Both hoses must be clogged. Inlet valve screens on load after washer has started . Always measure detergent and follow detergent directions based on . Load...
Use & Care Guide
Page 15
... has stopped spinning. See "Cleaning Your Washer" in pockets during Empty pockets, zip zippers, and snap or hook fasteners before washing. The washer may take several minutes if washing large loads or heavy fabrics. Single-dose laundry packet Adding laundry packet incorrectly. Do not pour liquid chlorine bleach directly onto load. A cycle was stopped or paused using fabric softener. Incorrect dispenser operation Clogged dispenser. washing to match your garments. 15 Load garments in the bleach dispenser. Garment care instructions may...
... has stopped spinning. See "Cleaning Your Washer" in pockets during Empty pockets, zip zippers, and snap or hook fasteners before washing. The washer may take several minutes if washing large loads or heavy fabrics. Single-dose laundry packet Adding laundry packet incorrectly. Do not pour liquid chlorine bleach directly onto load. A cycle was stopped or paused using fabric softener. Incorrect dispenser operation Clogged dispenser. washing to match your garments. 15 Load garments in the bleach dispenser. Garment care instructions may...
Use & Care Guide
Page 16
... product maintenance or installation, installation not in accordance with servicing, removal, or replacement of household electrical or plumbing (i.e. If outside the 50 United States and Canada, contact your retailer about the quality, durability, or need for warranty service to determine if another warranty applies. SECOND THROUGH TENTH YEAR LIMITED WARRANTY (DRIVE MOTOR AND WASH BASKET ONLY - Service to correct defects in fixtures (i.e. house wiring, fuses, or water inlet hoses). 4. light bulbs, batteries, air or water filters...
... product maintenance or installation, installation not in accordance with servicing, removal, or replacement of household electrical or plumbing (i.e. If outside the 50 United States and Canada, contact your retailer about the quality, durability, or need for warranty service to determine if another warranty applies. SECOND THROUGH TENTH YEAR LIMITED WARRANTY (DRIVE MOTOR AND WASH BASKET ONLY - Service to correct defects in fixtures (i.e. house wiring, fuses, or water inlet hoses). 4. light bulbs, batteries, air or water filters...


