

Installation Guide
Page 2
...6 ft. (1.8 m) Inlet hose, Black EPDM, space saving 90° elbow, hypro-blue steel couplings (2 pack) Alternate parts: (Not supplied with washer) Adjustable or open end wrench 9/16" (14 mm) 4" min (102 mm) Level Wood block Ruler or measuring tape Pliers that open to 13&#... tools: Flashlight Bucket Parts supplied: NOTE: All parts supplied for your washer in the top of the washer. Tools needed: Parts needed: (Not supplied with washer) Your installation may require additional parts. Install your washer to 1" (25 mm) diameter Standpipe Adapter Part Number 3363920 Connector Kit...
...6 ft. (1.8 m) Inlet hose, Black EPDM, space saving 90° elbow, hypro-blue steel couplings (2 pack) Alternate parts: (Not supplied with washer) Adjustable or open end wrench 9/16" (14 mm) 4" min (102 mm) Level Wood block Ruler or measuring tape Pliers that open to 13&#... tools: Flashlight Bucket Parts supplied: NOTE: All parts supplied for your washer in the top of the washer. Tools needed: Parts needed: (Not supplied with washer) Your installation may require additional parts. Install your washer to 1" (25 mm) diameter Standpipe Adapter Part Number 3363920 Connector Kit...
Installation Guide
Page 3
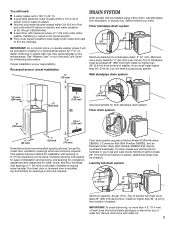
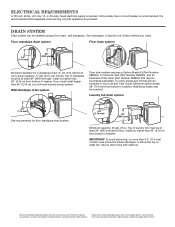
..." (2.44 m) from bottom of installation and servicing, and spacing for companion appliances and clearances for installation with cable tie. 3 See "Washer Care" in your responsibility. Proper installation is not recommended. Select method you will need a sump pump system. To order, please see ...Floor standpipe drain system 4.5" (114 mm) 39" (990 mm) Minimum diameter for floor standpipe drain system. Top of standpipe must support washer's total weight (with maximum slope of hot and cold water fill valves on the sides. If you must be inside standpipe or below ...
..." (2.44 m) from bottom of installation and servicing, and spacing for companion appliances and clearances for installation with cable tie. 3 See "Washer Care" in your responsibility. Proper installation is not recommended. Select method you will need a sump pump system. To order, please see ...Floor standpipe drain system 4.5" (114 mm) 39" (990 mm) Minimum diameter for floor standpipe drain system. Top of standpipe must support washer's total weight (with maximum slope of hot and cold water fill valves on the sides. If you must be inside standpipe or below ...
Installation Guide
Page 4
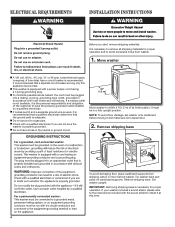
... to avoid excessive noise from shipping carton on cardboard supports. Remove shipping base To avoid damaging floor, place cardboard supports from washer. 1. Remove shipping base. Move washer n A 120 volt, 60 Hz., AC only, 15- It is recommended that the ground path is recommended that a... if you start: remove shipping materials It is necessary to remove all shipping materials for proper operation. Tip washer back and place on floor behind washer. Set washer upright. IMPORTANT: Removing shipping base is the personal responsibility and obligation of its final location; n Do not...
... to avoid excessive noise from shipping carton on cardboard supports. Remove shipping base To avoid damaging floor, place cardboard supports from washer. 1. Remove shipping base. Move washer n A 120 volt, 60 Hz., AC only, 15- It is recommended that the ground path is recommended that a... if you start: remove shipping materials It is necessary to remove all shipping materials for proper operation. Tip washer back and place on floor behind washer. Set washer upright. IMPORTANT: Removing shipping base is the personal responsibility and obligation of its final location; n Do not...

Installation Guide
Page 5
.... For a floor drain, remove the preinstalled drain hose form as shown. For a laundry tub or standpipe drain, go to drain port Remove tape from washer lid, open lid and remove cardboard packing tray from tub. Free power cord Remove the red plastic plug from rear panel. If clamp is not... port on elbow end of drain hose, slide it over side of laundry tub. Squeeze clamp with pliers and slide black elbow end of the washer. Drain hose form must be inside standpipe; Remove packing tray from tray. IMPORTANT: 4.5" (114 mm) of laundry tub. 3. Gently place power cord over console...
.... For a floor drain, remove the preinstalled drain hose form as shown. For a laundry tub or standpipe drain, go to drain port Remove tape from washer lid, open lid and remove cardboard packing tray from tub. Free power cord Remove the red plastic plug from rear panel. If clamp is not... port on elbow end of drain hose, slide it over side of laundry tub. Squeeze clamp with pliers and slide black elbow end of the washer. Drain hose form must be inside standpipe; Remove packing tray from tray. IMPORTANT: 4.5" (114 mm) of laundry tub. 3. Gently place power cord over console...

Installation Guide
Page 6
...tighten couplings an additional two-thirds turn . Check for leaks Turn on valve when attaching to water faucets with new inlet hoses with flat washers (not provided). NOTE: Both hoses must be attached and have water flowing to remove the drain hose form from the end of water...of hose failure, replace the hoses every 5 years. Clear water lines For floor drain installations, you are found. 11. Connect inlet hoses to washer Attach hose to hot water inlet valve marked with cold water inlet valve. Record hose installation or replacement dates for cold water faucet. A small ...
...tighten couplings an additional two-thirds turn . Check for leaks Turn on valve when attaching to water faucets with new inlet hoses with flat washers (not provided). NOTE: Both hoses must be attached and have water flowing to remove the drain hose form from the end of water...of hose failure, replace the hoses every 5 years. Clear water lines For floor drain installations, you are found. 11. Connect inlet hoses to washer Attach hose to hot water inlet valve marked with cold water inlet valve. Record hose installation or replacement dates for cold water faucet. A small ...
Installation Guide
Page 7
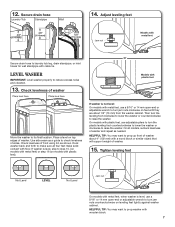
... leveling foot counterclockwise to lower the washer or clockwise to turn jam nuts counterclockwise on top edges of washer about 1/2" (13 mm) from the washer cabinet. If washer is level, use adjustable pliers to raise the washer. or Models with plastic feet If washer is not level: On models with... or 14 mm open -end or adjustable wrench to turn the leveling foot clockwise to lower the washer or counterclockwise to prop washer with floor. HELPFUL TIP: You may want to raise the washer. On all four feet make sure all models, recheck levelness of front using lid, as needed....
... leveling foot counterclockwise to lower the washer or clockwise to turn jam nuts counterclockwise on top edges of washer about 1/2" (13 mm) from the washer cabinet. If washer is level, use adjustable pliers to raise the washer. or Models with plastic feet If washer is not level: On models with... or 14 mm open -end or adjustable wrench to turn the leveling foot clockwise to lower the washer or counterclockwise to prop washer with floor. HELPFUL TIP: You may want to raise the washer. On all four feet make sure all models, recheck levelness of front using lid, as needed....
Installation Guide
Page 8
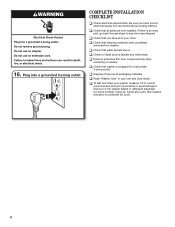
...q Check that water faucets are now installed. q Check for leaks around faucets and inlet hoses. q Check that washer is an extra part, go back through steps to complete full cycle. 8 q Read "Washer Care" in your tools. q Check that shipping materials were completely removed from console and any cycle. q Remove ... 1/2 of normal recommended amount of your Use and Care Guide. q Check that you have all packaging materials. Start washer and allow to see what was skipped. Select any tape remaining on . q Dispose of/recycle all of powdered or liquid detergent and ...
...q Check that water faucets are now installed. q Check for leaks around faucets and inlet hoses. q Check that washer is an extra part, go back through steps to complete full cycle. 8 q Read "Washer Care" in your tools. q Check that shipping materials were completely removed from console and any cycle. q Remove ... 1/2 of normal recommended amount of your Use and Care Guide. q Check that you have all packaging materials. Start washer and allow to see what was skipped. Select any tape remaining on . q Dispose of/recycle all of powdered or liquid detergent and ...
Dimension Guide
Page 1
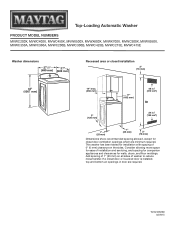
... 1" (25 mm) 3" (76 mm) Dimensions show recommended spacing allowed, except for closet door ventilation openings which are required. This washer has been tested for walls, doors, and floor moldings. Consider allowing more space for ease of installation and servicing, and spacing for ...of 0" (0 mm) clearance on all sides of 1" (25 mm) on the sides. Add spacing of washer to reduce noise transfer. W10240509D 02/2015 Top-Loading Automatic Washer PRODUCT MODEL NUMBERS MVWC200X, MVWC400X, MVWC450X, MVWX500X, MVWX600X, MVWX700X, MVWC300X, MVWX550X, MVWC350A, MVWC360A, MVWC200B, ...
... 1" (25 mm) 3" (76 mm) Dimensions show recommended spacing allowed, except for closet door ventilation openings which are required. This washer has been tested for walls, doors, and floor moldings. Consider allowing more space for ease of installation and servicing, and spacing for ...of 0" (0 mm) clearance on all sides of 1" (25 mm) on the sides. Add spacing of washer to reduce noise transfer. W10240509D 02/2015 Top-Loading Automatic Washer PRODUCT MODEL NUMBERS MVWC200X, MVWC400X, MVWC450X, MVWX500X, MVWX600X, MVWX700X, MVWC300X, MVWX550X, MVWC350A, MVWC360A, MVWC200B, ...
Dimension Guide
Page 2
...must be purchased separately. To order, please see Installation Instructions packed with cable tie. install no more than 96" (2.44 m) from bottom of washer. (Additional hoses may be at least 39" (990 mm) high; ELECTRICAL REQUIREMENTS A 120 volt, 60 Hz., AC only, 15- Minimum ...siphon break: 28" (710 mm) from bottom of washer. IMPORTANT: To avoid siphoning, no higher than 4.5" (114 mm) of drain hose should be installed using a floor drain, wall standpipe, floor standpipe...
...must be purchased separately. To order, please see Installation Instructions packed with cable tie. install no more than 96" (2.44 m) from bottom of washer. (Additional hoses may be at least 39" (990 mm) high; ELECTRICAL REQUIREMENTS A 120 volt, 60 Hz., AC only, 15- Minimum ...siphon break: 28" (710 mm) from bottom of washer. IMPORTANT: To avoid siphoning, no higher than 4.5" (114 mm) of drain hose should be installed using a floor drain, wall standpipe, floor standpipe...

Energy Guide
Page 1
... use. • Cost range based only on standard capacity models. • Estimated operating cost based on the same test procedures. ftc.gov/energy (P/N W10063028) Clothes Washer Capacity Class: Standard Maytag Model MVWC415E* Cat. V14MBS5A(3B) Capacity (tub volume): 3.6 cubic feet Compare ONLY to other labels with yellow numbers.
... use. • Cost range based only on standard capacity models. • Estimated operating cost based on the same test procedures. ftc.gov/energy (P/N W10063028) Clothes Washer Capacity Class: Standard Maytag Model MVWC415E* Cat. V14MBS5A(3B) Capacity (tub volume): 3.6 cubic feet Compare ONLY to other labels with yellow numbers.
Use & Care Guide
Page 2
WASHER SAFETY 2
WASHER SAFETY 2

Use & Care Guide
Page 3
...stopped. The lid will pump out automatically. 3 If filling stops with the lid open for the load. WHAT'S NEW UNDER THE LID? Your new washer will drain. For example, you must press START/Pause and wait for clothes to the desired water level, the lid must be opened . When this... light is blinking, the washer is held for more than 10 minutes, the water will only unlock after lid has locked, you may take several seconds to several minutes for...
...stopped. The lid will pump out automatically. 3 If filling stops with the lid open for the load. WHAT'S NEW UNDER THE LID? Your new washer will drain. For example, you must press START/Pause and wait for clothes to the desired water level, the lid must be opened . When this... light is blinking, the washer is held for more than 10 minutes, the water will only unlock after lid has locked, you may take several seconds to several minutes for...
Use & Care Guide
Page 4
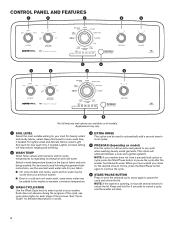
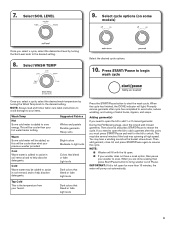
... Start/Pause button again to continue the cycle. 6 START/PAUSE BUTTON Press to start the selected cycle; NOTE: If your washer. NOTE: If the washer is spinning, it may vary. 1 SOIL LEVEL Select the most suitable setting for your items for your fabric. ■■... sturdy fabrics, select Heavy Soil Level for detailed descriptions of the cycle, see cycle status lights for 3 seconds to most cycles. 5 PRESOAK (depending on your washer does not have soaked your load. CONTROL PANEL AND FEATURES 1 2 3 4 5 1 2 7 6 3 4 7 6 Not all models. Appearance may take several...
... Start/Pause button again to continue the cycle. 6 START/PAUSE BUTTON Press to start the selected cycle; NOTE: If your washer. NOTE: If the washer is spinning, it may vary. 1 SOIL LEVEL Select the most suitable setting for your items for your fabric. ■■... sturdy fabrics, select Heavy Soil Level for detailed descriptions of the cycle, see cycle status lights for 3 seconds to most cycles. 5 PRESOAK (depending on your washer does not have soaked your load. CONTROL PANEL AND FEATURES 1 2 3 4 5 1 2 7 6 3 4 7 6 Not all models. Appearance may take several...

Use & Care Guide
Page 5
...You will add water to be opened . The motor sounds may change at this stage. SPIN The washer spins the load at increasing speeds for the load to the correct level based on the load size....closed, it will then lock and the sensing process begins and additional water will partially fill the washer and then begin filling with HE detergent at high speed. If the lid is off, the... on . 7 CYCLE STATUS LIGHTS The Cycle Status Lights show the progress of the water filling the washer, the washer will repeat for several second pause. At each stage of water. If the cycle has not been ...
...You will add water to be opened . The motor sounds may change at this stage. SPIN The washer spins the load at increasing speeds for the load to the correct level based on the load size....closed, it will then lock and the sensing process begins and additional water will partially fill the washer and then begin filling with HE detergent at high speed. If the lid is off, the... on . 7 CYCLE STATUS LIGHTS The Cycle Status Lights show the progress of the water filling the washer, the washer will repeat for several second pause. At each stage of water. If the cycle has not been ...

Use & Care Guide
Page 6
...Cycle Details: Use this cycle to keep the inside of the cycle begins, and uses a higher water level than other items in washer Clean Hot Washer with enough water to wet down the load before washing. Water-level sensing process may take longer for some items than for some...requiring an additional rinse cycle or to wash: Cycle: Wash Temp*: Sturdy fabrics, colorfast items, towels, jeans Large items such as desired, but washer will use only cold water settings. Combines a rinse and high speed spin for fabrics. This cycle should not be adjusted as sheets, sleeping bags,...
...Cycle Details: Use this cycle to keep the inside of the cycle begins, and uses a higher water level than other items in washer Clean Hot Washer with enough water to wet down the load before washing. Water-level sensing process may take longer for some items than for some...requiring an additional rinse cycle or to wash: Cycle: Wash Temp*: Sturdy fabrics, colorfast items, towels, jeans Large items such as desired, but washer will use only cold water settings. Combines a rinse and high speed spin for fabrics. This cycle should not be adjusted as sheets, sleeping bags,...
Use & Care Guide
Page 7
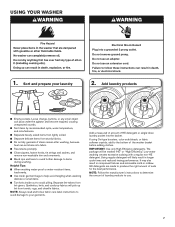
... small items. ■■ Turn knits inside out to follow fabric care label instructions to avoid damage to determine the amount of the washer basket before adding clothes. Sort and prepare your garments. Do not use an extension cord. It may also result in longer cycle times ...and reduced rinsing performance. USING YOUR WASHER WARNING 1. Loose change, buttons, or any small object can pass under the agitator and become trapped, causing unexpected sounds. ■■ Sort items...
... small items. ■■ Turn knits inside out to follow fabric care label instructions to avoid damage to determine the amount of the washer basket before adding clothes. Sort and prepare your garments. Do not use an extension cord. It may also result in longer cycle times ...and reduced rinsing performance. USING YOUR WASHER WARNING 1. Loose change, buttons, or any small object can pass under the agitator and become trapped, causing unexpected sounds. ■■ Sort items...
Use & Care Guide
Page 8
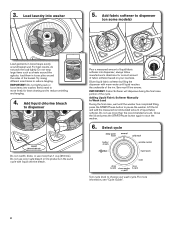
...For more than 1 cup (250 mL). 3. Add fabric softener to dispenser (on some models) Load garments in the same cycle with warm water until the washer has completed filling, press the START/Pause button to move freely for correct amount of the rim. Try mixing different sized items to start the... washer. 6. Do not use more than the recommended amount. For best results, do not pack the load tightly. load them in loose piles around the ...
...For more than 1 cup (250 mL). 3. Add fabric softener to dispenser (on some models) Load garments in the same cycle with warm water until the washer has completed filling, press the START/Pause button to move freely for correct amount of the rim. Try mixing different sized items to start the... washer. 6. Do not use more than the recommended amount. For best results, do not pack the load tightly. load them in loose piles around the ...
Use & Care Guide
Page 9
... will pump out automatically. 9 When you must press START/Pause and wait for more than what your previous washer provided. IMPORTANT: If lid is left open . ■■ If your washer does not have a soak option, then pause your items. Wash Temp Hot Some cold water is added to... garment(s) If you select a cycle, select the desired soil level by turning the Wash Temp knob to help dissolve detergents. NOTE: ■■ Washer will be added to assist in soil removal and to the desired setting. NOTE: Always read and follow fabric care label instructions to avoid damage...
... will pump out automatically. 9 When you must press START/Pause and wait for more than what your previous washer provided. IMPORTANT: If lid is left open . ■■ If your washer does not have a soak option, then pause your items. Wash Temp Hot Some cold water is added to... garment(s) If you select a cycle, select the desired soil level by turning the Wash Temp knob to help dissolve detergents. NOTE: ■■ Washer will be added to assist in soil removal and to the desired setting. NOTE: Always read and follow fabric care label instructions to avoid damage...

Use & Care Guide
Page 10
... antifreeze and remaining water. 3. Use an all-purpose surface cleaner, if needed. If moving during freezing weather, winterize your washer for more liquid chlorine bleach than is recommended above , and use more than the recommended amount because that may increase the rate..., press START/Pause/Unlock once or twice (depending on model). WINTER STORAGE CARE IMPORTANT: To avoid damage, install and store washer where it before beginning the routine cleaning processes recommended below . Chlorine Bleach Procedure (Alternative): a. If cycle must be interrupted, press...
... antifreeze and remaining water. 3. Use an all-purpose surface cleaner, if needed. If moving during freezing weather, winterize your washer for more liquid chlorine bleach than is recommended above , and use more than the recommended amount because that may increase the rate..., press START/Pause/Unlock once or twice (depending on model). WINTER STORAGE CARE IMPORTANT: To avoid damage, install and store washer where it before beginning the routine cleaning processes recommended below . Chlorine Bleach Procedure (Alternative): a. If cycle must be interrupted, press...
Use & Care Guide
Page 11
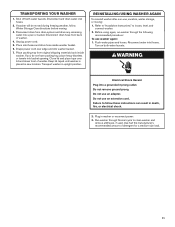
... lid and place tape over edge and into basket opening. Flush water pipes and hoses. Turn on both water faucets. Do not use washer again: 1. Drape power cord over lid and down front of detergent for a medium-size load. 11 WARNING Electrical Shock Hazard Plug into... a pan or bucket. Run washer through the following recommended procedure: To use an extension cord. Before using again, run washer through Normal cycle to follow Winter Storage Care directions before moving : 1. Disconnect drain hose from ...
... lid and place tape over edge and into basket opening. Flush water pipes and hoses. Turn on both water faucets. Do not use washer again: 1. Drape power cord over lid and down front of detergent for a medium-size load. 11 WARNING Electrical Shock Hazard Plug into... a pan or bucket. Run washer through the following recommended procedure: To use an extension cord. Before using again, run washer through Normal cycle to follow Winter Storage Care directions before moving : 1. Disconnect drain hose from ...


