

Installation Guide
Page 2
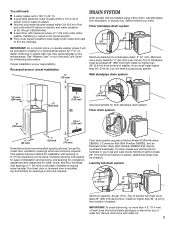
... suppliers) 1" (25 mm) standpipe 2" (51 mm) diameter to improve performance and minimize noise and possible "washer walk". INSTALLATION REQUIREMENTS Tools and Parts Gather required tools and parts before starting installation. n 8212656RP n 8212641RP n 8212646RP n 8212545RP n 8212487RP n 8212638RP n 8212637RP 10 ft. (3.0 m) Inlet hose, Black EPDM ...6 ft. (1.8 m) Inlet hose, Black EPDM, space saving 90° elbow, hypro-blue steel couplings (2 pack) Alternate parts: (Not supplied with flat washers To order, please refer to toll-free phone numbers on back page of your washer in ...
... suppliers) 1" (25 mm) standpipe 2" (51 mm) diameter to improve performance and minimize noise and possible "washer walk". INSTALLATION REQUIREMENTS Tools and Parts Gather required tools and parts before starting installation. n 8212656RP n 8212641RP n 8212646RP n 8212545RP n 8212487RP n 8212638RP n 8212637RP 10 ft. (3.0 m) Inlet hose, Black EPDM ...6 ft. (1.8 m) Inlet hose, Black EPDM, space saving 90° elbow, hypro-blue steel couplings (2 pack) Alternate parts: (Not supplied with flat washers To order, please refer to toll-free phone numbers on back page of your washer in ...
Installation Guide
Page 3
.... (76 L). install no higher than 96" (2.44 m), you need a sump pump system. Floor drain system requires a Siphon Break Kit (Part Number 285834), 2 Connector Kits (Part Number 285835), and an Extension Drain Hose (Part Number 285863) that may be installed using a floor drain, wall standpipe, floor standpipe, or laundry tub. n A grounded electrical outlet located...
.... (76 L). install no higher than 96" (2.44 m), you need a sump pump system. Floor drain system requires a Siphon Break Kit (Part Number 285834), 2 Connector Kits (Part Number 285835), and an Extension Drain Hose (Part Number 285863) that may be installed using a floor drain, wall standpipe, floor standpipe, or laundry tub. n A grounded electrical outlet located...

Installation Guide
Page 5
...Remove tape from washer lid, open lid and remove cardboard packing tray from tub. See "Tools and Parts". 6. do not force excess hose into standpipe (shown in picture) or over side of the ...IMPORTANT: 4.5" (114 mm) of drain hose, slide it over console to allow free access to remove all parts from the black drain port on elbow end of drain hose should be used. 5 3. Place drain hose... in Step 7. If clamp is not already in case you need additional parts with clamp. You may need to free from tub CONNECT DRAIN HOSE 5. NOTE: Keep tray in place...
...Remove tape from washer lid, open lid and remove cardboard packing tray from tub. See "Tools and Parts". 6. do not force excess hose into standpipe (shown in picture) or over side of the ...IMPORTANT: 4.5" (114 mm) of drain hose, slide it over console to allow free access to remove all parts from the black drain port on elbow end of drain hose should be used. 5 3. Place drain hose... in Step 7. If clamp is not already in case you need additional parts with clamp. You may need to free from tub CONNECT DRAIN HOSE 5. NOTE: Keep tray in place...

Installation Guide
Page 6
See "Tools and Parts". Do not use a Y-adapter (not provided). 8. Connect inlet hoses to water faucets Run water for a few seconds through hoses into a laundry tub, drainpipe, or bucket ... water hose to faucets or washer. Use pliers to water faucets with new inlet hoses with second hose for future reference. It will need additional parts with cold water inlet valve. 7. Remove drain hose form (floor drain installations only) 9. CONNECT INLET HOSES Washer must be connected to tighten couplings an additional...
See "Tools and Parts". Do not use a Y-adapter (not provided). 8. Connect inlet hoses to water faucets Run water for a few seconds through hoses into a laundry tub, drainpipe, or bucket ... water hose to faucets or washer. Use pliers to water faucets with new inlet hoses with second hose for future reference. It will need additional parts with cold water inlet valve. 7. Remove drain hose form (floor drain installations only) 9. CONNECT INLET HOSES Washer must be connected to tighten couplings an additional...
Installation Guide
Page 8
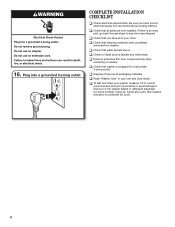
... washer and allow to see what was skipped. Be sure you have correct electrical supply and recommended grounding method. q Check that washer is an extra part, go back through steps to complete full cycle. 8 q Remove protective film from washer. q Check that water faucets are now installed. q Read "Washer Care" in your...
... washer and allow to see what was skipped. Be sure you have correct electrical supply and recommended grounding method. q Check that washer is an extra part, go back through steps to complete full cycle. 8 q Remove protective film from washer. q Check that water faucets are now installed. q Read "Washer Care" in your...
Dimension Guide
Page 2
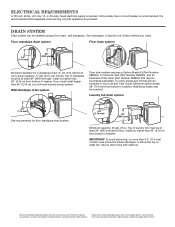
... REQUIREMENTS A 120 volt, 60 Hz., AC only, 15- Wall standpipe drain system Floor drain system requires a Siphon Break Kit (Part Number 285834), 2 Connector Kits (Part Number 285835), and an Extension Drain Hose (Part Number 285863) that a separate circuit serving only this appliance be installed using a floor drain, wall standpipe, floor standpipe, or laundry...
... REQUIREMENTS A 120 volt, 60 Hz., AC only, 15- Wall standpipe drain system Floor drain system requires a Siphon Break Kit (Part Number 285834), 2 Connector Kits (Part Number 285835), and an Extension Drain Hose (Part Number 285863) that a separate circuit serving only this appliance be installed using a floor drain, wall standpipe, floor standpipe, or laundry...

Warranty Information
Page 1
... may have other rights that existed when this major appliance is provided exclusively by unauthorized service, alteration, or modification of non-genuine Maytag parts or accessories. 6. This warranty gives you specific legal rights, and you want a longer or more comprehensive warranty than the representations... -home repair. 12. If you also may not apply to correct defects in accordance with the product, Maytag will pay for factory specified parts for the following information available when you . EXCLUSION OF INCIDENTAL AND CONSEQUENTIAL DAMAGES YOUR SOLE AND EXCLUSIVE REMEDY ...
... may have other rights that existed when this major appliance is provided exclusively by unauthorized service, alteration, or modification of non-genuine Maytag parts or accessories. 6. This warranty gives you specific legal rights, and you want a longer or more comprehensive warranty than the representations... -home repair. 12. If you also may not apply to correct defects in accordance with the product, Maytag will pay for factory specified parts for the following information available when you . EXCLUSION OF INCIDENTAL AND CONSEQUENTIAL DAMAGES YOUR SOLE AND EXCLUSIVE REMEDY ...
Use & Care Guide
Page 16
...these limitations and exclusions may have the following components to : https://www.maytag.com/product_help Maytag Customer eXperience Center In the U.S.A. Repairs to parts or systems to obtain service under these parts that prevent function of merchantability or fitness, so this major appliance and... Discoloration, rust, or oxidation of surfaces resulting from the date of the appliance. 9. The cost of non-genuine Maytag parts or accessories. 6. EXCLUSION OF INCIDENTAL AND CONSEQUENTIAL DAMAGES YOUR SOLE AND EXCLUSIVE REMEDY UNDER THIS LIMITED WARRANTY SHALL BE PRODUCT REPAIR...
...these limitations and exclusions may have the following components to : https://www.maytag.com/product_help Maytag Customer eXperience Center In the U.S.A. Repairs to parts or systems to obtain service under these parts that prevent function of merchantability or fitness, so this major appliance and... Discoloration, rust, or oxidation of surfaces resulting from the date of the appliance. 9. The cost of non-genuine Maytag parts or accessories. 6. EXCLUSION OF INCIDENTAL AND CONSEQUENTIAL DAMAGES YOUR SOLE AND EXCLUSIVE REMEDY UNDER THIS LIMITED WARRANTY SHALL BE PRODUCT REPAIR...


