Use and Care Guide
Page 4
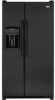
...behind machine compartment cover (located in to assure oil returns to internal parts. • Use an appliance dolly when moving refrigerator. ALWAYS truck refrigerator from its side or back-NEVER from its front. • Protect outside finish. Do not overtighten. Measuring the Opening ...Door and Hinge Removal Some installations require door removal to get refrigerator to allow '/2"space at this temperature. • Refrigerator is completely covered, use dimensions from power source. 2. For ice and water dispensing models only: Remove the left side bracket cover by using the ...
...behind machine compartment cover (located in to assure oil returns to internal parts. • Use an appliance dolly when moving refrigerator. ALWAYS truck refrigerator from its side or back-NEVER from its front. • Protect outside finish. Do not overtighten. Measuring the Opening ...Door and Hinge Removal Some installations require door removal to get refrigerator to allow '/2"space at this temperature. • Refrigerator is completely covered, use dimensions from power source. 2. For ice and water dispensing models only: Remove the left side bracket cover by using the ...
Use and Care Guide
Page 5
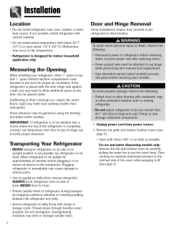
...as a guide for full insertion. • If tube end is damaged, cut off 5/8"before reconnecting. For ice and water dispensing models only: Detach main wire connector harness and red wire harness. Remove top hinge covers by removing Phillips screws. 5. Replacing the Doors ...Firmly push tube 5/8"into the connector. Close doors. 4. Installation Note • For refrigerators in operation, shut off water before reconnecting. • If leaking occurs, reconnect the line. 6. For water dispensing models only: • Do not remove screw connecting green ground wire. 8. IMPORTANT: If ...
...as a guide for full insertion. • If tube end is damaged, cut off 5/8"before reconnecting. For ice and water dispensing models only: Detach main wire connector harness and red wire harness. Remove top hinge covers by removing Phillips screws. 5. Replacing the Doors ...Firmly push tube 5/8"into the connector. Close doors. 4. Installation Note • For refrigerators in operation, shut off water before reconnecting. • If leaking occurs, reconnect the line. 6. For water dispensing models only: • Do not remove screw connecting green ground wire. 8. IMPORTANT: If ...
Use and Care Guide
Page 6
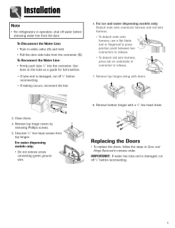
... not overtighten. A 3. Shape tubing slightly. Connect tubing to reach water supply for two to three hours prior to moving the refrigerator to confirm connection is secure. Continue to observe the water supply connection for creation of copper tubing into water valve inlet port. ...hours. so that tubing feeds straight into inlet port. Remove plastic cap from water valve inlet port. Installation Connecting the Water Supply (select models) Materials Needed • '/4" outer diameter flexible copper tubing • Shut-off valve (requires a '/4" hole to be drilled into ...
... not overtighten. A 3. Shape tubing slightly. Connect tubing to reach water supply for two to three hours prior to moving the refrigerator to confirm connection is secure. Continue to observe the water supply connection for creation of copper tubing into water valve inlet port. ...hours. so that tubing feeds straight into inlet port. Remove plastic cap from water valve inlet port. Installation Connecting the Water Supply (select models) Materials Needed • '/4" outer diameter flexible copper tubing • Shut-off valve (requires a '/4" hole to be drilled into ...
Use and Care Guide
Page 7
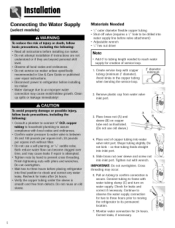
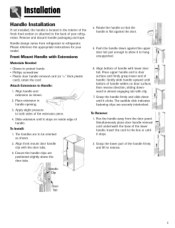
... positioned slightly above the door tabs. 4. Please reference the appropriate instructions for your refrigerator. The handles are to refrigerator. Align bottom of handle settles on inside edge of your model. Press upper handle end to both sides of handle. Apply slight pressure to door... the lower part of the lower handle. Grasp the handle firmly and slide down against the door. 5. Flex the handle from refrigerator to be oriented as shown. / J ......,./._. _' 2. Remove and discard handle packaging and tape. Align handle and extension as shown. 2. To_ 1....
... positioned slightly above the door tabs. 4. Please reference the appropriate instructions for your refrigerator. The handles are to refrigerator. Align bottom of handle settles on inside edge of your model. Press upper handle end to both sides of handle. Apply slight pressure to door... the lower part of the lower handle. Grasp the handle firmly and slide down against the door. 5. Flex the handle from refrigerator to be oriented as shown. / J ......,./._. _' 2. Remove and discard handle packaging and tape. Align handle and extension as shown. 2. To_ 1....

Use and Care Guide
Page 11
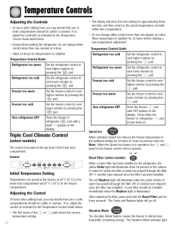
... left or right as indicated in the Temperature Control Guide table below. Temperature Control Guide Refrigerator too warm Turn the refrigerator control to the touch. TemperatuCroentrols Dial Temperature Controls ([select models) The controls are located at the top front of the refrigerator compartment. This is set to OFE Initial Control Settings After plugging the...
... left or right as indicated in the Temperature Control Guide table below. Temperature Control Guide Refrigerator too warm Turn the refrigerator control to the touch. TemperatuCroentrols Dial Temperature Controls ([select models) The controls are located at the top front of the refrigerator compartment. This is set to OFE Initial Control Settings After plugging the...
Use and Care Guide
Page 12
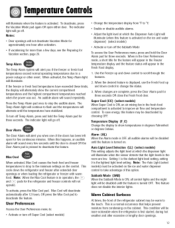
...the volume of water for which the filter is illuminated. Press either the freezer or refrigerator _=.b pad to stabilize for 24 hours before making a new temperature adjustment. Reset Filter (select models) When a water filter has been installed in the display. The Vacation Mode indicator ... the Temperature Control Guide below . • Except when starting the refrigerator, do not change either control more than one or both compartments should be colder or warmer. Triple Cool Climate Control Cselect models:} The control is in the Temperature Control Guide table below . •...
...the volume of water for which the filter is illuminated. Press either the freezer or refrigerator _=.b pad to stabilize for 24 hours before making a new temperature adjustment. Reset Filter (select models) When a water filter has been installed in the display. The Vacation Mode indicator ... the Temperature Control Guide below . • Except when starting the refrigerator, do not change either control more than one or both compartments should be colder or warmer. Triple Cool Climate Control Cselect models:} The control is in the Temperature Control Guide table below . •...
Use and Care Guide
Page 13
... down control to scroll through the features. 2. User Preferences Access the User Preferences menu to the touch. Note: The Auto Light (:select models) must be warm to : • Activate or turn off Super Cool I_selectmodels) • Change the temperature display from condensing on the ice... when the feature is turned OFF. If the freezer or fresh food temperatures have stabilized. Use the Freezer up and down the refrigerator and freezer after activation. • If vacationing for five continuous minutes. This is a normal occurrence that the light levels in ...
... down control to scroll through the features. 2. User Preferences Access the User Preferences menu to the touch. Note: The Auto Light (:select models) must be warm to : • Activate or turn off Super Cool I_selectmodels) • Change the temperature display from condensing on the ice... when the feature is turned OFF. If the freezer or fresh food temperatures have stabilized. Use the Freezer up and down the refrigerator and freezer after activation. • If vacationing for five continuous minutes. This is a normal occurrence that the light levels in ...
Use and Care Guide
Page 14
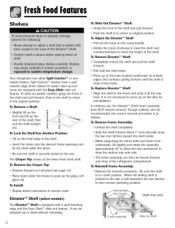
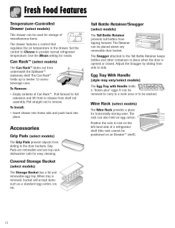
...front of the shelf and pull forward. • Push the shelf in the shelf to return to lower the height of the refrigerator compartment. To slide out (select models), grasp the front of the shelf, then pull the shelf straight out. Lift glass out. Pull until the shelf is pushed...continue pulling forward until the shelf stops. To Remove the Crisper Top: • Remove drawers as the lower fresh food shelf. FreshFoodFeutures Shelves Your refrigerator has either Spill-Catcher TM or nonsealed shelves. To Remove a Shelf: • Slightly tilt up the front and lift up and some are ...
...front of the shelf and pull forward. • Push the shelf in the shelf to return to lower the height of the refrigerator compartment. To slide out (select models), grasp the front of the shelf, then pull the shelf straight out. Lift glass out. Pull until the shelf is pushed...continue pulling forward until the shelf stops. To Remove the Crisper Top: • Remove drawers as the lower fresh food shelf. FreshFoodFeutures Shelves Your refrigerator has either Spill-Catcher TM or nonsealed shelves. To Remove a Shelf: • Slightly tilt up the front and lift up and some are ...

Use and Care Guide
Page 15
... Drawers Humidity-Controlled Crisper Drawers The Crisper Drawers provide a higher humidity environment for spreadable items such as butter and margarine. On select models, this compartment can be moved to several different locations to Another Location: • Remove bucket. • out.Lbifrtacket up front of... stops. To Move Bucket Frame to accommodate storage needs. A fabric-like material, wipe with a clean, damp cloth. * Maytag Automatic Humidity Control system features a unique, patented material called Shape Memory Polymer (SMP) that the hooks are equipped with outer skins.
... Drawers Humidity-Controlled Crisper Drawers The Crisper Drawers provide a higher humidity environment for spreadable items such as butter and margarine. On select models, this compartment can be moved to several different locations to Another Location: • Remove bucket. • out.Lbifrtacket up front of... stops. To Move Bucket Frame to accommodate storage needs. A fabric-like material, wipe with a clean, damp cloth. * Maytag Automatic Humidity Control system features a unique, patented material called Shape Memory Polymer (SMP) that the hooks are equipped with outer skins.
Use and Care Guide
Page 16
... contents of miscellaneous items. The drawer features a control that regulates the air temperature in the drawer. Pull straight out to provide normal refrigerator temperature. Accessories Grip Pads (select models) The Grip Pads prevent objects from sliding in place when the door is removed, bucket will accept items such as a standard egg carton...
... contents of miscellaneous items. The drawer features a control that regulates the air temperature in the drawer. Pull straight out to provide normal refrigerator temperature. Accessories Grip Pads (select models) The Grip Pads prevent objects from sliding in place when the door is removed, bucket will accept items such as a standard egg carton...
Use and Care Guide
Page 17
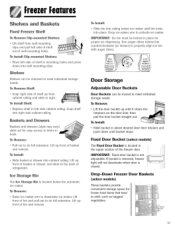
... in place for frozen food items that tend to deactivate ice maker. IMPORTANT: Fixed door bucket is closed. Lift up front of refrigerator. Ice Storage Bin The [co Storage Bin is located in left side cabinet railing. Lift up front of shelf in mounting holes and... to its full extension. IMPORTANT: Ice bin must be moved to meet individual storage needs. Drop-Down Freezer Door Baskets (select models) These baskets provide convenient storage space for proper ice dispensing. Door Storage Adjustable Door Buckets Door Buckets can be removed to meet individual...
... in place for frozen food items that tend to deactivate ice maker. IMPORTANT: Fixed door bucket is closed. Lift up front of refrigerator. Ice Storage Bin The [co Storage Bin is located in left side cabinet railing. Lift up front of shelf in mounting holes and... to its full extension. IMPORTANT: Ice bin must be moved to meet individual storage needs. Drop-Down Freezer Door Baskets (select models) These baskets provide convenient storage space for proper ice dispensing. Door Storage Adjustable Door Buckets Door Buckets can be removed to meet individual...
Use and Care Guide
Page 18
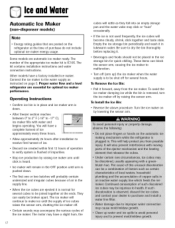
...the Ice Bin: • Pull it . Turn the ice maker on by raising the sensor arm. Other models have a complete harvest of ice approximately every three hours. • Allow approximately 24 hours after installation to ... is IC10S. Beverages and foods should not be shut off for optimal ice maker performance. Some models are automatic ice maker ready. The number of ice cubes raises the sensor arm, shutting the ... and taste stale. Iceu,d Wuter Automatic Ice Maker Cnon-dispenser models) Note • Energy rating guides that are posted on the refrigerator at the ends.
...the Ice Bin: • Pull it . Turn the ice maker on by raising the sensor arm. Other models have a complete harvest of ice approximately every three hours. • Allow approximately 24 hours after installation to ... is IC10S. Beverages and foods should not be shut off for optimal ice maker performance. Some models are automatic ice maker ready. The number of ice cubes raises the sensor arm, shutting the ... and taste stale. Iceu,d Wuter Automatic Ice Maker Cnon-dispenser models) Note • Energy rating guides that are posted on the refrigerator at the ends.
Use and Care Guide
Page 19
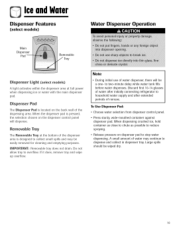
...selection chosen on the dispenser control panel will be a one- Iceu,d Wuter Dispenser Features (select models) Water Dispenser Operation Main Dispenser Pad Removable Tray Dispenser Light (seJect models) A light activates within the dispenser area at the bottom of the dispenser area is designed to ...when dispensing ice or water with the main dispenser pad. Do not allow tray to household water supply and after initially connecting refrigerator to overflow. UMPORTANT: Removable tray does not drain. Discard first 10-14 glasses of water after extended periods of nonuse. Press...
...selection chosen on the dispenser control panel will be a one- Iceu,d Wuter Dispenser Features (select models) Water Dispenser Operation Main Dispenser Pad Removable Tray Dispenser Light (seJect models) A light activates within the dispenser area at the bottom of the dispenser area is designed to ...when dispensing ice or water with the main dispenser pad. Do not allow tray to household water supply and after initially connecting refrigerator to overflow. UMPORTANT: Removable tray does not drain. Discard first 10-14 glasses of water after extended periods of nonuse. Press...
Use and Care Guide
Page 20
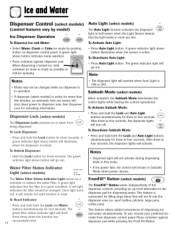
... Lock for three seconds. A green indicator light above button illuminates when the sensor is ON or OFF. FrontFill TM Button (select models) The FrontFill TM Button works independently of dispensing ice and water simultaneously. sport bottles, pitchers, large pans, coffee pots). A green...8226; The dispenser light will remain red until function is active for four seconds. I©eo,dWmer Dispenser Control (select models) Auto Light (select models) (control features vary by pushing button on • Press container against dispenser pad while pressing the Front Fill Button....
... Lock for three seconds. A green indicator light above button illuminates when the sensor is ON or OFF. FrontFill TM Button (select models) The FrontFill TM Button works independently of dispensing ice and water simultaneously. sport bottles, pitchers, large pans, coffee pots). A green...8226; The dispenser light will remain red until function is active for four seconds. I©eo,dWmer Dispenser Control (select models) Auto Light (select models) (control features vary by pushing button on • Press container against dispenser pad while pressing the Front Fill Button....

Use and Care Guide
Page 21
... of poor quality, replacement may be required in some households where water is of poor quality. 2O WateFr ilter Water Filter Removal and Installation ([select models) Replacing Water Filter IMPORTANT: Air trapped in system may be used determines life span of water filter cartridge. Rotate gently clockwise until water runs steady...
... of poor quality, replacement may be required in some households where water is of poor quality. 2O WateFr ilter Water Filter Removal and Installation ([select models) Replacing Water Filter IMPORTANT: Air trapped in system may be used determines life span of water filter cartridge. Rotate gently clockwise until water runs steady...
Use and Care Guide
Page 22
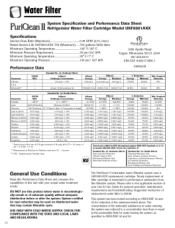
...009 mg/L 0.014 mg/L 0.081 mg/L 0.208 mg/L 0.002 mg/L 0.015 mg/L Effluent Average 0.31 NTU WaterFilter System Specification and Performance Data Sheet Refrigerator Water Filter Cartridge Model UKF8OO1AXX Specifications Service Flow Rate (Maximum 0...78 GPM (2.9 L/min) Rated Service Life UKF8001AXX-750 (Maximum) ......750 gallons/2838 liters Maximum Operating Temperature 1..00&#... Chlorine T&O Particulate ** USEPA MCL Standard No. 42: Aesthetic Effects Influent Challenge Concentration 2.0 mg/L ± 10% Influent Average 1.88 mg/L Effluent Average Maximum 97.26% 96.84% Min.
...009 mg/L 0.014 mg/L 0.081 mg/L 0.208 mg/L 0.002 mg/L 0.015 mg/L Effluent Average 0.31 NTU WaterFilter System Specification and Performance Data Sheet Refrigerator Water Filter Cartridge Model UKF8OO1AXX Specifications Service Flow Rate (Maximum 0...78 GPM (2.9 L/min) Rated Service Life UKF8001AXX-750 (Maximum) ......750 gallons/2838 liters Maximum Operating Temperature 1..00&#... Chlorine T&O Particulate ** USEPA MCL Standard No. 42: Aesthetic Effects Influent Challenge Concentration 2.0 mg/L ± 10% Influent Average 1.88 mg/L Effluent Average Maximum 97.26% 96.84% Min.
Use and Care Guide
Page 23
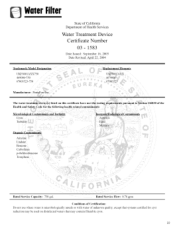
Apri ! 22_ 2004 RenlacementElements UKF8001AXX 46 9006 67003523 Manufacturer: PmltaPure Inc. WaterFilter Trademark/Model Designation UKFS001AXX750 469006-750 67003523-750 State of California Department of the Health and Safety Code for cyst reduction may contain filterable cysts. 22 Rated ...
Apri ! 22_ 2004 RenlacementElements UKF8001AXX 46 9006 67003523 Manufacturer: PmltaPure Inc. WaterFilter Trademark/Model Designation UKFS001AXX750 469006-750 67003523-750 State of California Department of the Health and Safety Code for cyst reduction may contain filterable cysts. 22 Rated ...
Use and Care Guide
Page 27
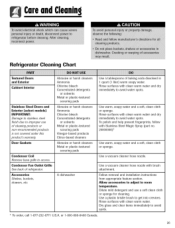
... a soft, clean cloth or sponge. Dry glass and clear items immediately to avoid water spots. or 1-800-688-8408 Canada. 26 Rinse surfaces with clean warm water. Use a vacuum cleaner hose nozzle. To polish and help prevent fingerprints, follow with brush attachment....tablespoons of cleaning products or non-recommended products is not covered under this products warranty. andCleanin9 Refrigerator Cleaning Chart Textured Doors and Exterior Cabinet Interior Stainless Steel Doors and Exterior [select models) I M PORTANT: Damage to stainless steel finish due to improper use a soft clean ...
... a soft, clean cloth or sponge. Dry glass and clear items immediately to avoid water spots. or 1-800-688-8408 Canada. 26 Rinse surfaces with clean warm water. Use a vacuum cleaner hose nozzle. To polish and help prevent fingerprints, follow with brush attachment....tablespoons of cleaning products or non-recommended products is not covered under this products warranty. andCleanin9 Refrigerator Cleaning Chart Textured Doors and Exterior Cabinet Interior Stainless Steel Doors and Exterior [select models) I M PORTANT: Damage to stainless steel finish due to improper use a soft clean ...
Use and Care Guide
Page 30
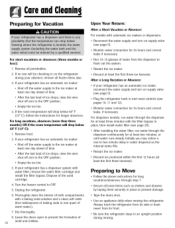
...then install water filter (see page 20). For dispenser models, run water through the dispenser continuously for 24 hours and correct leaks if necessary. • Run 10-15 glasses of water from its front. • Be sure the refrigerator stays in place to Move • Follow the above... the last load of both compartments with automatic ice makers or dispensers: • Reconnect the water supply and turn on the refrigerator during moving the refrigerator. Initially you may notice a one to two minute delay in water dispersal as shelves and drawers by taping them securely in an...
...then install water filter (see page 20). For dispenser models, run water through the dispenser continuously for 24 hours and correct leaks if necessary. • Run 10-15 glasses of water from its front. • Be sure the refrigerator stays in place to Move • Follow the above... the last load of both compartments with automatic ice makers or dispensers: • Reconnect the water supply and turn on the refrigerator during moving the refrigerator. Initially you may notice a one to two minute delay in water dispersal as shelves and drawers by taping them securely in an...
Use and Care Guide
Page 31
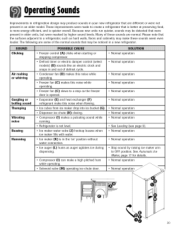
... this noise while operating. • Freezer fan (C) slows to a stop as the freezer door is opened. • Evaporator (E) and heat exchanger (F) refrigerant make this noise when flowing. • Ice cubes from ice maker drop into ice bucket (G). • Dispenser ice chute (H) closing. • Compressor ...these sounds are different or were not present in an older model. These improvements were made to create a refrigerator that are normal. Because new units run quieter, sounds may produce sounds in your new refrigerator that is better at preserving food, is more energy efficient,...
... this noise while operating. • Freezer fan (C) slows to a stop as the freezer door is opened. • Evaporator (E) and heat exchanger (F) refrigerant make this noise when flowing. • Ice cubes from ice maker drop into ice bucket (G). • Dispenser ice chute (H) closing. • Compressor ...these sounds are different or were not present in an older model. These improvements were made to create a refrigerator that are normal. Because new units run quieter, sounds may produce sounds in your new refrigerator that is better at preserving food, is more energy efficient,...

