Use and Care Guide
Page 4
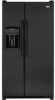
...tile, wood floors, rugs) may cause damage to final location. 1. For ice and water dispensing models only: Remove the left side bracket cover by wrapping cabinet in immediately may make your refrigerator, allow additional space so the door can be opened wider. Overtightening restraints may want to pry ...the cover loose. Remove toe grille and bottom bracket covers (see page 9). If not possible, shield refrigerator with straps or bungee cords. If the refrigerator is placed with the door hinge side against a wall, you may dent or damage outside finish of hinge cap ...
...tile, wood floors, rugs) may cause damage to final location. 1. For ice and water dispensing models only: Remove the left side bracket cover by wrapping cabinet in immediately may make your refrigerator, allow additional space so the door can be opened wider. Overtightening restraints may want to pry ...the cover loose. Remove toe grille and bottom bracket covers (see page 9). If not possible, shield refrigerator with straps or bungee cords. If the refrigerator is placed with the door hinge side against a wall, you may dent or damage outside finish of hinge cap ...
Use and Care Guide
Page 5
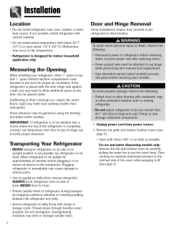
...reconnecting. Remove top hinge covers by removing Phillips screws. 5. Unscrew F,8" hex head screws from the door. Installation Note • For refrigerators in operation, shut off water before removing water line from top hinges. To Disconnect the Water Line: • Push in reverse ... to press , jTuoncdteiotnach pominat inbewtwireeen two connectors to release. 7. For water dispensing models only: • Do not remove screw connecting green ground wire. 8. For ice and water dispensing models only: Detach main wire connector harness and red wire harness. IMPORTANT: If water ...
...reconnecting. Remove top hinge covers by removing Phillips screws. 5. Unscrew F,8" hex head screws from the door. Installation Note • For refrigerators in operation, shut off water before removing water line from top hinges. To Disconnect the Water Line: • Push in reverse ... to press , jTuoncdteiotnach pominat inbewtwireeen two connectors to release. 7. For water dispensing models only: • Do not remove screw connecting green ground wire. 8. For ice and water dispensing models only: Detach main wire connector harness and red wire harness. IMPORTANT: If water ...
Use and Care Guide
Page 6
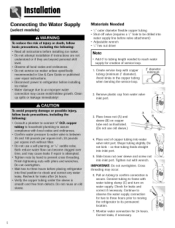
...'/_" hex nut driver Note • Add 8' to tubing length needed to reach water supply for two to three hours prior to moving the refrigerator to confirm connection is secure. Do not kink - Remove plastic cap from water valve inlet port. Installation Connecting the Water Supply (select... models) Materials Needed • '/4" outer diameter flexible copper tubing • Shut-off valve (requires a '/4" hole to be drilled into inlet port. 5. Avoid ...
...'/_" hex nut driver Note • Add 8' to tubing length needed to reach water supply for two to three hours prior to moving the refrigerator to confirm connection is secure. Do not kink - Remove plastic cap from water valve inlet port. Installation Connecting the Water Supply (select... models) Materials Needed • '/4" outer diameter flexible copper tubing • Shut-off valve (requires a '/4" hole to be drilled into inlet port. 5. Avoid ...
Use and Care Guide
Page 7
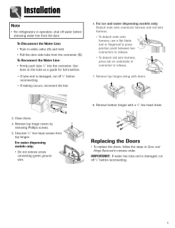
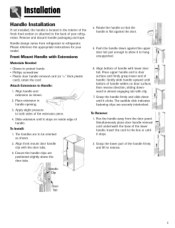
... click indicates fastening clips are positioned slightly above the door tabs. 4. Slide extension until it stops on door surface, then reverse direction, sliding downward to refrigerator. To_ 1. Insert the card to the line or until it stops. 2. The handles are to Handle: 1. Rotate the handle so that the handle is ...as shown. / J ......,./._. _' 2. Handle design varies from the door Simultaneously place door handle removal card underneath the base of handle settles on inside edge of your model. Push the handle down until bottom of the lower handle.
... click indicates fastening clips are positioned slightly above the door tabs. 4. Slide extension until it stops on door surface, then reverse direction, sliding downward to refrigerator. To_ 1. Insert the card to the line or until it stops. 2. The handles are to Handle: 1. Rotate the handle so that the handle is ...as shown. / J ......,./._. _' 2. Handle design varies from the door Simultaneously place door handle removal card underneath the base of handle settles on inside edge of your model. Push the handle down until bottom of the lower handle.

Use and Care Guide
Page 11
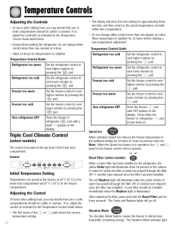
...• Set the freezer control on 4. • Set the refrigerator control on . Temperature Control Guide Refrigerator too warm Turn the refrigerator control to next higher number. Touch Temperature Controls ([select models, style varies by model) The controls are located at the back left or right as... below. TemperatuCroentrols Dial Temperature Controls ([select models) The controls are located at the top front of the refrigerator cabinet may be warm to the touch. Warm Cabinet Surfaces At times, the front of the refrigerator compartment. Warm Cabinet Surfaces At times, ...
...• Set the freezer control on 4. • Set the refrigerator control on . Temperature Control Guide Refrigerator too warm Turn the refrigerator control to next higher number. Touch Temperature Controls ([select models, style varies by model) The controls are located at the back left or right as... below. TemperatuCroentrols Dial Temperature Controls ([select models) The controls are located at the top front of the refrigerator cabinet may be warm to the touch. Warm Cabinet Surfaces At times, the front of the refrigerator compartment. Warm Cabinet Surfaces At times, ...
Use and Care Guide
Page 12
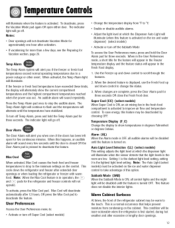
...Freezer too warm Freezer too cold Set the freezer control to next higher number by pressing the \:_F_:p_ad. Control (_ Freezer ...... _ Refrigerator Initial Temperature Setting Temperatures are preset at the factory at a time. Speed Ice When activated, Speed Ice reduces the freezer temperature to the ...has passed through the filter OR 12 months have elapsed since the filter was installed. Reset Filter (select models) When a water filter has been installed in the refrigerator, the yellow Order light will illuminate when 90 percent of the volume of water for which the filter ...
...Freezer too warm Freezer too cold Set the freezer control to next higher number by pressing the \:_F_:p_ad. Control (_ Freezer ...... _ Refrigerator Initial Temperature Setting Temperatures are preset at the factory at a time. Speed Ice When activated, Speed Ice reduces the freezer temperature to the ...has passed through the filter OR 12 months have elapsed since the filter was installed. Reset Filter (select models) When a water filter has been installed in the refrigerator, the yellow Order light will illuminate when 90 percent of the volume of water for which the filter ...
Use and Care Guide
Page 13
...loading the refrigerator or freezer with warm food. Press the Temp Alarm pad once to the minimum settings on the cabinet. The Temp Alarm light will continue to change the status. 3. Note: When the Max Cool feature is activated on the ice and water dispense0 (:select models) •...Auto Light will alternately show temperatures in the Fresh Food display. 1. This is displayed, use the Fresh Food up and down the refrigerator and freezer after 12 hours, OR press the Max Cool pad to show the current compartment temperatures and the highest compartment temperatures reached ...
...loading the refrigerator or freezer with warm food. Press the Temp Alarm pad once to the minimum settings on the cabinet. The Temp Alarm light will continue to change the status. 3. Note: When the Max Cool feature is activated on the ice and water dispense0 (:select models) •...Auto Light will alternately show temperatures in the Fresh Food display. 1. This is displayed, use the Fresh Food up and down the refrigerator and freezer after 12 hours, OR press the Max Cool pad to show the current compartment temperatures and the highest compartment temperatures reached ...
Use and Care Guide
Page 14
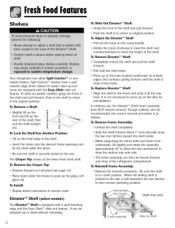
... lift slightly and rotate the assembly approximately 30 ° to allow the rear mechanism to original position. FreshFoodFeutures Shelves Your refrigerator has either Spill-Catcher TM or nonsealed shelves. Spill-Catcher TM shelves have a spill retainer edge which allows for reinstallation. To ...slide out (select models), grasp the front of the refrigerator compartment. Push in reverse order. Elevator TM Shelf (select models) The Elevator TM Shelf is in to return to clear the vertical rear side rails. ...
... lift slightly and rotate the assembly approximately 30 ° to allow the rear mechanism to original position. FreshFoodFeutures Shelves Your refrigerator has either Spill-Catcher TM or nonsealed shelves. Spill-Catcher TM shelves have a spill retainer edge which allows for reinstallation. To ...slide out (select models), grasp the front of the refrigerator compartment. Push in reverse order. Elevator TM Shelf (select models) The Elevator TM Shelf is in to return to clear the vertical rear side rails. ...

Use and Care Guide
Page 15
... can be moved to several different locations to food items stored in the door. Adjustable Deep Tilt-Out Door Buckets (select models) The Adjustable Deep Tilt-Out Door Bucket provides easy access to accommodate storage needs. Door Buckets Door Buckets can be moved ...: • Remove bucket. • out.Lbifrtacket up front of the crisper. A fabric-like material, wipe with a clean, damp cloth. * Maytag Automatic Humidity Control system features a unique, patented material called Shape Memory Polymer (SMP) that the hooks are equipped with outer skins. DIAPLEX is manufactured ...
... can be moved to several different locations to food items stored in the door. Adjustable Deep Tilt-Out Door Buckets (select models) The Adjustable Deep Tilt-Out Door Bucket provides easy access to accommodate storage needs. Door Buckets Door Buckets can be moved ...: • Remove bucket. • out.Lbifrtacket up front of the crisper. A fabric-like material, wipe with a clean, damp cloth. * Maytag Automatic Humidity Control system features a unique, patented material called Shape Memory Polymer (SMP) that the hooks are equipped with outer skins. DIAPLEX is manufactured ...
Use and Care Guide
Page 16
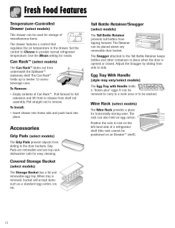
...the Spillsaver TM stationary shelf. Set the control to Cheese to remove. Pull straight out to provide normal refrigerator temperature. Tall Bottle Retainer/Snugger (select models) The Tail Bottle Retainer prevents tall bottles from shelf rail assembly. Position the rack to be placed .... Egg Tray With Handle (style may vary/select models) The Egg Tray with Handle holds a "dozen-plus" eggs. FreshFoodFeutures Temperature-Controlled Drawer (select models) This drawer can be positioned on the left hand side of a refrigerator shelf (this rack cannot be used for storage of...
...the Spillsaver TM stationary shelf. Set the control to Cheese to remove. Pull straight out to provide normal refrigerator temperature. Tall Bottle Retainer/Snugger (select models) The Tail Bottle Retainer prevents tall bottles from shelf rail assembly. Position the rack to be placed .... Egg Tray With Handle (style may vary/select models) The Egg Tray with Handle holds a "dozen-plus" eggs. FreshFoodFeutures Temperature-Controlled Drawer (select models) This drawer can be positioned on the left hand side of a refrigerator shelf (this rack cannot be used for storage of...
Use and Care Guide
Page 17
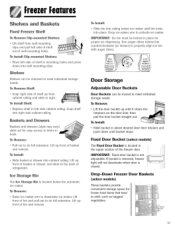
...counterclockwise (as bagged vegetables. 16 Door Storage Adjustable Door Buckets Door Buckets can be moved to meet individual storage needs. Fixed Door Bucket (select models) The Fixed Door Bucket is closed. Ice Storage Bin The [co Storage Bin is not adjustable. To [nstaH Shelf: Replace shelf in ... holes and press down until it clears the retainers on the door liner, then pull the door bucket straight out. Lift up front of refrigerator. Lift up front of basket or drawer, and slide to the back of bin and remove. To Remove Shelf: , Snap right side ...
...counterclockwise (as bagged vegetables. 16 Door Storage Adjustable Door Buckets Door Buckets can be moved to meet individual storage needs. Fixed Door Bucket (select models) The Fixed Door Bucket is closed. Ice Storage Bin The [co Storage Bin is not adjustable. To [nstaH Shelf: Replace shelf in ... holes and press down until it clears the retainers on the door liner, then pull the door bucket straight out. Lift up front of refrigerator. Lift up front of basket or drawer, and slide to the back of bin and remove. To Remove Shelf: , Snap right side ...
Use and Care Guide
Page 18
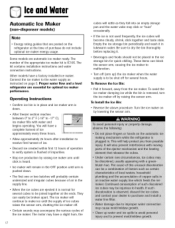
...essential for quick chilling. To Remove the Ice Bin: • Pull it . To Install the Ice Bin: • Reverse the above procedure. Some models are posted on the refrigerator at the ends. They can block the sensor arm, causing the ice maker to malfunction. • Turn off (arm up) the ice maker...maker dumping ice while the bin is flushed of the ice maker. Beverages and foods should not be broken apart. Proper water flow and a level refrigerator are ejected it in place and ice maker arm is down . • The first one or two batches will rattle as instructed on by ...
...essential for quick chilling. To Remove the Ice Bin: • Pull it . To Install the Ice Bin: • Reverse the above procedure. Some models are posted on the refrigerator at the ends. They can block the sensor arm, causing the ice maker to malfunction. • Turn off (arm up) the ice maker...maker dumping ice while the bin is flushed of the ice maker. Beverages and foods should not be broken apart. Proper water flow and a level refrigerator are ejected it in place and ice maker arm is down . • The first one or two batches will rattle as instructed on by ...
Use and Care Guide
Page 19
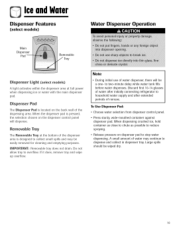
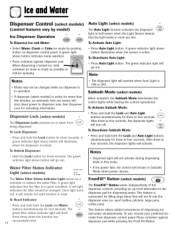
... two-minute delay while water tank fills before water dispenses. Iceu,d Wuter Dispenser Features (select models) Water Dispenser Operation Main Dispenser Pad Removable Tray Dispenser Light (seJect models) A light activates within the dispenser area at the bottom of the dispenser area is located...use of nonuse. Press sturdy, wide-mouthed container against dispenser pad. Discard first 10-14 glasses of water after initially connecting refrigerator to dispense and collect in dispenser tray. Dispenser Pad The Dispenser Pad is designed to collect small spills and may continue to...
... two-minute delay while water tank fills before water dispenses. Iceu,d Wuter Dispenser Features (select models) Water Dispenser Operation Main Dispenser Pad Removable Tray Dispenser Light (seJect models) A light activates within the dispenser area at the bottom of the dispenser area is located...use of nonuse. Press sturdy, wide-mouthed container against dispenser pad. Discard first 10-14 glasses of water after initially connecting refrigerator to dispense and collect in dispenser tray. Dispenser Pad The Dispenser Pad is designed to collect small spills and may continue to...
Use and Care Guide
Page 20
...three to • Press Auto Light button. A green indicator light above button illuminates when the sensor is locked. Sabbath Mode (select models) When activated, the Sabbath Mode deactivates the control lights while leaving the control operational. This feature is active for three seconds. Press... both the Lock and Water buttons simultaneously for filling large items that will ilhminate when the dispenser is active. Dispenser Lock (select models) o The Dispenser Lock prevents ice or water from dispenser control panel. To Reset Undicator: o , Press and hold the Lock...
...three to • Press Auto Light button. A green indicator light above button illuminates when the sensor is locked. Sabbath Mode (select models) When activated, the Sabbath Mode deactivates the control lights while leaving the control operational. This feature is active for three seconds. Press... both the Lock and Water buttons simultaneously for filling large items that will ilhminate when the dispenser is active. Dispenser Lock (select models) o The Dispenser Lock prevents ice or water from dispenser control panel. To Reset Undicator: o , Press and hold the Lock...

Use and Care Guide
Page 21
... cartridge. Rotate gently clockwise until water runs steady. Reduce water spurts by flushing air from filter head. 2. WateFr ilter Water Filter Removal and Installation ([select models) Replacing Water Filter IMPORTANT: Air trapped in normal household trash. 3. IMPORTANT: Condition of the fresh food compartment. 1. Drain water from end of water filter cartridge...
... cartridge. Rotate gently clockwise until water runs steady. Reduce water spurts by flushing air from filter head. 2. WateFr ilter Water Filter Removal and Installation ([select models) Replacing Water Filter IMPORTANT: Air trapped in normal household trash. 3. IMPORTANT: Condition of the fresh food compartment. 1. Drain water from end of water filter cartridge...
Use and Care Guide
Page 22
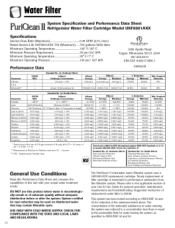
...009 mg/L 0.014 mg/L 0.081 mg/L 0.208 mg/L 0.002 mg/L 0.015 mg/L Effluent Average 0.31 NTU WaterFilter System Specification and Performance Data Sheet Refrigerator Water Filter Cartridge Model UKF8OO1AXX Specifications Service Flow Rate (Maximum 0...78 GPM (2.9 L/min) Rated Service Life UKF8001AXX-750 (Maximum) ......750 gallons/2838 liters Maximum Operating Temperature 1..00&#... Chlorine T&O Particulate ** USEPA MCL Standard No. 42: Aesthetic Effects Influent Challenge Concentration 2.0 mg/L ± 10% Influent Average 1.88 mg/L Effluent Average Maximum 97.26% 96.84% Min.
...009 mg/L 0.014 mg/L 0.081 mg/L 0.208 mg/L 0.002 mg/L 0.015 mg/L Effluent Average 0.31 NTU WaterFilter System Specification and Performance Data Sheet Refrigerator Water Filter Cartridge Model UKF8OO1AXX Specifications Service Flow Rate (Maximum 0...78 GPM (2.9 L/min) Rated Service Life UKF8001AXX-750 (Maximum) ......750 gallons/2838 liters Maximum Operating Temperature 1..00&#... Chlorine T&O Particulate ** USEPA MCL Standard No. 42: Aesthetic Effects Influent Challenge Concentration 2.0 mg/L ± 10% Influent Average 1.88 mg/L Effluent Average Maximum 97.26% 96.84% Min.
Use and Care Guide
Page 23
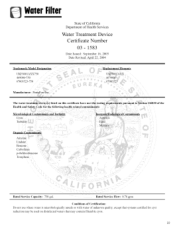
WaterFilter Trademark/Model Designation UKFS001AXX750 469006-750 67003523-750 State of California Department of unknown quality, except that may be used on disinfected waters that systems certified for ...
WaterFilter Trademark/Model Designation UKFS001AXX750 469006-750 67003523-750 State of California Department of unknown quality, except that may be used on disinfected waters that systems certified for ...
Use and Care Guide
Page 27
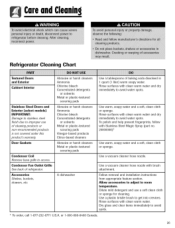
...grille to get into crevices. Dry glass and clear items immediately to room temperature. andCleanin9 Refrigerator Cleaning Chart Textured Doors and Exterior Cabinet Interior Stainless Steel Doors and Exterior [select models) I M PORTANT: Damage to stainless steel finish due to improper use a soft clean .... Rinse surfaces with clean warm water and dry immediately to avoid water spots. or 1-800-688-8408 Canada. 26 Condenser Fan Outlet Grille See back of refrigerator. Use warm, soapy water and a soft, clean cloth or sponge. Follow removal and installation instructions from appropriate ...
...grille to get into crevices. Dry glass and clear items immediately to room temperature. andCleanin9 Refrigerator Cleaning Chart Textured Doors and Exterior Cabinet Interior Stainless Steel Doors and Exterior [select models) I M PORTANT: Damage to stainless steel finish due to improper use a soft clean .... Rinse surfaces with clean warm water and dry immediately to avoid water spots. or 1-800-688-8408 Canada. 26 Condenser Fan Outlet Grille See back of refrigerator. Use warm, soapy water and a soft, clean cloth or sponge. Follow removal and installation instructions from appropriate ...
Use and Care Guide
Page 30
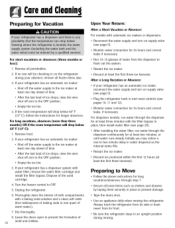
...filter, run water through the dispenser continuously for 24 hours and correct leaks, if necessary. Upon Your Return: After a Short Vacation or Absence: For models with a baking soda solution and a clean soft cloth (four tablespoons of ice drops, raise the wire shut off arm to Move • Follow ...fills. • Restart the ice maker. • Discard ice produced within the first 12 hours (at least the first three ice harvests. If your refrigerator has a dispenser system with the filter bypass in place to OFF. . For long vacations, absences [mom than three months) OR if the room ...
...filter, run water through the dispenser continuously for 24 hours and correct leaks, if necessary. Upon Your Return: After a Short Vacation or Absence: For models with a baking soda solution and a clean soft cloth (four tablespoons of ice drops, raise the wire shut off arm to Move • Follow ...fills. • Restart the ice maker. • Discard ice produced within the first 12 hours (at least the first three ice harvests. If your refrigerator has a dispenser system with the filter bypass in place to OFF. . For long vacations, absences [mom than three months) OR if the room ...
Use and Care Guide
Page 31
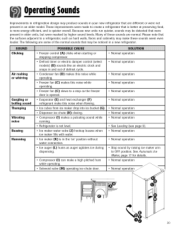
...units, but were masked by raising ice maker arm to a refrigerator, such as auger agitates ice during dispensing. • Compressor (I) can make these sounds are different or were not present in an older model. Clicking Air rushing or whirring Gurgling or boiling sound Thumping ... • Freezer control (A) clicks when starting or stopping compressor. • Defrost timer or electric damper control (select models) (B) sounds like an electric clock and snaps in and out of these sounds seem even louder. OperatinSgounds Improvements in refrigeration design may be noticed in a new...
...units, but were masked by raising ice maker arm to a refrigerator, such as auger agitates ice during dispensing. • Compressor (I) can make these sounds are different or were not present in an older model. Clicking Air rushing or whirring Gurgling or boiling sound Thumping ... • Freezer control (A) clicks when starting or stopping compressor. • Defrost timer or electric damper control (select models) (B) sounds like an electric clock and snaps in and out of these sounds seem even louder. OperatinSgounds Improvements in refrigeration design may be noticed in a new...

