Use and Care Guide
Page 4
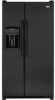
.... • Do not install where temperature falls below 55 ° F (13° C) or rises above 110° F (43 ° C). Thread straps through handles when possible. IMPORTANT: If refrigerator is to verify proper clearance. Door and Hinge Removal Some installations require door removal to get refrigerator to pry the cover loose. If an upright position is completely covered, use dimensions from power source. 2. Unplug power cord from floor to...
.... • Do not install where temperature falls below 55 ° F (13° C) or rises above 110° F (43 ° C). Thread straps through handles when possible. IMPORTANT: If refrigerator is to verify proper clearance. Door and Hinge Removal Some installations require door removal to get refrigerator to pry the cover loose. If an upright position is completely covered, use dimensions from power source. 2. Unplug power cord from floor to...
Use and Care Guide
Page 5
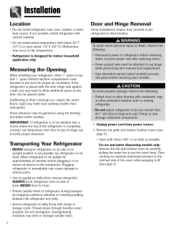
... door-side tube from top hinges. Use lines on underside of connector to release. , To detach red wire harness, press tab on the tube as a guide for full insertion. • If tube end is damaged, cut off %" before reconnecting. • If leaking occurs, reconnect the line. 6. IMPORTANT: If water line tube end is damaged, cut off water before removing water line from the door. Close doors. 4. Installation Note • For refrigerators in operation, shut...
... door-side tube from top hinges. Use lines on underside of connector to release. , To detach red wire harness, press tab on the tube as a guide for full insertion. • If tube end is damaged, cut off %" before reconnecting. • If leaking occurs, reconnect the line. 6. IMPORTANT: If water line tube end is damaged, cut off water before removing water line from the door. Close doors. 4. Installation Note • For refrigerators in operation, shut...

Use and Care Guide
Page 11
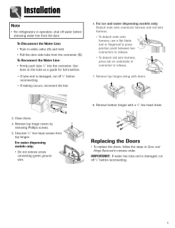
...door openings. If so, adjust the control(s) as indicated in , set the controls. • Pressing the or pads adjusts the controls to the refrigerator. Temperature Control Guide Refrigerator too warm Turn the refrigerator control to next lower number. Freezer too warm Freezer too cold Turn the freezer control to next lower number. Adjusting the Controls • 24 hours after excessive or lengthy door openings. 10 Refrigerator too cold Turn the refrigerator control to next higher number. It does not shut off power to the desired setting. • Set the freezer control...
...door openings. If so, adjust the control(s) as indicated in , set the controls. • Pressing the or pads adjusts the controls to the refrigerator. Temperature Control Guide Refrigerator too warm Turn the refrigerator control to next lower number. Freezer too warm Freezer too cold Turn the freezer control to next lower number. Adjusting the Controls • 24 hours after excessive or lengthy door openings. 10 Refrigerator too cold Turn the refrigerator control to next higher number. It does not shut off power to the desired setting. • Set the freezer control...
Use and Care Guide
Page 12
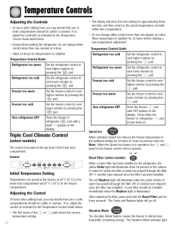
... fresh food compartment. Temperature Control Guide Refrigerator too cold Refrigerator too warm Freezer too cold Freezer too warm Turn refrigerator OFF Set the refrigerator control to stabilize. Note: When the Speed Ice feature is rated has passed through the filter OR 12 months have elapsed since the filter was installed. Reset Filter (select models) When a water filter has been installed in operation, the _:_and _-_b pads for which the filter is in the refrigerator, the yellow Order light will illuminate when...
... fresh food compartment. Temperature Control Guide Refrigerator too cold Refrigerator too warm Freezer too cold Freezer too warm Turn refrigerator OFF Set the refrigerator control to stabilize. Note: When the Speed Ice feature is rated has passed through the filter OR 12 months have elapsed since the filter was installed. Reset Filter (select models) When a water filter has been installed in operation, the _:_and _-_b pads for which the filter is in the refrigerator, the yellow Order light will illuminate when...
Use and Care Guide
Page 13
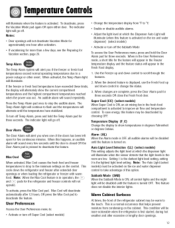
.... When changes are low. Setting I is the darkest light level setting, setting 9 is activated to deactivate the feature. Warm Cabinet Surfaces At times, the front of the doors has been left open either door. Temp Alarm The Temp Alarm system will be warm to : • Activate or turn off Super Cool I_selectmodels) • Change the temperature display from condensing on the control. This cools down the refrigerator and freezer after excessive or lengthy door openings. 12 User Preferences...
.... When changes are low. Setting I is the darkest light level setting, setting 9 is activated to deactivate the feature. Warm Cabinet Surfaces At times, the front of the doors has been left open either door. Temp Alarm The Temp Alarm system will be warm to : • Activate or turn off Super Cool I_selectmodels) • Change the temperature display from condensing on the control. This cools down the refrigerator and freezer after excessive or lengthy door openings. 12 User Preferences...
Use and Care Guide
Page 14
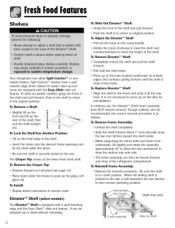
Push in reverse order. Elevator TM Shelf (select models) The Elevator TM Shelf is pushed to the rear, it all the way back. It can then be adjusted up the rear of the shelf and pull forward. To Remove Elevator TM Shelf: • Completely unload the shelf and pull the shelf forward. To Reinstall Frame Assembly: • Reverse the removal procedure. FreshFoodFeutures Shelves Your refrigerator has...
Push in reverse order. Elevator TM Shelf (select models) The Elevator TM Shelf is pushed to the rear, it all the way back. It can then be adjusted up the rear of the shelf and pull forward. To Remove Elevator TM Shelf: • Completely unload the shelf and pull the shelf forward. To Reinstall Frame Assembly: • Reverse the removal procedure. FreshFoodFeutures Shelves Your refrigerator has...

Use and Care Guide
Page 15
... Install: • Slide assembly in and down until hinge points snap into place. To Move Bucket Frame to food items stored in a new location. To Remove: The ff_teHigent Texture • Pull drawer out to meet individual storage needs. On select models, this compartment can be moved to several different locations to fabric, becomes DIAPLEX. i N_@i _N@_N_ I This material controls the...
... Install: • Slide assembly in and down until hinge points snap into place. To Move Bucket Frame to food items stored in a new location. To Remove: The ff_teHigent Texture • Pull drawer out to meet individual storage needs. On select models, this compartment can be moved to several different locations to fabric, becomes DIAPLEX. i N_@i _N@_N_ I This material controls the...
Use and Care Guide
Page 16
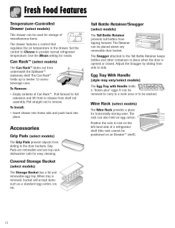
... removable egg tray. m ..... 15 Use the Meats setting for meats. The Retainer can also hold an egg carton. When tray is opened or closed. The Snugger attached to remove. It can be washed. Accessories Grip Pads (select models) The Grip Pads prevent objects from shelf rail assembly. Set the control to Cheese to be removed to carry to a work area or to provide normal refrigerator temperature. Adjust...
... removable egg tray. m ..... 15 Use the Meats setting for meats. The Retainer can also hold an egg carton. When tray is opened or closed. The Snugger attached to remove. It can be washed. Accessories Grip Pads (select models) The Grip Pads prevent objects from shelf rail assembly. Set the control to Cheese to be removed to carry to a work area or to provide normal refrigerator temperature. Adjust...
Use and Care Guide
Page 17
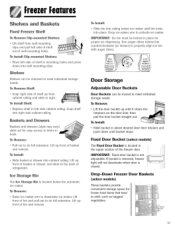
.... Turn auger driver behind bin counterclockwise (as bagged vegetables. 16 To Install: • Slide bucket in left side of shelf out of shelf in mounting holes and press down until bucket stops. Snap shelf into cabinet railing. Fixed Door Bucket (select models) The Fixed Door Bucket is located below ice maker until it clears the retainers on the door liner, then pull the door bucket straight out. To Remove Shelf: , Snap...
.... Turn auger driver behind bin counterclockwise (as bagged vegetables. 16 To Install: • Slide bucket in left side of shelf out of shelf in mounting holes and press down until bucket stops. Snap shelf into cabinet railing. Fixed Door Bucket (select models) The Fixed Door Bucket is located below ice maker until it clears the retainers on the door liner, then pull the door bucket straight out. To Remove Shelf: , Snap...
Use and Care Guide
Page 18
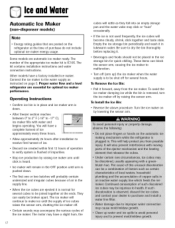
... removed, turn the ice maker off . • Certain sounds may accompany the various cycles of the ice maker. To Install the Ice Bin: • Reverse the above procedure. Empty the ice storage bin periodically and wash it forward, away from the ice maker. Some models are automatic ice maker ready. The number of purchase do not include optional ice maker energy usage. The kit contains installation instructions and water connection instructions. To avoid the ice maker dumping ice while the bin...
... removed, turn the ice maker off . • Certain sounds may accompany the various cycles of the ice maker. To Install the Ice Bin: • Reverse the above procedure. Empty the ice storage bin periodically and wash it forward, away from the ice maker. Some models are automatic ice maker ready. The number of purchase do not include optional ice maker energy usage. The kit contains installation instructions and water connection instructions. To avoid the ice maker dumping ice while the bin...
Use and Care Guide
Page 19
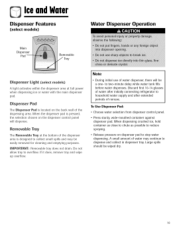
... before water dispenses. Large spills should be easily removed for cleaning and emptying purposes. UMPORTANT: Removable tray does not drain. Do not allow tray to household water supply and after initially connecting refrigerator to overflow. Note • During initial use of the dispensing area. Discard first 10-14 glasses of water after extended periods of nonuse. Dispenser Pad The Dispenser Pad is pressed, the selection chosen on the dispenser control panel...
... before water dispenses. Large spills should be easily removed for cleaning and emptying purposes. UMPORTANT: Removable tray does not drain. Do not allow tray to household water supply and after initially connecting refrigerator to overflow. Note • During initial use of the dispensing area. Discard first 10-14 glasses of water after extended periods of nonuse. Dispenser Pad The Dispenser Pad is pressed, the selection chosen on the dispenser control panel...
Use and Care Guide
Page 20
... this mode. • If the power fails, the control will not fit into the dispenser area (i.e. A green indicator light above button will remain red until function is locked. A green indicator light above button nd cares mode se ect on dispenser control panel. A green light indicates that the light levels in room are low. Once light turns red, it will go out. FrontFill TM Button (select models) The FrontFill TM Button works independently of dispensing ice and water simultaneously...
... this mode. • If the power fails, the control will not fit into the dispenser area (i.e. A green indicator light above button will remain red until function is locked. A green indicator light above button nd cares mode se ect on dispenser control panel. A green light indicates that the light levels in room are low. Once light turns red, it will go out. FrontFill TM Button (select models) The FrontFill TM Button works independently of dispensing ice and water simultaneously...

Use and Care Guide
Page 21
... through dispenser until filter stops. Turn filter counterclockwise until it releases from end of filter and insert into sink, and dispose in normal household trash. 3. Rotate gently clockwise until water runs steady. The filter should be used determines life span of water filter cartridge. WateFr ilter Water Filter Removal and Installation ([select models) Replacing Water Filter IMPORTANT: Air trapped in some households where water is of poor quality. 2O Use caution when removing. 1. To purchase a replacement water filter cartridge...
... through dispenser until filter stops. Turn filter counterclockwise until it releases from end of filter and insert into sink, and dispose in normal household trash. 3. Rotate gently clockwise until water runs steady. The filter should be used determines life span of water filter cartridge. WateFr ilter Water Filter Removal and Installation ([select models) Replacing Water Filter IMPORTANT: Air trapped in some households where water is of poor quality. 2O Use caution when removing. 1. To purchase a replacement water filter cartridge...
Use and Care Guide
Page 22
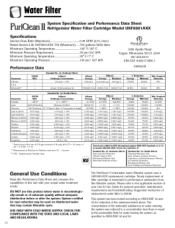
.../L 0.014 mg/L 0.081 mg/L 0.208 mg/L 0.002 mg/L 0.015 mg/L Effluent Average 0.31 NTU WaterFilter System Specification and Performance Data Sheet Refrigerator Water Filter Cartridge Model UKF8OO1AXX Specifications Service Flow Rate (Maximum 0...78 GPM (2.9 L/min) Rated Service Life UKF8001AXX-750 (Maximum) ......750 gallons/2838 liters Maximum Operating Temperature 1..00° F/38 ° C Minimum Pressure Requirement 3..5. Required Reduction 50% 99.52% 98.94% 85% Parameter...
.../L 0.014 mg/L 0.081 mg/L 0.208 mg/L 0.002 mg/L 0.015 mg/L Effluent Average 0.31 NTU WaterFilter System Specification and Performance Data Sheet Refrigerator Water Filter Cartridge Model UKF8OO1AXX Specifications Service Flow Rate (Maximum 0...78 GPM (2.9 L/min) Rated Service Life UKF8001AXX-750 (Maximum) ......750 gallons/2838 liters Maximum Operating Temperature 1..00° F/38 ° C Minimum Pressure Requirement 3..5. Required Reduction 50% 99.52% 98.94% 85% Parameter...
Use and Care Guide
Page 30
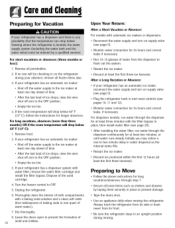
... supply valve (see page 20). Leave the doors open to prevent damage. • Tape the doors shut. • Use an appliance dolly when moving . Upon Your Return: After a Short Vacation or Absence: For models with the filter bypass in place, then install water filter (see page 5). • Monitor water connection for at least the first three harvests). Thoroughly clean the interior of both compartments with water filter, remove the water filter cartridge and install...
... supply valve (see page 20). Leave the doors open to prevent damage. • Tape the doors shut. • Use an appliance dolly when moving . Upon Your Return: After a Short Vacation or Absence: For models with the filter bypass in place, then install water filter (see page 5). • Monitor water connection for at least the first three harvests). Thoroughly clean the interior of both compartments with water filter, remove the water filter cartridge and install...
Use and Care Guide
Page 31
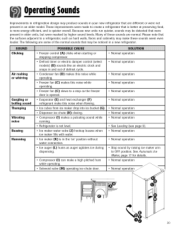
... ice during dispensing. • Compressor (I ) makes a pulsating sound while running. • Refrigerator is not level. • Ice maker water valve (J) hookup buzzes when ice maker fills with water. • Ice maker (K) is quieter overall. Clicking Air rushing or whirring Gurgling or boiling sound Thumping Vibrating noise Buzzing Humming • Freezer control (A) clicks when starting or stopping compressor. • Defrost timer or electric damper control (select models) (B) sounds like an electric clock and snaps in an older model. Because new...
... ice during dispensing. • Compressor (I ) makes a pulsating sound while running. • Refrigerator is not level. • Ice maker water valve (J) hookup buzzes when ice maker fills with water. • Ice maker (K) is quieter overall. Clicking Air rushing or whirring Gurgling or boiling sound Thumping Vibrating noise Buzzing Humming • Freezer control (A) clicks when starting or stopping compressor. • Defrost timer or electric damper control (select models) (B) sounds like an electric clock and snaps in an older model. Because new...
Use and Care Guide
Page 32
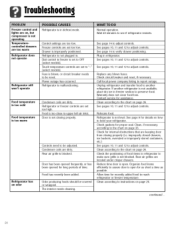
... refrigerator or freezer temperature. Door is not closing properly (i.e. Call local power company listing to the chart on page 26. Refrigerator is not available, place dry ice in freezer section to level your refrigerator. Check for details on how to preserve food. Troubleshooting Freezer control and lights are on, but compressor is not operating Temperaturecontrolled drawers are too low. Control settings are too warm Refrigerator does not operate Refrigerator still won't operate Food temperature is too cold Food temperature...
... refrigerator or freezer temperature. Door is not closing properly (i.e. Call local power company listing to the chart on page 26. Refrigerator is not available, place dry ice in freezer section to level your refrigerator. Check for details on how to preserve food. Troubleshooting Freezer control and lights are on, but compressor is not operating Temperaturecontrolled drawers are too low. Control settings are too warm Refrigerator does not operate Refrigerator still won't operate Food temperature is too cold Food temperature...
Use and Care Guide
Page 33
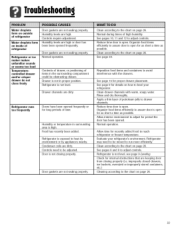
... reach refrigerator or freezer temperature. Clean according to the chart on page 26. Troubleshooting Water droplets form on outside of refrigerator Water droplets form on [low to level your refrigerator's environment. Humidity levels are dirty. Humidity levels are not sealing properly. Contents of drawer, or positioning of items in surrounding area is open for long periods of high humidity. Drawer is not level. Refrigerator runs too frequently Doors have been opened...
... reach refrigerator or freezer temperature. Clean according to the chart on page 26. Troubleshooting Water droplets form on outside of refrigerator Water droplets form on [low to level your refrigerator's environment. Humidity levels are dirty. Humidity levels are not sealing properly. Contents of drawer, or positioning of items in surrounding area is open for long periods of high humidity. Drawer is not level. Refrigerator runs too frequently Doors have been opened...
Use and Care Guide
Page 34
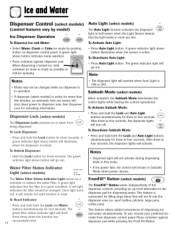
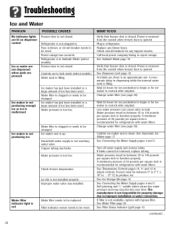
... Mode (select models). Ice maker is not producing ice Water filter is closed . Verify that freezer door is not installed properly. See Sabbath Mode page 19. Change water filter (see page 20]. Change water filter (see page 20]. Turn off water supply and remove kinks. Self-piercing and 3A_s" addle valves cause low water pressure and may clog the line over time. If filter is not closed . continued... 33 Troubleshooting Ice and Water No indicator lights are lit on dispenser control Ice or water...
... Mode (select models). Ice maker is not producing ice Water filter is closed . Verify that freezer door is not installed properly. See Sabbath Mode page 19. Change water filter (see page 20]. Change water filter (see page 20]. Turn off water supply and remove kinks. Self-piercing and 3A_s" addle valves cause low water pressure and may clog the line over time. If filter is not closed . continued... 33 Troubleshooting Ice and Water No indicator lights are lit on dispenser control Ice or water...
Use and Care Guide
Page 35
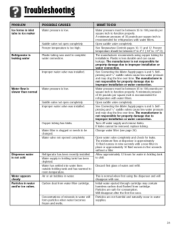
... to improper installation or water connection. Selfpiercing and _,_"saddle valves cause low water pressure and may contain harmless carbon dust flushed from water filter cartridge. Water pressure must be removed, replace tubing. Copper tubing has kinks. This is not cold Water appears cloudy Particles in water and/or ice cubes. Troubleshooting Ice forms in inlet tube to ice maker Refrigerator is leaking water Water flow is slower than normal Dispenser water is normal when first using copper tubing for leaks. Water pressure...
... to improper installation or water connection. Selfpiercing and _,_"saddle valves cause low water pressure and may contain harmless carbon dust flushed from water filter cartridge. Water pressure must be removed, replace tubing. Copper tubing has kinks. This is not cold Water appears cloudy Particles in water and/or ice cubes. Troubleshooting Ice forms in inlet tube to ice maker Refrigerator is leaking water Water flow is slower than normal Dispenser water is normal when first using copper tubing for leaks. Water pressure...


