Owners Manual
Page 4
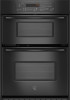
...Start The Start pad begins any other time, a power failure has occurred. On some models), the display will appear on the display. Clock This is not pressed within 4 to 5 minutes (depending on your model) after pressing a function pad, the oven display will return to the appliance, "... pads B. When the oven is preheated ■ Function has been entered Three tones ■ Invalid pad press 4 When using Cook Time (on some models, "START?" will show on the display. Press CLOCK. 2. Hour pad I. Start pad M. The clock time should not have to operate after pressing ...
...Start The Start pad begins any other time, a power failure has occurred. On some models), the display will appear on the display. Clock This is not pressed within 4 to 5 minutes (depending on your model) after pressing a function pad, the oven display will return to the appliance, "... pads B. When the oven is preheated ■ Function has been entered Three tones ■ Invalid pad press 4 When using Cook Time (on some models, "START?" will show on the display. Press CLOCK. 2. Hour pad I. Start pad M. The clock time should not have to operate after pressing ...
Owners Manual
Page 5
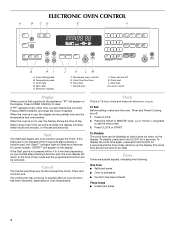
..." and "LOCK'D" (on your previous oven, so the temperature calibration can be changed in Fahrenheit or Celsius. "LOC" and "LOCK'D" (on some models) will appear on the display. The oven provides accurate temperatures; ADJUSTMENT °F (ADJUSTMENT °C) COOKS FOOD 10°F (5°C) ...a little more 20... of -cycle tones can be changed to unlock. If not pressed within a certain amount of time, the display will appear on your model). All except the end-of day mode and the programmed function will sound, and "oFF" or "Snd OFF" (depending on the ...
..." and "LOCK'D" (on your previous oven, so the temperature calibration can be changed in Fahrenheit or Celsius. "LOC" and "LOCK'D" (on some models) will appear on the display. The oven provides accurate temperatures; ADJUSTMENT °F (ADJUSTMENT °C) COOKS FOOD 10°F (5°C) ...a little more 20... of -cycle tones can be changed to unlock. If not pressed within a certain amount of time, the display will appear on your model). All except the end-of day mode and the programmed function will sound, and "oFF" or "Snd OFF" (depending on the ...
Owners Manual
Page 6
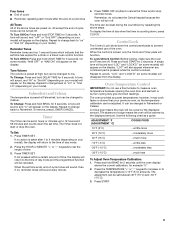
... as a guide. RACKS NOTES: ■ Position racks before turning the oven on. ■ Do not move freely. ■ To catch spills, place foil on this model. Use the following illustration and chart as a guide. 5 4 3 2 1 1 2 3 or 4 Center of space around bakeware and oven walls. BAKEWARE/ RESULTS RECOMMENDATIONS Light colored ■ aluminum ■...
... as a guide. RACKS NOTES: ■ Position racks before turning the oven on. ■ Do not move freely. ■ To catch spills, place foil on this model. Use the following illustration and chart as a guide. 5 4 3 2 1 1 2 3 or 4 Center of space around bakeware and oven walls. BAKEWARE/ RESULTS RECOMMENDATIONS Light colored ■ aluminum ■...

Owners Manual
Page 7
.... Use tongs to turn food to avoid the loss of the oven rack. Drippings will bake on the display. Position food on some models) The Precise Bake system electronically regulates the oven heat levels during preheat and bake to maintain a precise temperature range for easier cleaning. &#...176;F (177°C) in 5° amounts. Press LOWER CANCEL when finished. 7 Oven Double Oven D. To Bake or Roast: 1. Meat Thermometer On models without a temperature probe, use a meat thermometer to determine whether meat, poultry and fish, are designed to drain juices and help avoid spatter and smoke...
.... Use tongs to turn food to avoid the loss of the oven rack. Drippings will bake on the display. Position food on some models) The Precise Bake system electronically regulates the oven heat levels during preheat and bake to maintain a precise temperature range for easier cleaning. &#...176;F (177°C) in 5° amounts. Press LOWER CANCEL when finished. 7 Oven Double Oven D. To Bake or Roast: 1. Meat Thermometer On models without a temperature probe, use a meat thermometer to determine whether meat, poultry and fish, are designed to drain juices and help avoid spatter and smoke...

Owners Manual
Page 9
...cycle uses very high temperatures, burning soil to clear the oven display. Keep the kitchen well-ventilated during the Self-Cleaning cycle. On Combination oven models, the upper oven will not begin . Do not clean, rub, damage or move freely. See "General Cleaning" section for a good seal... well-ventilated room. The door will not affect cooking performance. 1. Once the oven has completely cooled, remove ash with porcelain. On double oven models only, be able to heavy soil. Do not let water, cleaner, etc., enter slots on the oven display. At high temperatures, foods react...
...cycle uses very high temperatures, burning soil to clear the oven display. Keep the kitchen well-ventilated during the Self-Cleaning cycle. On Combination oven models, the upper oven will not begin . Do not clean, rub, damage or move freely. See "General Cleaning" section for a good seal... well-ventilated room. The door will not affect cooking performance. 1. Once the oven has completely cooled, remove ash with porcelain. On double oven models only, be able to heavy soil. Do not let water, cleaner, etc., enter slots on the oven display. At high temperatures, foods react...

Owners Manual
Page 10
When the start time is automatically calculated and displayed. Depending on some models) NOTE: To avoid damage to stainless steel surfaces, do not use abrasive cleaners, steel-wool pads, gritty washcloths or abrasive paper towels. Cleaning Method: ■ ...
When the start time is automatically calculated and displayed. Depending on some models) NOTE: To avoid damage to stainless steel surfaces, do not use abrasive cleaners, steel-wool pads, gritty washcloths or abrasive paper towels. Cleaning Method: ■ ...
Owners Manual
Page 12
... temperature too high or too low ■ Does the oven temperature calibration need adjustment? There has been a power failure. On some models, is the Sabbath Mode set correctly? Oven cooking results not what expected ■ Is the appliance level? Oven peeking releases oven heat... and can result in longer cooking times. ■ Are baked items too brown on . ■ On double oven models, has the correct oven been selected? See "Self-Cleaning Cycle" section. ■ Has a delay start been set ? See "Electronic Oven Control" ...
... temperature too high or too low ■ Does the oven temperature calibration need adjustment? There has been a power failure. On some models, is the Sabbath Mode set correctly? Oven cooking results not what expected ■ Is the appliance level? Oven peeking releases oven heat... and can result in longer cooking times. ■ Are baked items too brown on . ■ On double oven models, has the correct oven been selected? See "Self-Cleaning Cycle" section. ■ Has a delay start been set ? See "Electronic Oven Control" ...

Owners Manual
Page 13
.... ■ Specialized customer assistance (Spanish speaking, hearing impaired, limited vision, etc.). ■ Referrals to build every new MAYTAG® appliance. Maytag® appliances designated service technicians are trained to fulfill the product warranty and provide after -warranty service, anywhere in your area...If you need further assistance, you use only factory specified parts. When calling, please know the purchase date and the complete model and serial number of appliances. ■ Use and maintenance procedures. ■ Accessory and repair parts sales. ■ Referrals ...
.... ■ Specialized customer assistance (Spanish speaking, hearing impaired, limited vision, etc.). ■ Referrals to build every new MAYTAG® appliance. Maytag® appliances designated service technicians are trained to fulfill the product warranty and provide after -warranty service, anywhere in your area...If you need further assistance, you use only factory specified parts. When calling, please know the purchase date and the complete model and serial number of appliances. ■ Use and maintenance procedures. ■ Accessory and repair parts sales. ■ Referrals ...

Owners Manual
Page 14
... 1. Expenses for travel and transportation for product service if your sales slip together for in-warranty service. Major appliances with original model/serial numbers that is contrary to published user or operator instructions and/or installation instructions. 4. You must be easily determined. LIMITATION...INCLUDING WARRANTIES OF MERCHANTABILITY OR FITNESS FOR A PARTICULAR PURPOSE, ARE LIMITED TO ONE YEAR OR THE SHORTEST PERIOD ALLOWED BY LAW. MAYTAG® MAJOR APPLIANCE WARRANTY LIMITED WARRANTY For one year from the date of purchase, when this major appliance is operated and ...
... 1. Expenses for travel and transportation for product service if your sales slip together for in-warranty service. Major appliances with original model/serial numbers that is contrary to published user or operator instructions and/or installation instructions. 4. You must be easily determined. LIMITATION...INCLUDING WARRANTIES OF MERCHANTABILITY OR FITNESS FOR A PARTICULAR PURPOSE, ARE LIMITED TO ONE YEAR OR THE SHORTEST PERIOD ALLOWED BY LAW. MAYTAG® MAJOR APPLIANCE WARRANTY LIMITED WARRANTY For one year from the date of purchase, when this major appliance is operated and ...

Installation Instructions
Page 2
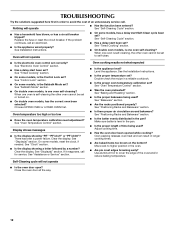
.... ■ Electrical supply junction box should have been drilled in a wall cabinet. recessed depth E. 41" (104.1 cm) recessed height 30" (76.2 cm) models A. 28 71.9 cm) recessed width B. 42³⁄₈" (107.6 cm) overall height C. 29³⁄₄" (75.6 cm) overall width D. ... CSA approved conduit connector ■ UL listed wire connectors Parts supplied ■ # 8-14 x 1" screws - bottom vent (supplied on some models) ■ Side trim Check local codes. IMPORTANT: To avoid damage to your cabinets, check with your builder or cabinet supplier to support a total...
.... ■ Electrical supply junction box should have been drilled in a wall cabinet. recessed depth E. 41" (104.1 cm) recessed height 30" (76.2 cm) models A. 28 71.9 cm) recessed width B. 42³⁄₈" (107.6 cm) overall height C. 29³⁄₄" (75.6 cm) overall width D. ... CSA approved conduit connector ■ UL listed wire connectors Parts supplied ■ # 8-14 x 1" screws - bottom vent (supplied on some models) ■ Side trim Check local codes. IMPORTANT: To avoid damage to your cabinets, check with your builder or cabinet supplier to support a total...

Installation Instructions
Page 3
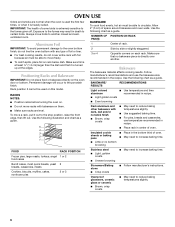
... copper cable (with local codes. A A B E C D A. 23¹⁄₄" (59.1 cm) min. Oven front D. Recessed oven E. Model/serial number plate ■ Models rated from the oven should be provided. 3 Check with the National Electrical Code, ANSI/NFPA 70-latest edition or CSA Standards C22.1-94...latest edition, and all local codes and ordinances. Cabinet Dimensions 27" (68.6 cm) and 30" (76.2 cm) Ovens A B F D E C 27" (68.6 cm) models A. 27" (68.6 cm) min. cabinet width B. 1" (2.5 cm) top of cutout to bottom of upper cabinet door C. 19¹⁄₄" (48.9 cm) bottom ...
... copper cable (with local codes. A A B E C D A. 23¹⁄₄" (59.1 cm) min. Oven front D. Recessed oven E. Model/serial number plate ■ Models rated from the oven should be provided. 3 Check with the National Electrical Code, ANSI/NFPA 70-latest edition or CSA Standards C22.1-94...latest edition, and all local codes and ordinances. Cabinet Dimensions 27" (68.6 cm) and 30" (76.2 cm) Ovens A B F D E C 27" (68.6 cm) models A. 27" (68.6 cm) min. cabinet width B. 1" (2.5 cm) top of cutout to bottom of upper cabinet door C. 19¹⁄₄" (48.9 cm) bottom ...

Installation Instructions
Page 6
... oven side rails. 8. Push against seal area of water and place container inside microwave oven. On models with 1 cup (250 mL) of front frame to the Use and Care Guide. Insert screw. 6. On some models, the oven vent is intact and tight; Push hinges in as far as they will go back...
... oven side rails. 8. Push against seal area of water and place container inside microwave oven. On models with 1 cup (250 mL) of front frame to the Use and Care Guide. Insert screw. 6. On some models, the oven vent is intact and tight; Push hinges in as far as they will go back...
Dimension Guide
Page 1
... (2.5 cm) top of cutout to bottom of upper cabinet door C. 19-1/4" (48.9 cm) bottom of cutout to change materials and specifications without notice. Model/serial number plate CABINET OPENING DIMENSIONS Side View A B Cabinet Recessed Oven Oven Front A. 23-1/4" 59.1 cm) min. A circuit breaker is located at ..., sheathed copper cable (with product. 27" (68.6 CM) AND 30" (76.2 CM) ELECTRIC BUILT-IN MICROWAVE/OVEN COMBINATION PRODUCT MODEL SERIES MMW7530WD PRODUCT DIMENSIONS Electrical: Oven must be connected to 7.2 kW at 208 volts) require a separate 40-amp circuit. See the ...
... (2.5 cm) top of cutout to bottom of upper cabinet door C. 19-1/4" (48.9 cm) bottom of cutout to change materials and specifications without notice. Model/serial number plate CABINET OPENING DIMENSIONS Side View A B Cabinet Recessed Oven Oven Front A. 23-1/4" 59.1 cm) min. A circuit breaker is located at ..., sheathed copper cable (with product. 27" (68.6 CM) AND 30" (76.2 CM) ELECTRIC BUILT-IN MICROWAVE/OVEN COMBINATION PRODUCT MODEL SERIES MMW7530WD PRODUCT DIMENSIONS Electrical: Oven must be connected to 7.2 kW at 208 volts) require a separate 40-amp circuit. See the ...
Warranty Information
Page 1
...including scratches, dents, chips or other than normal, single-family household use of consumables or cleaning products not approved by an authorized Maytag servicer is used in the country in which it is installed in an inaccessible location or is not installed in accordance with published... these excluded circumstances shall be provided by the customer. Service calls to correct defects in accordance with original model/serial numbers that is covered by calling Maytag. This major appliance is designed to be easily determined. The removal and reinstallation of your authorized...
...including scratches, dents, chips or other than normal, single-family household use of consumables or cleaning products not approved by an authorized Maytag servicer is used in the country in which it is installed in an inaccessible location or is not installed in accordance with published... these excluded circumstances shall be provided by the customer. Service calls to correct defects in accordance with original model/serial numbers that is covered by calling Maytag. This major appliance is designed to be easily determined. The removal and reinstallation of your authorized...


