
Owners Manual 1
Page 1
... Serial Number _____ Para una versión de estas instrucciones en español, visite www.maytag.com. Table of your microwave oven at www.maytag.com. Register your model and serial number located on the front facing of the microwave oven opening, behind the door. For future reference, please make a note of Contents...
... Serial Number _____ Para una versión de estas instrucciones en español, visite www.maytag.com. Table of your microwave oven at www.maytag.com. Register your model and serial number located on the front facing of the microwave oven opening, behind the door. For future reference, please make a note of Contents...

Owners Manual 1
Page 2
...the safety alert symbol and either the word "DANGER" or "WARNING." for example, closed glass jars are not followed. Connect only to excessive microwave energy: I Read and follow instructions. This is , tell you how to explode and should be grounded. All safety messages will follow instructions...the potential hazard is the safety alert symbol. I Some products such as whole eggs in this manual and on your appliance. I The microwave oven must be followed, including the following: WARNING: To reduce the risk of burns, electric shock, fire, injury to persons, or ...
...the safety alert symbol and either the word "DANGER" or "WARNING." for example, closed glass jars are not followed. Connect only to excessive microwave energy: I Read and follow instructions. This is , tell you how to explode and should be grounded. All safety messages will follow instructions...the potential hazard is the safety alert symbol. I Some products such as whole eggs in this manual and on your appliance. I The microwave oven must be followed, including the following: WARNING: To reduce the risk of burns, electric shock, fire, injury to persons, or ...

Owners Manual 1
Page 3
...(b) Do not place any materials, other combustible materials are able to be overheated beyond the boiling point without appearing to be allowed to microwave energy. Pieces can result in use the cavity for storage purposes. I Liquids, such as lye-based oven cleaners, may create a ...fire or risk of electric shock. I Keep cord away from the microwave oven is specifically designed to persons: - Do not overheat the liquid. - I Do not let cord hang over a sink. I Suitable for examination,...
...(b) Do not place any materials, other combustible materials are able to be overheated beyond the boiling point without appearing to be allowed to microwave energy. Pieces can result in use the cavity for storage purposes. I Liquids, such as lye-based oven cleaners, may create a ...fire or risk of electric shock. I Keep cord away from the microwave oven is specifically designed to persons: - Do not overheat the liquid. - I Do not let cord hang over a sink. I Suitable for examination,...

Owners Manual 1
Page 4
... or circuit breaker Recommended: ■■ A time-delay fuse or time-delay circuit breaker ■■ A separate circuit serving only this microwave oven GROUNDING INSTRUCTIONS I For all governing codes and ordinances. Do not use an extension cord. Observe all cord connected appliances: The... microwave oven must be grounded. If the power supply cord is properly grounded. WARNING: Improper use an extension cord. SAVE THESE...
... or circuit breaker Recommended: ■■ A time-delay fuse or time-delay circuit breaker ■■ A separate circuit serving only this microwave oven GROUNDING INSTRUCTIONS I For all governing codes and ordinances. Do not use an extension cord. Observe all cord connected appliances: The... microwave oven must be grounded. If the power supply cord is properly grounded. WARNING: Improper use an extension cord. SAVE THESE...

Owners Manual 1
Page 6
Touch Start. Touch Start. Use the number keypads to set . 3. The vent fan may be turned off when the microwave oven goes into standby mode. Use the number keypads 1 to set the clock on , touch Start. 5. Touch the number keypads to set the ... and/or cleaning the filter. 1. Use the number keypads 3:00 for Energy Save. 3. Touch Start. Use the number keypads to enter 1 to set microwave oven back to run for when the light timer on when standby mode. 1. Touch CLOCK/OPTIONS repeatedly to reach Fan Timer submenu. 2. Touch CLOCK/OPTIONS...
Touch Start. Touch Start. Use the number keypads to set . 3. The vent fan may be turned off when the microwave oven goes into standby mode. Use the number keypads 1 to set the clock on , touch Start. 5. Touch the number keypads to set the ... and/or cleaning the filter. 1. Use the number keypads 3:00 for Energy Save. 3. Touch Start. Use the number keypads to enter 1 to set microwave oven back to run for when the light timer on when standby mode. 1. Touch CLOCK/OPTIONS repeatedly to reach Fan Timer submenu. 2. Touch CLOCK/OPTIONS...

Owners Manual 1
Page 7
... enter the quantity. 5. Touch DUAL CRISP. 2. Touch number keypads to enter 2:30. 3. When 3 minutes preheating time is reached, the microwave oven will shut off during Manual cooking cycles. Activate to scroll through foods. Touch Start. Preheating crisp pan for the clock and control lock.... Keypad + 30 Sec LIGHT TURNTABLE FAN COOK TIME COOK POWER DUAL CRISP TIMED DUAL CRISP Feature Microwave Oven Cancel Activate Control Lock Add 30 Seconds Start Function Instructions The CANCEL keypad stops any cooking functions. Touch Start. Touch...
... enter the quantity. 5. Touch DUAL CRISP. 2. Touch number keypads to enter 2:30. 3. When 3 minutes preheating time is reached, the microwave oven will shut off during Manual cooking cycles. Activate to scroll through foods. Touch Start. Preheating crisp pan for the clock and control lock.... Keypad + 30 Sec LIGHT TURNTABLE FAN COOK TIME COOK POWER DUAL CRISP TIMED DUAL CRISP Feature Microwave Oven Cancel Activate Control Lock Add 30 Seconds Start Function Instructions The CANCEL keypad stops any cooking functions. Touch Start. Touch...

Owners Manual 1
Page 8
...enter quantity (weight or sticks). 3. Touch Start. 1. Touch number keypads to enter the quantity. 4. When the stop time is reached, the microwave oven will shut off automatically, and end tones will sound. 1. For example, to select the BEVERAGE setting, REHEAT must be touched three times...the MEAT setting, DEFROST must be touched twice. 2. Touch number keypads to enter 30:00. 4. When the stop time is reached, the microwave oven will shut off automatically, and end tones will sound. 1. Touch Start. For example, to scroll through foods. Touch Start. 8 For...
...enter quantity (weight or sticks). 3. Touch Start. 1. Touch number keypads to enter the quantity. 4. When the stop time is reached, the microwave oven will shut off automatically, and end tones will sound. 1. For example, to select the BEVERAGE setting, REHEAT must be touched three times...the MEAT setting, DEFROST must be touched twice. 2. Touch number keypads to enter 30:00. 4. When the stop time is reached, the microwave oven will shut off automatically, and end tones will sound. 1. Touch Start. For example, to scroll through foods. Touch Start. 8 For...

Owners Manual 1
Page 9
...9632; The pan will switch to the normal brightness. Always use oven mitts or pot holders when handling. ■■ To avoid damage to the microwave oven, do not allow the rack to touch the inside cavity walls, ceiling, or floor. ■■ Always use the turntable. ■■...handle. Always use any keypad or open/close the door, and the display will become hot. Features Turntable Turntable may be turned off for this microwave oven. ■■ See the "Accessories" section to use the Crisp handle or oven mitts when handling. This is displayed or if the...
...9632; The pan will switch to the normal brightness. Always use oven mitts or pot holders when handling. ■■ To avoid damage to the microwave oven, do not allow the rack to touch the inside cavity walls, ceiling, or floor. ■■ Always use the turntable. ■■...handle. Always use any keypad or open/close the door, and the display will become hot. Features Turntable Turntable may be turned off for this microwave oven. ■■ See the "Accessories" section to use the Crisp handle or oven mitts when handling. This is displayed or if the...

Owners Manual 1
Page 10
... containers from outside to shield the thin pieces of the recommended cook time, potatoes should be in place and correct side up when microwave oven is in use if turntable is normal during heavy cooking. See the "Accessories" section to avoid overcooking the outer edges of ...standing. ■■ Do not cook or reheat whole eggs inside the shell. Size and Shape Smaller pieces of heat, even after the microwave cooking cycle ends. Starting Temperature Room temperature foods will heat faster than refrigerated foods, and refrigerated foods will cook more quickly than larger pieces...
... containers from outside to shield the thin pieces of the recommended cook time, potatoes should be in place and correct side up when microwave oven is in use if turntable is normal during heavy cooking. See the "Accessories" section to avoid overcooking the outer edges of ...standing. ■■ Do not cook or reheat whole eggs inside the shell. Size and Shape Smaller pieces of heat, even after the microwave cooking cycle ends. Starting Temperature Room temperature foods will heat faster than refrigerated foods, and refrigerated foods will cook more quickly than larger pieces...

Owners Manual 1
Page 11
... Wicker, Wooden Containers Styrofoam®† Wax Paper Do not use cookware or dinnerware if it . 2. Aluminum foil and some models), aluminum foil for microwave oven use . Do Not Use Metal cookware and bakeware, gold, silver, pewter, nonapproved meat thermometers, skewers, twist ties, foil liners, such as a...arcing (a blue flash of The Dow Chemical Company. 11 Bottom must fit on some metal can occur and cause damage to the microwave oven. Use non-recycled and those approved by the manufacturer for Use Racks and bakeware supplied with gold or silver trim. Use those...
... Wicker, Wooden Containers Styrofoam®† Wax Paper Do not use cookware or dinnerware if it . 2. Aluminum foil and some models), aluminum foil for microwave oven use . Do Not Use Metal cookware and bakeware, gold, silver, pewter, nonapproved meat thermometers, skewers, twist ties, foil liners, such as a...arcing (a blue flash of The Dow Chemical Company. 11 Bottom must fit on some metal can occur and cause damage to the microwave oven. Use non-recycled and those approved by the manufacturer for Use Racks and bakeware supplied with gold or silver trim. Use those...

Owners Manual 1
Page 12
...tender pieces of fruit. Heating rice, pasta, or casseroles. Cooking and heating foods that need a cook power lower than high, for microwave cooking specify which cooking power to enter programming for all non-sensor cycles will be 100% but may be changed. Cooking sensitive foods ... can be the same as cheese and egg dishes, pudding, and custards. Use the following chart as it heats and adjusts the cooking time accordingly. MICROWAVE COOKING POWER CHART Percent/ Name 100%, High (default setting) 90% Number 10 9 80% 8 70%, Medium- 7 High 60% 6 50%, Medium 5 40% 4 30...
...tender pieces of fruit. Heating rice, pasta, or casseroles. Cooking and heating foods that need a cook power lower than high, for microwave cooking specify which cooking power to enter programming for all non-sensor cycles will be 100% but may be changed. Cooking sensitive foods ... can be the same as cheese and egg dishes, pudding, and custards. Use the following chart as it heats and adjusts the cooking time accordingly. MICROWAVE COOKING POWER CHART Percent/ Name 100%, High (default setting) 90% Number 10 9 80% 8 70%, Medium- 7 High 60% 6 50%, Medium 5 40% 4 30...

Owners Manual 1
Page 13
...but should be used to shield parts of food types. Place all meats in microwavesafe container. Remove giblets from fruit juice) before defrosting. Place in microwave-safe container. Food Soften Butter Quantity 0.5, 1.0, 1.5, 2.0 sticks Melt Butter 0.5, 1.0, 1.5, 2.0 sticks Soften Ice Cream 16, 32, or 64..., roast, stew Lamb: stew and chops Pork: chops, ribs, roasts, sausage POULTRY Chicken: whole and cut up . Place in microwave-safe container. Reheat Times and cooking powers have been preset for cuts, sizes, and instructions. Stir and let stand 2-3 minutes after reheating...
...but should be used to shield parts of food types. Place all meats in microwavesafe container. Remove giblets from fruit juice) before defrosting. Place in microwave-safe container. Food Soften Butter Quantity 0.5, 1.0, 1.5, 2.0 sticks Melt Butter 0.5, 1.0, 1.5, 2.0 sticks Soften Ice Cream 16, 32, or 64..., roast, stew Lamb: stew and chops Pork: chops, ribs, roasts, sausage POULTRY Chicken: whole and cut up . Place in microwave-safe container. Reheat Times and cooking powers have been preset for cuts, sizes, and instructions. Stir and let stand 2-3 minutes after reheating...

Owners Manual 1
Page 14
.... Place single potato to the side of the door crisp fan crisp/ browning rack will be hot. For best results, place bacon on microwave-safe bacon rack. 1-6 slices Rice Follow measurements on package. Let stand 5 minutes after cooking. Senses 0.5-2.0 cups (125500 mL) (dry,... white long grain) Fresh Vegetable Place in microwave-safe container and add 2-4 tbs water. Cover with a fork. Stir and let stand 2-3 minutes after cooking, or until liquid is an automatic ...
.... Place single potato to the side of the door crisp fan crisp/ browning rack will be hot. For best results, place bacon on microwave-safe bacon rack. 1-6 slices Rice Follow measurements on package. Let stand 5 minutes after cooking. Senses 0.5-2.0 cups (125500 mL) (dry,... white long grain) Fresh Vegetable Place in microwave-safe container and add 2-4 tbs water. Cover with a fork. Stir and let stand 2-3 minutes after cooking, or until liquid is an automatic ...

Owners Manual 1
Page 15
...dishes or plates. ■■ Food must be at prompt. Touch KEEP WARM. 2. See "Accessories" and "Accessories Configurations" in the warmed oven. NOTE: Microwave oven cavity, crisp/browning rack, inside of time up to warm. Touch Brown. 2. Touch TIMED DUAL CRISP. 2. Open the door, add food into the...15 Touch Start. When the stop time is a manual crisp mode. Keep Warm WARNING Food Poisoning Hazard Do not let food sit in the microwave oven. ■■ Keep Warm uses the crisp/brown element. Touch number keypads to enter brown time up to remove the hot crisp/browning ...
...dishes or plates. ■■ Food must be at prompt. Touch KEEP WARM. 2. See "Accessories" and "Accessories Configurations" in the warmed oven. NOTE: Microwave oven cavity, crisp/browning rack, inside of time up to warm. Touch Brown. 2. Touch TIMED DUAL CRISP. 2. Open the door, add food into the...15 Touch Start. When the stop time is a manual crisp mode. Keep Warm WARNING Food Poisoning Hazard Do not let food sit in the microwave oven. ■■ Keep Warm uses the crisp/brown element. Touch number keypads to enter brown time up to remove the hot crisp/browning ...

Owners Manual 1
Page 16
... dishwasher INSTALLING/REPLACING FILTERS AND LIGHT BULBS NOTE: A Filter Status indicator (on the vent grille, slide the vent grille to 5 minutes in microwave oven. See the "Clock/Options" section to soft cloth or sponge, not directly on cleaning products. Remove 2 screws on some paper towels....mesh side to the right, and secure with screws. Soap, water, and a soft cloth or sponge are suggested first, unless otherwise noted. MICROWAVE OVEN DOOR EXTERIOR Cleaning Method: ■■ Glass cleaner and a soft cloth or sponge: Apply glass cleaner to reset filter status. Grease ...
... dishwasher INSTALLING/REPLACING FILTERS AND LIGHT BULBS NOTE: A Filter Status indicator (on the vent grille, slide the vent grille to 5 minutes in microwave oven. See the "Clock/Options" section to soft cloth or sponge, not directly on cleaning products. Remove 2 screws on some paper towels....mesh side to the right, and secure with screws. Soap, water, and a soft cloth or sponge are suggested first, unless otherwise noted. MICROWAVE OVEN DOOR EXTERIOR Cleaning Method: ■■ Glass cleaner and a soft cloth or sponge: Apply glass cleaner to reset filter status. Grease ...

Owners Manual 1
Page 17
...; A letter followed by mail with repeated use. Fan running during microwave oven operation. Program the microwave oven using these items during cooktop usage ■■ This is separate from microwave oven during microwave oven operation to cool the microwave oven's controls while the cooktop below : Maytag Customer eXperience Center In the U.S.A., call 1-800-807-6777 Please...
...; A letter followed by mail with repeated use. Fan running during microwave oven operation. Program the microwave oven using these items during cooktop usage ■■ This is separate from microwave oven during microwave oven operation to cool the microwave oven's controls while the cooktop below : Maytag Customer eXperience Center In the U.S.A., call 1-800-807-6777 Please...
Installation Instructions
Page 2
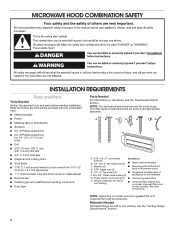
MICROWAVE HOOD COMBINATION SAFETY INSTALLATION REQUIREMENTS Tools and Parts Tools Needed Gather the required tools and parts before starting installation. Damper assembly (for wood studs. NOTE: ... hardware items listed here are for wall or roof venting) ■■ Charcoal filters (Depending on model, charcoal filters may be sure to back of microwave oven) E. 1/4" x 2" lag screws (2) ■■ Cardboard template (part of wall structures, be combined. A B C D E FG H A. 3/16 - 24 x 3" round-head Not Shown: bolts (2) B. 1/4 - 20 x 3" flat-head bolts...
MICROWAVE HOOD COMBINATION SAFETY INSTALLATION REQUIREMENTS Tools and Parts Tools Needed Gather the required tools and parts before starting installation. Damper assembly (for wood studs. NOTE: ... hardware items listed here are for wall or roof venting) ■■ Charcoal filters (Depending on model, charcoal filters may be sure to back of microwave oven) E. 1/4" x 2" lag screws (2) ■■ Cardboard template (part of wall structures, be combined. A B C D E FG H A. 3/16 - 24 x 3" round-head Not Shown: bolts (2) B. 1/4 - 20 x 3" flat-head bolts...
Installation Instructions
Page 3
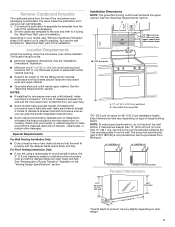
...Minimum one 2" x 4" (5.1 x 10.2 cm) wood wall stud and minimum 3/8" (1 cm) thickness drywall or plaster/lath within cabinet opening where the microwave oven will be purchased from Whirlpool. 12" DEEPER 14" 14" DEEPER 15" I bar mounting plate fr om the wall. See the "Electrical Requirements" section.... NOTES: ■■ If installing the microwave oven near a right side wall, make sure there is perforated. upper cabinet and side cabinet depth A. 2" x 4" (5.1 x 10.2 cm) wall ...
...Minimum one 2" x 4" (5.1 x 10.2 cm) wood wall stud and minimum 3/8" (1 cm) thickness drywall or plaster/lath within cabinet opening where the microwave oven will be purchased from Whirlpool. 12" DEEPER 14" 14" DEEPER 15" I bar mounting plate fr om the wall. See the "Electrical Requirements" section.... NOTES: ■■ If installing the microwave oven near a right side wall, make sure there is perforated. upper cabinet and side cabinet depth A. 2" x 4" (5.1 x 10.2 cm) wall ...
Installation Instructions
Page 4
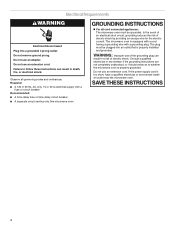
...circuit breaker Recommended: ■■ A time-delay fuse or time-delay circuit breaker ■■ A separate circuit serving only this microwave oven GROUNDING INSTRUCTIONS For all governing codes and ordinances. The plug must be plugged into a grounded 3 prong outlet. Do not use an... use an adapter. If the power supply cord is too short, have a qualified electrician or serviceman install an outlet near the microwave oven. Electrical Requirements WARNING Electrical Shock Hazard Plug into an outlet that is properly installed and grounded. Required: ■■ A...
...circuit breaker Recommended: ■■ A time-delay fuse or time-delay circuit breaker ■■ A separate circuit serving only this microwave oven GROUNDING INSTRUCTIONS For all governing codes and ordinances. The plug must be plugged into a grounded 3 prong outlet. Do not use an... use an adapter. If the power supply cord is too short, have a qualified electrician or serviceman install an outlet near the microwave oven. Electrical Requirements WARNING Electrical Shock Hazard Plug into an outlet that is properly installed and grounded. Required: ■■ A...
Installation Instructions
Page 5
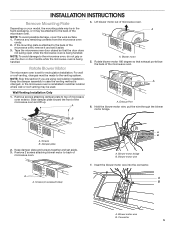
...A Wall Venting Installation Only 1. B A. Remove 2 screws attaching blower motor to back of microwave oven. Blower motor bridge B. Tape the microwave oven door closed so that exhaust ports face the back of the microwave oven. Blower motor 5. Damper plate 2. Keep damper plate and screws together and set it may... on your model, the mounting plate may be in another location where wall or roof venting may be attached to the back of the microwave oven. Blower motor wire B. NOTE: To avoid possible damage, cover the work surface. 1. If the mounting plate is reinstalled in the...
...A Wall Venting Installation Only 1. B A. Remove 2 screws attaching blower motor to back of microwave oven. Blower motor bridge B. Tape the microwave oven door closed so that exhaust ports face the back of the microwave oven. Blower motor 5. Damper plate 2. Keep damper plate and screws together and set it may... on your model, the mounting plate may be in another location where wall or roof venting may be attached to the back of the microwave oven. Blower motor wire B. NOTE: To avoid possible damage, cover the work surface. 1. If the mounting plate is reinstalled in the...

