Maytag UMV1160C Support and Manuals
Get Help and Manuals for this Maytag item
View All Support Options Below
Free Maytag UMV1160C manuals!
Problems with Maytag UMV1160C?
Ask a Question
Free Maytag UMV1160C manuals!
Problems with Maytag UMV1160C?
Ask a Question
Popular Maytag UMV1160C Manual Pages
Installation Instructions - Page 2
...
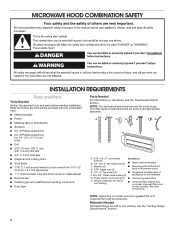
■■ 3/4" (1.9 cm) hole saw
■■ Caulking gun and weatherproof caulking compound
■■ Duct tape
Parts Needed
For information on reordering, see the "Replacement Parts" section. See User Instructions.)
NOTE: Depending on model, charcoal filters may be combined.
Materials Needed
Standard fittings for wood studs. Washers (2) D. 3/16" toggle nuts (2)
■...
Installation Instructions - Page 3
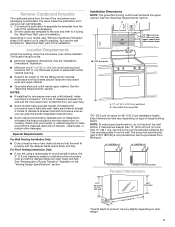
...Support for "Mark Rear Wall" part of the installation. See the "Electrical Requirements" section.
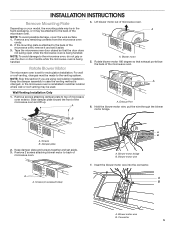
For Roof Venting Installation Only:
■■ If you can be inside upper cabinet. Installation...bump out mounting kit replacing the I bar ...Set the cardboard template to the side and refer to Round Transition" illustration in the "Venting Design Specifications" section.
If installing...
Installation Instructions - Page 4
... codes and ordinances. The plug must be plugged into a grounded 3 prong outlet. If the power supply cord is too short, have a qualified electrician or serviceman install an outlet near the microwave oven. Consult a qualified electrician or serviceman if the grounding instructions are not completely understood, or if doubt exists as to follow these instructions...
Installation Instructions - Page 5
... method is changed, or the microwave oven is set for recirculation installation. Slide damper plate toward the front of microwave oven. Exhaust Port
6. Remove 2 screws attaching blower motor to the venting system. Blower motor wire 7. Blower motor wire B. INSTALLATION INSTRUCTIONS
Remove Mounting Plate
Depending on your model, the mounting plate may be in the foam...
Installation Instructions - Page 6
...
A. Slots
12. AB
A.
A
B
C
D
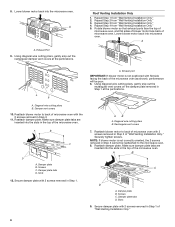
A. Screws C. Exhaust Port 9. Reattach blower motor to back of microwave oven with flat side facing the back of "Wall Venting Installation Only."
Roof Venting Installation Only
1. Damper plate tabs D.
Make sure damper plate tabs are
inserted into the microwave oven. Reattach damper plate. Damper plate tabs D. Using diagonal...
Installation Instructions - Page 7

...) of each stud, and draw a plumb line down each stud center. End holes (on mounting plate) B. Holes for lag screws E. Support tabs F. Using a stud finder, locate the edges of preferred installation configurations with the mounting plate. See illustrations in "Possible Wall Stud Configurations." Possible Wall Stud Configurations
These depictions show examples of...
Installation Instructions - Page 8

... both sides of the centerline, and mark.
10. Set the mounting plate aside. Using a straightedge, draw the...hole in the "Locate Wall Stud(s)" section. Rear wall B.
Wall Venting Installation Only
Upper cabinet bottom
³⁄₈" (1 cm)
4" (10... cm) rectangle. Top of the cutout area. 14. With the support tabs facing forward (see illustrations in steps 8 and 10.
12. ...
Installation Instructions - Page 9
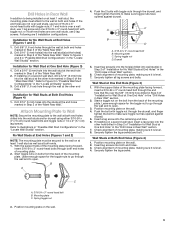
... nut has opened against drywall. 5. C
A. 3/16-24 x 3" round-head bolt B. or if both end holes of "Installation for the toggle nut to go through the drywall, and finger tighten the bolts to open .
3.
With the support tabs of the mounting plate facing forward,
insert 3/16-24 x 3" round-head bolts through the wall...
Installation Instructions - Page 10
... be sure the "Rear Wall" arrows align to use as guides.
■■ If the wall behind the microwave oven (as... oven. The template has trim lines to the thickest part of the microwave oven.
Disconnect power to the upper cabinet...; If the upper cabinet has a frame around the supply cord hole as installed) has a partial wall covering (for example, the thickness of the
upper cabinet...
Installation Instructions - Page 11

...or more people, lift microwave oven and hang it on your model, it may be added. Place a washer on a covered ... have packing spacers, begin with at the bottom of mounting plate, and set aside on each 1/4-20 x 3" flat-head bolt and place
inside upper..., wood filler blocks (installer to be the same thickness as the space between upper cabinet and microwave oven.
Support tabs
A. If it ...
Installation Instructions - Page 12

Refer to the User Instructions for troubleshooting information.
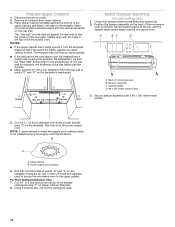
Insert damper assembly through the cabinet cutout so that the long tab of the damper assembly slides under vent)
12 A
B
C
D
E
F
A. Raised tabs B. Do not remove ground prong. Save Installation Instructions for future use an adapter. Install filters. NOTE: The screw cannot be installed if the damper assembly is...
Installation Instructions - Page 13
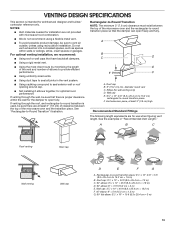
...Vent Length." Roof cap B. 6" (15.2 cm) min. For optimal venting installation, we recommend:
■■ Using roof or wall caps that have backdraft ...10 ft (8.3 x 25.4 cm = 3 m)
13 VENTING DESIGN SPECIFICATIONS
This section is intended for wall venting only) D. NOTES:
■■ Vent materials needed for installation are not provided with microwave hood combination.
■■ We do ...
Installation Instructions - Page 14
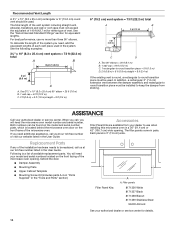
... website listed in the User Guide. Replacement Parts
If any of vent. Filler...service center. Both numbers can be installed to use no more than three 90° elbows.
Two 90° elbows = 20 ft (6.1 m) B. 1 wall cap = 40 ft (12.2 m) C. 1 rectangular-to round transition piece must be used in pairs.
You will need additional assistance, call , you need the microwave oven model...
Maytag UMV1160C Reviews
We have not received any reviews for Maytag yet.