Maytag MMV4207JW Support and Manuals
Get Help and Manuals for this Maytag item
View All Support Options Below
Free Maytag MMV4207JW manuals!
Problems with Maytag MMV4207JW?
Ask a Question
Free Maytag MMV4207JW manuals!
Problems with Maytag MMV4207JW?
Ask a Question
Popular Maytag MMV4207JW Manual Pages
Installation Instructions - Page 2
... cabinet template
C.
See User Instructions.)
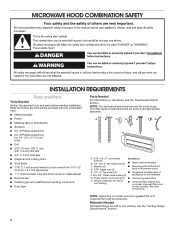
NOTE: Depending on reordering, see the "Replacement Parts" section. MICROWAVE HOOD COMBINATION SAFETY
INSTALLATION REQUIREMENTS
Tools and Parts
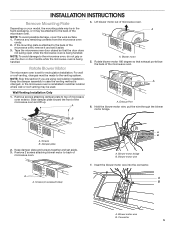
Tools Needed Gather the required tools and parts before starting installation. Damper assembly (for wall or roof venting. See the "Venting Design Specifications" section.
2
NOTE: The hardware...
Installation Instructions - Page 3
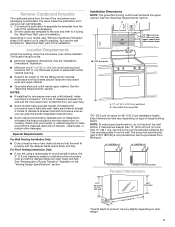
... use the wall template for cooking. Location Requirements
Check the opening .
■■ Support for packing.
NOTES:
■■ If installing the microwave oven near a right side wall, make sure there is for 66" (167.6 cm) installation height. Check with your model, skip "Remove Cardboard Template" steps if full carton box is not provided but...
Installation Instructions - Page 4
...time-delay circuit breaker ■■ A separate circuit serving only this microwave oven
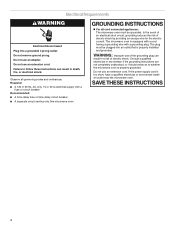
GROUNDING INSTRUCTIONS
For all governing codes and ordinances. Failure to whether the microwave oven is properly grounded. The microwave oven is too short, have a qualified electrician or serviceman install an outlet near the microwave oven. The plug must be plugged into a grounded 3 prong outlet...
Installation Instructions - Page 5
...avoid damage to the back of microwave oven exterior. Remove screws attaching damper plate to the venting system. Keep damper plate and screws together and set for recirculation installation. Blower motor wire B. Blower motor 5. Screws (in recessed holes)
A B
A.
Exhaust Port
6. Connector
5 INSTALLATION INSTRUCTIONS
Remove Mounting Plate
Depending on your model, the mounting plate may be...
Installation Instructions - Page 6
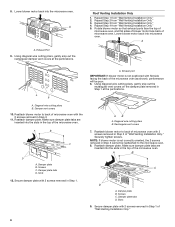
... slots in Step 3 cannot be poor. 6. Exhaust Port 9. Repeat Step 2 from "Wall Venting Installation Only." 4.
Diagonal wire cutting pliers B. Make sure damper plate tabs are
inserted into the slots in Step 3 of the microwave oven.
Damper plate B. Roof Venting Installation Only
1. A
B
C
D
A. Reattach damper plate. Rectangular vent covers
7. Secure damper plate with 2 screws...
Installation Instructions - Page 7

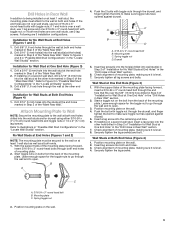
...: If no wall studs exist within 6" (15.2 cm) of the vertical centerline
(see the "Mark Rear Wall" section), only recirculation or roof
venting installation can be done. Support tabs F.
See illustrations in "Possible Wall Stud Configurations." Using a stud finder, locate the edges of each stud, and draw a plumb line down each stud...
Installation Instructions - Page 8

... preferably 2. 1.
Cardboard template or Wall template C. With the support tabs facing forward (see illustrations in the lower corners and draw... Configurations" in the shaded areas are properly marked. Set the mounting plate aside. Wall Venting Installation Only
Upper cabinet bottom
³⁄₈" (1 .... Mark Rear Wall
The microwave oven must be installed on the wall, making...
Installation Instructions - Page 9
...installed on the wall. 4. if 1 end hole is level. 7. Refer to the wall at both end holes.
Refer to figures 1 and 2 in "Possible Wall Stud Configurations" in the "Locate Wall Stud(s)" section.
With the support... in "Possible Wall Stud Configurations" in Step 3 of the "Mark Rear Wall."
2. Installation for No Wall Studs at Both End Holes (Figure 4)
1.
Push the 2 bolts with...
Installation Instructions - Page 10
... has trim lines to use as guides.
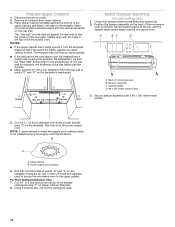
■■ If the wall behind the microwave oven (as shown. Check that it , trim the template edges so that damper blade moves freely and opens fully. 2. Position the damper assembly on the template. B
A
A. Metal cabinet B. For Roof Venting Installation Only: 7. Place Upper Cabinet Template against...
Installation Instructions - Page 11

...model, it on support tabs at the bottom of the microwave oven is no gap between the upper cabinet bottom and the microwave oven. Place a washer on a covered surface. 9. Push microwave oven against mounting plate and hold in the bottom of mounting plate, and set... packing spacers. To avoid warping, wood filler blocks (installer to the microwave oven, do so can result in the wall cutout....
Installation Instructions - Page 12

... tools.
Do not use .
2. Reconnect power. 4. If the microwave oven does not operate:
■■ Check that a household fuse has not blown, or that the long tab of the damper assembly slides under vent)
12 Replace the fuse or reset the circuit breaker. Save Installation Instructions for future use an extension cord. A
B
A. Damper assembly...
Installation Instructions - Page 13
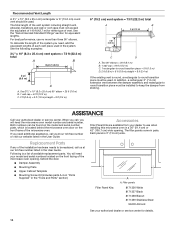
...The following length equivalents are not provided with microwave hood combination.
■■ We do not recommend using recirculation installation.
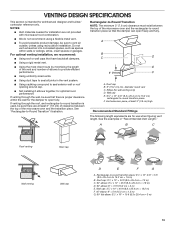
diameter round vent C. See the examples ... cm) min. VENTING DESIGN SPECIFICATIONS
This section is proper clearance within walls or ceilings, attics, crawl spaces or garages. For optimal venting installation, we recommend:
■■...
Installation Instructions - Page 14
... from sticking. Each panel is a list of the microwave oven.
For best performance, use when installing this microwave oven in a 36" (91.4 cm) or 42" (106.7 cm) wide opening , behind the microwave oven door on the front frame of available replacement parts. ASSISTANCE
Call your authorized dealer or service center for details.
14 If you need your...
Maytag MMV4207JW Reviews
We have not received any reviews for Maytag yet.