Maytag MMV1175JB Support and Manuals
Get Help and Manuals for this Maytag item

View All Support Options Below
Free Maytag MMV1175JB manuals!
Problems with Maytag MMV1175JB?
Ask a Question
Free Maytag MMV1175JB manuals!
Problems with Maytag MMV1175JB?
Ask a Question
Popular Maytag MMV1175JB Manual Pages
Installation Instructions - Page 1
... including 36" (91.4 cm) wide. These installation instructions cover different models. MICROWAVE HOOD COMBINATION INSTALLATION INSTRUCTIONS
This product is suitable for wall venting only 10 Install the Microwave Oven 10 Complete Installation 11 VENTING DESIGN SPECIFICATIONS 12 ASSISTANCE 14 Replacement Parts 14 Accessories 14
MICROWAVE HOOD COMBINATION SAFETY
W11485889B The appearance...
Installation Instructions - Page 2
...
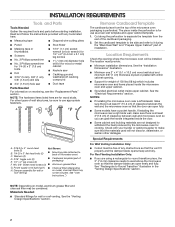
Gather the required tools and parts before starting installation. Location Requirements
Check the opening .
■ Support for wood studs. Power supply cord bushing (1) ■ Charcoal filters (Depending
H. See "Rectangular to back of the cardboard packaging.
2. See "User
Instructions.")
Remove Cardboard Template
The cardboard piece from the rest of microwave oven)
C. Washers...
Installation Instructions - Page 3
... microwave oven
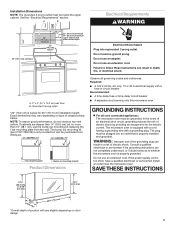
GROUNDING INSTRUCTIONS
For all governing codes and ordinances. SAVE THESE INSTRUCTIONS
... out mounting kit (part # W11185746) is properly installed and grounded. A
...instructions are deeper than 15" (38.1 cm), use the bump out mounting kit replacing the I bar mounting plate
Bump out mounting bracket
Product Dimensions
Observe all cord connected appliances: The microwave...
Installation Instructions - Page 4

...
4 If the mounting plate is being handled.
3.
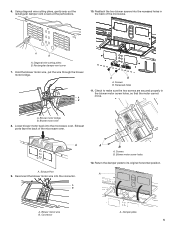
Remove two blower screws attaching blower motor to the back of
B
microwave oven, set it aside.
3.
Damper plate
A.
A
B
A. Blower motor wire B. INSTALLATION INSTRUCTIONS
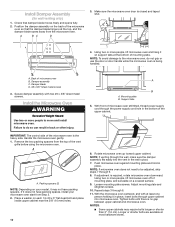
Remove Mounting Plate
Depending on your model, the mounting plate may be in the foam packaging, or it may be made to the back of...
Installation Instructions - Page 5
....
A B
A
B
A. Return the damper plate to make sure the two screws are secured properly in the back of the microwave oven. A B
A. Hold the blower motor wire, put the wire through the blower motor bridge.
Blower motor wire B. Damper plate 5
Rectangular damper vent cover 7. Screws B. Lower ...
Installation Instructions - Page 6
... at the perforations. Rectangular vent covers B. Secure damper plate with two screws removed in
the back of the microwave. 10.
A
B A. Screws
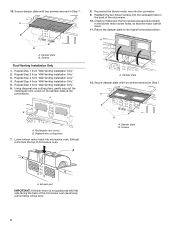
Roof Venting Installation Only 1. Repeat Step 1 from "Wall Venting Installation Only." 3. Repeat Step 4 from "Wall Venting Installation Only." 5.
Reattach the two blower screws into the recessed holes in Step 1. Check to its original...
Installation Instructions - Page 7

...
C
F
F
A. Wall stud centerlines
D. Support tabs F.
D. See illustrations in "Possible Wall Stud Configurations."
2. Mounting plate center markers
Mark Rear Wall
The microwave oven must align with the dimensions described in Step...), only recirculation or roof
venting installation can be done. Cabinet opening , do not install the microwave oven.
1.
Possible Wall Stud ...
Installation Instructions - Page 8

... centerline(s) drawn in Step 3 and that the end holes are properly marked. Wall Venting Installation Only
Upper cabinet bottom
3/8" (1 cm)
4" (10.2 cm)
Centerline
6" (15.2 ... holes must each other end hole. With the support tabs of the upper cabinet.
9. Start toggle ... Wall Stud Configurations" in steps 8 and 10.
12. Set the mounting plate aside. Using a straightedge, draw the two...
Installation Instructions - Page 9

... wall to open.
3. Wall Stud at Both End Holes (Figure 4)
1. With the support tabs of the microwave oven. Insert a lag screw into both end holes. 3. Prepare Upper Cabinet
1.
Position mounting...
5.
If installing on a second wall stud, insert a lag screw into the upper cabinet align with toggle nuts through the drywall, and finger
tighten the bolt to the thickest part of the ...
Installation Instructions - Page 10
... the vent in back or other injury. Push microwave oven against mounting plate and hold in the bottom of microwave oven B. NOTES: ■ Some upper cabinets may not have packing spaces, install your model, it on your microwave oven start from the top of mounting plate, and set aside on each 1/4-20 x 3" flat-head bolt and...
Installation Instructions - Page 11
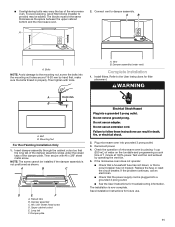
... be the same thickness as shown. Then tighten with #6 x 3/8" sheet metal screw. Install filters.
Damper assembly C. #6 x 3/8" Sheet metal screw D. Do not remove ground prong. Plug microwave oven into a grounded 3 prong outlet. ■ See the User Instructions for troubleshooting information. If the problem continues, call an electrician. ■ Check that the power supply cord is...
Installation Instructions - Page 12
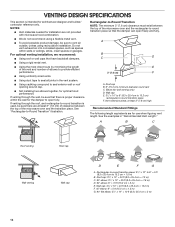
...31⁄4" x 10" to 6" (8.3 x 25.4 cm to 15.2 cm)
rectangular-to vent air outside, unless using recirculation installation. Roof cap: 31⁄4" x 10" = 24 ft (8.3 x 25.4 cm = 7.3 m) C. 90° elbow:... between the top of the microwave oven and the transition piece. If venting through the wall, be sure to -round transition piece F. VENTING DESIGN SPECIFICATIONS
This section is used, be...
Installation Instructions - Page 13
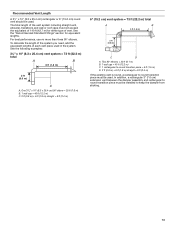
... used. The total length of each vent piece used . Recommended Vent Length
A 31⁄4" x 10" (8.3 x 25.4 cm) rectangular or 6" (15.2 cm) round vent should be installed to keep the damper from sticking.
13 For best performance, use no more than three 90° elbows.
Installation Instructions - Page 14
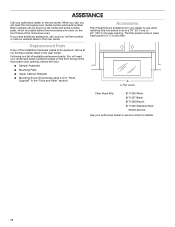
... microwave oven. You will need the microwave oven model number and serial number. Accessories
Filler Panel Kits are available from your authorized dealer or service center for details.
14 The filler panels come in the User Guide. Following is 3" (7.6 cm) wide. If you need your authorized dealer or service center.
Each panel is a list of available replacement parts...
Maytag MMV1175JB Reviews
We have not received any reviews for Maytag yet.