
Installation Instructions
Page 1
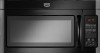
...model may differ slightly from the illustration in this manual and on your appliance. Always read and obey all safety messages. All safety messages will tell you what the potential hazard is, tell you how to Wall 8 Prepare Upper Cabinet 8 Install Damper Assembly 9 Install the Microwave Oven... 9 Complete Installation 10 VENTING DESIGN SPECIFICATIONS 11 ASSISTANCE 12 Replacement Parts 12 Accessories 12 MICROWAVE HOOD COMBINATION SAFETY Your safety and the safety of others . These words ...
...model may differ slightly from the illustration in this manual and on your appliance. Always read and obey all safety messages. All safety messages will tell you what the potential hazard is, tell you how to Wall 8 Prepare Upper Cabinet 8 Install Damper Assembly 9 Install the Microwave Oven... 9 Complete Installation 10 VENTING DESIGN SPECIFICATIONS 11 ASSISTANCE 12 Replacement Parts 12 Accessories 12 MICROWAVE HOOD COMBINATION SAFETY Your safety and the safety of others . These words ...

Installation Instructions
Page 2
... with your builder or cabinet supplier to withstand the heat produced by the microwave oven for cooking. For other damages. A B C D E FG H A. 1/4-20 x 3" round-head bolts (2) B. 1/4-20 x 3" flat-head bolts (2) C. Toggle nuts (2) E. 1/4" x 2" lag screws (2) F. See User Instructions.) NOTE: Depending on model, charcoal filters may be free of wall structures, be sure to use as...
... with your builder or cabinet supplier to withstand the heat produced by the microwave oven for cooking. For other damages. A B C D E FG H A. 1/4-20 x 3" round-head bolts (2) B. 1/4-20 x 3" flat-head bolts (2) C. Toggle nuts (2) E. 1/4" x 2" lag screws (2) F. See User Instructions.) NOTE: Depending on model, charcoal filters may be free of wall structures, be sure to use as...

Installation Instructions
Page 4
... 2 screws removed in the foam packaging, or it aside. 3. Blower motor 5. Remove any remaining contents from the microwave oven cavity. 2. NOTE: To avoid damage to back of the microwave oven. A A. INSTALLATION INSTRUCTIONS Remove Mounting Plate Depending on your model, the mounting plate may be in Step 1. 4 Wall Venting Installation Only 1. Exhaust port 6. Reattach damper plate...
... 2 screws removed in the foam packaging, or it aside. 3. Blower motor 5. Remove any remaining contents from the microwave oven cavity. 2. NOTE: To avoid damage to back of the microwave oven. A A. INSTALLATION INSTRUCTIONS Remove Mounting Plate Depending on your model, the mounting plate may be in Step 1. 4 Wall Venting Installation Only 1. Exhaust port 6. Reattach damper plate...

Installation Instructions
Page 12
... come in China Following is round, a rectangular to be used. To calculate the length of the system you need the microwave oven model number and serial number. Filler panels Filler Panel Kit Number 8171336 8171337 8171338 8171339 99403 White Black Biscuit Stainless Steel Almond See your...in the User Instructions. All rights reserved. 461966202992 9/10 Printed in pairs. You will need , add the equivalent lengths of the microwave oven. When you will need additional assistance, call , you call us at our toll free number or visit our website listed in the...
... come in China Following is round, a rectangular to be used. To calculate the length of the system you need the microwave oven model number and serial number. Filler panels Filler Panel Kit Number 8171336 8171337 8171338 8171339 99403 White Black Biscuit Stainless Steel Almond See your...in the User Instructions. All rights reserved. 461966202992 9/10 Printed in pairs. You will need , add the equivalent lengths of the microwave oven. When you will need additional assistance, call , you call us at our toll free number or visit our website listed in the...
Owners Manual
Page 1
... alerts you to potential hazards that can kill or hurt you what can be killed or seriously injured if you still need your model and serial number located on your appliance. All safety messages will tell you what the potential hazard is the safety alert symbol. ...the microwave oven opening, behind the door. You will follow the specific "PRECAUTIONS TO AVOID POSSIBLE EXPOSURE TO EXCESSIVE MICROWAVE ENERGY" found in this section. ■ Some products such as whole eggs in the shell and sealed containers - All safety messages will need assistance, call us at www.maytag.com...
... alerts you to potential hazards that can kill or hurt you what can be killed or seriously injured if you still need your model and serial number located on your appliance. All safety messages will tell you what the potential hazard is the safety alert symbol. ...the microwave oven opening, behind the door. You will follow the specific "PRECAUTIONS TO AVOID POSSIBLE EXPOSURE TO EXCESSIVE MICROWAVE ENERGY" found in this section. ■ Some products such as whole eggs in the shell and sealed containers - All safety messages will need assistance, call us at www.maytag.com...

Owners Manual
Page 2
...it is important not to defeat or tamper with the safety interlocks. (b) Do not place any openings on top of the microwave oven when the microwave oven is in the microwave oven for a short time before removing the container. - It is not working properly, or if it . - It is .... ■ Do not use paper products when appliance is specifically designed to operate this microwave oven outdoors. This type of oven is operated in convection, combination, grill or "PAN BROWN" mode (on models with such features). ■ Do not store any appliance, close properly and that the...
...it is important not to defeat or tamper with the safety interlocks. (b) Do not place any openings on top of the microwave oven when the microwave oven is in the microwave oven for a short time before removing the container. - It is not working properly, or if it . - It is .... ■ Do not use paper products when appliance is specifically designed to operate this microwave oven outdoors. This type of oven is operated in convection, combination, grill or "PAN BROWN" mode (on models with such features). ■ Do not store any appliance, close properly and that the...

Owners Manual
Page 3
... on some models) Timer can result in hours and minutes with a fuse or circuit breaker. or P.M. Programming tones may be turned off at certain times. Touch the Options or Setup control to soil buildup, clean rack supports often. To avoid damage to the microwave oven due to reach...Mode and Language (on some models) for exactly 30 minutes, or to reach the "Light Timer" submenu, and set speed. Vent Timer (on . Touch the Options or Setup control to reach the "Demo Mode" submenu, and activate or deactivate Demo Mode. See "Microwave Oven Care" section. Scroll Speed Scroll...
... on some models) Timer can result in hours and minutes with a fuse or circuit breaker. or P.M. Programming tones may be turned off at certain times. Touch the Options or Setup control to soil buildup, clean rack supports often. To avoid damage to the microwave oven due to reach...Mode and Language (on some models) for exactly 30 minutes, or to reach the "Light Timer" submenu, and set speed. Vent Timer (on . Touch the Options or Setup control to reach the "Demo Mode" submenu, and activate or deactivate Demo Mode. See "Microwave Oven Care" section. Scroll Speed Scroll...

Owners Manual
Page 4
...screws. ■ Cooktop light: The cooktop light bulb is located on the underside of the microwave oven, under the bulb cover, and is located behind the vent grille at 100%. Remove two screws on some models) Touch COOK TIME, touch number pads to enter time, touch COOK POWER (if not 100...9632; Objects with gold or silver trim or with metallic glaze To Test Cookware/Dinnerware: Place dish in microwave oven with your model. Program 1 minute of cook time at the top front of the microwave oven, and is not recommended. If dish becomes hot and the water stays cool, do not use stainless ...
...screws. ■ Cooktop light: The cooktop light bulb is located on the underside of the microwave oven, under the bulb cover, and is located behind the vent grille at 100%. Remove two screws on some models) Touch COOK TIME, touch number pads to enter time, touch COOK POWER (if not 100...9632; Objects with gold or silver trim or with metallic glaze To Test Cookware/Dinnerware: Place dish in microwave oven with your model. Program 1 minute of cook time at the top front of the microwave oven, and is not recommended. If dish becomes hot and the water stays cool, do not use stainless ...

Owners Manual
Page 5
...experience static or noise while microwave oven is normal and depends on during microwave oven operation to cool the microwave oven. Make sure Control Lock is off to cool the microwave oven's controls while the cooktop below . Make sure Demo Mode (on some models), which may also automatically...■ Rack support ■ Grease filters ■ Charcoal filter ■ Cooktop light bulb ■ Cavity light bulb 5 www.maytag.com Microwave oven will not operate Check the following : ■ Proximity Move the receiver away from the vent fan, automatically comes on motor rotation ...
...experience static or noise while microwave oven is normal and depends on during microwave oven operation to cool the microwave oven. Make sure Control Lock is off to cool the microwave oven's controls while the cooktop below . Make sure Demo Mode (on some models), which may also automatically...■ Rack support ■ Grease filters ■ Charcoal filter ■ Cooktop light bulb ■ Cavity light bulb 5 www.maytag.com Microwave oven will not operate Check the following : ■ Proximity Move the receiver away from the vent fan, automatically comes on motor rotation ...
Owners Manual
Page 6
... major appliance is located in a remote area where service by a Maytag designated service company. Have your complete model number ready. Service calls to view FAQs (Frequently Asked Questions), visit www.maytag.com. Costs associated with the removal from your home of the microwave oven opening, behind the door. Repairs to parts or systems resulting from...
... major appliance is located in a remote area where service by a Maytag designated service company. Have your complete model number ready. Service calls to view FAQs (Frequently Asked Questions), visit www.maytag.com. Costs associated with the removal from your home of the microwave oven opening, behind the door. Repairs to parts or systems resulting from...

Dimension Guide
Page 1
... be inside the upper cabinet. Rectangular to Round Transition for either type of the microwave oven and the rectangular to round transition piece so that a separate circuit serving only this microwave oven be used in the system. For complete details, see Installation our products, we ... 3 " x 10" to 6" = 5 ft (8.3 x 25.4 cm to improve Dimensions are for 66" (167.6 cm) installation height. Microwave Hood Combination PRODUCT MODEL NUMBERS MMV1164W MMV4203W MMV5208W MMV6180W MMV6186W Electrical: A 120-Volt, 60-Hz, AC-only, 15- or 20-amp fused electrical supply with product.
... be inside the upper cabinet. Rectangular to Round Transition for either type of the microwave oven and the rectangular to round transition piece so that a separate circuit serving only this microwave oven be used in the system. For complete details, see Installation our products, we ... 3 " x 10" to 6" = 5 ft (8.3 x 25.4 cm to improve Dimensions are for 66" (167.6 cm) installation height. Microwave Hood Combination PRODUCT MODEL NUMBERS MMV1164W MMV4203W MMV5208W MMV6180W MMV6186W Electrical: A 120-Volt, 60-Hz, AC-only, 15- or 20-amp fused electrical supply with product.

Warranty Information
Page 1
... warranty applies. 9/07 For additional product information or to view FAQs (Frequently Asked Questions), visit www.maytag.com. Please keep this User Instructions and model number information for other damage to the finish of your major appliance, unless such damage results from defects...service, call 1-800-688-9900. W10306244A SP PN W10306246A © 2009. You can write to Maytag with the removal from the date of the microwave oven opening, behind the door. MAYTAG® MAJOR APPLIANCE WARRANTY LIMITED WARRANTY For one year from unauthorized modifications made to the appliance. ...
... warranty applies. 9/07 For additional product information or to view FAQs (Frequently Asked Questions), visit www.maytag.com. Please keep this User Instructions and model number information for other damage to the finish of your major appliance, unless such damage results from defects...service, call 1-800-688-9900. W10306244A SP PN W10306246A © 2009. You can write to Maytag with the removal from the date of the microwave oven opening, behind the door. MAYTAG® MAJOR APPLIANCE WARRANTY LIMITED WARRANTY For one year from unauthorized modifications made to the appliance. ...


