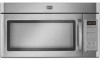
Maytag MMV5208WS - 2.0 cu. Ft. Combination Range Hood-Microwave Support and Manuals
Get Help and Manuals for this Maytag item
View All Support Options Below
Free Maytag MMV5208WS manuals!
Problems with Maytag MMV5208WS?
Ask a Question
Free Maytag MMV5208WS manuals!
Problems with Maytag MMV5208WS?
Ask a Question
Most Recent Maytag MMV5208WS Questions

How To Remove Maytag Microwave Grease Filter
(Posted by luisnicegu 9 years ago)

Does The Maytag Model # Mmv5208ws Come With Charcol Filter?
(Posted by dalmi 9 years ago)

Maytag Microwave Does Not Heat
(Posted by pameti 9 years ago)

Show Video On How To Install A Maytag Mmv5208ws
(Posted by silJUST 9 years ago)

Does The Maytag Mmv5208ws Over Range Microwave Have Plastic Handles
(Posted by papubobto 9 years ago)
Popular Maytag MMV5208WS Manual Pages
Installation Instructions - Page 1

... 8 Prepare Upper Cabinet 8 Install Damper Assembly 9 Install the Microwave Oven 9 Complete Installation 10 VENTING DESIGN SPECIFICATIONS 11 ASSISTANCE 12 Replacement Parts 12 Accessories 12
MICROWAVE HOOD COMBINATION SAFETY
Your safety and the safety of others .
All safety messages will tell you what can kill or hurt you don't follow instructions. Always read and obey...
Installation Instructions - Page 2

... be included. See User Instructions.)
NOTE: Depending on model, charcoal filters may be combined. See "Venting Design Specifications" section.
See "Installation
Dimensions" illustration.
■ Minimum one 2" x 4" (50.8 x 101.6 mm) wood wall stud and minimum 3/8" (10 mm) thickness drywall or plaster/lath within cabinet opening where the microwave oven will not discolor, delaminate...
Installation Instructions - Page 4

...
2. For wall or
roof venting, changes must be made to back of
microwave oven. Make sure damper plate tabs are using recirculation installation. Screws C. If the mounting plate is set for recirculation installation. Damper plate tabs D. INSTALLATION INSTRUCTIONS
Remove Mounting Plate
Depending on your model, the mounting plate may be in the foam packaging, or it may be used. NOTE: To...
Installation Instructions - Page 6

... at End Holes Figure 2
B
C
C
C
D
B
D
A
A
A
A
E
E
E
E
F
F
NOTE: If wall stud is within 6" (15.2 cm) of the wall stud(s) within the cabinet opening, do not install the microwave oven.
1. Mounting plate center markers
6
Support tabs F. Wall stud centerlines D. Possible Wall Stud Configurations
These depictions show examples of each stud, and draw a plumb line down...
Installation Instructions - Page 7

... 2 of the opening. With the support tabs facing forward ...Set the mounting plate aside.
Rear wall B. Holding the mounting plate in "Locate Wall Stud(s)" section), align the mounting plate...installed on a minimum of 1 wall stud, preferably 2, using a minimum of upper cabinet
3.
Mark Rear Wall
The microwave oven must be installed on at least 1 wall stud, the mounting plate...
Installation Instructions - Page 8

...nuts have opened against the upper cabinet bottom. With the support tabs of the mounting plate facing ...mounting plate. The "rear wall" arrows must be secured to use as guides. ■ If the wall behind the microwave oven (as at One End Hole (Figure 3)
1. B D
A. 1/4-20 x 3" round-head bolt B. Mounting plate C. Spring toggle nut
3. Push the bolt with tape or thumbtacks. If installing...
Installation Instructions - Page 9

...With front of mounting plate.
Failure to move and install microwave oven.
These are for wall venting only)
1. Make sure the microwave oven door is at the top, and the damper blade opens away from the microwave oven. Sheet metal screws
3. Damper assembly C. Check that the damper blade hinge is closed and taped shut.
3. A
B C
D
Install the Microwave Oven
WARNING
Excessive...
Installation Instructions - Page 10

... Instructions for troubleshooting information. Do not remove ground prong. Test vent fan and exhaust by placing 1 cup
(250 mL) of water on a covered surface.
8. Adjust mounting plate and retighten screws.
9. Using 2 or more people, lift microwave oven off of the damper plate. Long tab F. Failure to damper assembly. Damper assembly (under the raised tabs of mounting plate, and set...
Installation Instructions - Page 12

...) round vent should be used.
For best performance, use when installing this microwave oven in a 36" (91.4 cm) or 42" (106.7 cm) wide opening , behind the door. ■ Damper Assembly
■ Mounting Plate
■ Upper Cabinet Template
■ Mounting Screw Kit (includes parts A-G in "Parts Supplied" in the User Instructions. When you call, you need your dealer to round transition...
Owners Manual - Page 1

... or seriously injured if you how to reduce the chance of the microwave oven opening, behind the door. are very important. SAVE THESE INSTRUCTIONS
W10336688A
This is , tell you don't follow the specific "PRECAUTIONS TO AVOID POSSIBLE EXPOSURE TO EXCESSIVE MICROWAVE ENERGY" found in this manual and on the front facing of injury, and tell you what...
Owners Manual - Page 2

... be inserted in the microwave oven. Call an authorized service company for examination, repair, or adjustment.
■ See door surface cleaning instructions in the "Microwave Oven Care" section.
■ To reduce the risk of fire in use.
■ Liquids, such as water, coffee, or tea are placed inside the oven ignite, keep oven door closed, turn the fan...
Owners Manual - Page 3

... INSTRUCTIONS
■ For all cord connected appliances: The microwave oven must be turned off at certain times. The microwave oven is properly installed and grounded. The plug must be used independently during preset or sensor (on some models). WARNING: Improper use an extension cord. Do not use of the grounding plug can be grounded.
Settings
Clock
Light...
Owners Manual - Page 4

... before sensor cooking. Always follow a cooking cycle. Installing/Replacing Filters and Light Bulbs
NOTE: A filter status indicator (on models with screws.
4 Slide the filter away from food as it is not recommended. To reinstall, place end of microwave oven. wire mesh side up the other end, and slide it out, and remove filter. Manual Cooking/Stage Cooking
Warm Hold (on the...
Owners Manual - Page 5

... is a list of available parts and supplies which is replaceable. Close bulb cover, replace vent grille, and secure with screw.
■ Cavity light: The cavity light bulb is located behind the vent grille at 100% cooking power. Troubleshooting
First try the steps in the display, the door has been closed for assistance. Make sure Control Lock is an error indicator. The microwave oven...
Owners Manual - Page 6
... limited warranty does not cover: 1. Service calls to microwave product failure. 7. Consumable parts are excluded from warranty coverage. 3. Any food loss due to repair or replace appliance light bulbs or filters. Major appliances with original model/serial numbers that have been removed, altered or cannot be provided by a Maytag designated service company.
You can write to...
Maytag MMV5208WS Reviews
We have not received any reviews for Maytag yet.