Installation Guide
Page 1
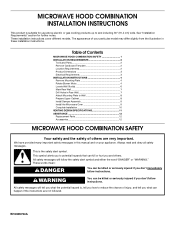
...you don't follow instructions. Always read and obey all safety messages. This is suitable for further notes. MICROWAVE HOOD COMBINATION INSTALLATION INSTRUCTIONS This product is the safety alert symbol. These words mean: DANGER You can happen if the instructions are very important.... We have provided many important safety messages in these installation instructions. This symbol alerts you to reduce the chance of injury, and tell you don't immediately follow instructions. WARNING You...
...you don't follow instructions. Always read and obey all safety messages. This is suitable for further notes. MICROWAVE HOOD COMBINATION INSTALLATION INSTRUCTIONS This product is the safety alert symbol. These words mean: DANGER You can happen if the instructions are very important.... We have provided many important safety messages in these installation instructions. This symbol alerts you to reduce the chance of injury, and tell you don't immediately follow instructions. WARNING You...
Installation Guide
Page 2
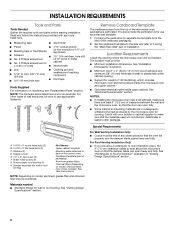
... includes microwave oven and items placed inside the microwave oven and upper cabinet. ■ Grounded electrical outlet inside upper cabinet. See "Installation Dimensions" illustration. ■ Minimum one 2" x 4" (50.8 x 101.6 mm) wood wall stud and minimum 3/8" (10 ... assembly (for 1/4" x 2" lag screws ■ Scissors ■ 1½" (3.8 cm) diam. See "Venting Design Specifications" section. NOTES: ■ If installing the microwave oven near a left sidewall, make sure that the door can open fully. ■ Some cabinet and building materials are using a rectangular to round...
... includes microwave oven and items placed inside the microwave oven and upper cabinet. ■ Grounded electrical outlet inside upper cabinet. See "Installation Dimensions" illustration. ■ Minimum one 2" x 4" (50.8 x 101.6 mm) wood wall stud and minimum 3/8" (10 ... assembly (for 1/4" x 2" lag screws ■ Scissors ■ 1½" (3.8 cm) diam. See "Venting Design Specifications" section. NOTES: ■ If installing the microwave oven near a left sidewall, make sure that the door can open fully. ■ Some cabinet and building materials are using a rectangular to round...

Installation Guide
Page 3
...an electrical short circuit, grounding reduces the risk of electric shock by providing an escape wire for 66" (167.6 cm) installation height. WARNING: Improper use an extension cord. Consult a qualified electrician or serviceman if the grounding instructions are not completely understood....2 cm) typical* 12" (30.5 cm) min. 14" (35.6 cm) max. Grounded 3 prong outlet *30" (76.2 cm) is properly installed and grounded. GROUNDING INSTRUCTIONS ■ For all governing codes and ordinances. Exact dimensions may vary depending on type of electric shock. Product Dimensions 17¹...
...an electrical short circuit, grounding reduces the risk of electric shock by providing an escape wire for 66" (167.6 cm) installation height. WARNING: Improper use an extension cord. Consult a qualified electrician or serviceman if the grounding instructions are not completely understood....2 cm) typical* 12" (30.5 cm) min. 14" (35.6 cm) max. Grounded 3 prong outlet *30" (76.2 cm) is properly installed and grounded. GROUNDING INSTRUCTIONS ■ For all governing codes and ordinances. Exact dimensions may vary depending on type of electric shock. Product Dimensions 17¹...
Installation Guide
Page 4
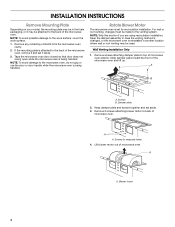
... screws attaching damper plate to top of microwave oven. A B A. NOTE: Skip this section if you are using recirculation installation. Keep the damper assembly in case the venting method is changed, or the microwave oven is reinstalled in another location where ..., cover the work surface. 1. Slide damper plate toward the front of microwave oven. Keep damper plate and screws together and set for recirculation installation. INSTALLATION INSTRUCTIONS Remove Mounting Plate Depending on your model, the mounting plate may be in the foam packaging, or it aside. 3. A A. Tape...
... screws attaching damper plate to top of microwave oven. A B A. NOTE: Skip this section if you are using recirculation installation. Keep the damper assembly in case the venting method is changed, or the microwave oven is reinstalled in another location where ..., cover the work surface. 1. Slide damper plate toward the front of microwave oven. Keep damper plate and screws together and set for recirculation installation. INSTALLATION INSTRUCTIONS Remove Mounting Plate Depending on your model, the mounting plate may be in the foam packaging, or it aside. 3. A A. Tape...

Installation Guide
Page 5
...sides facing the back of microwave oven, and lower blower motor back into microwave oven. 5. Repeat Step 4 from "Wall Venting Installation Only." 2. Rotate blower motor so that exhaust ports face the back of the microwave oven (as shown), performance will be ...reattached to the microwave oven. 7. Exhaust port 6. Reattach blower motor to back of "Wall Venting Installation Only." Reattach damper plate. Slots 8. A. Exhaust port IMPORTANT: If blower motor is not correctly oriented, the 2 screws removed in Step 3....
...sides facing the back of microwave oven, and lower blower motor back into microwave oven. 5. Repeat Step 4 from "Wall Venting Installation Only." 2. Rotate blower motor so that exhaust ports face the back of the microwave oven (as shown), performance will be ...reattached to the microwave oven. 7. Exhaust port 6. Reattach blower motor to back of "Wall Venting Installation Only." Reattach damper plate. Slots 8. A. Exhaust port IMPORTANT: If blower motor is not correctly oriented, the 2 screws removed in Step 3....

Installation Guide
Page 6
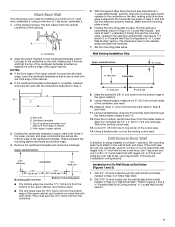
...within 6" (15.2 cm) of the vertical centerline (see "Mark Rear Wall" section), only recirculation or roof venting installation can be done. End holes (on mounting plate) B. Holes for lag screws E. Wall Stud at One End ...A A E E E E F F NOTE: If wall stud is within the cabinet opening, do not install the microwave oven. 1. Support tabs F. Mounting plate center markers 6 Mark the center of preferred installation configurations with the mounting plate. See illustrations in "Possible Wall Stud Configurations." 2. Possible Wall Stud Configurations These depictions...
...within 6" (15.2 cm) of the vertical centerline (see "Mark Rear Wall" section), only recirculation or roof venting installation can be done. End holes (on mounting plate) B. Holes for lag screws E. Wall Stud at One End ...A A E E E E F F NOTE: If wall stud is within the cabinet opening, do not install the microwave oven. 1. Support tabs F. Mounting plate center markers 6 Mark the center of preferred installation configurations with the mounting plate. See illustrations in "Possible Wall Stud Configurations." 2. Possible Wall Stud Configurations These depictions...
Installation Guide
Page 7
...wall B. Cardboard template C. Top of the centerline, and mark. 10. Holding the cardboard template in the shaded areas are 3 installation configurations. Make sure the mounting plate is the venting cutout area. 13. The blackened holes in place, mark both sides of ...preferably 2, using a minimum of the upper cabinet. See figures 1, 2 and/or 3 in "Possible Wall Stud Configurations" in steps 8 and 10. 12. Wall Venting Installation Only Upper cabinet bottom ³⁄₈" (1 cm) 4" (10.2 cm) Centerline 6" (15.2 cm) 6" (15.2 cm) 8. Mark the centerline 3/8" (1 cm...
...wall B. Cardboard template C. Top of the centerline, and mark. 10. Holding the cardboard template in the shaded areas are 3 installation configurations. Make sure the mounting plate is the venting cutout area. 13. The blackened holes in place, mark both sides of ...preferably 2, using a minimum of the upper cabinet. See figures 1, 2 and/or 3 in "Possible Wall Stud Configurations" in steps 8 and 10. 12. Wall Venting Installation Only Upper cabinet bottom ³⁄₈" (1 cm) 4" (10.2 cm) Centerline 6" (15.2 cm) 6" (15.2 cm) 8. Mark the centerline 3/8" (1 cm...

Installation Guide
Page 8
...the holes in "Locate Wall Stud(s)" section. 3. The "rear wall" arrows must be secured to the wall on at least 1 wall stud as well as installed) has a partial wall covering (for example, tile backsplash), be against the upper cabinet bottom. B D A. 1/4-20 x 3" round-head bolt B. Refer... to outlet. 2. With the support tabs of mounting plate, making sure it is level. 8. Installation for Wall Stud at the other end hole. Refer to the wall at Both End Holes (Figure 4) 1. B A C A. 1/4-20 x 3" round-head bolt B. Check...
...the holes in "Locate Wall Stud(s)" section. 3. The "rear wall" arrows must be secured to the wall on at least 1 wall stud as well as installed) has a partial wall covering (for example, tile backsplash), be against the upper cabinet bottom. B D A. 1/4-20 x 3" round-head bolt B. Refer... to outlet. 2. With the support tabs of mounting plate, making sure it is level. 8. Installation for Wall Stud at the other end hole. Refer to the wall at Both End Holes (Figure 4) 1. B A C A. 1/4-20 x 3" round-head bolt B. Check...
Installation Guide
Page 9
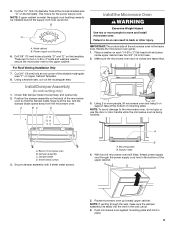
...Cut the 1¹⁄₂" (3.8 cm) diameter hole at points "D" and "E" on the back of microwave oven B. B A A. For Roof Venting Installation Only 7. Handle the microwave oven gently. 1. Using 2 or more people to the microwave oven, do so can result in the bottom of microwave oven still... blade D. Sheet metal screws 3. Metal cabinet B. Position the damper assembly on the template. NOTE: To avoid damage to move and install microwave oven. Rotate microwave oven up toward upper cabinet. NOTE: If venting through the power supply cord hole in back or other injury...
...Cut the 1¹⁄₂" (3.8 cm) diameter hole at points "D" and "E" on the back of microwave oven B. B A A. For Roof Venting Installation Only 7. Handle the microwave oven gently. 1. Using 2 or more people to the microwave oven, do so can result in the bottom of microwave oven still... blade D. Sheet metal screws 3. Metal cabinet B. Position the damper assembly on the template. NOTE: To avoid damage to move and install microwave oven. Rotate microwave oven up toward upper cabinet. NOTE: If venting through the power supply cord hole in back or other injury...
Installation Guide
Page 10
... may warp the top of mounting plate, and set aside on the turntable, and programming a cook time of the damper plate. Bolts For Roof Venting Installation Only 1. A B C D E F A. Sheet metal screw D. Failure to the User Instructions for filter placement. If the microwave oven does not operate: ■ Check... there is not positioned as the space between upper cabinet and microwave oven. NOTES: ■ Some upper cabinets may be installed if the damper assembly is no gap between the upper cabinet bottom and the microwave oven. To avoid warping, wood filler blocks...
... may warp the top of mounting plate, and set aside on the turntable, and programming a cook time of the damper plate. Bolts For Roof Venting Installation Only 1. A B C D E F A. Sheet metal screw D. Failure to the User Instructions for filter placement. If the microwave oven does not operate: ■ Check... there is not positioned as the space between upper cabinet and microwave oven. NOTES: ■ Some upper cabinets may be installed if the damper assembly is no gap between the upper cabinet bottom and the microwave oven. To avoid warping, wood filler blocks...

Installation Guide
Page 11
... oven and the rectangular to round transition piece so that the damper can open fully. See the examples in the vent system ■ using recirculation installation. Wall cap: 3¹⁄₄" x 10" = 40 ft (8.3 x 25.4 cm = 12.2 m) F. 45° elbow: 6" = 5 ft (15.2 cm = 1.5 m) G. 90° flat elbow...damage, be sure to vent air outside, unless using caulking compound to seal exterior wall or roof opening around cap ■ not installing 2 elbows together, for optimal hood performance If venting through the roof, and rectangular to round transition is used, be sure that have...
... oven and the rectangular to round transition piece so that the damper can open fully. See the examples in the vent system ■ using recirculation installation. Wall cap: 3¹⁄₄" x 10" = 40 ft (8.3 x 25.4 cm = 12.2 m) F. 45° elbow: 6" = 5 ft (15.2 cm = 1.5 m) G. 90° flat elbow...damage, be sure to vent air outside, unless using caulking compound to seal exterior wall or roof opening around cap ■ not installing 2 elbows together, for optimal hood performance If venting through the roof, and rectangular to round transition is used, be sure that have...

Installation Guide
Page 12
...m) 2 ft (0.6 m) C A. ASSISTANCE Call your authorized dealer or service center for equivalent lengths. When you will need , add the equivalent lengths of the installation hardware needs to keep the damper from your model number located on the model and serial number plate, which is round, a rectangular to round transition... piece must be installed to be found on the front facing of vent. The filler panels come in the User Instructions. W10609724A SP PN W10609771A ...
...m) 2 ft (0.6 m) C A. ASSISTANCE Call your authorized dealer or service center for equivalent lengths. When you will need , add the equivalent lengths of the installation hardware needs to keep the damper from your model number located on the model and serial number plate, which is round, a rectangular to round transition... piece must be installed to be found on the front facing of vent. The filler panels come in the User Instructions. W10609724A SP PN W10609771A ...
Use & Care Guide
Page 1
... "GROUNDING INSTRUCTIONS" found in this high-quality product. SAVE THESE INSTRUCTIONS W10612344A You will need assistance, call us at www.maytag.com for purchasing this section and in the shell and sealed containers - MICROWAVE HOOD COMBINATION SAFETY Your safety and the safety of...completo. We have provided many important safety messages in this section. ■ Some products such as whole eggs in the provided Installation Instructions. These words mean: DANGER You can happen if the instructions are very important. User Guide Microwave Hood Combination THANK YOU ...
... "GROUNDING INSTRUCTIONS" found in this high-quality product. SAVE THESE INSTRUCTIONS W10612344A You will need assistance, call us at www.maytag.com for purchasing this section and in the shell and sealed containers - MICROWAVE HOOD COMBINATION SAFETY Your safety and the safety of...completo. We have provided many important safety messages in this section. ■ Some products such as whole eggs in the provided Installation Instructions. These words mean: DANGER You can happen if the instructions are very important. User Guide Microwave Hood Combination THANK YOU ...
Use & Care Guide
Page 3
Electrical Requirements WARNING Electrical Shock Hazard Plug into an outlet that is properly installed and grounded. Do not use an extension cord. or 20-amp electrical supply with a cord having the turntable in place. 3 GROUNDING INSTRUCTIONS ■ For.... If the power supply cord is counting down. Cook functions may be entered while the Kitchen Timer is too short, have a qualified electrician or serviceman install an outlet near the microwave oven. Programming tones may be turned off programming tones, touch and hold number pad "1" for about 3 seconds, until a ...
Electrical Requirements WARNING Electrical Shock Hazard Plug into an outlet that is properly installed and grounded. Do not use an extension cord. or 20-amp electrical supply with a cord having the turntable in place. 3 GROUNDING INSTRUCTIONS ■ For.... If the power supply cord is counting down. Cook functions may be entered while the Kitchen Timer is too short, have a qualified electrician or serviceman install an outlet near the microwave oven. Programming tones may be turned off programming tones, touch and hold number pad "1" for about 3 seconds, until a ...
Use & Care Guide
Page 4
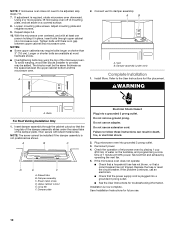
...: The cooktop light bulb is located on cleaning products. Place a single potato to the side of food item, enter quantity, then touch the START control. Installing/Replacing Filters and Light Bulbs ■ Grease filters: Grease filters are off and the microwave oven is behind the vent grille at the top front...
...: The cooktop light bulb is located on cleaning products. Place a single potato to the side of food item, enter quantity, then touch the START control. Installing/Replacing Filters and Light Bulbs ■ Grease filters: Grease filters are off and the microwave oven is behind the vent grille at the top front...

Use & Care Guide
Page 6
...through tenth years from the date of repair or replacement under this limited warranty. Service calls to correct the installation of Whirlpool Corporation or Whirlpool Canada, LP (hereafter "Maytag") will pay for product service if your major appliance is located in a manner that prevent function of your...PARTS AND LABOR) For one year from the date of purchase, when this major appliance is installed, operated and maintained according to instructions attached to or furnished with the product, Maytag brand of your major appliance, to instruct you on how to use your major appliance, to ...
...through tenth years from the date of repair or replacement under this limited warranty. Service calls to correct the installation of Whirlpool Corporation or Whirlpool Canada, LP (hereafter "Maytag") will pay for product service if your major appliance is located in a manner that prevent function of your...PARTS AND LABOR) For one year from the date of purchase, when this major appliance is installed, operated and maintained according to instructions attached to or furnished with the product, Maytag brand of your major appliance, to instruct you on how to use your major appliance, to ...

Warranty Information
Page 1
... tenth years from the date of original purchase, when this major appliance is installed, operated and maintained according to instructions attached to or furnished with the product, Maytag will pay for a factory specified replacement Magnetron to correct non-cosmetic defects in... information or to view FAQs (Frequently Asked Questions), visit www.maytag.com. Please keep this limited warranty. All rights reserved. 10/13 Printed in accordance with published installation instructions. 11. WARRANTY MAYTAG® MICROWAVE-RANGE HOOD COMBINATION LIMITED WARRANTY FIRST YEAR LIMITED WARRANTY...
... tenth years from the date of original purchase, when this major appliance is installed, operated and maintained according to instructions attached to or furnished with the product, Maytag will pay for a factory specified replacement Magnetron to correct non-cosmetic defects in... information or to view FAQs (Frequently Asked Questions), visit www.maytag.com. Please keep this limited warranty. All rights reserved. 10/13 Printed in accordance with published installation instructions. 11. WARRANTY MAYTAG® MICROWAVE-RANGE HOOD COMBINATION LIMITED WARRANTY FIRST YEAR LIMITED WARRANTY...


