Use & Care Guide
Page 5
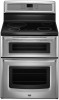
...: Pan size, material and positioning are very important to correct the interference by using the cooktop. COOKTOP USE This manual covers different models. Control lock L. Food spilled on . FG H E I . Left front surface cooking area display E. Surface cooking area off ...display H. Heat level power slider M. Induction cooking allows for additional information about its effects with a traditional element. Consult your model. Cooktop power B. The electromagnetic field may have purchased may affect the pacemaker or similar device. When melting foods such as ...
...: Pan size, material and positioning are very important to correct the interference by using the cooktop. COOKTOP USE This manual covers different models. Control lock L. Food spilled on . FG H E I . Left front surface cooking area display E. Surface cooking area off ...display H. Heat level power slider M. Induction cooking allows for additional information about its effects with a traditional element. Consult your model. Cooktop power B. The electromagnetic field may have purchased may affect the pacemaker or similar device. When melting foods such as ...

Use & Care Guide
Page 9
... the surface cooking area or element. ■ Do not place canner on 2 surface cooking areas or elements at the same time. ■ On ceramic glass models, use of medium-to cool. ■ Center the canner on the largest surface cooking area or element. If there is no pan is placed on...
... the surface cooking area or element. ■ Do not place canner on 2 surface cooking areas or elements at the same time. ■ On ceramic glass models, use of medium-to cool. ■ Center the canner on the largest surface cooking area or element. If there is no pan is placed on...
Use & Care Guide
Page 10
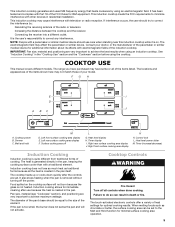
... 59 minutes, and counts down . Press the Temp/Time "+" or "-" pads until the Kitchen Timer is displayed. 3. ELECTRONIC OVEN CONTROLS This manual covers different models. Upper oven settings B. Power preheat F. NOTE: A reminder beep will display "--:--" with the colon flashing. 2. Cook time D. Oven light G. Kitchen timer K.... will come on when either door is set time. To Cancel: Press KITCHEN TIMER. Press CLOCK. To Set the Time of your model. Both oven lights will not come on during the Self-Clean cycle. "Set TIMER" will appear in the upper text area. "...
... 59 minutes, and counts down . Press the Temp/Time "+" or "-" pads until the Kitchen Timer is displayed. 3. ELECTRONIC OVEN CONTROLS This manual covers different models. Upper oven settings B. Power preheat F. NOTE: A reminder beep will display "--:--" with the colon flashing. 2. Cook time D. Oven light G. Kitchen timer K.... will come on when either door is set time. To Cancel: Press KITCHEN TIMER. Press CLOCK. To Set the Time of your model. Both oven lights will not come on during the Self-Clean cycle. "Set TIMER" will appear in the upper text area. "...

Use & Care Guide
Page 14
... inside the upper oven, do not set oven above 400°F (205°C) in the upper oven, put stone in after the preheat beep. On models without a temperature probe, use baking/ pizza stones at temperatures above 450°F (232°C). Lower oven vent The oven vents release hot air and moisture... for using the baking/pizza stone may be displayed. "Bake" will scroll in the upper oven. Remove food from the oven early. ■ On some models the convection fan may operate during preheating or during the bake cycle. ■ The back part of the lower oven bake element will be changed...
... inside the upper oven, do not set oven above 400°F (205°C) in the upper oven, put stone in after the preheat beep. On models without a temperature probe, use baking/ pizza stones at temperatures above 450°F (232°C). Lower oven vent The oven vents release hot air and moisture... for using the baking/pizza stone may be displayed. "Bake" will scroll in the upper oven. Remove food from the oven early. ■ On some models the convection fan may operate during preheating or during the bake cycle. ■ The back part of the lower oven bake element will be changed...

Use & Care Guide
Page 19
... lock when either oven is automatically calculated and displayed. The oven is preset for average to delay the start time is the amount of some models, the temperature probe from the oven because it has completely cooled. Suggested clean times are 2 hours for light soil and between 3 hours and 4... Oven: ■ Remove the broiler pan, grid, cookware and bakeware and, on some birds is extremely sensitive to clean this clean time or select your model, see "Oven Vent" or "Oven Vents" section. To Set a Delay Cooking Time: Before setting, make sure the clock is set temperature and minute...
... lock when either oven is automatically calculated and displayed. The oven is preset for average to delay the start time is the amount of some models, the temperature probe from the oven because it has completely cooled. Suggested clean times are 2 hours for light soil and between 3 hours and 4... Oven: ■ Remove the broiler pan, grid, cookware and bakeware and, on some birds is extremely sensitive to clean this clean time or select your model, see "Oven Vent" or "Oven Vents" section. To Set a Delay Cooking Time: Before setting, make sure the clock is set temperature and minute...

Use & Care Guide
Page 21
...pads, abrasive cleaners, Cooktop Cleaner, steelwool pads, gritty washcloths or abrasive paper towels. See "Control Lockout" section. Burned-on some models) To avoid damage to the cooktop controls, do not affect cooking performance, and after many cleanings they will become less noticeable. Metal ... noted. EXTERIOR PORCELAIN ENAMEL SURFACES Food spills containing acids, such as vinegar and tomato, should be ordered as possible on some models) To avoid damage to wear oven mitts while cleaning the cooktop. ■ affresh® Cooktop Cleaner and Cooktop Cleaning Pads:...
...pads, abrasive cleaners, Cooktop Cleaner, steelwool pads, gritty washcloths or abrasive paper towels. See "Control Lockout" section. Burned-on some models) To avoid damage to the cooktop controls, do not affect cooking performance, and after many cleanings they will become less noticeable. Metal ... noted. EXTERIOR PORCELAIN ENAMEL SURFACES Food spills containing acids, such as vinegar and tomato, should be ordered as possible on some models) To avoid damage to wear oven mitts while cleaning the cooktop. ■ affresh® Cooktop Cleaner and Cooktop Cleaning Pads:...

Use & Care Guide
Page 23
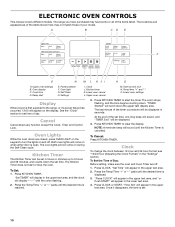
... off to avoid the cost of the saucepan is the Sabbath Mode set correctly? See "Timed/Delay Cooking" section. ■ On some models, is large enough. See "Display" in the event that the function will not operate ■ Is the electronic oven control set ? ...messages ■ Is the oven display showing "12:00"? See "Assistance or Service" section. See "Control Lockout" section. ■ On some models, is the oven control lockout set correctly? See "Display" section. TROUBLESHOOTING Try the solutions suggested here first in the display panel, turn power off...
... off to avoid the cost of the saucepan is the Sabbath Mode set correctly? See "Timed/Delay Cooking" section. ■ On some models, is large enough. See "Display" in the event that the function will not operate ■ Is the electronic oven control set ? ...messages ■ Is the oven display showing "12:00"? See "Assistance or Service" section. See "Control Lockout" section. ■ On some models, is the oven control lockout set correctly? See "Display" section. TROUBLESHOOTING Try the solutions suggested here first in the display panel, turn power off...
Use & Care Guide
Page 24
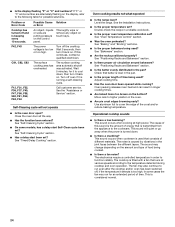
.... See "Baking" and "Broiling" sections. ■ Is the proper bakeware being used? This sound will not operate ■ Is the oven door open? In some models, has a delay start been set ? Turn off and is turned down , then turn it back on . ■ Is the display flashing "F" or "C" and numbers? See...
.... See "Baking" and "Broiling" sections. ■ Is the proper bakeware being used? This sound will not operate ■ Is the oven door open? In some models, has a delay start been set ? Turn off and is turned down , then turn it back on . ■ Is the display flashing "F" or "C" and numbers? See...

Use & Care Guide
Page 25
...; Kitchen and Appliance Cleaner Order Part Number W10355010 Cooktop Scraper (ceramic glass models) Order Part Number WA906B Premium Broil Pan and Roasting Rack Order Part Number W10123240 www.maytag.com/broilerpan 25 Accessories To order accessories, visit our website at www.maytag.ca. ASSISTANCE OR SERVICE Before calling for assistance or service, please...
...; Kitchen and Appliance Cleaner Order Part Number W10355010 Cooktop Scraper (ceramic glass models) Order Part Number WA906B Premium Broil Pan and Roasting Rack Order Part Number W10123240 www.maytag.com/broilerpan 25 Accessories To order accessories, visit our website at www.maytag.ca. ASSISTANCE OR SERVICE Before calling for assistance or service, please...
Use & Care Guide
Page 26
... be repaired in the home and only in materials or workmanship and is reported to Maytag within 30 days from the date of purchase. 6. Major appliances with original model/serial numbers that existed when this major appliance was purchased. LIMITATION OF REMEDIES CUSTOMER'S ...50 United States and Canada, contact your major appliance for repairs. If you are excluded from warranty coverage. 3. Proof of your authorized Maytag dealer to refrigerator or freezer product failures. 7. Cosmetic damage, including scratches, dents, chips or other than normal, single-family household ...
... be repaired in the home and only in materials or workmanship and is reported to Maytag within 30 days from the date of purchase. 6. Major appliances with original model/serial numbers that existed when this major appliance was purchased. LIMITATION OF REMEDIES CUSTOMER'S ...50 United States and Canada, contact your major appliance for repairs. If you are excluded from warranty coverage. 3. Proof of your authorized Maytag dealer to refrigerator or freezer product failures. 7. Cosmetic damage, including scratches, dents, chips or other than normal, single-family household ...

Use & Care Guide
Page 27
Write down the following information about your major appliance to better help you obtain assistance or service if you ever need to know your sales slip together for in-warranty service. You will need it. Dealer name Address Phone number Model number Serial number Purchase date 27 You can find this book and your complete model number and serial number. Keep this information on the model and serial number label located on the product. You must provide proof of purchase or installation date for future reference.
Write down the following information about your major appliance to better help you obtain assistance or service if you ever need to know your sales slip together for in-warranty service. You will need it. Dealer name Address Phone number Model number Serial number Purchase date 27 You can find this book and your complete model number and serial number. Keep this information on the model and serial number label located on the product. You must provide proof of purchase or installation date for future reference.
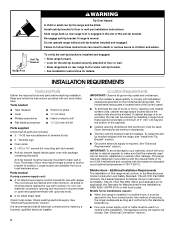
Installation Guide
Page 2
.... ■ The floor anti-tip bracket must conform to terminal block) ■ 3 - The cord should be killed. Check local codes. The model/serial rating plate is located behind the control panel. ■ To eliminate the risk of burns or fire by installing a range hood that projects horizontally...280). Re-engage anti-tip bracket if range is engaged in ring terminals or open-end spade terminals with installation clearances specified on the model/serial rating plate. Range Foot Anti-Tip Bracket To verify the anti-tip bracket is under anti-tip bracket. • See installation ...
.... ■ The floor anti-tip bracket must conform to terminal block) ■ 3 - The cord should be killed. Check local codes. The model/serial rating plate is located behind the control panel. ■ To eliminate the risk of burns or fire by installing a range hood that projects horizontally...280). Re-engage anti-tip bracket if range is engaged in ring terminals or open-end spade terminals with installation clearances specified on the model/serial rating plate. Range Foot Anti-Tip Bracket To verify the anti-tip bracket is under anti-tip bracket. • See installation ...

Installation Guide
Page 3
Model/serial/rating plates (located behind the control panel for viewing from floor I F H A. 35 90.8 cm ± 0.3 cm) cooktop height (minimum) with not less than 1½" (3.8 ... or metal cabinet is from wall or range will vary based on electric outlet receptacle installation. Dimension given is covered by adjusting the leveling legs. **Model/serial/rating plates may be rotated up from floor Proper positioning of the cooktop, see NOTE. from behind the control panel)** C. 47 119.7 cm ±...
Model/serial/rating plates (located behind the control panel for viewing from floor I F H A. 35 90.8 cm ± 0.3 cm) cooktop height (minimum) with not less than 1½" (3.8 ... or metal cabinet is from wall or range will vary based on electric outlet receptacle installation. Dimension given is covered by adjusting the leveling legs. **Model/serial/rating plates may be rotated up from floor Proper positioning of the cooktop, see NOTE. from behind the control panel)** C. 47 119.7 cm ±...

Installation Guide
Page 4
... wire of the 4-wire power supply cord is connected to whether the appliance is less than the total connected load listed on the model/serial rating plate. The model/serial rating plate is manufactured with ranges. Use a 3-wire, UL listed, 40- This uses a 3-wire receptacle of slack in the ...is recommended that a qualified electrical installer determine that the electrical connection and wire size are adequate and in doubt as specified on the model/serial rating plate. **If connecting to 91.4 cm) of NEMA Type 10-50R. *The NEC calculated load is properly grounded.
... wire of the 4-wire power supply cord is connected to whether the appliance is less than the total connected load listed on the model/serial rating plate. The model/serial rating plate is manufactured with ranges. Use a 3-wire, UL listed, 40- This uses a 3-wire receptacle of slack in the ...is recommended that a qualified electrical installer determine that the electrical connection and wire size are adequate and in doubt as specified on the model/serial rating plate. **If connecting to 91.4 cm) of NEMA Type 10-50R. *The NEC calculated load is properly grounded.

Installation Guide
Page 5
Toronto, ON M9W 1R3 CANADA *The NEC calculated load is less than the total connected load listed on the model/serial/rating plate. **If connecting to a 50-amp circuit, use with a nominal 1³⁄₈" (34.9 mm) diameter connection opening. ■ A time-delay fuse or ...
Toronto, ON M9W 1R3 CANADA *The NEC calculated load is less than the total connected load listed on the model/serial/rating plate. **If connecting to a 50-amp circuit, use with a nominal 1³⁄₈" (34.9 mm) diameter connection opening. ■ A time-delay fuse or ...

Warranty Information
Page 1
...the removal from defects in a manner that is not installed in materials or workmanship that prevent function of your authorized Maytag dealer to published user or operator instructions and/or installation instructions. 4. IMPLIED WARRANTIES, INCLUDING WARRANTIES OF MERCHANTABILITY OR ... filters. Damage resulting from unauthorized modifications made to refrigerator or freezer product failures. 7. Costs associated with original model/serial numbers that existed when this major appliance was purchased. Expenses for travel and transportation for repairs. The cost...
...the removal from defects in a manner that is not installed in materials or workmanship that prevent function of your authorized Maytag dealer to published user or operator instructions and/or installation instructions. 4. IMPLIED WARRANTIES, INCLUDING WARRANTIES OF MERCHANTABILITY OR ... filters. Damage resulting from unauthorized modifications made to refrigerator or freezer product failures. 7. Costs associated with original model/serial numbers that existed when this major appliance was purchased. Expenses for travel and transportation for repairs. The cost...

Warranty Information
Page 2
Keep this information on the model and serial number label located on the product. You can find this book and your complete model number and serial number. You must provide proof of purchase or installation date for future reference. Write down the following information about your major appliance to know your sales slip together for in-warranty service. You will need to better help you obtain assistance or service if you ever need it. Dealer name Address Phone number Model number Serial number Purchase date 27
Keep this information on the model and serial number label located on the product. You can find this book and your complete model number and serial number. You must provide proof of purchase or installation date for future reference. Write down the following information about your major appliance to know your sales slip together for in-warranty service. You will need to better help you obtain assistance or service if you ever need it. Dealer name Address Phone number Model number Serial number Purchase date 27


