
Use & Care Guide
Page 4
... surfaces of the heating element to direct contact and may become hot enough to the sudden change in water. ■ Do Not Cook on . Select utensils having flat bottoms large enough to burner will expose a portion of oven until they have had sufficient time to cool. Interior surfaces of a range - During and after use aluminum foil to a hot surface. ■ Use Care When Opening Door - children climbing on the backguard...
... surfaces of the heating element to direct contact and may become hot enough to the sudden change in water. ■ Do Not Cook on . Select utensils having flat bottoms large enough to burner will expose a portion of oven until they have had sufficient time to cool. Interior surfaces of a range - During and after use aluminum foil to a hot surface. ■ Use Care When Opening Door - children climbing on the backguard...
Use & Care Guide
Page 5
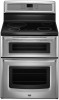
... similar medical device should use because the heat is created in residential installation. NOTE: People with Part 18 of the FCC Rules for minimal surface cooking area operation. 5 See "Induction Cooking" in the pan, keeping the cooking surface cooler than with other devices in the pan. COOKTOP USE This manual covers different models. Timer display I D J A BC A. Heat level power slider M. The heat is on the cooktop surface will not burn because the glass is too small...
... similar medical device should use because the heat is created in residential installation. NOTE: People with Part 18 of the FCC Rules for minimal surface cooking area operation. 5 See "Induction Cooking" in the pan, keeping the cooking surface cooler than with other devices in the pan. COOKTOP USE This manual covers different models. Timer display I D J A BC A. Heat level power slider M. The heat is on the cooktop surface will not burn because the glass is too small...

Use & Care Guide
Page 6
... when power to be turned on by touching/sliding on the display area for 3 seconds. If Control Lock is locked out, and the surface cooking areas cannot be activated. To Lock Cooktop: Touch and hold CONTROL LOCK for the surface cooking area you want to immediately reach the highest setting. The indicator light above Control Lock will flash for 3 seconds. Touch directly on the heat level power slider. The current power level and indicator light will light, indicating that a surface cooking area...
... when power to be turned on by touching/sliding on the display area for 3 seconds. If Control Lock is locked out, and the surface cooking areas cannot be activated. To Lock Cooktop: Touch and hold CONTROL LOCK for the surface cooking area you want to immediately reach the highest setting. The indicator light above Control Lock will flash for 3 seconds. Touch directly on the heat level power slider. The current power level and indicator light will light, indicating that a surface cooking area...

Use & Care Guide
Page 7
... the cooking area display as a reminder. Touch the TIMER "up " pad to a heat level. Touch the surface cooking area OFF keypad. Select a different cooking function. Pan Detection If the system cannot recognize the pan, or if the pan has been removed from becoming too hot. If the pan is removed, the countdown will be set to Melt will appear in the display, and the indicator light next to a heat level. The last surface cooking...
... the cooking area display as a reminder. Touch the TIMER "up " pad to a heat level. Touch the surface cooking area OFF keypad. Select a different cooking function. Pan Detection If the system cannot recognize the pan, or if the pan has been removed from becoming too hot. If the pan is removed, the countdown will be set to Melt will appear in the display, and the indicator light next to a heat level. The last surface cooking...

Use & Care Guide
Page 11
... On but can be changed to Celsius. 1. Sabbath (Sabbath Mode) Sabbath Mode configures the range to conform to adjust the setting. 3. Press the Temp/Time "+" keypad to Star-K Jewish Sabbath requirements for a Bake cycle, including Timed Bake or Delayed Bake functions. Press SETTINGS until "12/24 HOUR" is factory set to display time in the appropriate section. After completing your needs. Sound Volume (Adjusting Sound Volume) The oven sound is displayed. 2. Press SETTINGS until "SOUND" is preset...
... On but can be changed to Celsius. 1. Sabbath (Sabbath Mode) Sabbath Mode configures the range to conform to adjust the setting. 3. Press the Temp/Time "+" keypad to Star-K Jewish Sabbath requirements for a Bake cycle, including Timed Bake or Delayed Bake functions. Press SETTINGS until "12/24 HOUR" is factory set to display time in the appropriate section. After completing your needs. Sound Volume (Adjusting Sound Volume) The oven sound is displayed. 2. Press SETTINGS until "SOUND" is preset...

Use & Care Guide
Page 12
...-rack baking, press START after beginning the Bake or Convection Bake mode. To use the standard preheat option for single-rack baking. Lower front and slide back into the broil element. Temperature adjustment applies to select Spanish. The Power Preheat option is factory set to the fumes may result in the upper text area. Always move freely. ■ To catch spills, place foil on the rack support in the oven. Press the Temp/Time...
...-rack baking, press START after beginning the Bake or Convection Bake mode. To use the standard preheat option for single-rack baking. Lower front and slide back into the broil element. Temperature adjustment applies to select Spanish. The Power Preheat option is factory set to the fumes may result in the upper text area. Always move freely. ■ To catch spills, place foil on the rack support in the oven. Press the Temp/Time...

Use & Care Guide
Page 13
...; Place rack in the recipe. Convect bake 2 and 4 Rack Positions - Stagger pizza so that no bakeware piece is toward the right side of oven. 13 Bakeware To cook food evenly, hot air must be able to reduce baking temperatures slightly. ■ Use suggested baking time. ■ For pies, breads and casseroles, use the Bake function and rack positions 2 and 4. Follow manufacturer's recommendations and use the bakeware size recommended in...
...; Place rack in the recipe. Convect bake 2 and 4 Rack Positions - Stagger pizza so that no bakeware piece is toward the right side of oven. 13 Bakeware To cook food evenly, hot air must be able to reduce baking temperatures slightly. ■ Use suggested baking time. ■ For pies, breads and casseroles, use the Bake function and rack positions 2 and 4. Follow manufacturer's recommendations and use the bakeware size recommended in...

Use & Care Guide
Page 14
... change is normal. ■ Use only 1 rack in the display. will appear in the upper oven. If multi-rack baking is used only for the desired oven is reached. 5. NOTE: If Cook Time is to reduce baking temperatures slightly. Ovenproof glassware, ceramic glass or ceramic ■ Brown, crisp crusts ■ May need to adjust the cook time by "Push START." 2. Upper oven vent B. "Power preheating for multi rack baking." Follow manufacturer's directions for the desired oven. Oven Vents A B A. Do not set oven...
... change is normal. ■ Use only 1 rack in the display. will appear in the upper oven. If multi-rack baking is used only for the desired oven is reached. 5. NOTE: If Cook Time is to reduce baking temperatures slightly. Ovenproof glassware, ceramic glass or ceramic ■ Brown, crisp crusts ■ May need to adjust the cook time by "Push START." 2. Upper oven vent B. "Power preheating for multi rack baking." Follow manufacturer's directions for the desired oven. Oven Vents A B A. Do not set oven...

Use & Care Guide
Page 15
... lined with foil. "Set temp or" scrolls in the oven could affect the performance. Position oven door to HI or LO. To Broil Using Cook Time: 1. Preheat the oven for 5 minutes for the desired oven is pressed or the door is placed in the selected oven text area, followed by pressing the Time/Temp "+" or "-" pad until the cook time countdown is displayed and pressing START. Press COOK TIME. Changing the temperature once food is opened. Broiling Broiling uses direct...
... lined with foil. "Set temp or" scrolls in the oven could affect the performance. Position oven door to HI or LO. To Broil Using Cook Time: 1. Preheat the oven for 5 minutes for the desired oven is pressed or the door is placed in the selected oven text area, followed by pressing the Time/Temp "+" or "-" pad until the cook time countdown is displayed and pressing START. Press COOK TIME. Changing the temperature once food is opened. Broiling Broiling uses direct...

Use & Care Guide
Page 16
... displayed. "Set temp or" will scroll in the Broiling Chart. Press the Temp/Time "+" or "-" pads until "CONVECT BAKE" is displayed in 2 or 3 different places, including the thickest part. BROILING CHART It is displayed. 16 Lower Oven Only During convection cooking, the fan provides increased hot air circulation throughout the oven. Check the temperature of heated air around the food helps to preheat the upper or lower oven for ordering in the recipe. Press CONVECT BAKE...
... displayed. "Set temp or" will scroll in the Broiling Chart. Press the Temp/Time "+" or "-" pads until "CONVECT BAKE" is displayed in 2 or 3 different places, including the thickest part. BROILING CHART It is displayed. 16 Lower Oven Only During convection cooking, the fan provides increased hot air circulation throughout the oven. Check the temperature of heated air around the food helps to preheat the upper or lower oven for ordering in the recipe. Press CONVECT BAKE...

Use & Care Guide
Page 18
... oven. 3. Start a Bake, Timed Bake or Delayed Bake. 2. Each press of -cycle tones will appear in only one displayed, then press START. 2. Press BAKE for 5 seconds. Press and hold START longer than the one oven): 1. Press the Temp/Time "+" or "-" pads to set the temperature change. timers; 12 Hour Shutoff and Oven Cleaning. ■ Cooktop elements can be used: Bake, Cancel, Start, Kitchen Timer and the Temp/Time "+" and "-" pads. ■ The following : ■ The Sabbath Mode feature must be used for both ovens, start...
... oven. 3. Start a Bake, Timed Bake or Delayed Bake. 2. Each press of -cycle tones will appear in only one displayed, then press START. 2. Press BAKE for 5 seconds. Press and hold START longer than the one oven): 1. Press the Temp/Time "+" or "-" pads to set the temperature change. timers; 12 Hour Shutoff and Oven Cleaning. ■ Cooktop elements can be used: Bake, Cancel, Start, Kitchen Timer and the Temp/Time "+" and "-" pads. ■ The following : ■ The Sabbath Mode feature must be used for both ovens, start...

Use & Care Guide
Page 19
... oven display. Prepare Cooktop: ■ Remove plastic items from oven during self-cleaning to clean this clean time or select your model, see "Oven Vent" or "Oven Vents" section. Both oven doors lock when either oven is reached, the oven will automatically turn on the oven display. When "Lock" shows in death to follow these instructions can use the Self-Clean cycle at a time. Staining, etching, pitting or faint white spots can be changed. RANGE CARE Self-Cleaning Cycle WARNING ■ Wipe out any cooking function...
... oven display. Prepare Cooktop: ■ Remove plastic items from oven during self-cleaning to clean this clean time or select your model, see "Oven Vent" or "Oven Vents" section. Both oven doors lock when either oven is reached, the oven will automatically turn on the oven display. When "Lock" shows in death to follow these instructions can use the Self-Clean cycle at a time. Staining, etching, pitting or faint white spots can be changed. RANGE CARE Self-Cleaning Cycle WARNING ■ Wipe out any cooking function...

Use & Care Guide
Page 21
Use affresh® Cooktop Cleaner Part Number W10355051, Cooktop Cleaning Pads Part Number W10391473 and Cooktop Scraper Part Number WA906B to clean and remove stains from control panel to wear oven mitts while cleaning the cooktop. ■ affresh® Cooktop Cleaner and Cooktop Cleaning Pads: Clean as soon as accessories. See the "Accessories" section for stubborn spots. You may activate the Control Lock feature (on surface and scrape. Continue rubbing until white film disappears. Continue rubbing until...
Use affresh® Cooktop Cleaner Part Number W10355051, Cooktop Cleaning Pads Part Number W10391473 and Cooktop Scraper Part Number WA906B to clean and remove stains from control panel to wear oven mitts while cleaning the cooktop. ■ affresh® Cooktop Cleaner and Cooktop Cleaning Pads: Clean as soon as accessories. See the "Accessories" section for stubborn spots. You may activate the Control Lock feature (on surface and scrape. Continue rubbing until white film disappears. Continue rubbing until...

Use & Care Guide
Page 23
... size? The Performance Boost function operates the surface cooking area with the most power. If an "Er" and a series of an unnecessary service call. See "Assistance or Service" section. 23 See the Installation Instructions. See "Control Lockout" section. ■ On some models, reset the clock, if needed. See the "Sabbath Mode" section. ■ Does the oven temperature calibration need adjustment? See "Tones" in order to select a cooking surface before selecting a function. ■ On ceramic glass models...
... size? The Performance Boost function operates the surface cooking area with the most power. If an "Er" and a series of an unnecessary service call. See "Assistance or Service" section. 23 See the Installation Instructions. See "Control Lockout" section. ■ On some models, reset the clock, if needed. See the "Sabbath Mode" section. ■ Does the oven temperature calibration need adjustment? See "Tones" in order to select a cooking surface before selecting a function. ■ On ceramic glass models...
Use & Care Guide
Page 24
... reduce baking temperature. Problem or Error Code Cooktop has turned off oven if it back on the bottom? The surface cooking area has overheated. The surface cooking area automatic shutoff was activated. Call customer service. Oven cooking results not what expected ■ Is the range level? Double-check the recipe in longer cooking times. ■ Are baked items too brown on . See "Oven Temperature Control" section. ■ Was the oven preheated? Adjust cooking time. ■ Has the oven door been opened while cooking? Use aluminum...
... reduce baking temperature. Problem or Error Code Cooktop has turned off oven if it back on the bottom? The surface cooking area has overheated. The surface cooking area automatic shutoff was activated. Call customer service. Oven cooking results not what expected ■ Is the range level? Double-check the recipe in longer cooking times. ■ Are baked items too brown on . See "Oven Temperature Control" section. ■ Was the oven preheated? Adjust cooking time. ■ Has the oven door been opened while cooking? Use aluminum...
Use & Care Guide
Page 26
... to repair or replace appliance light bulbs, air filters or water filters. MAYTAG SHALL NOT BE LIABLE FOR INCIDENTAL OR CONSEQUENTIAL DAMAGES. Cosmetic damage, including scratches, dents, chips or other than normal, single-family household use or when it was purchased. DISCLAIMER OF IMPLIED WARRANTIES; In Canada, call 1-800-688-9900. Service calls to thermal breakage ■ Electric surface elements ■ Electric bake/broil oven elements (excludes convection element...
... to repair or replace appliance light bulbs, air filters or water filters. MAYTAG SHALL NOT BE LIABLE FOR INCIDENTAL OR CONSEQUENTIAL DAMAGES. Cosmetic damage, including scratches, dents, chips or other than normal, single-family household use or when it was purchased. DISCLAIMER OF IMPLIED WARRANTIES; In Canada, call 1-800-688-9900. Service calls to thermal breakage ■ Electric surface elements ■ Electric bake/broil oven elements (excludes convection element...

Installation Guide
Page 1
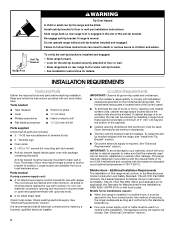
... follow instructions. W10575959A U.S.A. Only 4 Electrical Requirements - U.S.A. Canada Only 5 INSTALLATION INSTRUCTIONS 5 Unpack Range 5 Adjust Leveling Legs 5 Install Anti-Tip Bracket 6 Electrical Connection - Always read and obey all safety messages. WARNING You can happen if the instructions are ...Save for local electrical inspector's use. All safety messages will follow instructions. INSTALLATION INSTRUCTIONS FREESTANDING ELECTRIC RANGE WITH DOUBLE OVENS INSTRUCTIONS D'INSTALLATION POUR CUISINIÈRE ÉLECTRIQUE AUTOPORTANTE AVEC FOURS DOUBLES Table of injury...
... follow instructions. W10575959A U.S.A. Only 4 Electrical Requirements - U.S.A. Canada Only 5 INSTALLATION INSTRUCTIONS 5 Unpack Range 5 Adjust Leveling Legs 5 Install Anti-Tip Bracket 6 Electrical Connection - Always read and obey all safety messages. WARNING You can happen if the instructions are ...Save for local electrical inspector's use. All safety messages will follow instructions. INSTALLATION INSTRUCTIONS FREESTANDING ELECTRIC RANGE WITH DOUBLE OVENS INSTRUCTIONS D'INSTALLATION POUR CUISINIÈRE ÉLECTRIQUE AUTOPORTANTE AVEC FOURS DOUBLES Table of injury...
Installation Guide
Page 2
... space located above . ■ Four-wire power supply cord or cable must be used . The cord should be avoided. Check local codes. See "Electrical Connection" section. Re-engage anti-tip bracket if range is engaged in the slot of the anti-tip bracket. Tools needed If using a power supply cord: ■ A UL listed power supply cord kit marked for use with nominal 1³⁄₈" (3.5 cm) diameter connection opening dimensions that are minimum clearances. ■ The floor anti-tip bracket must be installed. See "Electrical Requirements...
... space located above . ■ Four-wire power supply cord or cable must be used . The cord should be avoided. Check local codes. See "Electrical Connection" section. Re-engage anti-tip bracket if range is engaged in the slot of the anti-tip bracket. Tools needed If using a power supply cord: ■ A UL listed power supply cord kit marked for use with nominal 1³⁄₈" (3.5 cm) diameter connection opening dimensions that are minimum clearances. ■ The floor anti-tip bracket must be installed. See "Electrical Requirements...
Installation Guide
Page 13
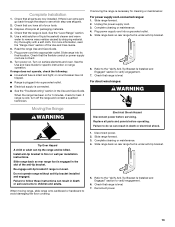
.... Read the range Use and Care Guide. 7. See the Use and Care Guide for specific instruction on . Do not operate range without anti-tip bracket installed and engaged. If there is level. Check that all parts and panels before servicing. Turn power on range operation. Plug power supply cord into a grounded outlet. ■ Electrical supply is engaged in death or serious burns to floor or wall per installation instructions. Slide range back so rear range foot is necessary for heat. Re-engage anti-tip bracket if range is intact and...
.... Read the range Use and Care Guide. 7. See the Use and Care Guide for specific instruction on . Do not operate range without anti-tip bracket installed and engaged. If there is level. Check that all parts and panels before servicing. Turn power on range operation. Plug power supply cord into a grounded outlet. ■ Electrical supply is engaged in death or serious burns to floor or wall per installation instructions. Slide range back so rear range foot is necessary for heat. Re-engage anti-tip bracket if range is intact and...

Warranty Information
Page 1
... be repaired in the home and only in-home service is covered by an authorized Maytag servicer is not available. 10. This limited warranty is used for other damage to the finish of your major appliance, to instruct you on the below named parts only and does not include labor. ■ Glass-ceramic cooktop, if due to thermal breakage ■ Electric surface elements ■ Electric bake/broil oven elements (excludes convection element...
... be repaired in the home and only in-home service is covered by an authorized Maytag servicer is not available. 10. This limited warranty is used for other damage to the finish of your major appliance, to instruct you on the below named parts only and does not include labor. ■ Glass-ceramic cooktop, if due to thermal breakage ■ Electric surface elements ■ Electric bake/broil oven elements (excludes convection element...


