
Owners Manual
Page 14
... the oven to begin preheating oven. See the "Positioning Racks and Bakeware" section. ■ If the oven is in 2 or 3 different places, including the thickest part. 5. Place food in oven. 2. It is displayed. 4. Place food in the oven. Press CONVECT ROAST. "CONVECT ROAST" will be displayed. "Set temp or" will scroll...
... the oven to begin preheating oven. See the "Positioning Racks and Bakeware" section. ■ If the oven is in 2 or 3 different places, including the thickest part. 5. Place food in oven. 2. It is displayed. 4. Place food in the oven. Press CONVECT ROAST. "CONVECT ROAST" will be displayed. "Set temp or" will scroll...

Owners Manual
Page 19
...vinegar and tomato, should be cleaned when oven cools. These spills may affect the finish. CONTROL PANEL ■ All-Purpose Appliance Cleaner Part Number 31682 (not included): See "Assistance or Service" section to order. To avoid turning the controls on some models). At high ...not directly on soils should be cleaned as soon as cooktop, grates and caps are cool. Cooked-on panel. ■ All-Purpose Appliance Cleaner Part Number 31682 (not included): See "Assistance or Service" section to order. Cleaning Method: ■ Self-Cleaning cycle: See "Self-Cleaning Cycle"...
...vinegar and tomato, should be cleaned when oven cools. These spills may affect the finish. CONTROL PANEL ■ All-Purpose Appliance Cleaner Part Number 31682 (not included): See "Assistance or Service" section to order. To avoid turning the controls on some models). At high ...not directly on soils should be cleaned as soon as cooktop, grates and caps are cool. Cooked-on panel. ■ All-Purpose Appliance Cleaner Part Number 31682 (not included): See "Assistance or Service" section to order. Cleaning Method: ■ Self-Cleaning cycle: See "Self-Cleaning Cycle"...

Owners Manual
Page 22
...807-6777. See "Oven Temperature Control" section. ■ Was the oven preheated? If you need replacement parts If you need further assistance, you can write to Maytag® appliances with : ■ Features and specifications on our full line of appliances. ■ Installation... (Spanish speaking, hearing impaired, limited vision, etc.). ■ Referrals to build every new MAYTAG® appliance. Factory specified parts will help , follow the instructions below. Call Maytag Customer eXperience Center toll free: 1-800-688-9900, or visit our website at : Whirlpool Canada...
...807-6777. See "Oven Temperature Control" section. ■ Was the oven preheated? If you need replacement parts If you need further assistance, you can write to Maytag® appliances with : ■ Features and specifications on our full line of appliances. ■ Installation... (Spanish speaking, hearing impaired, limited vision, etc.). ■ Referrals to build every new MAYTAG® appliance. Factory specified parts will help , follow the instructions below. Call Maytag Customer eXperience Center toll free: 1-800-688-9900, or visit our website at : Whirlpool Canada...

Owners Manual
Page 23
...OF IMPLIED WARRANTIES OF MERCHANTABILITY OR FITNESS, SO THESE EXCLUSIONS OR LIMITATIONS MAY NOT APPLY TO YOU. MAYTAG® GAS RANGE LIMITED WARRANTY FIRST YEAR LIMITED WARRANTY (PARTS AND LABOR) For one year from the date of purchase, when this major appliance is installed, operated... to obtain service under these excluded circumstances shall be repaired in the home and only in accordance with the product, Maytag will pay for factory specified parts for the following components to the appliance. 9. This limited warranty is required to repair or replace appliance light bulbs,...
...OF IMPLIED WARRANTIES OF MERCHANTABILITY OR FITNESS, SO THESE EXCLUSIONS OR LIMITATIONS MAY NOT APPLY TO YOU. MAYTAG® GAS RANGE LIMITED WARRANTY FIRST YEAR LIMITED WARRANTY (PARTS AND LABOR) For one year from the date of purchase, when this major appliance is installed, operated... to obtain service under these excluded circumstances shall be repaired in the home and only in accordance with the product, Maytag will pay for factory specified parts for the following components to the appliance. 9. This limited warranty is required to repair or replace appliance light bulbs,...

Installation Instructions
Page 3
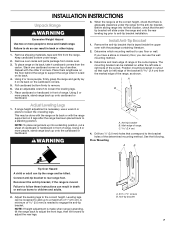
...gas ■ Noncorrosive leak-detection solution For LP/Natural Gas Conversions ■ ½" combination wrench 7.0 mm) nut driver ■ Masking tape Parts supplied Check that the floor covering can withstand at least 200°F (93°C). ■ Use an insulated pad or ¼" (0.64 ... tools listed here. This oven has been designed in the wall or floor where range is the installer's responsibility to your local hardware store. Parts needed ■ Tape measure 3.2 mm) drill bit ■ Phillips screwdriver ■ Marker or pencil ■ Torx† T-20 screwdriver ...
...gas ■ Noncorrosive leak-detection solution For LP/Natural Gas Conversions ■ ½" combination wrench 7.0 mm) nut driver ■ Masking tape Parts supplied Check that the floor covering can withstand at least 200°F (93°C). ■ Use an insulated pad or ¼" (0.64 ... tools listed here. This oven has been designed in the wall or floor where range is the installer's responsibility to your local hardware store. Parts needed ■ Tape measure 3.2 mm) drill bit ■ Phillips screwdriver ■ Marker or pencil ■ Torx† T-20 screwdriver ...
Installation Instructions
Page 7
... anti-tip bracket to loosen the 4 leveling legs. Failure to a standing position. Adjust the leveling legs to adjust the rear legs. Remove oven racks and parts package from the range. The mounting bracket can result in cutout so that is standing, tilt the range back to adjust the front legs, then...
... anti-tip bracket to loosen the 4 leveling legs. Failure to a standing position. Adjust the leveling legs to adjust the rear legs. Remove oven racks and parts package from the range. The mounting bracket can result in cutout so that is standing, tilt the range back to adjust the front legs, then...

Installation Instructions
Page 9
... or the household fuse has not blown. ■ Check that the gas shutoff valve is set to the "open when the handle is removed from parts package. If a burner does not light at this point, turn each control knob to the gas pipe. If range is not level, pull range forward...
... or the household fuse has not blown. ■ Check that the gas shutoff valve is set to the "open when the handle is removed from parts package. If a burner does not light at this point, turn each control knob to the gas pipe. If range is not level, pull range forward...
Installation Instructions
Page 11
...or contact the dealer from whom you have all of liquid household cleaner and warm water to see the "Range Care" section of /recycle all parts are now installed. If there is level. Check that all packaging materials. 4. If range does not operate, check the following: ■ ...9632; See "Troubleshooting" in the Use and Care Guide. 8. Dry thoroughly with a soft cloth. Complete Installation 1. Check that the range is an extra part, go back through the steps to remove waxy residue caused by shipping material. Check that the gas supply line shutoff valve is open. ■ If...
...or contact the dealer from whom you have all of liquid household cleaner and warm water to see the "Range Care" section of /recycle all parts are now installed. If there is level. Check that all packaging materials. 4. If range does not operate, check the following: ■ ...9632; See "Troubleshooting" in the Use and Care Guide. 8. Dry thoroughly with a soft cloth. Complete Installation 1. Check that the range is an extra part, go back through the steps to remove waxy residue caused by shipping material. Check that the gas supply line shutoff valve is open. ■ If...

Installation Instructions
Page 15
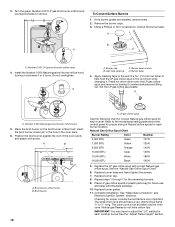
Remove the burner caps. 3. Place Natural gas orifice spuds in plastic parts bag for each cooktop burner. Complete installation. IMPORTANT: You may have to adjust the "LO" setting for future use and keep with the correct LP ...
Remove the burner caps. 3. Place Natural gas orifice spuds in plastic parts bag for each cooktop burner. Complete installation. IMPORTANT: You may have to adjust the "LO" setting for future use and keep with the correct LP ...
Installation Instructions
Page 18
... White 180N 16,000 BTU Black 195N 5. See the "Natural Gas Orifice Spud Chart." 6. Insert the broil burner locator pin in the hole in plastic parts bag for proper cooktop burner flame is not as distinct as the inner cone. Install the Number 0.054 Natural gas broil burner orifice hood, turning...
... White 180N 16,000 BTU Black 195N 5. See the "Natural Gas Orifice Spud Chart." 6. Insert the broil burner locator pin in the hole in plastic parts bag for proper cooktop burner flame is not as distinct as the inner cone. Install the Number 0.054 Natural gas broil burner orifice hood, turning...


