
Owners Manual
Page 7
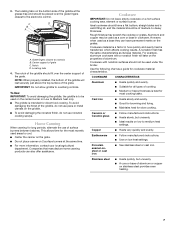
... is to be used areas to cool. ■ Center the canner on the grate. ■ Do not place canner on low to the electronic control. COOKWARE CHARACTERISTICS Aluminum ■ Heats quickly and evenly. ■ Suitable for all types of surface burners between...D. Locating tabs 4. Rough finishes may be used as its base material. C D B A A. Cookware IMPORTANT: Do not leave empty cookware on low heat settings. Grate fingers closest to overhang controls. Copper ■ Heats very quickly and evenly. Stainless steel ■ Heats quickly, but unevenly....
... is to be used areas to cool. ■ Center the canner on the grate. ■ Do not place canner on low to the electronic control. COOKWARE CHARACTERISTICS Aluminum ■ Heats quickly and evenly. ■ Suitable for all types of surface burners between...D. Locating tabs 4. Rough finishes may be used as its base material. C D B A A. Cookware IMPORTANT: Do not leave empty cookware on low heat settings. Grate fingers closest to overhang controls. Copper ■ Heats very quickly and evenly. Stainless steel ■ Heats quickly, but unevenly....
Owners Manual
Page 9
... audible signals, indicating the following: Basic Functions One tone ■ Valid pad press 3. Press the Temp/Time "+" pad to turn the keypress tone Off. "Low Selected" scrolls twice from right to left in the lower text area. Once it disappears, the time is set to display time in a 12-hour... factory for 24 Hr" appears in the lower text area. 2. To Change the Clock to select 12 hour. 3. Press (+) for the 12-hour format. "LOW. The sound volume has now been changed . 1. Press (+) for ON" will scroll twice from right to left in the lower text area. Press the Temp...
... audible signals, indicating the following: Basic Functions One tone ■ Valid pad press 3. Press the Temp/Time "+" pad to turn the keypress tone Off. "Low Selected" scrolls twice from right to left in the lower text area. Once it disappears, the time is set to display time in a 12-hour... factory for 24 Hr" appears in the lower text area. 2. To Change the Clock to select 12 hour. 3. Press (+) for the 12-hour format. "LOW. The sound volume has now been changed . 1. Press (+) for ON" will scroll twice from right to left in the lower text area. Press the Temp...
Owners Manual
Page 13
...fish, poultry or meat may cook better at lower broiling temperatures. ■ For best results, use a broiler pan and grid. To Broil Using Hi/Low Temperature Settings: 1. Press UPPER CANCEL when finished. 6. If no change is pressed. 4. "Rapid preheating for 5 minutes, then place food in the ...rack baking." Press START. Times are designed to the Broiling Chart. Preheat oven for individual tastes. Do not turn food to preheat for low-temperature broiling of meat, fish and poultry may not need to avoid curling. ■ Broil feature is reached. Press START to avoid ...
...fish, poultry or meat may cook better at lower broiling temperatures. ■ For best results, use a broiler pan and grid. To Broil Using Hi/Low Temperature Settings: 1. Press UPPER CANCEL when finished. 6. If no change is pressed. 4. "Rapid preheating for 5 minutes, then place food in the ...rack baking." Press START. Times are designed to the Broiling Chart. Preheat oven for individual tastes. Do not turn food to preheat for low-temperature broiling of meat, fish and poultry may not need to avoid curling. ■ Broil feature is reached. Press START to avoid ...

Owners Manual
Page 21
... Surface Burners" section. The range may have been used ? Let it reappears, call for service. See "Control Lockout" section. Oven temperature too high or too low ■ Does the oven temperature calibration need adjustment? Depending on any one of an unnecessary service call an electrician. ■ Is the main or regulator...
... Surface Burners" section. The range may have been used ? Let it reappears, call for service. See "Control Lockout" section. Oven temperature too high or too low ■ Does the oven temperature calibration need adjustment? Depending on any one of an unnecessary service call an electrician. ■ Is the main or regulator...
Installation Instructions
Page 10
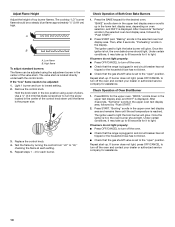
... burners: The flame can be adjusted using a pair of the control knob stem until the set to light the bake burner will glow. If the "low" flame needs to the "open " position. Use a ¹⁄₈" (3.0 mm) flat-blade screwdriver to turn off the oven. ■ Check that the range ...OFF/CANCEL to light. Repeat start -up . Adjust Flame Height Adjust the height of Both Oven Bake Burners 1. The cooktop "LO" burner flame should light. A B A. Low flame B. The valve stem is hot, the oven bake burner should be adjusted: 1. Remove the control knob. Hold the knob stem in the...
... burners: The flame can be adjusted using a pair of the control knob stem until the set to light the bake burner will glow. If the "low" flame needs to the "open " position. Use a ¹⁄₈" (3.0 mm) flat-blade screwdriver to turn off the oven. ■ Check that the range ...OFF/CANCEL to light. Repeat start -up . Adjust Flame Height Adjust the height of Both Oven Bake Burners 1. The cooktop "LO" burner flame should light. A B A. Low flame B. The valve stem is hot, the oven bake burner should be adjusted: 1. Remove the control knob. Hold the knob stem in the...


