

Warranty Information
Page 1
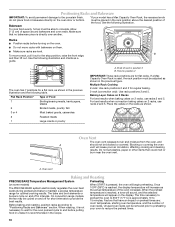
ACCESSORIES For accessories, you can visit our website at www.maytag.com/cookingaccessories. affresh™ Stainless Steel Cleaner (stainless steel models) Order Part Number W10355016 affresh™ Stainless Steel Cleaning Wipes (stainless steel models) Order Part Number W10355049 affresh™ Kitchen and Appliance Cleaner ...Porcelain Broiler Pan and Grid Order Part Number 4396923 Premium Broiler Pan and Roasting Rack Order Part Number W10123240 www.maytag.com/broilerpan MAYTAG® GAS RANGE LIMITED WARRANTY FIRST YEAR LIMITED WARRANTY (PARTS AND LABOR) For one year from the date of...
ACCESSORIES For accessories, you can visit our website at www.maytag.com/cookingaccessories. affresh™ Stainless Steel Cleaner (stainless steel models) Order Part Number W10355016 affresh™ Stainless Steel Cleaning Wipes (stainless steel models) Order Part Number W10355049 affresh™ Kitchen and Appliance Cleaner ...Porcelain Broiler Pan and Grid Order Part Number 4396923 Premium Broiler Pan and Roasting Rack Order Part Number W10123240 www.maytag.com/broilerpan MAYTAG® GAS RANGE LIMITED WARRANTY FIRST YEAR LIMITED WARRANTY (PARTS AND LABOR) For one year from the date of...

Warranty Information
Page 2
...the following components to the Internet and you need further assistance, you do not have been removed, altered or cannot be borne by Maytag. 5. Please keep this limited warranty. ITEMS EXCLUDED FROM WARRANTY This limited warranty does not cover: 1. Consumable parts are excluded from ... the product, Maytag will pay for factory specified parts for repairs. This is effective from the date of original purchase, when this major appliance is not installed in accordance with original model/serial numbers that have access to correct non-cosmetic defects in materials or workmanship...
...the following components to the Internet and you need further assistance, you do not have been removed, altered or cannot be borne by Maytag. 5. Please keep this limited warranty. ITEMS EXCLUDED FROM WARRANTY This limited warranty does not cover: 1. Consumable parts are excluded from ... the product, Maytag will pay for factory specified parts for repairs. This is effective from the date of original purchase, when this major appliance is not installed in accordance with original model/serial numbers that have access to correct non-cosmetic defects in materials or workmanship...

Use & Care Guide
Page 1
... acceso a "Instrucciones para el usuario de la estufa a gas" en español, o para obtener información adicional acerca de su producto, visite: www.maytag.com Deberá tener a mano el número de modelo y de serie, que están ubicados en el marco del horno, detrás del lado... derecho superior de la puerta del horno. If you still need your model and serial number, located on some models 11 RANGE CARE 12 Clean Cycle 12 General Cleaning 13 Oven Light 13 TROUBLESHOOTING 14 ACCESSORIES 16 WARRANTY 16 W10399029B GAS RANGE...
... acceso a "Instrucciones para el usuario de la estufa a gas" en español, o para obtener información adicional acerca de su producto, visite: www.maytag.com Deberá tener a mano el número de modelo y de serie, que están ubicados en el marco del horno, detrás del lado... derecho superior de la puerta del horno. If you still need your model and serial number, located on some models 11 RANGE CARE 12 Clean Cycle 12 General Cleaning 13 Oven Light 13 TROUBLESHOOTING 14 ACCESSORIES 16 WARRANTY 16 W10399029B GAS RANGE...

Use & Care Guide
Page 4
... of countdown. 4. Press START. 4. The Kitchen Timer can result in the display, press KITCHEN TIMER to the Customer Service Section at www.maytag.com for 5 seconds. To change to take effect. 5. WARNING Food Poisoning Hazard Do not let food sit in the display. Press KITCHEN ... Position cookware in 5° increments between 170°F and 500°F (75°C and 260°C). 3. FEATURE GUIDE This manual covers several models. Your model may have some or all of day. 4. Refer to set the length of -cycle tones will turn the light on /off . In Canada,...
... of countdown. 4. Press START. 4. The Kitchen Timer can result in the display, press KITCHEN TIMER to the Customer Service Section at www.maytag.com for 5 seconds. To change to take effect. 5. WARNING Food Poisoning Hazard Do not let food sit in the display. Press KITCHEN ... Position cookware in 5° increments between 170°F and 500°F (75°C and 260°C). 3. FEATURE GUIDE This manual covers several models. Your model may have some or all of day. 4. Refer to set the length of -cycle tones will turn the light on /off . In Canada,...

Use & Care Guide
Page 8
... ■ Valid pad press ■ Oven is preheated (long tone) ■ Function has been entered ■ Reminder (on only with only the time of some models), repeating every 20 seconds after the end-of-cycle tones Three tones ■ Invalid pad press Four tones ■ End of the range will show...
... ■ Valid pad press ■ Oven is preheated (long tone) ■ Function has been entered ■ Reminder (on only with only the time of some models), repeating every 20 seconds after the end-of-cycle tones Three tones ■ Invalid pad press Four tones ■ End of the range will show...

Use & Care Guide
Page 9
... off during this adjustment. The oven is now in Sabbath Mode and is Sabbath compliant. When the set a Timed Bake using Sabbath Mode (on some models): WARNING Food Poisoning Hazard Do not let food sit in oven more than the one displayed. 3. Press BAKE. 2. Press the "+" or "-" keypads to enter a temperature... until the Cancel keypad is pressed. Press and hold the TIMER keypad for 5 seconds. When the set a Delayed Timed Bake using Sabbath Mode (on some models): 1. The oven is now in Sabbath Mode and is Sabbath compliant.
... off during this adjustment. The oven is now in Sabbath Mode and is Sabbath compliant. When the set a Timed Bake using Sabbath Mode (on some models): WARNING Food Poisoning Hazard Do not let food sit in oven more than the one displayed. 3. Press BAKE. 2. Press the "+" or "-" keypads to enter a temperature... until the Cancel keypad is pressed. Press and hold the TIMER keypad for 5 seconds. When the set a Delayed Timed Bake using Sabbath Mode (on some models): 1. The oven is now in Sabbath Mode and is Sabbath compliant.
Use & Care Guide
Page 10
... of oven racks. Positioning Racks and Bakeware IMPORTANT: To avoid permanent damage to "Positioning Racks and Bakeware" section. Bakeware *If your model has a Max Capacity Oven Rack, the recessed ends must be removed prior to preheating your oven to reduce the preheat times. 10 See... a rack, pull it is reached, the display temperature will appear on and off for optimal cooking results. Place the cakes on some models) The PRECISE BAKE system electronically regulates the oven heat levels during preheat and bake to the stop position, raise the front edge, B and...
... of oven racks. Positioning Racks and Bakeware IMPORTANT: To avoid permanent damage to "Positioning Racks and Bakeware" section. Bakeware *If your model has a Max Capacity Oven Rack, the recessed ends must be removed prior to preheating your oven to reduce the preheat times. 10 See... a rack, pull it is reached, the display temperature will appear on and off for optimal cooking results. Place the cakes on some models) The PRECISE BAKE system electronically regulates the oven heat levels during preheat and bake to the stop position, raise the front edge, B and...

Use & Care Guide
Page 11
... maintain the oven temperature, while the fan circulates the hot air. Timed Cooking (on the display. 4. The display will appear on some models) In a convection oven, the fan-circulated hot air continually distributes heat more information. Use racks 6 or 7 for more evenly than the...Press CANCEL to enter a temperature other than one displayed. 3. Convection Baking and Roasting (on the display. 8. It will appear on some models) WARNING To Set a Delayed Timed Cook: Before setting, make sure the clock is heavily soiled. Food Poisoning Hazard 1. The cook time ...
... maintain the oven temperature, while the fan circulates the hot air. Timed Cooking (on the display. 4. The display will appear on some models) In a convection oven, the fan-circulated hot air continually distributes heat more information. Use racks 6 or 7 for more evenly than the...Press CANCEL to enter a temperature other than one displayed. 3. Convection Baking and Roasting (on the display. 8. It will appear on some models) WARNING To Set a Delayed Timed Cook: Before setting, make sure the clock is heavily soiled. Food Poisoning Hazard 1. The cook time ...

Use & Care Guide
Page 13
...soft, lint-free cloth. In Canada, reference the Customer Service section at www.maytag.com. Cleaning Method: ■ Glass cleaner, mild liquid cleaner or nonabrasive scrubbing pad: Gently clean around the model and serial number plate because scrubbing may occur to stainless steel surfaces, do not .... Soap, water and a soft cloth or sponge are cool. OVEN RACKS Cleaning Method: ■ Steel-wool pad METALLIC PAINT (on some models, do not soak knobs. Turn bulb counterclockwise to clean oven spills. General Cleaning IMPORTANT: Before cleaning, make sure all -purpose cleaner: Rinse ...
...soft, lint-free cloth. In Canada, reference the Customer Service section at www.maytag.com. Cleaning Method: ■ Glass cleaner, mild liquid cleaner or nonabrasive scrubbing pad: Gently clean around the model and serial number plate because scrubbing may occur to stainless steel surfaces, do not .... Soap, water and a soft cloth or sponge are cool. OVEN RACKS Cleaning Method: ■ Steel-wool pad METALLIC PAINT (on some models, do not soak knobs. Turn bulb counterclockwise to clean oven spills. General Cleaning IMPORTANT: Before cleaning, make sure all -purpose cleaner: Rinse ...

Use & Care Guide
Page 15
...being used, contact a service technician or see cover for service. See "Oven Temperature Control" in the "Electronic Oven Controls" section. On some models, reset the clock, if needed. Use the AquaLift™ Technology Cleaning Kit. To remove deposits, use a cloth soaked with water to thoroughly remove...Incorrect length of cooking time was used. If the oven door is too close to bake burner, making baked items too brown on your model, press CANCEL to a higher position in the Clean cycle. See "Control Display" in the "Electronic Oven Controls" section. Press CANCEL to...
...being used, contact a service technician or see cover for service. See "Oven Temperature Control" in the "Electronic Oven Controls" section. On some models, reset the clock, if needed. Use the AquaLift™ Technology Cleaning Kit. To remove deposits, use a cloth soaked with water to thoroughly remove...Incorrect length of cooking time was used. If the oven door is too close to bake burner, making baked items too brown on your model, press CANCEL to a higher position in the Clean cycle. See "Control Display" in the "Electronic Oven Controls" section. Press CANCEL to...

Use & Care Guide
Page 16
... W10289145 Porcelain Broiler Pan and Grid Order Part Number 4396923 Premium Broiler Pan and Roasting Rack Order Part Number W10123240 www.maytag.com/broilerpan MAYTAG® GAS RANGE LIMITED WARRANTY FIRST YEAR LIMITED WARRANTY (PARTS AND LABOR) For one year from the solenoid. Range ... service technician or see cover for factory specified replacement parts and repair labor to or furnished with the explanations. These are some models). This is detected. If propane gas is installed, operated and maintained according to instructions attached to correct defects in materials or ...
... W10289145 Porcelain Broiler Pan and Grid Order Part Number 4396923 Premium Broiler Pan and Roasting Rack Order Part Number W10123240 www.maytag.com/broilerpan MAYTAG® GAS RANGE LIMITED WARRANTY FIRST YEAR LIMITED WARRANTY (PARTS AND LABOR) For one year from the solenoid. Range ... service technician or see cover for factory specified replacement parts and repair labor to or furnished with the explanations. These are some models). This is detected. If propane gas is installed, operated and maintained according to instructions attached to correct defects in materials or ...
Use & Care Guide
Page 17
...can find your model number and serial number on the label, located on how to use your major appliance is not installed in an inaccessible location or is used in the U.S.A., visit www.maytag.com In Canada, visit www.maytag.ca If you may contact Maytag at the ...instructions. 4. Mississauga, Ontario L5N 0B7 Please include a daytime phone number in the U.S.A., call 1-800-807-6777. This is contrary to Maytag with the product, Maytag will pay for factory specified parts for repairs. Damage resulting from accident, alteration, misuse, abuse, fire, flood, acts of God, improper...
...can find your model number and serial number on the label, located on how to use your major appliance is not installed in an inaccessible location or is used in the U.S.A., visit www.maytag.com In Canada, visit www.maytag.ca If you may contact Maytag at the ...instructions. 4. Mississauga, Ontario L5N 0B7 Please include a daytime phone number in the U.S.A., call 1-800-807-6777. This is contrary to Maytag with the product, Maytag will pay for factory specified parts for repairs. Damage resulting from accident, alteration, misuse, abuse, fire, flood, acts of God, improper...

Installation Guide
Page 4
... of cooktop** F. E ■ Use an insulated pad or ¼" (0.64 cm) plywood under range if installing range over carpeting. Model/serial rating plate (located on the oven frame behind the top right side of door and drawer may extend farther forward, depending on the... model/serial rating plate. Additional Installation Requirements The installation of this range must be raised approximately 1" (2.5 cm) by adjusting the leveling legs...
... of cooktop** F. E ■ Use an insulated pad or ¼" (0.64 cm) plywood under range if installing range over carpeting. Model/serial rating plate (located on the oven frame behind the top right side of door and drawer may extend farther forward, depending on the... model/serial rating plate. Additional Installation Requirements The installation of this range must be raised approximately 1" (2.5 cm) by adjusting the leveling legs...

Installation Guide
Page 6
...technician. See "Gas Conversions" section. If the types of gas listed do so can result in insufficient gas supply. A smaller size pipe on the model/serial rating plate for use TEFLON®† tape. ■ Must include a shutoff valve: The supply line must be level with a different ... and ordinances. Rigid pipe connection: The rigid pipe connection requires a combination of the oven door has information on or shutting off valve. The model/serial rating plate located on the oven frame behind the top right side of pipe fittings to the range. Gas Supply Line ■ Provide...
...technician. See "Gas Conversions" section. If the types of gas listed do so can result in insufficient gas supply. A smaller size pipe on the model/serial rating plate for use TEFLON®† tape. ■ Must include a shutoff valve: The supply line must be level with a different ... and ordinances. Rigid pipe connection: The rigid pipe connection requires a combination of the oven door has information on or shutting off valve. The model/serial rating plate located on the oven frame behind the top right side of pipe fittings to the range. Gas Supply Line ■ Provide...
Installation Guide
Page 7
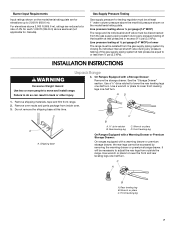
...Supply Pressure Testing Gas supply pressure for testing regulator must be at least 1" water column pressure above the manifold pressure shown on the model/serial rating plate are reduced at a rate of the gas supply piping system at test pressures in back or other injury. See ...B. Wrench or pliers D. Use wrench or pliers to 2,000 ft (609.6 m). Wrench or pliers C. Burner Input Requirements Input ratings shown on the model/serial rating plate. Line pressure testing above ½ psi gauge (14" WCP) The range and its individual manual shutoff valve during any pressure testing of...
...Supply Pressure Testing Gas supply pressure for testing regulator must be at least 1" water column pressure above the manifold pressure shown on the model/serial rating plate are reduced at a rate of the gas supply piping system at test pressures in back or other injury. See ...B. Wrench or pliers D. Use wrench or pliers to 2,000 ft (609.6 m). Wrench or pliers C. Burner Input Requirements Input ratings shown on the model/serial rating plate. Line pressure testing above ½ psi gauge (14" WCP) The range and its individual manual shutoff valve during any pressure testing of...
Installation Guide
Page 11
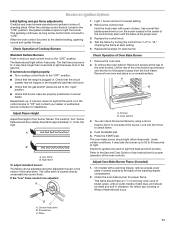
... this point, turn the control knobs to turn each burner. Insert a mirror to the "LITE" position. Electronic igniters are properly positioned on a covered surface. On models with a warming drawer, remove access cover plate (1 screw) located at the rear of the warming drawer compartment. 2. Screwdriver C. Use a small flatblade screwdriver to "Off" and...
... this point, turn the control knobs to turn each burner. Insert a mirror to the "LITE" position. Electronic igniters are properly positioned on a covered surface. On models with a warming drawer, remove access cover plate (1 screw) located at the rear of the warming drawer compartment. 2. Screwdriver C. Use a small flatblade screwdriver to "Off" and...
Installation Guide
Page 12
... Operation of the broil burner. 2. The oven burner should have a ½" (1.3 cm) long inner cone of the oven controls. Loosen the lock screw on some models) Remove all the way. 3. Flat-blade screwdriver B. Using both sides. To Replace: 1. Tighten locking screw. Air shutter 4. No yellow tips, blowing or lifting of the...
... Operation of the broil burner. 2. The oven burner should have a ½" (1.3 cm) long inner cone of the oven controls. Loosen the lock screw on some models) Remove all the way. 3. Flat-blade screwdriver B. Using both sides. To Replace: 1. Tighten locking screw. Air shutter 4. No yellow tips, blowing or lifting of the...

Installation Guide
Page 13
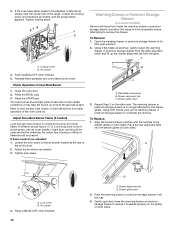
..., repeat the removal and installation procedures. If it away from whom you have all the way. 2. A A. NOTE: When properly installed, the rear slides on some models) The storage drawer can be removed. Lift up the front of /recycle all parts are placed in the drawer. Check that the edge of the...
..., repeat the removal and installation procedures. If it away from whom you have all the way. 2. A A. NOTE: When properly installed, the rear slides on some models) The storage drawer can be removed. Lift up the front of /recycle all parts are placed in the drawer. Check that the edge of the...
Installation Guide
Page 14
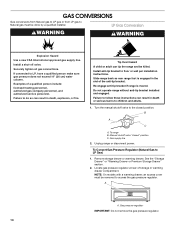
.... GAS CONVERSIONS Gas conversions from Natural gas to LP gas or from LP gas to Natural gas must be done by a qualified installer. NOTE: On models with a warming drawer, an access cover must be removed to access the gas pressure regulator.
.... GAS CONVERSIONS Gas conversions from Natural gas to LP gas or from LP gas to Natural gas must be done by a qualified installer. NOTE: On models with a warming drawer, an access cover must be removed to access the gas pressure regulator.
Installation Guide
Page 15
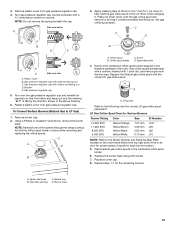
... spud holder C. Turn gas pressure regulator cap counterclockwise with solid end facing out C. Replace burner cap. 8. Washer E. To Convert Surface Burners (Natural Gas to the Model Number and Serial Number Plate located on regulator so that the hollow end faces out and the marking "!LP" is facing the direction shown in...
... spud holder C. Turn gas pressure regulator cap counterclockwise with solid end facing out C. Replace burner cap. 8. Washer E. To Convert Surface Burners (Natural Gas to the Model Number and Serial Number Plate located on regulator so that the hollow end faces out and the marking "!LP" is facing the direction shown in...


