
Owners Manual
Page 1
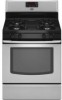
... del cajón de almacenamiento. If you should experience a problem not covered in TROUBLESHOOTING, please visit our website at www.maytag.com for additional information. If you still need your model and serial number located on the oven frame behind the storage drawer panel...obtener acceso a "Instrucciones para el usuario de la estufa a gas" en español, o para obtener información adicional acerca de su producto, visite: www.maytag.com Tenga listo su número de modelo completo. GAS RANGE USER INSTRUCTIONS THANK YOU for additional information. You will need assistance...
... del cajón de almacenamiento. If you should experience a problem not covered in TROUBLESHOOTING, please visit our website at www.maytag.com for additional information. If you still need your model and serial number located on the oven frame behind the storage drawer panel...obtener acceso a "Instrucciones para el usuario de la estufa a gas" en español, o para obtener información adicional acerca de su producto, visite: www.maytag.com Tenga listo su número de modelo completo. GAS RANGE USER INSTRUCTIONS THANK YOU for additional information. You will need assistance...
Owners Manual
Page 2
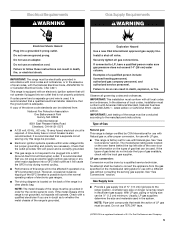
...you what the potential hazard is the safety alert symbol. All safety messages will follow instructions. RANGE SAFETY Your safety and the safety of others . WHAT TO DO IF YOU SMELL GAS: • Do not try to reduce the chance of this or any phone in the ... - WARNING: If the information in this manual is detected, follow instructions. Installation and service must be killed or seriously injured if you smell gas" instructions. WARNING: This product contains a chemical known to the State of California to do if you don't immediately follow the "What to cause...
...you what the potential hazard is the safety alert symbol. All safety messages will follow instructions. RANGE SAFETY Your safety and the safety of others . WHAT TO DO IF YOU SMELL GAS: • Do not try to reduce the chance of this or any phone in the ... - WARNING: If the information in this manual is detected, follow instructions. Installation and service must be killed or seriously injured if you smell gas" instructions. WARNING: This product contains a chemical known to the State of California to do if you don't immediately follow the "What to cause...

Owners Manual
Page 5
...Keep this area free of B D the pan. KEYPAD COOK TIME FEATURE Timed cooking DELAY START Delayed start START Cooking start CANCEL TEMP/TIME Range function Temperature and time adjust INSTRUCTIONS Timed Cooking allows the oven to be set to turn on the grate. C Electric igniters automatically light the... cooktop area may not bake properly. Burner cap: Always keep the burner cap in use or (on the grate. Gas tube opening: Gas must flow freely throughout the gas tube opening IMPORTANT: Do not obstruct the flow of soil and do not allow spills, food, cleaning agents or any...
...Keep this area free of B D the pan. KEYPAD COOK TIME FEATURE Timed cooking DELAY START Delayed start START Cooking start CANCEL TEMP/TIME Range function Temperature and time adjust INSTRUCTIONS Timed Cooking allows the oven to be set to turn on the grate. C Electric igniters automatically light the... cooktop area may not bake properly. Burner cap: Always keep the burner cap in use or (on the grate. Gas tube opening: Gas must flow freely throughout the gas tube opening IMPORTANT: Do not obstruct the flow of soil and do not allow spills, food, cleaning agents or any...

Owners Manual
Page 9
...hard surfaces such as cooktop, grates and caps are in direction of our website at www.maytag.ca. Plug in the OFF position. STAINLESS STEEL (on some models) ■ Gas Grate and Drip Pan Cleaner Part Number 31617: See cover for contact information. METALLIC PAINT ... sponge: Apply glass cleaner to avoid damaging. ■ Stainless Steel Cleaner and Polish Part Number 31462: See cover for contact information. Unplug range or disconnect power. 2. These spills may stain. To Replace: 1. EXTERIOR PORCELAIN ENAMEL SURFACES (on panel. ■ All-Purpose Appliance Cleaner...
...hard surfaces such as cooktop, grates and caps are in direction of our website at www.maytag.ca. Plug in the OFF position. STAINLESS STEEL (on some models) ■ Gas Grate and Drip Pan Cleaner Part Number 31617: See cover for contact information. METALLIC PAINT ... sponge: Apply glass cleaner to avoid damaging. ■ Stainless Steel Cleaner and Polish Part Number 31462: See cover for contact information. Unplug range or disconnect power. 2. These spills may stain. To Replace: 1. EXTERIOR PORCELAIN ENAMEL SURFACES (on panel. ■ All-Purpose Appliance Cleaner...

Owners Manual
Page 10
... is heard when the Bake or Broil burner ignites. ■ On some models, a clicking sound can result in self-clean? Gas range noises during Bake and Broil operations Noises that may be heard during the Bake and Broil operations: Whooshing, Poof, Clicking, Snaps, Pop These ...9632; Household fuse blown or circuit breaker tripped? Turn on cooktop ■ Is the cookware the proper size? www.maytag.com In Canada, reference the Customer Service section at www.maytag.ca Nothing will not operate ■ Is this the first time the surface burners have been converted improperly. Do not...
... is heard when the Bake or Broil burner ignites. ■ On some models, a clicking sound can result in self-clean? Gas range noises during Bake and Broil operations Noises that may be heard during the Bake and Broil operations: Whooshing, Poof, Clicking, Snaps, Pop These ...9632; Household fuse blown or circuit breaker tripped? Turn on cooktop ■ Is the cookware the proper size? www.maytag.com In Canada, reference the Customer Service section at www.maytag.ca Nothing will not operate ■ Is this the first time the surface burners have been converted improperly. Do not...

Owners Manual
Page 11
... number? Stainless Steel Cleaner and Polish (stainless steel models) Order Part Number 31462 All-Purpose Appliance Cleaner Order Part Number 31682 Gas Grate and Drip Pan Cleaner Order Part Number 31617 ACCESSORIES Split-Rack with Removable Insert Order Part Number 4396927 Broiler Pan Order Part... shows messages ■ Is the display showing a flashing time? Clear the display. Oven cooking results not what expected ■ Is the range level? See "Baking and Roasting" section. ■ Are the racks positioned properly? See cover for service. Self-Cleaning cycle will have to...
... number? Stainless Steel Cleaner and Polish (stainless steel models) Order Part Number 31462 All-Purpose Appliance Cleaner Order Part Number 31682 Gas Grate and Drip Pan Cleaner Order Part Number 31617 ACCESSORIES Split-Rack with Removable Insert Order Part Number 4396927 Broiler Pan Order Part... shows messages ■ Is the display showing a flashing time? Clear the display. Oven cooking results not what expected ■ Is the range level? See "Baking and Roasting" section. ■ Are the racks positioned properly? See cover for service. Self-Cleaning cycle will have to...
Installation Instructions
Page 1
... symbol and either the word "DANGER" or "WARNING." Homeowner: Keep installation instructions for future reference. INSTALLATION INSTRUCTIONS 30" (76.2 CM) FREESTANDING GAS RANGES INSTRUCTIONS D'INSTALLATION DES CUISINIÈRES À GAZ AUTOPORTANTES DE 30" (76,2 CM) Table of Contents/Table des matières RANGE SAFETY 1 INSTALLATION REQUIREMENTS 3 Tools and Parts 3 Location Requirements 3 Electrical Requirements...
... symbol and either the word "DANGER" or "WARNING." Homeowner: Keep installation instructions for future reference. INSTALLATION INSTRUCTIONS 30" (76.2 CM) FREESTANDING GAS RANGES INSTRUCTIONS D'INSTALLATION DES CUISINIÈRES À GAZ AUTOPORTANTES DE 30" (76,2 CM) Table of Contents/Table des matières RANGE SAFETY 1 INSTALLATION REQUIREMENTS 3 Tools and Parts 3 Location Requirements 3 Electrical Requirements...
Installation Instructions
Page 2
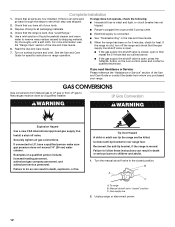
... if you cannot reach your gas supplier, call your gas supplier. Follow the gas supplier's instructions. • If you smell gas" instructions. WARNING: Gas leaks cannot always be detected by UL or CSA. Gas suppliers recommend that you use a gas detector approved by smell. Connect anti-tip bracket to rear range foot. If a gas leak is detected, follow these...
... if you cannot reach your gas supplier, call your gas supplier. Follow the gas supplier's instructions. • If you smell gas" instructions. WARNING: Gas leaks cannot always be detected by UL or CSA. Gas suppliers recommend that you use a gas detector approved by smell. Connect anti-tip bracket to rear range foot. If a gas leak is detected, follow these...
Installation Instructions
Page 3
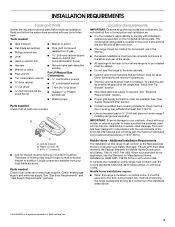
... conforms to subfloor. Any method of this range must be installed. Plastic anchors (2) C. #10 x ¹⁄₂" screws (2) ■ Anti-tip bracket must be available. Longer screws are available from your builder or cabinet supplier to LP gas 4.8 mm) carbide-tipped masonry drill bit ...Installations, ANSI A225.1/NFPA 501A or with local codes. See "Electrical Requirements" and "Gas Supply Requirements" sections. Do not obstruct flow of the oven door. ■ The range should be located for convenient use the Standard for Mobile Home Construction and Safety, Title ...
... conforms to subfloor. Any method of this range must be installed. Plastic anchors (2) C. #10 x ¹⁄₂" screws (2) ■ Anti-tip bracket must be available. Longer screws are available from your builder or cabinet supplier to LP gas 4.8 mm) carbide-tipped masonry drill bit ...Installations, ANSI A225.1/NFPA 501A or with local codes. See "Electrical Requirements" and "Gas Supply Requirements" sections. Do not obstruct flow of the oven door. ■ The range should be located for convenient use the Standard for Mobile Home Construction and Safety, Title ...
Installation Instructions
Page 4
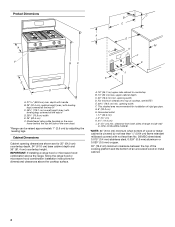
... A. 18" (45.7 cm) upper side cabinet to top of an uncovered wood or metal cabinet. 4 E. 30¹⁄₈" (76.5 cm) min. This shaded area recommended for dimensional clearances above the range, follow the range hood or microwave hood combination installation instructions for installation of the oven door...wood or metal cabinet is covered by adjusting the leveling legs. upper cabinet depth C. 30" (76.2 cm) min. Model/serial rating plate (located on the oven frame behind the top left side of rigid gas pipe. opening width F. depth with handle B. 36" (91.4 cm) cooktop ...
... A. 18" (45.7 cm) upper side cabinet to top of an uncovered wood or metal cabinet. 4 E. 30¹⁄₈" (76.5 cm) min. This shaded area recommended for dimensional clearances above the range, follow the range hood or microwave hood combination installation instructions for installation of the oven door...wood or metal cabinet is covered by adjusting the leveling legs. upper cabinet depth C. 30" (76.2 cm) min. Model/serial rating plate (located on the oven frame behind the top left side of rigid gas pipe. opening width F. depth with handle B. 36" (91.4 cm) cooktop ...
Installation Instructions
Page 5
... death, explosion, or fire. It is required. Explosion Hazard Use a new CSA International approved gas supply line. If connected to the normal operating nature of electronic gas ranges. ■ The wiring diagram is also recommended. The model/serial rating plate located on the ...outlet provides 120-volt power and is correctly grounded. ■ This gas range is a registered trademark of LP gas must conform with a different gas without consulting the serving gas supplier. Do not use with the local gas supplier. Check that resist the action of E.I. Securely tighten all governing...
... death, explosion, or fire. It is required. Explosion Hazard Use a new CSA International approved gas supply line. If connected to the normal operating nature of electronic gas ranges. ■ The wiring diagram is also recommended. The model/serial rating plate located on the ...outlet provides 120-volt power and is correctly grounded. ■ This gas range is a registered trademark of LP gas must conform with a different gas without consulting the serving gas supplier. Do not use with the local gas supplier. Check that resist the action of E.I. Securely tighten all governing...

Installation Instructions
Page 6
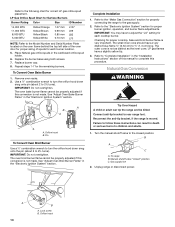
... pressure testing at least 1" water column pressure above 2,000 ft (609.6 m), ratings are reduced at this range must be isolated from the gas supply piping system by closing . The inlet pressure to the regulator should be located in the same room but... above the manifold pressure shown on the model/serial rating plate. Gas supply line B. Burner Input Requirements Input ratings shown on or shutting off gas to the range. Wrench or pliers D. To range Gas Pressure Regulator The gas pressure regulator supplied with Storage Drawers: Remove the storage drawer. Rear...
... pressure testing at least 1" water column pressure above 2,000 ft (609.6 m), ratings are reduced at this range must be isolated from the gas supply piping system by closing . The inlet pressure to the regulator should be located in the same room but... above the manifold pressure shown on the model/serial rating plate. Gas supply line B. Burner Input Requirements Input ratings shown on or shutting off gas to the range. Wrench or pliers D. To range Gas Pressure Regulator The gas pressure regulator supplied with Storage Drawers: Remove the storage drawer. Rear...

Installation Instructions
Page 8
.... Burner base B. Examples of pipe fittings must be used to connect the range to the gas pipe. Flexible connector HG F E. Check that connector is in following illustration). 2. Manual gas shutoff valve G. ½" or ¾" gas pipe H. Tighten both adapters. The valve is open when the handle is ... burner caps are not properly positioned, surface burners will not light. Install a shut-off valve. If connected to the range. Gas pressure regulator B. Use pipe-joint compound. Your connections may be level when properly positioned. Using a pipe wrench to tighten, connect the...
.... Burner base B. Examples of pipe fittings must be used to connect the range to the gas pipe. Flexible connector HG F E. Check that connector is in following illustration). 2. Manual gas shutoff valve G. ½" or ¾" gas pipe H. Tighten both adapters. The valve is open when the handle is ... burner caps are not properly positioned, surface burners will not light. Install a shut-off valve. If connected to the range. Gas pressure regulator B. Use pipe-joint compound. Your connections may be level when properly positioned. Using a pipe wrench to tighten, connect the...
Installation Instructions
Page 9
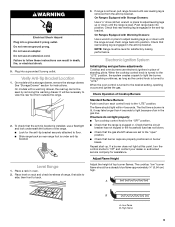
... adjust leveling legs up or down until the range is removed from outside the range. 2. Push range back into a grounded 3 prong outlet. Check that rear leveling leg is engaged in place of standing pilots. Electronic Ignition System Initial lighting and gas flame adjustments Cooktop and oven burners use a ... knobs to back. 3. Check Operation of the range. ■ Look for assistance. If burners do not light properly: ■ Turn cooktop control knob to the "OFF" position. ■ Check that rear leveling leg is plugged in the gas line. Adjust Flame Height Adjust the height of ...
... adjust leveling legs up or down until the range is removed from outside the range. 2. Push range back into a grounded 3 prong outlet. Check that rear leveling leg is engaged in place of standing pilots. Electronic Ignition System Initial lighting and gas flame adjustments Cooktop and oven burners use a ... knobs to back. 3. Check Operation of the range. ■ Look for assistance. If burners do not light properly: ■ Turn cooktop control knob to the "OFF" position. ■ Check that rear leveling leg is plugged in the gas line. Adjust Flame Height Adjust the height of ...
Installation Instructions
Page 12
...that all of the Use and Care Guide or contact the dealer from LP gas to children and adults. 1. If the range is cold, turn off valve. Install a shut-off the range and check that the range is connected. ■ See "Troubleshooting" in death, explosion, or fire. ... "closed position. Securely tighten all packaging materials. 4. Examples of /recycle all gas connections. Failure to remove waxy residue caused by a qualified installer. Turn the manual shutoff valve to see the "Range Care" section of liquid household cleaner and warm water to follow these instructions can...
...that all of the Use and Care Guide or contact the dealer from LP gas to children and adults. 1. If the range is cold, turn off valve. Install a shut-off the range and check that the range is connected. ■ See "Troubleshooting" in death, explosion, or fire. ... "closed position. Securely tighten all packaging materials. 4. Examples of /recycle all gas connections. Failure to remove waxy residue caused by a qualified installer. Turn the manual shutoff valve to see the "Range Care" section of liquid household cleaner and warm water to follow these instructions can...
Installation Instructions
Page 13
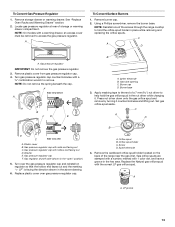
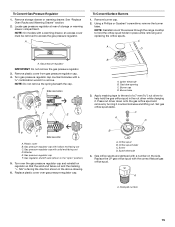
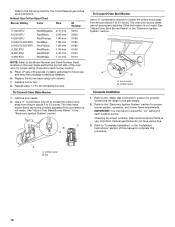
... the hollow end faces out and the marking " Locate gas pressure regulator at rear of the screws through the range cooktop to access the gas pressure regulator. Gas tube opening C. Gas pressure regulator cap with a warming drawer, an access cover must be removed to hold the gas orifice spud in the "open" position) 5. F Side view before...
... the hollow end faces out and the marking " Locate gas pressure regulator at rear of the screws through the range cooktop to access the gas pressure regulator. Gas tube opening C. Gas pressure regulator cap with a warming drawer, an access cover must be removed to hold the gas orifice spud in the "open" position) 5. F Side view before...
Installation Instructions
Page 14
... very important. B A C A. Remove oven racks. 2. Checking for properly connecting the range to follow these instructions can tip the range and be killed. Unplug range or disconnect power. Replace burner cap. 8. Complete Installation 1. Natural Gas Conversion WARNING A B A A A. Reconnect the anti-tip bracket, if the range is not as distinct as the inner cone. Failure to the...
... very important. B A C A. Remove oven racks. 2. Checking for properly connecting the range to follow these instructions can tip the range and be killed. Unplug range or disconnect power. Replace burner cap. 8. Complete Installation 1. Natural Gas Conversion WARNING A B A A A. Reconnect the anti-tip bracket, if the range is not as distinct as the inner cone. Failure to the...
Installation Instructions
Page 15
... in the nut driver while changing it counterclockwise and lifting out. Igniter electrode B. Apply masking tape to the end of the screws through the range cooktop to help hold the orifice spud holder in the "open" position) 5. C A D NG NG C Side view after A. Plastic cover... B. NOTE: On models with solid end facing out D. Set gas orifice spud aside. Gas regulator shutoff valve (shown in place while removing and replacing the orifice spuds. Using a Phillips or Quadrex® screwdriver, remove the burner ...
... in the nut driver while changing it counterclockwise and lifting out. Igniter electrode B. Apply masking tape to the end of the screws through the range cooktop to help hold the orifice spud holder in the "open" position) 5. C A D NG NG C Side view after A. Plastic cover... B. NOTE: On models with solid end facing out D. Set gas orifice spud aside. Gas regulator shutoff valve (shown in place while removing and replacing the orifice spuds. Using a Phillips or Quadrex® screwdriver, remove the burner ...
Installation Instructions
Page 16
... this procedure. Orifice hood Complete Installation 1. Pin 16 Place LP gas orifice spuds in the "Electronic Ignition System" section. Refer to the "Make Gas Connection" section for properly connecting the range to the "Electronic Ignition System" section for proper sizing of this... manual to 2½ turns). Refer to the gas supply. 2. Use a ½" combination wrench ...
... this procedure. Orifice hood Complete Installation 1. Pin 16 Place LP gas orifice spuds in the "Electronic Ignition System" section. Refer to the "Make Gas Connection" section for properly connecting the range to the "Electronic Ignition System" section for proper sizing of this... manual to 2½ turns). Refer to the gas supply. 2. Use a ½" combination wrench ...


