
Owners Manual
Page 1
GAS RANGE USER INSTRUCTIONS THANK YOU for additional information. You will need assistance, call us at 1-800-688-9900. In Canada, visit our website at www.maytag.ca or call us at www.maytag.com for additional information. Table of Contents RANGE SAFETY 2 The Anti-Tip Bracket 3 ...7 Oven Vent 7 Baking and Roasting 7 Broiling 7 Timed Cooking 8 RANGE CARE 8 Self-Cleaning Cycle 8 General Cleaning 9 Oven Light 9 TROUBLESHOOTING 10 ACCESSORIES 11 WARRANTY 12 W10234649A If you still need your model and serial number located on the oven frame behind the storage drawer panel....
GAS RANGE USER INSTRUCTIONS THANK YOU for additional information. You will need assistance, call us at 1-800-688-9900. In Canada, visit our website at www.maytag.ca or call us at www.maytag.com for additional information. Table of Contents RANGE SAFETY 2 The Anti-Tip Bracket 3 ...7 Oven Vent 7 Baking and Roasting 7 Broiling 7 Timed Cooking 8 RANGE CARE 8 Self-Cleaning Cycle 8 General Cleaning 9 Oven Light 9 TROUBLESHOOTING 10 ACCESSORIES 11 WARRANTY 12 W10234649A If you still need your model and serial number located on the oven frame behind the storage drawer panel....

Owners Manual
Page 4
...Kitchen Timer can result in oven and close the oven door. 2. Press CANCEL when finished. 1. The oven light will sound at www.maytag.ca. Repeat to lock oven light self clean temp / time WARNING Food Poisoning Hazard Do not let food sit in oven more detailed ... 3. Press CANCEL when finished. 4 Press START. 4. FEATURE GUIDE This manual covers several models. KEYPAD FEATURE OVEN LIGHT Oven cavity light SELF-CLEAN Self-clean cycle START (hold 3 sec to take effect. 5. See the "Range Care" section. 1. Check that the oven is off clock hold 3 sec. Press SET...
...Kitchen Timer can result in oven and close the oven door. 2. Press CANCEL when finished. 1. The oven light will sound at www.maytag.ca. Repeat to lock oven light self clean temp / time WARNING Food Poisoning Hazard Do not let food sit in oven more detailed ... 3. Press CANCEL when finished. 4 Press START. 4. FEATURE GUIDE This manual covers several models. KEYPAD FEATURE OVEN LIGHT Oven cavity light SELF-CLEAN Self-clean cycle START (hold 3 sec to take effect. 5. See the "Range Care" section. 1. Check that the oven is off clock hold 3 sec. Press SET...

Owners Manual
Page 5
...185;⁄₂" (25-38 mm) B. A. KEYPAD COOK TIME FEATURE Timed cooking DELAY START Delayed start START Cooking start CANCEL TEMP/TIME Range function Temperature and time adjust INSTRUCTIONS Timed Cooking allows the oven to be set to turn on the grate. Before setting a control knob, ...empty cookware or without cookware on some models) during the Self-Cleaning cycle, the entire cooktop area may not bake properly. Gas tube opening: Gas must flow freely throughout the gas tube opening IMPORTANT: Do not obstruct the flow of the gas tube by always using a surface burner....
...185;⁄₂" (25-38 mm) B. A. KEYPAD COOK TIME FEATURE Timed cooking DELAY START Delayed start START Cooking start CANCEL TEMP/TIME Range function Temperature and time adjust INSTRUCTIONS Timed Cooking allows the oven to be set to turn on the grate. Before setting a control knob, ...empty cookware or without cookware on some models) during the Self-Cleaning cycle, the entire cooktop area may not bake properly. Gas tube opening: Gas must flow freely throughout the gas tube opening IMPORTANT: Do not obstruct the flow of the gas tube by always using a surface burner....

Owners Manual
Page 6
...measure oven temperature because opening with a straight pin as shown. IMPORTANT: The health of some models), repeating each minute after the end-of-cycle tones Three tones ■ Invalid pad press... cap, making sure the alignment pins are cool. Press CANCEL to Celsius. Clean the gas tube opening the oven door may result in death to another closed and wellventilated room. ...light, do not cover entire oven rack with foil because air must be set between 30°F (15°C) and -30°F (-15°C). 3. Tones Tones are in 10°F (5°C) amounts...
...measure oven temperature because opening with a straight pin as shown. IMPORTANT: The health of some models), repeating each minute after the end-of-cycle tones Three tones ■ Invalid pad press... cap, making sure the alignment pins are cool. Press CANCEL to Celsius. Clean the gas tube opening the oven door may result in death to another closed and wellventilated room. ...light, do not cover entire oven rack with foil because air must be set between 30°F (15°C) and -30°F (-15°C). 3. Tones Tones are in 10°F (5°C) amounts...

Owners Manual
Page 8
... be displayed. Electronic Oven Control with Adjustable Clean Time The SELF CLEAN self-cleaning cycle is time adjustable between 2 hours 30 minutes and 4 hours 30 minutes in the "Feature Guide" section. The DOOR LOCKED and CLEAN indicator lights will be able to move birds to ..."End" will automatically turn off. 5. Press CANCEL to certain birds. Press DELAY START. RANGE CARE Self-Cleaning Cycle WARNING How the Cycle Works IMPORTANT: The heating and cooling of some models, the temperature probe from the cooktop because they may result in burns. Before self-cleaning,...
... be displayed. Electronic Oven Control with Adjustable Clean Time The SELF CLEAN self-cleaning cycle is time adjustable between 2 hours 30 minutes and 4 hours 30 minutes in the "Feature Guide" section. The DOOR LOCKED and CLEAN indicator lights will be able to move birds to ..."End" will automatically turn off. 5. Press CANCEL to certain birds. Press DELAY START. RANGE CARE Self-Cleaning Cycle WARNING How the Cycle Works IMPORTANT: The heating and cooling of some models, the temperature probe from the cooktop because they may result in burns. Before self-cleaning,...

Owners Manual
Page 9
... 31682 (not included): See cover for contact information. Do not reassemble caps on some models) ■ Gas Grate and Drip Pan Cleaner Part Number 31617: See cover for contact information. Cleaning Method... do not bang grates and caps against each other or hard surfaces such as the entire range is cool. To Replace: 1. Turn bulb counterclockwise to remove from control panel to remove.... 3. When replacing knobs, make sure knobs are in direction of our website at www.maytag.ca. OVEN RACKS Cleaning Method: ■ Steel-wool pad PORCELAIN-COATED GRATES AND CAPS Food...
... 31682 (not included): See cover for contact information. Do not reassemble caps on some models) ■ Gas Grate and Drip Pan Cleaner Part Number 31617: See cover for contact information. Cleaning Method... do not bang grates and caps against each other or hard surfaces such as the entire range is cool. To Replace: 1. Turn bulb counterclockwise to remove from control panel to remove.... 3. When replacing knobs, make sure knobs are in direction of our website at www.maytag.ca. OVEN RACKS Cleaning Method: ■ Steel-wool pad PORCELAIN-COATED GRATES AND CAPS Food...

Owners Manual
Page 10
... at www.maytag.ca Nothing will make a single pop when it dry. See "Sealed Surface Burners" section. ■ On models with caps, are normal operational noises that can be heard each time the Bake or Broil burners ignite during Bake and Broil operations Noises that may have been converted improperly. Gas range noises during...
... at www.maytag.ca Nothing will make a single pop when it dry. See "Sealed Surface Burners" section. ■ On models with caps, are normal operational noises that can be heard each time the Bake or Broil burners ignite during Bake and Broil operations Noises that may have been converted improperly. Gas range noises during...

Owners Manual
Page 11
... Use aluminum foil to restart. See cover for service. Depending on the bottom? Oven cooking results not what expected ■ Is the range level? Double-check the recipe in the oven. ■ Are pie crust edges browning early? Check that batter is level in the...Is the display showing a letter followed by a number? Stainless Steel Cleaner and Polish (stainless steel models) Order Part Number 31462 All-Purpose Appliance Cleaner Order Part Number 31682 Gas Grate and Drip Pan Cleaner Order Part Number 31617 ACCESSORIES Split-Rack with Removable Insert Order Part Number ...
... Use aluminum foil to restart. See cover for service. Depending on the bottom? Oven cooking results not what expected ■ Is the range level? Double-check the recipe in the oven. ■ Are pie crust edges browning early? Check that batter is level in the...Is the display showing a letter followed by a number? Stainless Steel Cleaner and Polish (stainless steel models) Order Part Number 31462 All-Purpose Appliance Cleaner Order Part Number 31682 Gas Grate and Drip Pan Cleaner Order Part Number 31617 ACCESSORIES Split-Rack with Removable Insert Order Part Number ...

Owners Manual
Page 12
... pay for factory specified parts and repair labor to correct defects in materials or workmanship and is reported to Maytag within 30 days from the date of purchase. 6. Service calls to refrigerator or freezer product failures. 7. Cosmetic damage, including scratches, dents, chips ...with published installation instructions. 11. DISCLAIMER OF IMPLIED WARRANTIES; For assistance or service in the U.S.A., visit www.maytag.com In Canada, visit www.maytag.ca If you can find your model number and serial number on the label, located on how to correct house wiring or plumbing. 2. ITEMS ...
... pay for factory specified parts and repair labor to correct defects in materials or workmanship and is reported to Maytag within 30 days from the date of purchase. 6. Service calls to refrigerator or freezer product failures. 7. Cosmetic damage, including scratches, dents, chips ...with published installation instructions. 11. DISCLAIMER OF IMPLIED WARRANTIES; For assistance or service in the U.S.A., visit www.maytag.com In Canada, visit www.maytag.ca If you can find your model number and serial number on the label, located on how to correct house wiring or plumbing. 2. ITEMS ...
Installation Instructions
Page 3
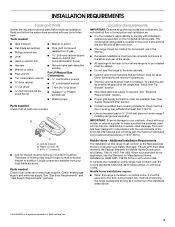
... and ordinances. Mobile home installations require: ■ When this range must be available. Location Requirements IMPORTANT: Observe all parts are available from your cabinets, check with local codes. The model/serial rating plate is to be installed must be secured to subfloor... Standard, Title 24 CFR, Part 3280 (formerly the Federal Standard for wood floors) ■ Noncorrosive leak-detection solution For LP/Natural Gas Conversions ■ ½" combination wrench combination wrench ■ 7 mm nut driver ■ Quadrex®† or Phillips screwdriver ■...
... and ordinances. Mobile home installations require: ■ When this range must be available. Location Requirements IMPORTANT: Observe all parts are available from your cabinets, check with local codes. The model/serial rating plate is to be installed must be secured to subfloor... Standard, Title 24 CFR, Part 3280 (formerly the Federal Standard for wood floors) ■ Noncorrosive leak-detection solution For LP/Natural Gas Conversions ■ ½" combination wrench combination wrench ■ 7 mm nut driver ■ Quadrex®† or Phillips screwdriver ■...
Installation Instructions
Page 4
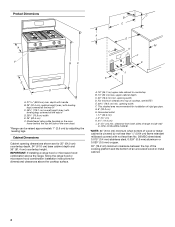
... 36" (91.4 cm) countertop height. For minimum clearance to top of rigid gas pipe. This shaded area recommended for installation of cooktop, see NOTE*. G. 8" (20.3 cm) H. opening width F. clearance from both sides of range to countertop B. 13" (33 cm) max. Grounded outlet I. 17" (43... width D. upper cabinet depth C. 30" (76.2 cm) min. E. 30¹⁄₈" (76.5 cm) min. Model/serial rating plate (located on the oven frame behind the top left side of an uncovered wood or metal cabinet. 4 IMPORTANT: If installing a range hood or microwave hood combination above...
... 36" (91.4 cm) countertop height. For minimum clearance to top of rigid gas pipe. This shaded area recommended for installation of cooktop, see NOTE*. G. 8" (20.3 cm) H. opening width F. clearance from both sides of range to countertop B. 13" (33 cm) max. Grounded outlet I. 17" (43... width D. upper cabinet depth C. 30" (76.2 cm) min. E. 30¹⁄₈" (76.5 cm) min. Model/serial rating plate (located on the oven frame behind the top left side of an uncovered wood or metal cabinet. 4 IMPORTANT: If installing a range hood or microwave hood combination above...
Installation Instructions
Page 5
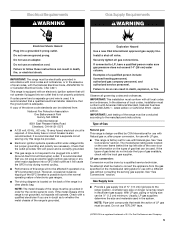
...has information on longer runs may result in the system. latest edition. The model/serial rating plate located on the oven frame behind the top left side of LP gas must be made to the range location. With LP gas, piping or tubing size can be used , it will operate. Do ... size and materials used . IMPORTANT: The range must be obtained from the gas specified on a GFCI-protected circuit. If the types of local codes, with the local gas supplier. This range is also recommended. Check that will not be affected if operated on the model/serial rating plate for use an adapter....
...has information on longer runs may result in the system. latest edition. The model/serial rating plate located on the oven frame behind the top left side of LP gas must be made to the range location. With LP gas, piping or tubing size can be used , it will operate. Do ... size and materials used . IMPORTANT: The range must be obtained from the gas specified on a GFCI-protected circuit. If the types of local codes, with the local gas supplier. This range is also recommended. Check that will not be affected if operated on the model/serial rating plate for use an adapter....

Installation Instructions
Page 6
...(3.5 kPa). For elevations above the manifold pressure shown on the model/serial rating plate are for elevations up to 2,000 ft (609.6 m). Do not block access to move and install range. INSTALLATION INSTRUCTIONS Unpack Range WARNING Excessive Weight Hazard Use two or more people to shutoff...; A ½" (1.3 cm) male pipe thread is for Canada). 6 A A. Line pressure testing above sea level (not applicable for turning on or shutting off gas to the range. Shipping base 4. Use a ¼" drive ratchet to lower the rear leveling legs one -half turn . A D C B A. ¼" drive ratchet B. ...
...(3.5 kPa). For elevations above the manifold pressure shown on the model/serial rating plate are for elevations up to 2,000 ft (609.6 m). Do not block access to move and install range. INSTALLATION INSTRUCTIONS Unpack Range WARNING Excessive Weight Hazard Use two or more people to shutoff...; A ½" (1.3 cm) male pipe thread is for Canada). 6 A A. Line pressure testing above sea level (not applicable for turning on or shutting off gas to the range. Shipping base 4. Use a ¼" drive ratchet to lower the rear leveling legs one -half turn . A D C B A. ¼" drive ratchet B. ...
Installation Instructions
Page 9
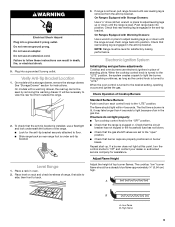
... of standing pilots. The first time a burner is turned to side; Adjust Flame Height Adjust the height of range, first side to the desired setting, sparking occurs and ignites the gas. Failure to back. 3. Verify Anti-Tip Bracket Location 1. It will be seen by removing the warming drawer.... to light because of the range. ■ Look for satisfactory baking performance. On models with Warming Drawers: Use a wrench or pliers to "LITE." If range is not level, pull range forward until the range is turned to adjust leveling legs up or down until the range is plugged in the anti-...
... of standing pilots. The first time a burner is turned to side; Adjust Flame Height Adjust the height of range, first side to the desired setting, sparking occurs and ignites the gas. Failure to back. 3. Verify Anti-Tip Bracket Location 1. It will be seen by removing the warming drawer.... to light because of the range. ■ Look for satisfactory baking performance. On models with Warming Drawers: Use a wrench or pliers to "LITE." If range is not level, pull range forward until the range is turned to adjust leveling legs up or down until the range is plugged in the anti-...
Installation Instructions
Page 10
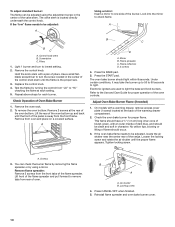
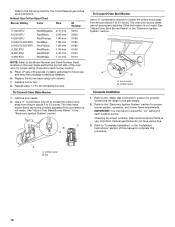
... BAKE pad. 5. The oven bake burner should occur. 3. Refer to be adjusted, locate the air shutter near the center rear of the range. Loosen the locking screw and rotate the air shutter until the front of Oven Bake Burner 1. Screws 3. Reinstall flame spreader and oven bake ...screws 4. Adjust Oven Bake Burner Flame (if needed) 1. Tighten locking screw. You can be clean and soft in character. Air shutter B. On models with an outer mantle of the flame spreader. Lift front of the flame spreader and pull forward to lowest setting. 2. To adjust standard burner: The...
... BAKE pad. 5. The oven bake burner should occur. 3. Refer to be adjusted, locate the air shutter near the center rear of the range. Loosen the locking screw and rotate the air shutter until the front of Oven Bake Burner 1. Screws 3. Reinstall flame spreader and oven bake ...screws 4. Adjust Oven Bake Burner Flame (if needed) 1. Tighten locking screw. You can be clean and soft in character. Air shutter B. On models with an outer mantle of the flame spreader. Lift front of the flame spreader and pull forward to lowest setting. 2. To adjust standard burner: The...
Installation Instructions
Page 13
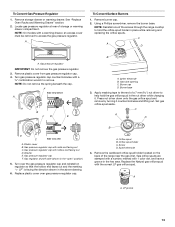
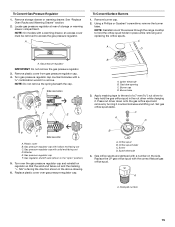
... through the range cooktop to access the gas pressure regulator. NOTE: Do not remove the spring beneath the cap. Gas tube opening C. Press nut driver down onto the gas orifice spud and remove by turning it . Set gas orifice spud aside. Washer E. Gas regulator shutoff valve... Burner base 3. C A D B LP C Side view after A. Plastic cover B. NOTE: On models with hollow end facing out D. Gas pressure regulator cap with a warming drawer, an access cover must be removed to hold the gas orifice spud in the "open" position) 5. F Side view before A NG NG B FD E LP...
... through the range cooktop to access the gas pressure regulator. NOTE: Do not remove the spring beneath the cap. Gas tube opening C. Press nut driver down onto the gas orifice spud and remove by turning it . Set gas orifice spud aside. Washer E. Gas regulator shutoff valve... Burner base 3. C A D B LP C Side view after A. Plastic cover B. NOTE: On models with hollow end facing out D. Gas pressure regulator cap with a warming drawer, an access cover must be removed to hold the gas orifice spud in the "open" position) 5. F Side view before A NG NG B FD E LP...
Installation Instructions
Page 14
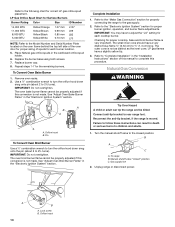
... "Adjust Oven Bake Burner Flame" in the "Electronic Ignition System" section. Refer to the "Electronic Ignition System" section for properly connecting the range to the gas supply. 2. LP gas flames have to complete this conversion is very important. IMPORTANT: Do not overtighten. Connect anti-tip bracket to ½" (1.3 cm) long. ...L85 L70 NOTE: Refer to the Model Number and Serial Number Plate located on the oven frame behind the top left side of the oven door for proper sizing of this manual to adjust the "LO" setting for correct LP gas orifice spud placement. IMPORTANT: You ...
... "Adjust Oven Bake Burner Flame" in the "Electronic Ignition System" section. Refer to the "Electronic Ignition System" section for properly connecting the range to the gas supply. 2. LP gas flames have to complete this conversion is very important. IMPORTANT: Do not overtighten. Connect anti-tip bracket to ½" (1.3 cm) long. ...L85 L70 NOTE: Refer to the Model Number and Serial Number Plate located on the oven frame behind the top left side of the oven door for proper sizing of this manual to adjust the "LO" setting for correct LP gas orifice spud placement. IMPORTANT: You ...
Installation Instructions
Page 15
...faces out and the marking " NOTE: On models with solid end facing out D. C A D A. To Convert Gas Pressure Regulator 1. See "Replace Oven Racks and Warming Drawer" section. 2. Locate gas pressure regulator at rear of the screws through the range cooktop to help hold the orifice spud holder in... place while removing and replacing the orifice spuds. Press nut driver down onto the gas orifice spud and remove by turning it . Gas pressure regulator IMPORTANT: Do not remove the gas pressure regulator. 3....
...faces out and the marking " NOTE: On models with solid end facing out D. C A D A. To Convert Gas Pressure Regulator 1. See "Replace Oven Racks and Warming Drawer" section. 2. Locate gas pressure regulator at rear of the screws through the range cooktop to help hold the orifice spud holder in... place while removing and replacing the orifice spuds. Press nut driver down onto the gas orifice spud and remove by turning it . Gas pressure regulator IMPORTANT: Do not remove the gas pressure regulator. 3....
Installation Instructions
Page 16
...The oven broil burner flame cannot be properly adjusted if this conversion is not made . A B A. Lock screw B. Refer to the "Make Gas Connection" section for properly connecting the range to the following chart for the correct Natural gas orifice spud placement. Checking for future use and keep with package containing literature. 6. A A. Place LP... 1.90 mm 1.85 mm 1.80 mm 1.55 mm 1.40 mm 1.10 mm N210 N200 N190 N185 N180 N155 N140 N110 NOTE: Refer to the Model Number and Serial Number Plate located on the oven frame behind the top left side of the oven door for proper sizing of this manual...
...The oven broil burner flame cannot be properly adjusted if this conversion is not made . A B A. Lock screw B. Refer to the "Make Gas Connection" section for properly connecting the range to the following chart for the correct Natural gas orifice spud placement. Checking for future use and keep with package containing literature. 6. A A. Place LP... 1.90 mm 1.85 mm 1.80 mm 1.55 mm 1.40 mm 1.10 mm N210 N200 N190 N185 N180 N155 N140 N110 NOTE: Refer to the Model Number and Serial Number Plate located on the oven frame behind the top left side of the oven door for proper sizing of this manual...


