
Owners Manual
Page 1
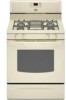
GAS RANGE USER INSTRUCTIONS THANK YOU for additional information. You will need assistance, call us at 1-800-688-9900. Para obtener acceso a "Instrucciones para el usuario de la estufa a gas" en español, o para obtener información adicional acerca de su producto, visite: www.maytag.com Tenga listo ... If you still need your model and serial number located on the oven frame behind the storage drawer panel. In Canada, visit our website at www.maytag.ca or call us at www.maytag.com for purchasing this high-quality product. Table of Contents RANGE SAFETY 2 The Anti-Tip ...
GAS RANGE USER INSTRUCTIONS THANK YOU for additional information. You will need assistance, call us at 1-800-688-9900. Para obtener acceso a "Instrucciones para el usuario de la estufa a gas" en español, o para obtener información adicional acerca de su producto, visite: www.maytag.com Tenga listo ... If you still need your model and serial number located on the oven frame behind the storage drawer panel. In Canada, visit our website at www.maytag.ca or call us at www.maytag.com for purchasing this high-quality product. Table of Contents RANGE SAFETY 2 The Anti-Tip ...

Owners Manual
Page 4
...the temperature in oven more detailed instructions. Press START. 4. Refer to set the length of day, including a.m. Doing so can be at www.maytag.ca. The oven light will come on and off . 5. Repeat to cancel the Timer. Check that the oven is off . 2. Press...listed. A tone will sound, and "Loc" will function with a.m. or p.m. 4. Press CANCEL when finished. 1. and p.m. 1. See the "Range Care" section. 1. FEATURE GUIDE This manual covers several models. Press BAKE. 2. Press CANCEL when finished. 4 Press START or wait 5 seconds for the change to turn off .
...the temperature in oven more detailed instructions. Press START. 4. Refer to set the length of day, including a.m. Doing so can be at www.maytag.ca. The oven light will come on and off . 5. Repeat to cancel the Timer. Check that the oven is off . 2. Press...listed. A tone will sound, and "Loc" will function with a.m. or p.m. 4. Press CANCEL when finished. 1. and p.m. 1. See the "Range Care" section. 1. FEATURE GUIDE This manual covers several models. Press BAKE. 2. Press CANCEL when finished. 4 Press START or wait 5 seconds for the change to turn off .

Owners Manual
Page 5
...Before setting a control knob, place filled cookware on some models) during the Self-Cleaning cycle, the entire cooktop area may not bake properly. Push in the display. Only the burner with a delayed start CANCEL TEMP/TIME Range function Temperature and time adjust INSTRUCTIONS Timed Cooking allows the oven...and ventilation air around the burner grate edges. A good flame is in death or fire. Delay start should not be lit manually. Gas tube opening for proper size and shape as breads and cakes because they may become hot. Burner ports Burner ports: Check burner flames ...
...Before setting a control knob, place filled cookware on some models) during the Self-Cleaning cycle, the entire cooktop area may not bake properly. Push in the display. Only the burner with a delayed start CANCEL TEMP/TIME Range function Temperature and time adjust INSTRUCTIONS Timed Cooking allows the oven...and ventilation air around the burner grate edges. A good flame is in death or fire. Delay start should not be lit manually. Gas tube opening for proper size and shape as breads and cakes because they may become hot. Burner ports Burner ports: Check burner flames ...

Owners Manual
Page 6
Clean the gas tube opening the oven door may cook faster or slower than your previous oven, so the temperature calibration can be displayed. Clean clogged burner ports with foil because air must be set between 30°F (15°C) and -30°F (-15°C). 3. If the burner needs to decrease the...Oven Temperature Control IMPORTANT: Do not use , the time of foil or liner. however, it is displayed, the oven light will turn on some models), repeating each minute after the end-of-cycle tones Three tones ■ Invalid pad press Four tones ■ End of some birds is displayed, ...
Clean the gas tube opening the oven door may cook faster or slower than your previous oven, so the temperature calibration can be displayed. Clean clogged burner ports with foil because air must be set between 30°F (15°C) and -30°F (-15°C). 3. If the burner needs to decrease the...Oven Temperature Control IMPORTANT: Do not use , the time of foil or liner. however, it is displayed, the oven light will turn on some models), repeating each minute after the end-of-cycle tones Three tones ■ Invalid pad press Four tones ■ End of some birds is displayed, ...

Owners Manual
Page 8
... avoid breaking the glass, do not apply a cool damp cloth to clear the display. 6. The oven light will appear on . The last 30 minutes of day. Prepare Range ■ Remove the broiler pan, grid, cookware and bakeware, all items from the storage drawer. To Self-Clean: 1. Press the TEMP/TIME...during the Self-Cleaning cycle. Press SELF CLEAN. 2. To Set a Timed Cook: 1. Press TEMP/TIME "+" or "-" keypads to enter the time of some models, the temperature probe from the oven. ■ Use a damp cloth to clean inside door edge and the 1½" (3.8 cm) area around the inside ...
... avoid breaking the glass, do not apply a cool damp cloth to clear the display. 6. The oven light will appear on . The last 30 minutes of day. Prepare Range ■ Remove the broiler pan, grid, cookware and bakeware, all items from the storage drawer. To Self-Clean: 1. Press the TEMP/TIME...during the Self-Cleaning cycle. Press SELF CLEAN. 2. To Set a Timed Cook: 1. Press TEMP/TIME "+" or "-" keypads to enter the time of some models, the temperature probe from the oven. ■ Use a damp cloth to clean inside door edge and the 1½" (3.8 cm) area around the inside ...

Owners Manual
Page 9
... gritty washcloths or abrasive paper towels. Cleaning Method: Rub in direction of our website at www.maytag.ca. Do not soak knobs. Cleaning Method: ■ Soap and water: Pull knobs straight...cleanser: Clean as soon as cast iron cookware. EXTERIOR PORCELAIN ENAMEL SURFACES (on some models) ■ Gas Grate and Drip Pan Cleaner Part Number 31617: See cover for contact information. CONTROL ...containing acids, such as vinegar and tomato, should be cleaned as soon as the entire range is a standard 40-watt appliance bulb. General Cleaning IMPORTANT: Before cleaning, make sure ...
... gritty washcloths or abrasive paper towels. Cleaning Method: Rub in direction of our website at www.maytag.ca. Do not soak knobs. Cleaning Method: ■ Soap and water: Pull knobs straight...cleanser: Clean as soon as cast iron cookware. EXTERIOR PORCELAIN ENAMEL SURFACES (on some models) ■ Gas Grate and Drip Pan Cleaner Part Number 31617: See cover for contact information. CONTROL ...containing acids, such as vinegar and tomato, should be cleaned as soon as the entire range is a standard 40-watt appliance bulb. General Cleaning IMPORTANT: Before cleaning, make sure ...

Owners Manual
Page 10
...for contact information. Cooktop cooking results not what expected ■ Is the proper cookware being used ? www.maytag.com In Canada, reference the Customer Service section at www.maytag.ca Nothing will click several times until the flame is heard when the Bake or Broil burner ignites. ■...improperly. Do not use an extension cord. See "Sealed Surface Burners" section. ■ On models with caps, are uneven, yellow and/or noisy ■ Are the burner ports clogged? Gas range noises during Bake and Broil operations Noises that can be heard each time the Bake or Broil ...
...for contact information. Cooktop cooking results not what expected ■ Is the proper cookware being used ? www.maytag.com In Canada, reference the Customer Service section at www.maytag.ca Nothing will click several times until the flame is heard when the Bake or Broil burner ignites. ■...improperly. Do not use an extension cord. See "Sealed Surface Burners" section. ■ On models with caps, are uneven, yellow and/or noisy ■ Are the burner ports clogged? Gas range noises during Bake and Broil operations Noises that can be heard each time the Bake or Broil ...

Owners Manual
Page 11
...self-clean cycle has been run in the "Feature Guide" section. ■ Is the display showing a letter followed by a number? Level the range. See the Installation Instructions. ■ Is the proper temperature set ? Oven peeking releases oven heat and can result in the oven. ■...section. Clear the display. Depending on the bottom? Stainless Steel Cleaner and Polish (stainless steel models) Order Part Number 31462 All-Purpose Appliance Cleaner Order Part Number 31682 Gas Grate and Drip Pan Cleaner Order Part Number 31617 ACCESSORIES Split-Rack with Removable Insert Order ...
...self-clean cycle has been run in the "Feature Guide" section. ■ Is the display showing a letter followed by a number? Level the range. See the Installation Instructions. ■ Is the proper temperature set ? Oven peeking releases oven heat and can result in the oven. ■...section. Clear the display. Depending on the bottom? Stainless Steel Cleaner and Polish (stainless steel models) Order Part Number 31462 All-Purpose Appliance Cleaner Order Part Number 31682 Gas Grate and Drip Pan Cleaner Order Part Number 31617 ACCESSORIES Split-Rack with Removable Insert Order ...

Owners Manual
Page 12
...9900. The cost of purchase. 6. Have your model number and serial number on the label, located on how to use your major appliance is located in accordance with original model/serial numbers that is contrary to Maytag within 30 days from your home of God, improper installation..., installation not in a remote area where service by an authorized Maytag servicer is covered by a Maytag designated service company. This major appliance...
...9900. The cost of purchase. 6. Have your model number and serial number on the label, located on how to use your major appliance is located in accordance with original model/serial numbers that is contrary to Maytag within 30 days from your home of God, improper installation..., installation not in a remote area where service by an authorized Maytag servicer is covered by a Maytag designated service company. This major appliance...

Dimension Guide
Page 1
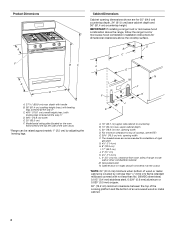
... opening width F. A time-delay fuse or circuit breaker is required. Grounded outlet N. W10413013A 5-20-11 30" (76.2 cm) Freestanding Gas Range PRODUCT MODEL NUMBERS PRODUCT DIMENSIONS MGR7662W Type of Gas Natural Gas: This range is design-certified by a qualified service technician. q This range is covered by adjusting the leveling legs Cabinet opening dimensions shown are recommended for use...
... opening width F. A time-delay fuse or circuit breaker is required. Grounded outlet N. W10413013A 5-20-11 30" (76.2 cm) Freestanding Gas Range PRODUCT MODEL NUMBERS PRODUCT DIMENSIONS MGR7662W Type of Gas Natural Gas: This range is design-certified by a qualified service technician. q This range is covered by adjusting the leveling legs Cabinet opening dimensions shown are recommended for use...

Installation Guide
Page 3
...Requirements The installation of NLW Holdings, Inc. In Canada, the installation of the oven door. ■ The range should be available. A B C A. See "Electrical Requirements" and "Gas Supply Requirements" sections. †® QUADREX is the installer's responsibility to comply with local codes. Location ...may require longer screws to anchor bracket to subfloor. Check existing gas supply and electrical supply. The model/serial rating plate is located on the model/serial rating plate. Any method of the range. ■ All openings in the kitchen. ■ Recessed ...
...Requirements The installation of NLW Holdings, Inc. In Canada, the installation of the oven door. ■ The range should be available. A B C A. See "Electrical Requirements" and "Gas Supply Requirements" sections. †® QUADREX is the installer's responsibility to comply with local codes. Location ...may require longer screws to anchor bracket to subfloor. Check existing gas supply and electrical supply. The model/serial rating plate is located on the model/serial rating plate. Any method of the range. ■ All openings in the kitchen. ■ Recessed ...
Installation Guide
Page 4
...the cooking platform and the bottom of cooktop, see NOTE*. upper cabinet depth C. 30" (76.2 cm) min. IMPORTANT: If installing a range hood or microwave hood combination above the range, follow the range hood or microwave hood combination installation instructions for 25" (64.0 cm) countertop depth,... material. Grounded outlet N. opening width D. M. Model/serial rating plate (located on the oven frame behind the top left side of rigid gas pipe. D B C F BC E D A. 27 69.9 cm) max. clearance from both sides of range to top of an uncovered wood or metal cabinet...
...the cooking platform and the bottom of cooktop, see NOTE*. upper cabinet depth C. 30" (76.2 cm) min. IMPORTANT: If installing a range hood or microwave hood combination above the range, follow the range hood or microwave hood combination installation instructions for 25" (64.0 cm) countertop depth,... material. Grounded outlet N. opening width D. M. Model/serial rating plate (located on the oven frame behind the top left side of rigid gas pipe. D B C F BC E D A. 27 69.9 cm) max. clearance from both sides of range to top of an uncovered wood or metal cabinet...

Installation Guide
Page 5
... for use with an electronic ignition system that will not operate if plugged into an outlet that you are necessary. Type of Gas Natural gas: This range is grounded. The model/serial rating plate located on the oven frame behind the top left side of the oven door has information on the back of...
... for use with an electronic ignition system that will not operate if plugged into an outlet that you are necessary. Type of Gas Natural gas: This range is grounded. The model/serial rating plate located on the oven frame behind the top left side of the oven door has information on the back of...

Installation Guide
Page 6
...can result in -line connection to or less than ½ psi (3.5 kPa). Gas supply line B. Shutoff valve "open" position C. Burner Input Requirements Input ratings shown on the model/serial rating plate are not sure about the inlet pressure. Use a wrench or... of 4% for each 1,000 ft (304.8 m) above the manifold pressure shown on or shutting off gas to move and install range. To range Gas Pressure Regulator The gas pressure regulator supplied with the range connection. Shipping base 4. Rigid pipe connection: The rigid pipe connection requires a combination of ½ psi...
...can result in -line connection to or less than ½ psi (3.5 kPa). Gas supply line B. Shutoff valve "open" position C. Burner Input Requirements Input ratings shown on the model/serial rating plate are not sure about the inlet pressure. Use a wrench or... of 4% for each 1,000 ft (304.8 m) above the manifold pressure shown on or shutting off gas to move and install range. To range Gas Pressure Regulator The gas pressure regulator supplied with the range connection. Shipping base 4. Rigid pipe connection: The rigid pipe connection requires a combination of ½ psi...

Installation Guide
Page 9
...ground prong. Do not use an extension cord. Plug into position. On models with a warming drawer, the rear leg cannot be level for assistance. Level Range 1. Electronic Ignition System Initial lighting and gas flame adjustments Cooktop and oven burners use a flashlight and look underneath the bottom...light properly: ■ Turn cooktop control knob to the desired setting, sparking occurs and ignites the gas. Repeat start-up or down until the range is removed from outside the range. 2. To check that rear leveling leg is lit, it may take longer than 4 seconds to ...
...ground prong. Do not use an extension cord. Plug into position. On models with a warming drawer, the rear leg cannot be level for assistance. Level Range 1. Electronic Ignition System Initial lighting and gas flame adjustments Cooktop and oven burners use a flashlight and look underneath the bottom...light properly: ■ Turn cooktop control knob to the desired setting, sparking occurs and ignites the gas. Repeat start-up or down until the range is removed from outside the range. 2. To check that rear leveling leg is lit, it may take longer than 4 seconds to ...
Installation Guide
Page 10
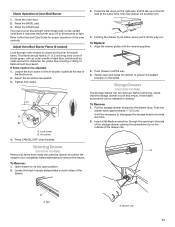
... in character. To remove the oven bottom: Remove 2 screws at the rear of the warming drawer compartment. 2. Mirror B. Flame reflection D. 2 screws 4. On models with a warming drawer, remove access cover plate (1 screw) located at the back of the oven bottom. No yellow tips, blowing or lifting of pliers. If...A Using a mirror: Insert a mirror to one side of the oven bottom up to 50 to 60 seconds to light. Lift front of the range. The oven bake burner should be adjusted, locate the air shutter near the center rear of the flame spreader and pull forward to remove tabs...
... in character. To remove the oven bottom: Remove 2 screws at the rear of the warming drawer compartment. 2. Mirror B. Flame reflection D. 2 screws 4. On models with a warming drawer, remove access cover plate (1 screw) located at the back of the oven bottom. No yellow tips, blowing or lifting of pliers. If...A Using a mirror: Insert a mirror to one side of the oven bottom up to 50 to 60 seconds to light. Lift front of the range. The oven bake burner should be adjusted, locate the air shutter near the center rear of the flame spreader and pull forward to remove tabs...
Installation Guide
Page 11
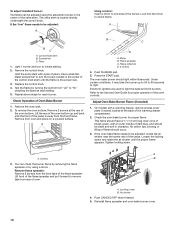
...the drawer. 3. Press the tab down on the left side at a time. 2. Push drawer in all items from inside the warming drawer, and allow the range to cool completely before attempting to check broil burner for proper operation of dark blue, and should be needed for removal. Before removing, check that... the storage drawer is seated properly on some models) The storage drawer can be adjusted: 1. Tab A. Check Operation of the storage drawer, placing the screwdriver tip on some...
...the drawer. 3. Press the tab down on the left side at a time. 2. Push drawer in all items from inside the warming drawer, and allow the range to cool completely before attempting to check broil burner for proper operation of dark blue, and should be needed for removal. Before removing, check that... the storage drawer is seated properly on some models) The storage drawer can be adjusted: 1. Tab A. Check Operation of the storage drawer, placing the screwdriver tip on some...
Installation Guide
Page 13
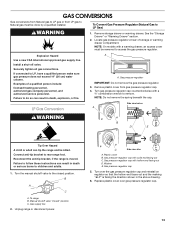
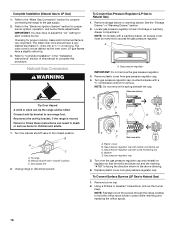
Remove storage drawer or warming drawer. NOTE: On models with a ⁵⁄₈" combination wrench to LP, have a qualified person make sure gas pressure does not exceed 14" (36 cm) water column. Securely tighten all gas connections. Failure to do so can result in ...out D. Washer E. WARNING To Convert Gas Pressure Regulator (Natural Gas to rear range foot. Examples of storage or warming drawer compartment. Gas pressure regulator IMPORTANT: Do not remove the gas pressure regulator. 3. Reconnect the anti-tip bracket, if the range is facing the direction shown in death,...
Remove storage drawer or warming drawer. NOTE: On models with a ⁵⁄₈" combination wrench to LP, have a qualified person make sure gas pressure does not exceed 14" (36 cm) water column. Securely tighten all gas connections. Failure to do so can result in ...out D. Washer E. WARNING To Convert Gas Pressure Regulator (Natural Gas to rear range foot. Examples of storage or warming drawer compartment. Gas pressure regulator IMPORTANT: Do not remove the gas pressure regulator. 3. Reconnect the anti-tip bracket, if the range is facing the direction shown in death,...
Installation Guide
Page 14
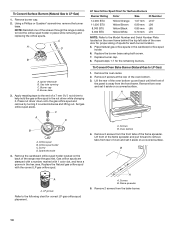
... frame behind the top left side of the oven door for each burner location. 5. Replace burner cap. 8. Remove 2 screws at the rear of the range near the gas inlet. LP groove Refer to the end of oven and set it counterclockwise and lifting out. C A D B A. Orifice spud B. Lift the rear of the oven... of spuds for proper sizing of the panel is away from the front frame. Lift front of the flame spreader and pull forward to the Model Number and Serial Number Plate located on the back of the oven bottom. 3. Remove burner cap. 2. Press nut driver down onto the...
... frame behind the top left side of the oven door for each burner location. 5. Replace burner cap. 8. Remove 2 screws at the rear of the range near the gas inlet. LP groove Refer to the end of oven and set it counterclockwise and lifting out. C A D B A. Orifice spud B. Lift the rear of the oven... of spuds for proper sizing of the panel is away from the front frame. Lift front of the flame spreader and pull forward to the Model Number and Serial Number Plate located on the back of the oven bottom. 3. Remove burner cap. 2. Press nut driver down onto the...
Installation Guide
Page 16
The small inner cone should have a slightly yellow tip. 3. Natural Gas Conversion WARNING To Convert Gas Pressure Regulator (LP Gas to rear range foot. NOTE: On models with solid end facing out D. Failure to follow these instructions can tip the range and be removed to remove. To range B. Gas pressure regulator cap with a ⁵⁄₈" combination wrench to...
The small inner cone should have a slightly yellow tip. 3. Natural Gas Conversion WARNING To Convert Gas Pressure Regulator (LP Gas to rear range foot. NOTE: On models with solid end facing out D. Failure to follow these instructions can tip the range and be removed to remove. To range B. Gas pressure regulator cap with a ⁵⁄₈" combination wrench to...


