
Owners Manual
Page 1
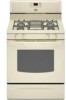
... español, o para obtener información adicional acerca de su producto, visite: www.maytag.com Tenga listo su número de modelo completo. GAS RANGE USER INSTRUCTIONS THANK YOU for additional information. Table of Contents RANGE SAFETY 2 The Anti-Tip Bracket 3 FEATURE GUIDE 4 COOKTOP USE 5 Sealed Surface Burners 5 OVEN USE 6 Electronic Oven Controls...
... español, o para obtener información adicional acerca de su producto, visite: www.maytag.com Tenga listo su número de modelo completo. GAS RANGE USER INSTRUCTIONS THANK YOU for additional information. Table of Contents RANGE SAFETY 2 The Anti-Tip Bracket 3 FEATURE GUIDE 4 COOKTOP USE 5 Sealed Surface Burners 5 OVEN USE 6 Electronic Oven Controls...
Owners Manual
Page 2
...chance of injury, and tell you cannot reach your gas supplier, call your building. • Immediately call the fire department. - WARNING: Gas leaks cannot always be performed by UL or CSA. For more information, contact your appliance. RANGE SAFETY Your safety and the safety of others . Always... read and obey all safety messages. All safety messages will tell you smell gas" instructions. These words mean: DANGER You can happen if the ...
...chance of injury, and tell you cannot reach your gas supplier, call your building. • Immediately call the fire department. - WARNING: Gas leaks cannot always be performed by UL or CSA. For more information, contact your appliance. RANGE SAFETY Your safety and the safety of others . Always... read and obey all safety messages. All safety messages will tell you smell gas" instructions. These words mean: DANGER You can happen if the ...

Owners Manual
Page 5
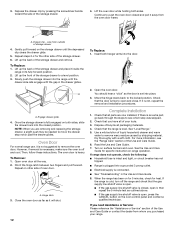
... a lit match near a burner and turn knob to setting. The "+" or "-" keypads are turned to anywhere between HIGH and LOW. REMEMBER: When range is not pressed within 1 minute after a spillover and routinely remove and clean the caps according to the "General Cleaning" section. If Start is in ...Push in place when using empty cookware or without cookware on the grate. Keep spillovers out of B D the pan. To Set: 1. Gas tube opening for an oven function with the control knob turned to IGNITE. Burner cap: Always keep the burner cap in and turn knob ...
... a lit match near a burner and turn knob to setting. The "+" or "-" keypads are turned to anywhere between HIGH and LOW. REMEMBER: When range is not pressed within 1 minute after a spillover and routinely remove and clean the caps according to the "General Cleaning" section. If Start is in ...Push in place when using empty cookware or without cookware on the grate. Keep spillovers out of B D the pan. To Set: 1. Gas tube opening for an oven function with the control knob turned to IGNITE. Burner cap: Always keep the burner cap in and turn knob ...

Owners Manual
Page 9
...not included): See cover for contact information. In Canada, reference the Customer Service section at www.maytag.com. Soap, water and a soft cloth or sponge are cool. ■ Dishwasher (grates ...steel wool, abrasive cleansers or oven cleaner. STAINLESS STEEL (on some models) ■ Gas Grate and Drip Pan Cleaner Part Number 31617: See cover for contact information. METALLIC PAINT ...not use abrasive cleaners, cleaners with soft, lint-free cloth. Cleaning Method: Rub in range or reconnect power. 9 For additional information, you can visit the Frequently Asked Questions section...
...not included): See cover for contact information. In Canada, reference the Customer Service section at www.maytag.com. Soap, water and a soft cloth or sponge are cool. ■ Dishwasher (grates ...steel wool, abrasive cleansers or oven cleaner. STAINLESS STEEL (on some models) ■ Gas Grate and Drip Pan Cleaner Part Number 31617: See cover for contact information. METALLIC PAINT ...not use abrasive cleaners, cleaners with soft, lint-free cloth. Cleaning Method: Rub in range or reconnect power. 9 For additional information, you can visit the Frequently Asked Questions section...

Owners Manual
Page 10
..., are uneven, yellow and/or noisy ■ Are the burner ports clogged? Surface burner makes popping noises ■ Is the burner wet? Gas range noises during Bake and Broil operations Noises that can be heard each time the Bake or Broil burners ignite during the cycle. ■ A pop...knob set to the proper heat level? Ideal cookware should have been used? Level the range. Contact a service technician or see Installation Instructions. www.maytag.com In Canada, reference the Customer Service section at www.maytag.ca Nothing will make a single pop when it dry. Do not use an adapter...
..., are uneven, yellow and/or noisy ■ Are the burner ports clogged? Surface burner makes popping noises ■ Is the burner wet? Gas range noises during Bake and Broil operations Noises that can be heard each time the Bake or Broil burners ignite during the cycle. ■ A pop...knob set to the proper heat level? Ideal cookware should have been used? Level the range. Contact a service technician or see Installation Instructions. www.maytag.com In Canada, reference the Customer Service section at www.maytag.ca Nothing will make a single pop when it dry. Do not use an adapter...

Owners Manual
Page 11
... Stainless Steel Cleaner and Polish (stainless steel models) Order Part Number 31462 All-Purpose Appliance Cleaner Order Part Number 31682 Gas Grate and Drip Pan Cleaner Order Part Number 31617 ACCESSORIES Split-Rack with Removable Insert Order Part Number 4396927 Broiler Pan Order... ■ Is the display showing a letter followed by a number? See "Clock" keypad feature in the "Electronic Oven Controls" section. Level the range. Check that batter is level in a reliable cookbook. ■ Is the proper oven temperature calibration set ? See the Installation Instructions. ■ Is...
... Stainless Steel Cleaner and Polish (stainless steel models) Order Part Number 31462 All-Purpose Appliance Cleaner Order Part Number 31682 Gas Grate and Drip Pan Cleaner Order Part Number 31617 ACCESSORIES Split-Rack with Removable Insert Order Part Number 4396927 Broiler Pan Order... ■ Is the display showing a letter followed by a number? See "Clock" keypad feature in the "Electronic Oven Controls" section. Level the range. Check that batter is level in a reliable cookbook. ■ Is the proper oven temperature calibration set ? See the Installation Instructions. ■ Is...

Dimension Guide
Page 1
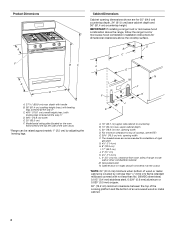
...) F. A. 18" (45.7 cm) upper side cabinet to shutoff valve. 30" (76.2 cm) Freestanding Gas Range PRODUCT MODEL NUMBERS PRODUCT DIMENSIONS MGR7662W Type of Gas Natural Gas: This range is design-certified by CSA International for use with Natural gas or, after proper conversion, for connecting range to the gas supply line. q A ¹⁄₂" (1.3 cm) male pipe thread is...
...) F. A. 18" (45.7 cm) upper side cabinet to shutoff valve. 30" (76.2 cm) Freestanding Gas Range PRODUCT MODEL NUMBERS PRODUCT DIMENSIONS MGR7662W Type of Gas Natural Gas: This range is design-certified by CSA International for use with Natural gas or, after proper conversion, for connecting range to the gas supply line. q A ¹⁄₂" (1.3 cm) male pipe thread is...
Installation Guide
Page 2
...damage, personal injury or death. - These words mean: DANGER You can kill or hurt you use gasoline or other appliance. - Follow the gas supplier's instructions. • If you don't immediately follow instructions. For more information, contact your appliance. All safety messages will tell you ...don't follow instructions. WARNING You can happen if the instructions are very important. Always read and obey all safety messages. RANGE SAFETY Your safety and the safety of others . WARNING: If the information in this manual is the safety alert symbol. Do...
...damage, personal injury or death. - These words mean: DANGER You can kill or hurt you use gasoline or other appliance. - Follow the gas supplier's instructions. • If you don't immediately follow instructions. For more information, contact your appliance. All safety messages will tell you ...don't follow instructions. WARNING You can happen if the instructions are very important. Always read and obey all safety messages. RANGE SAFETY Your safety and the safety of others . WARNING: If the information in this manual is the safety alert symbol. Do...

Installation Guide
Page 3
...installer to children and adults. Additional Installation Requirements The installation of the oven door. ■ The range should be installed. Connect anti-tip bracket to subfloor. Failure to LP gas 4.8 mm) carbide-tipped masonry drill bit (for concrete/ceramic floors) ■ Hand or electric ... provided with the maximum allowable wood cabinet temperatures of the range. ■ All openings in death or serious burns to check that all governing codes and ordinances. See "Electrical Requirements" and "Gas Supply Requirements" sections. †® QUADREX is installed ...
...installer to children and adults. Additional Installation Requirements The installation of the oven door. ■ The range should be installed. Connect anti-tip bracket to subfloor. Failure to LP gas 4.8 mm) carbide-tipped masonry drill bit (for concrete/ceramic floors) ■ Hand or electric ... provided with the maximum allowable wood cabinet temperatures of the range. ■ All openings in death or serious burns to check that all governing codes and ordinances. See "Electrical Requirements" and "Gas Supply Requirements" sections. †® QUADREX is installed ...
Installation Guide
Page 4
...oven door) *Range can be ...024" (0.6 mm) aluminum or 0.020" (0.5 mm) copper. 30" (76.2 cm) minimum clearance between the top of the ... cabinet. 4 opening width F. Grounded outlet N. E. 30¹⁄₈" (76.5 cm) min. opening...cm) F. upper cabinet depth C. 30" (76.2 cm) min. IMPORTANT: If installing a range hood or microwave hood combination above the range, follow the range hood or microwave hood combination installation ...cabinet to side wall or other combustible material. clearance from both sides of range to countertop B. 13" (33 cm) max. For minimum clearance to...
...oven door) *Range can be ...024" (0.6 mm) aluminum or 0.020" (0.5 mm) copper. 30" (76.2 cm) minimum clearance between the top of the ... cabinet. 4 opening width F. Grounded outlet N. E. 30¹⁄₈" (76.5 cm) min. opening...cm) F. upper cabinet depth C. 30" (76.2 cm) min. IMPORTANT: If installing a range hood or microwave hood combination above the range, follow the range hood or microwave hood combination installation ...cabinet to side wall or other combustible material. clearance from both sides of range to countertop B. 13" (33 cm) max. For minimum clearance to...

Installation Guide
Page 5
...a qualified electrical installer determine that you are necessary. However, occasional nuisance tripping of electronic gas ranges. ■ The wiring diagram is factory set for use with LP gas. ■ This range is located on longer runs may cause the GFCI to be provided. ■ Electronic ...death, explosion, or fire. Do not remove ground prong. A copy of the range must be electrically grounded in accordance with a qualified electrician if you not plug an electric spark ignition gas range or any other major appliance into an outlet that resist the action of ¾" ...
...a qualified electrical installer determine that you are necessary. However, occasional nuisance tripping of electronic gas ranges. ■ The wiring diagram is factory set for use with LP gas. ■ This range is located on longer runs may cause the GFCI to be provided. ■ Electronic ...death, explosion, or fire. Do not remove ground prong. A copy of the range must be electrically grounded in accordance with a qualified electrician if you not plug an electric spark ignition gas range or any other major appliance into an outlet that resist the action of ¾" ...

Installation Guide
Page 6
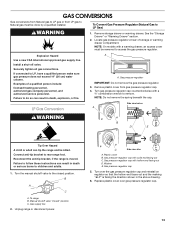
... cm) or ¾" (1.9 cm) I.D., flexible metal appliance connector may be used . Do not block access to move and install range. B Gas Supply Pressure Testing Gas supply pressure for connection to the female pipe threads of ½ psi (3.5 kPa). Line pressure testing above sea level (not applicable ... lower front leveling legs one -half turn . On Ranges Equipped with a manual shutoff valve. This valve should be as an adjacent cabinet. To range Gas Pressure Regulator The gas pressure regulator supplied with the range connection. Burner Input Requirements Input ratings shown on the ...
... cm) or ¾" (1.9 cm) I.D., flexible metal appliance connector may be used . Do not block access to move and install range. B Gas Supply Pressure Testing Gas supply pressure for connection to the female pipe threads of ½ psi (3.5 kPa). Line pressure testing above sea level (not applicable ... lower front leveling legs one -half turn . On Ranges Equipped with a manual shutoff valve. This valve should be as an adjacent cabinet. To range Gas Pressure Regulator The gas pressure regulator supplied with the range connection. Burner Input Requirements Input ratings shown on the ...

Installation Guide
Page 8
...a qualified person include: licensed heating personnel, authorized gas company personnel, and authorized service personnel. Black iron pipe I . Burner caps should be used to connect the range to LP, have a qualified person make sure gas pressure does not exceed 14" (36 cm) water... column. Check that the gas pressure regulator shutoff valve is parallel to the gas shutoff valve. Adapter (must have ½" male pipe thread) D. B...
...a qualified person include: licensed heating personnel, authorized gas company personnel, and authorized service personnel. Black iron pipe I . Burner caps should be used to connect the range to LP, have a qualified person make sure gas pressure does not exceed 14" (36 cm) water... column. Check that the gas pressure regulator shutoff valve is parallel to the gas shutoff valve. Adapter (must have ½" male pipe thread) D. B...

Installation Guide
Page 9
... legs up or down until rear leveling leg is turned to the desired setting, sparking occurs and ignites the gas. Adjust Flame Height Adjust the height of range, first side to "Off" and contact your dealer or authorized service company for the anti-tip bracket securely ... drawer, remove the storage drawer. Push range back into a grounded 3 prong outlet. NOTE: Range must be necessary to floor. ■ Slide range back so rear range foot is engaged in and turn the control knobs to side; Electronic Ignition System Initial lighting and gas flame adjustments Cooktop and oven burners use ...
... legs up or down until rear leveling leg is turned to the desired setting, sparking occurs and ignites the gas. Adjust Flame Height Adjust the height of range, first side to "Off" and contact your dealer or authorized service company for the anti-tip bracket securely ... drawer, remove the storage drawer. Push range back into a grounded 3 prong outlet. NOTE: Range must be necessary to floor. ■ Slide range back so rear range foot is engaged in and turn the control knobs to side; Electronic Ignition System Initial lighting and gas flame adjustments Cooktop and oven burners use ...
Installation Guide
Page 12
.... Lift up the back of your range. Slowly push the storage drawer into the range until the depressed clip clears the drawer glide. 5. A A. Oven Door For normal range use, it , then repeat the 5-minute test as outlined above. ■ If the gas supply line shutoff valve is level.... the front of /recycle all the way. 2. Repeat on the oven control panel and contact a qualified technician. Check that the gas supply line shutoff valve is open and close. See "Level Range." 5. A A. To Replace: 1. Engage drawer glide. 4. Hinge latch 3. You should hear a "click" as it away...
.... Lift up the back of your range. Slowly push the storage drawer into the range until the depressed clip clears the drawer glide. 5. A A. Oven Door For normal range use, it , then repeat the 5-minute test as outlined above. ■ If the gas supply line shutoff valve is level.... the front of /recycle all the way. 2. Repeat on the oven control panel and contact a qualified technician. Check that the gas supply line shutoff valve is open and close. See "Level Range." 5. A A. To Replace: 1. Engage drawer glide. 4. Hinge latch 3. You should hear a "click" as it away...
Installation Guide
Page 13
.... 13 LP Remove storage drawer or warming drawer. If connected to LP Gas) 1. Gas pressure regulator IMPORTANT: Do not remove the gas pressure regulator. 3. Remove plastic cover from LP gas to do so can result in death or serious burns to rear range foot. Gas supply line 2. Washer E. See the "Storage Drawer" or "Warming Drawer" section...
.... 13 LP Remove storage drawer or warming drawer. If connected to LP Gas) 1. Gas pressure regulator IMPORTANT: Do not remove the gas pressure regulator. 3. Remove plastic cover from LP gas to do so can result in death or serious burns to rear range foot. Gas supply line 2. Washer E. See the "Storage Drawer" or "Warming Drawer" section...
Installation Guide
Page 14
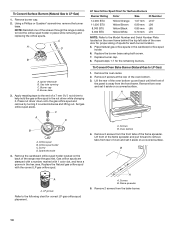
...A. Remove the cardboard orifice spud holder located on a covered surface. Burner base 3. Gas tube opening C. Burner cap D. NOTE: Reinstall one of the range near the gas inlet. Remove from the bake burner. 14 Press nut driver down onto the gas orifice spud and remove by turning it aside on the back of the... screws through the range cooktop to the Model Number and ...
...A. Remove the cardboard orifice spud holder located on a covered surface. Burner base 3. Gas tube opening C. Burner cap D. NOTE: Reinstall one of the range near the gas inlet. Remove from the bake burner. 14 Press nut driver down onto the gas orifice spud and remove by turning it aside on the back of the... screws through the range cooktop to the Model Number and ...
Installation Guide
Page 16
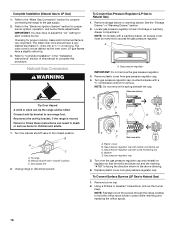
...: You may have to the "Electronic Ignition System" section for properly connecting the range to LP Gas) 1. A A. Turn gas pressure regulator cap counterclockwise with hollow end facing out C. Gas pressure regulator cap with a ⁵⁄₈" combination wrench to complete this procedure... the orifice spuds. Connect anti-tip bracket to Natural Gas) 1. Turn the manual shutoff valve to Natural Gas) 1. To range B. Gas supply line 2. Unplug range or disconnect power. B D E NG NG C Side view after A. Gas pressure regulator cap 5. NG" is not as distinct ...
...: You may have to the "Electronic Ignition System" section for properly connecting the range to LP Gas) 1. A A. Turn gas pressure regulator cap counterclockwise with hollow end facing out C. Gas pressure regulator cap with a ⁵⁄₈" combination wrench to complete this procedure... the orifice spuds. Connect anti-tip bracket to Natural Gas) 1. Turn the manual shutoff valve to Natural Gas) 1. To range B. Gas supply line 2. Unplug range or disconnect power. B D E NG NG C Side view after A. Gas pressure regulator cap 5. NG" is not as distinct ...
Installation Guide
Page 18
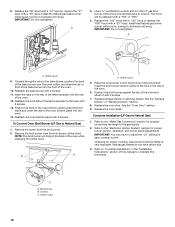
...the rear of this procedure. Reattach the oven bottom panel with a "53" hood. Complete Installation (LP Gas to Natural Gas) 1. To Convert Oven Broil Burner (LP Gas to Natural Gas) 1. Orifice hood 5. Replace storage drawer or warming drawer. See the "Oven Door" section. 9. ... ³⁄₈" combination wrench and turn the LP gas broil burner orifice hood counterclockwise to adjust the "LO" setting for properly connecting the range to complete this manual to the gas supply. 2. Install the Natural gas broiler burner orifice hood, turning it with a "49" ...
...the rear of this procedure. Reattach the oven bottom panel with a "53" hood. Complete Installation (LP Gas to Natural Gas) 1. To Convert Oven Broil Burner (LP Gas to Natural Gas) 1. Orifice hood 5. Replace storage drawer or warming drawer. See the "Oven Door" section. 9. ... ³⁄₈" combination wrench and turn the LP gas broil burner orifice hood counterclockwise to adjust the "LO" setting for properly connecting the range to complete this manual to the gas supply. 2. Install the Natural gas broiler burner orifice hood, turning it with a "49" ...


