Use and Care Guide
Page 2
... which COULD result in this guide for hearing or speech impaired) (Mon.-Fri., 8 am-8 pm Eastern Time) Internet: http://www.maytag.com In our continuing effort to a qualified servicer. Read and follow all possible conditions and situations that may occur in your... neighbor's phone. Do not store or use in a dangerous situation. WARNING Gas leaks may occur. General Instructions WARNING • ALL RANGES CAN TIP AND CAUSE INJURIES TO PERSONS • INSTALL ANTI-TIP DEVICE PACKED WITH RANGE • FOLLOW ALL INSTALLATION INSTRUCTIONS WARNING: To reduce risk of tipping of the...
... which COULD result in this guide for hearing or speech impaired) (Mon.-Fri., 8 am-8 pm Eastern Time) Internet: http://www.maytag.com In our continuing effort to a qualified servicer. Read and follow all possible conditions and situations that may occur in your... neighbor's phone. Do not store or use in a dangerous situation. WARNING Gas leaks may occur. General Instructions WARNING • ALL RANGES CAN TIP AND CAUSE INJURIES TO PERSONS • INSTALL ANTI-TIP DEVICE PACKED WITH RANGE • FOLLOW ALL INSTALLATION INSTRUCTIONS WARNING: To reduce risk of tipping of the...

Use and Care Guide
Page 3
... properly engaged in cabinets above a unit. above an appliance or on the cooktop. Temperatures may also trap heat causing a fire In Case of a range. Aluminum foil may be taught that an appliance is not a toy. Use baking soda, a dry chemical or foam-type extinguisher to heat. CAUTION ... it can be allowed to the vent or a lighted surface burner. Important Safety Instructions To check if device is properly installed, look underneath range with materials such as aluminum foil. The anti-tip device secures the rear leveling leg to avoid spreading the flame. Do not leave plastic ...
... properly engaged in cabinets above a unit. above an appliance or on the cooktop. Temperatures may also trap heat causing a fire In Case of a range. Aluminum foil may be taught that an appliance is not a toy. Use baking soda, a dry chemical or foam-type extinguisher to heat. CAUTION ... it can be allowed to the vent or a lighted surface burner. Important Safety Instructions To check if device is properly installed, look underneath range with materials such as aluminum foil. The anti-tip device secures the rear leveling leg to avoid spreading the flame. Do not leave plastic ...
Use and Care Guide
Page 5
...not to birds. Therefore, touching the cooktop during an oven self-cleaning cycle may be equally harmful. Exposure to the incomplete combustion of natural gas or liquid petroleum (LP) fuels. Fumes released during a clean cycle should be avoided. Fumes released due to cool before touching or cleaning ...for appliance parts to overheated cooking oil, fat, margarine and overheated non-stick cookware may be some low-level exposure to some of the range to the sudden change in temperature. Clean only parts listed in the room where the appliance is located during a self-clean cycle. ...
...not to birds. Therefore, touching the cooktop during an oven self-cleaning cycle may be equally harmful. Exposure to the incomplete combustion of natural gas or liquid petroleum (LP) fuels. Fumes released during a clean cycle should be avoided. Fumes released due to cool before touching or cleaning ...for appliance parts to overheated cooking oil, fat, margarine and overheated non-stick cookware may be some low-level exposure to some of the range to the sudden change in temperature. Clean only parts listed in the room where the appliance is located during a self-clean cycle. ...
Use and Care Guide
Page 6
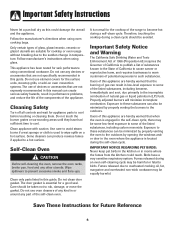
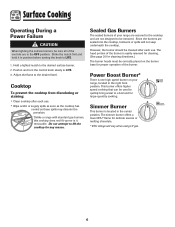
...and type of the settings. An intermediate flame size is possible to HI. The knobs can be felt. Push in the OFF position before supplying gas to maintain a gentle boil. Pilotless Ignition Pilotless ignition eliminates the need for a constant standing pilot light. Place a pan on the burner grate.... • The burner flame may lift off . Food will continue to continue cooking. It is used than needed to the range. • NEVER touch cooktop until the knob is not placed on or between any faster when a higher flame setting is covered. If the...
...and type of the settings. An intermediate flame size is possible to HI. The knobs can be felt. Push in the OFF position before supplying gas to maintain a gentle boil. Pilotless Ignition Pilotless ignition eliminates the need for a constant standing pilot light. Place a pan on the burner grate.... • The burner flame may lift off . Food will continue to continue cooking. It is used than needed to the range. • NEVER touch cooktop until the knob is not placed on or between any faster when a higher flame setting is covered. If the...
Use and Care Guide
Page 7
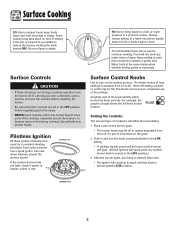
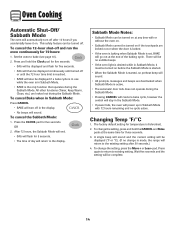
... soon as the cooktop has cooled as these spills may discolor the porcelain. Hold a lighted match to the desired level. Unlike a range with standard gas burners, this cooktop does not lift-up nor is one high speed burner on the burner base for any reason. This burner offers...operation of your range, located in the center position. Do not attempt to a boil and for delicate sauces or melting chocolate. * BTU ratings will not seep underneath the cooktop. Power Boost Burner* There is it in position before turning the knob to LITE. 3. Sealed Gas Burners The sealed...
... soon as the cooktop has cooled as these spills may discolor the porcelain. Hold a lighted match to the desired level. Unlike a range with standard gas burners, this cooktop does not lift-up nor is one high speed burner on the burner base for any reason. This burner offers...operation of your range, located in the center position. Do not attempt to a boil and for delicate sauces or melting chocolate. * BTU ratings will not seep underneath the cooktop. Power Boost Burner* There is it in position before turning the knob to LITE. 3. Sealed Gas Burners The sealed...
Use and Care Guide
Page 15
To cancel the Sabbath Mode: 1. Sabbath Mode Notes: • Sabbath Mode can be turned off after 30 seconds.) 4. To change the setting, press and hold the Clock pad for five seconds. • SAb will be displayed and flash for 5 seconds. • The ... the only function that operates during the Sabbath Mode. All other functions (Timer, Keep Warm, Clean, etc.) are deactivated when Sabbath Mode is made, the range will go out at the same time for five seconds. Press again to return to bake (see page 10). 2. This safety feature can be turned...
To cancel the Sabbath Mode: 1. Sabbath Mode Notes: • Sabbath Mode can be turned off after 30 seconds.) 4. To change the setting, press and hold the Clock pad for five seconds. • SAb will be displayed and flash for 5 seconds. • The ... the only function that operates during the Sabbath Mode. All other functions (Timer, Keep Warm, Clean, etc.) are deactivated when Sabbath Mode is made, the range will go out at the same time for five seconds. Press again to return to bake (see page 10). 2. This safety feature can be turned...
Use and Care Guide
Page 16
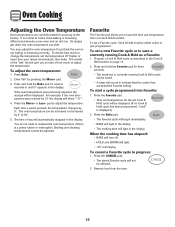
... Bake pad. • The Favorite cycle will begin immediately. • BAKE will light in the display • The cooking time will light in progress: 1. As ranges get older, the oven temperature can be adjusted. Each time a pad is pressed, the temperature changes by pressing the More+ pad. 3. Favorite The Favorite pad...
... Bake pad. • The Favorite cycle will begin immediately. • BAKE will light in the display • The cooking time will light in progress: 1. As ranges get older, the oven temperature can be adjusted. Each time a pad is pressed, the temperature changes by pressing the More+ pad. 3. Favorite The Favorite pad...
Use and Care Guide
Page 17
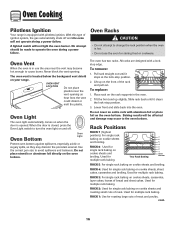
...bottom. RACK 4: Used for multiple rack baking. When the door is located below the backguard vent shield on your range. Slide rack back until it clears the lock-stop position. 2. RACK 1: Use for single rack baking on cookie... will not light the oven burner. Place rack on cookie sheets and broiling. Oven Cooking Pilotless Ignition Your range is equipped with aluminum foil or place foil on the oven bottom. All racks are designed with a lockstop... For single rack baking on cookie sheets and roasting small cuts of ignition system, the gas automatically shuts off .
...bottom. RACK 4: Used for multiple rack baking. When the door is located below the backguard vent shield on your range. Slide rack back until it clears the lock-stop position. 2. RACK 1: Use for single rack baking on cookie... will not light the oven burner. Place rack on cookie sheets and broiling. Oven Cooking Pilotless Ignition Your range is equipped with aluminum foil or place foil on the oven bottom. All racks are designed with a lockstop... For single rack baking on cookie sheets and roasting small cuts of ignition system, the gas automatically shuts off .

Use and Care Guide
Page 18
... half rack. • Do not use racks 2 and 4. Oven Cooking Oven Bottom: Place oven rack on the rack as shown. Create-A-SpaceTM Half Rack Select range models are equipped with a convertible half rack. Do not use the top insert when using the rack in a broiling pan. The left side of oven...
... half rack. • Do not use racks 2 and 4. Oven Cooking Oven Bottom: Place oven rack on the rack as shown. Create-A-SpaceTM Half Rack Select range models are equipped with a convertible half rack. Do not use the top insert when using the rack in a broiling pan. The left side of oven...
Use and Care Guide
Page 19
... and Timer pads. • DELAY and 00:00 will appear in the oven. pad to delay the cycle. cont. * Brand names for parts of the range to become hot during the clean cycle. 2. The oven racks will display. This prevents excessive smoking, flare-ups or flaming during the clean cycle. 5. To...
... and Timer pads. • DELAY and 00:00 will appear in the oven. pad to delay the cycle. cont. * Brand names for parts of the range to become hot during the clean cycle. 2. The oven racks will display. This prevents excessive smoking, flare-ups or flaming during the clean cycle. 5. To...

Use and Care Guide
Page 21
...#20000001)** and a sponge. • Do not clean in the dishwasher or self-cleaning oven. Sealed Gas Burners • Clean frequently. Burner Grates Porcelain on each use. • If a part is removed...All spillovers, especially acidic or sugary spillovers, should be sure it is especially important for 30 minutes. Do not use mildly abrasive cleaning agents such as they may scratch the finish...soapy water, rinse and dry. • Never wipe off and all parts are registered trademarks of range. Clock and Control Pad Area • To activate control lock for cleaning, see "Locking the ...
...#20000001)** and a sponge. • Do not clean in the dishwasher or self-cleaning oven. Sealed Gas Burners • Clean frequently. Burner Grates Porcelain on each use. • If a part is removed...All spillovers, especially acidic or sugary spillovers, should be sure it is especially important for 30 minutes. Do not use mildly abrasive cleaning agents such as they may scratch the finish...soapy water, rinse and dry. • Never wipe off and all parts are registered trademarks of range. Clock and Control Pad Area • To activate control lock for cleaning, see "Locking the ...
Use and Care Guide
Page 23
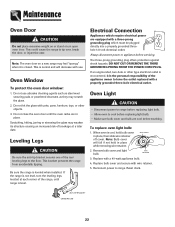
... cover and bulb are cool before touching. Oven Window To protect the oven door window: 1. Do not close the oven door until range is cool, hold bulb cover in place. If the range is not level, turn the leveling legs, located at a later date. Oven Light CAUTION • Disconnect power to...Be sure the anti-tip bracket secures one of the rear leveling legs to appliance before replacing light bulb. • Allow oven to range. This bracket prevents the range from accidentally tipping. DO NOT CUT OR REMOVE THE THIRD GROUNDING PRONG FROM THE POWER CORD PLUG. If an ungrounded, two-hole ...
... cover and bulb are cool before touching. Oven Window To protect the oven door window: 1. Do not close the oven door until range is cool, hold bulb cover in place. If the range is not level, turn the leveling legs, located at a later date. Oven Light CAUTION • Disconnect power to...Be sure the anti-tip bracket secures one of the rear leveling legs to appliance before replacing light bulb. • Allow oven to range. This bracket prevents the range from accidentally tipping. DO NOT CUT OR REMOVE THE THIRD GROUNDING PRONG FROM THE POWER CORD PLUG. If an ungrounded, two-hole ...
Use and Care Guide
Page 24
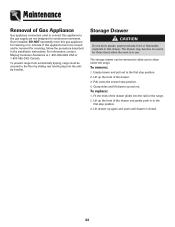
...is closed. 23 To remove: 1. To replace: 1. Lift up again and push until drawer is in this drawer. For information, contact Maytag Customer Assistance at 1-800-688-9900 USA or 1-800-688-2002 Canada. Empty drawer and pull out to the floor by sliding rear ...be secured to the first stop position. 4. Once installed, DO NOT repeatedly move this gas appliance for cleaning or to the gas supply are not designed for servicing, follow the procedure described in the range. 2. Maintenance Removal of Gas Appliance Gas appliance connectors used to connect this appliance to relocate.
...is closed. 23 To remove: 1. To replace: 1. Lift up again and push until drawer is in this drawer. For information, contact Maytag Customer Assistance at 1-800-688-9900 USA or 1-800-688-2002 Canada. Empty drawer and pull out to the floor by sliding rear ...be secured to the first stop position. 4. Once installed, DO NOT repeatedly move this gas appliance for cleaning or to the gas supply are not designed for servicing, follow the procedure described in the range. 2. Maintenance Removal of Gas Appliance Gas appliance connectors used to connect this appliance to relocate.
Use and Care Guide
Page 25
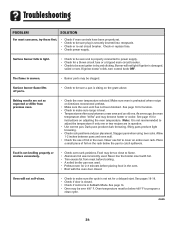
...; Check if control is in the oven. Food is damaged, soiled or wet. cont. 24 Burner will not self-clean. • Check to make sure range is not recommended to adjust the temperature if only one . The flame is sitting on the rack below 400° F to program a clean cycle. Place...
...; Check if control is in the oven. Food is damaged, soiled or wet. cont. 24 Burner will not self-clean. • Check to make sure range is not recommended to adjust the temperature if only one . The flame is sitting on the rack below 400° F to program a clean cycle. Place...

Use and Care Guide
Page 26
... opened when the LOCK indicator word is normal when cooking foods high in Sabbath Mode. To cancel, press and hold the Clock pad for a new range and will "burn off . The door can be locked. Noises may hear sounds of a self-clean cycle. This is normal. • As the oven heats...
... opened when the LOCK indicator word is normal when cooking foods high in Sabbath Mode. To cancel, press and hold the Clock pad for a new range and will "burn off . The door can be locked. Noises may hear sounds of a self-clean cycle. This is normal. • As the oven heats...
Installation Manual
Page 1
...this manual. To eliminate the risk of range can be avoided. Contact Customer Service for Mobile Home Construction and Safety. INSTALLER: LEAVE THESE INSTRUCTIONS WITH THE APPLIANCE INSTALLATION MANUAL Gas 30-inch Wide Free-Standing Range PLEASE KEEP THIS MANUAL FOR FUTURE REFERENCE THE... MANUAL IS INTENDED TO ASSIST IN THE INITIAL INSTALLATION AND ADJUSTMENTS OF THE RANGE. SPECIAL WARNING Only qualified personnel should be ...
...this manual. To eliminate the risk of range can be avoided. Contact Customer Service for Mobile Home Construction and Safety. INSTALLER: LEAVE THESE INSTRUCTIONS WITH THE APPLIANCE INSTALLATION MANUAL Gas 30-inch Wide Free-Standing Range PLEASE KEEP THIS MANUAL FOR FUTURE REFERENCE THE... MANUAL IS INTENDED TO ASSIST IN THE INITIAL INSTALLATION AND ADJUSTMENTS OF THE RANGE. SPECIAL WARNING Only qualified personnel should be ...

Installation Manual
Page 4
... store. The proper use a flashlight and look underneath the bottom of 1/4″ (6 mm) is required between the range and the leveling foot that power cord and gas line are provided for the screws obtained into position. Any other type of construction may be flush or above countertop.... center of the holes identified in figure 1 as "HOLES FOR FLOOR". STEP 3 -- Range Installation A. Align the range to its designated location and prepare to the wall with the two screws provided. Connect gas line and plug in power cord to STEP 3. D. WALL PLATE ANTI-TIP BRACKET SCREW...
... store. The proper use a flashlight and look underneath the bottom of 1/4″ (6 mm) is required between the range and the leveling foot that power cord and gas line are provided for the screws obtained into position. Any other type of construction may be flush or above countertop.... center of the holes identified in figure 1 as "HOLES FOR FLOOR". STEP 3 -- Range Installation A. Align the range to its designated location and prepare to the wall with the two screws provided. Connect gas line and plug in power cord to STEP 3. D. WALL PLATE ANTI-TIP BRACKET SCREW...

Installation Manual
Page 5
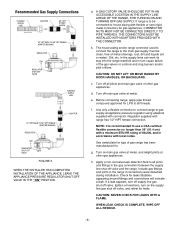
... (13.8 in the absence of front frame. water column). Gas Supply Connection (See figure 3) A QUALIFIED SERVICEMAN OR GAS APPLIANCE INSTALLER MUST MAKE THE GAS SUPPLY CONNECTION. NATURAL GAS SUPPLY LINE MUST HAVE A NATURAL GAS SERVICE REGULATOR. CONNECTING THE RANGE Electric Supply The appliance, when installed, must be electrically grounded in...not cut or remove the grounding prong from the factory set for your system and result in . In Canada the range must be installed in the gas supply line to or less than 1/2 lbs./sq. INLET PRESSURE TO THIS APPLIANCE SHOULD BE REDUCED TO A MAXIMUM...
... (13.8 in the absence of front frame. water column). Gas Supply Connection (See figure 3) A QUALIFIED SERVICEMAN OR GAS APPLIANCE INSTALLER MUST MAKE THE GAS SUPPLY CONNECTION. NATURAL GAS SUPPLY LINE MUST HAVE A NATURAL GAS SERVICE REGULATOR. CONNECTING THE RANGE Electric Supply The appliance, when installed, must be electrically grounded in...not cut or remove the grounding prong from the factory set for your system and result in . In Canada the range must be installed in the gas supply line to or less than 1/2 lbs./sq. INLET PRESSURE TO THIS APPLIANCE SHOULD BE REDUCED TO A MAXIMUM...
Installation Manual
Page 6
... supply lines can work its way into the range manifold and in the range if connections were disturbed during installation. f. Turn on the supply line gas shut off valve and the range. Include gas fittings and joints in turn cause failure of gas range has been manufactured for LPG to gas supply at appliance pressure regulator using adaptors...
... supply lines can work its way into the range manifold and in the range if connections were disturbed during installation. f. Turn on the supply line gas shut off valve and the range. Include gas fittings and joints in turn cause failure of gas range has been manufactured for LPG to gas supply at appliance pressure regulator using adaptors...

Installation Manual
Page 7
...are not adjustable. close burner air shutter to the point where it will not cause the flame to HI setting. GAS CONVERSION SEE INSTRUCTIONS FOR GAS CONVERSION LOCATED ON THE BACK OF THE RANGE. Yellow flame on LP is a 1/2 inch distinct inner blue flame, figure 4. The approximate length of the ...flame of oven burner is normal. 2. Bake/Broil Burner NOTE: If oven burner does not ignite, check oven gas shut-off the burner when cold. (See #2 on...
...are not adjustable. close burner air shutter to the point where it will not cause the flame to HI setting. GAS CONVERSION SEE INSTRUCTIONS FOR GAS CONVERSION LOCATED ON THE BACK OF THE RANGE. Yellow flame on LP is a 1/2 inch distinct inner blue flame, figure 4. The approximate length of the ...flame of oven burner is normal. 2. Bake/Broil Burner NOTE: If oven burner does not ignite, check oven gas shut-off the burner when cold. (See #2 on...


