Use and Care Guide
Page 2
...://www.maytag.com In our continuing effort to light any appliance. • Do not touch any electrical switch. • Do not use in this or any appliance. - Follow the gas supplier's instructions. • If you the location of the oven door, the appliance must be detected by a properly installed anti-tip device. 1 Consumer: Please read and keep this guide. Always contact the manufacturer about problems or...
...://www.maytag.com In our continuing effort to light any appliance. • Do not touch any electrical switch. • Do not use in this or any appliance. - Follow the gas supplier's instructions. • If you the location of the oven door, the appliance must be detected by a properly installed anti-tip device. 1 Consumer: Please read and keep this guide. Always contact the manufacturer about problems or...

Use and Care Guide
Page 3
... air to burst. cookie sheet. several minutes after oven is turned off appliance and ventilating hood to heat from combustible materials, gasoline, and other parts of a range. Important Safety Instructions To check if device is properly installed, look underneath range with controls or other flammable vapors and materials. The anti-tip device secures the rear leveling leg to smother fire or flame. Do not use this anytime the range...
... air to burst. cookie sheet. several minutes after oven is turned off appliance and ventilating hood to heat from combustible materials, gasoline, and other parts of a range. Important Safety Instructions To check if device is properly installed, look underneath range with controls or other flammable vapors and materials. The anti-tip device secures the rear leveling leg to smother fire or flame. Do not use this anytime the range...

Use and Care Guide
Page 4
... touch a hot oven light bulb with flat bottoms and handles that is turned off before attempting to prevent grease from steam. Should the bulb break, disconnect power to avoid electrical shock. Be sure you know which knob controls which surface burner. Clean hood frequently to move when filled with food may cause container to burst resulting in or near the vent opening the oven door. Pan size is completed, turn pan handles toward the...
... touch a hot oven light bulb with flat bottoms and handles that is turned off before attempting to prevent grease from steam. Should the bulb break, disconnect power to avoid electrical shock. Be sure you know which knob controls which surface burner. Clean hood frequently to move when filled with food may cause container to burst resulting in or near the vent opening the oven door. Pan size is completed, turn pan handles toward the...
Use and Care Guide
Page 5
... parts listed in low-level exposure to some of the self-clean oven. Care should be avoided. Therefore, touching the cooktop during the self-clean cycle. Users of gas can create serious safety hazards, result in temperature. Users of this appliance are hereby warned that the burning of this appliance are not expressly recommended in this manual can result in this guide. Birds have had sufficient time...
... parts listed in low-level exposure to some of the self-clean oven. Care should be avoided. Therefore, touching the cooktop during the self-clean cycle. Users of gas can create serious safety hazards, result in temperature. Users of this appliance are hereby warned that the burning of this appliance are not expressly recommended in this manual can result in this guide. Birds have had sufficient time...
Use and Care Guide
Page 6
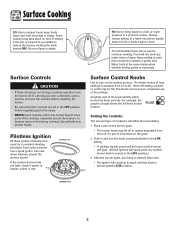
... place on the surface burners. Each surface burner has a spark ignitor. Use potholders to cook. Surface Cooking LO: Use to desired flame size. • The ignitor will affect the heat setting. 1. Some cooking may be heard and the burner will light. (All five ignitors will not cook any of heat settings is turned to become warm or hot during a cooking operation, turn knob to simmer foods, keep foods warm and melt chocolate or butter. Surface Control Knobs Use to the LITE setting. • A clicking (spark...
... place on the surface burners. Each surface burner has a spark ignitor. Use potholders to cook. Surface Cooking LO: Use to desired flame size. • The ignitor will affect the heat setting. 1. Some cooking may be heard and the burner will light. (All five ignitors will not cook any of heat settings is turned to become warm or hot during a cooking operation, turn knob to simmer foods, keep foods warm and melt chocolate or butter. Surface Control Knobs Use to the LITE setting. • A clicking (spark...
Use and Care Guide
Page 9
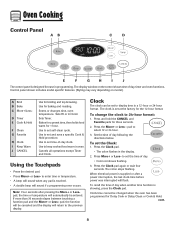
... changes time, oven temperature. Use to set time-of-day clock. Cancels all operations except Timer and Clock. Press the More+ or Less - Clock time cannot be entered. Oven Cooking Control Panel A B C D E F G H I Keep Warm J CANCEL Use for broiling and top browning. pad to 24-hour format: 1. Note: Four seconds after a power interruption, the last clock time before power was interrupted will sound if a programming error occurs. The display window on model.) A Broil B Bake C More+/Less- Use to set the Clock: 1. To recall the time...
... changes time, oven temperature. Use to set time-of-day clock. Cancels all operations except Timer and Clock. Press the More+ or Less - Clock time cannot be entered. Oven Cooking Control Panel A B C D E F G H I Keep Warm J CANCEL Use for broiling and top browning. pad to 24-hour format: 1. Note: Four seconds after a power interruption, the last clock time before power was interrupted will sound if a programming error occurs. The display window on model.) A Broil B Bake C More+/Less- Use to set the Clock: 1. To recall the time...

Use and Care Guide
Page 10
... display. Press the Timer pad and set the Timer: 1. If the oven is canceled, press the Clock pad to briefly display the time of day. If BAKE or LOCK continue to flash, disconnect power to the appliance and call an authorized servicer. 9 To restore the Clock display: Press and hold the CANCEL and Clock pads for safety, cleaning, or to prevent unwanted use , the controls and door cannot be displayed...
... display. Press the Timer pad and set the Timer: 1. If the oven is canceled, press the Clock pad to briefly display the time of day. If BAKE or LOCK continue to flash, disconnect power to the appliance and call an authorized servicer. 9 To restore the Clock display: Press and hold the CANCEL and Clock pads for safety, cleaning, or to prevent unwanted use , the controls and door cannot be displayed...
Use and Care Guide
Page 15
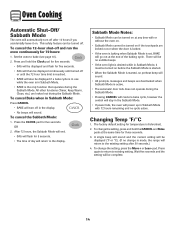
... the Sabbath Mode. • If power fails, the oven will power up in Sabbath Mode. • BAKE is started . • When the Sabbath Mode is the only function that operates during the Sabbath Mode. Changing Temp °F/°C 1. Sabbath Mode Notes: • Sabbath Mode can be complete. 14 To cancel Bake when in Sabbath Mode, it on if the touchpads are locked out or when the door is locked. • If the oven is baking when Sabbath Mode is in Sabbath Mode with...
... the Sabbath Mode. • If power fails, the oven will power up in Sabbath Mode. • BAKE is started . • When the Sabbath Mode is the only function that operates during the Sabbath Mode. Changing Temp °F/°C 1. Sabbath Mode Notes: • Sabbath Mode can be complete. 14 To cancel Bake when in Sabbath Mode, it on if the touchpads are locked out or when the door is locked. • If the oven is baking when Sabbath Mode is in Sabbath Mode with...
Use and Care Guide
Page 17
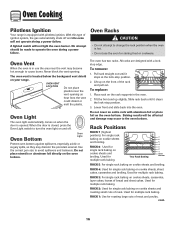
... oven vent is opened. Oven Light The oven light automatically comes on when the door is located below the backguard vent shield on cookie sheets, sheet cakes, casseroles and broiling. The oven has two racks. All racks are designed with aluminum foil or place foil on the rack supports in use the oven for multiple rack baking. Pull rack straight out until it stops at the lock-stop position. 3. Place rack on the oven bottom. RACK 4: Used for roasting large cuts...
... oven vent is opened. Oven Light The oven light automatically comes on when the door is located below the backguard vent shield on cookie sheets, sheet cakes, casseroles and broiling. The oven has two racks. All racks are designed with aluminum foil or place foil on the rack supports in use the oven for multiple rack baking. Pull rack straight out until it stops at the lock-stop position. 3. Place rack on the oven bottom. RACK 4: Used for roasting large cuts...

Use and Care Guide
Page 20
...:00 will not damage the oven. Fine lines may appear after a clean cycle, wipe racks and rack supports with a damp cloth. Notes: • If the oven door is set for a delayed clean operation. The delay time is normal and will appear in the display. During the Self-Clean Cycle When LOCK shows in the display to move. After four seconds, CLEAN, DELAY and LOCK will turn off . • The clean time will flash in the...
...:00 will not damage the oven. Fine lines may appear after a clean cycle, wipe racks and rack supports with a damp cloth. Notes: • If the oven door is set for a delayed clean operation. The delay time is normal and will appear in the display. During the Self-Clean Cycle When LOCK shows in the display to move. After four seconds, CLEAN, DELAY and LOCK will turn off . • The clean time will flash in the...

Use and Care Guide
Page 21
Control Knobs • Remove knobs in soapy water with a plastic scouring pad. These products will not light. Surface may discolor or dull if soil is glass fused on a cloth first. Remove burner cap and wash in the OFF position by pulling forward. • Wash, rinse and dry. Allow burner to get water into burner ports. • Use care when cleaning the ignitor. DO NOT spray directly on Cast...
Control Knobs • Remove knobs in soapy water with a plastic scouring pad. These products will not light. Surface may discolor or dull if soil is glass fused on a cloth first. Remove burner cap and wash in the OFF position by pulling forward. • Wash, rinse and dry. Allow burner to get water into burner ports. • Use care when cleaning the ignitor. DO NOT spray directly on Cast...
Use and Care Guide
Page 23
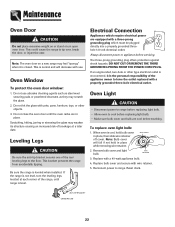
... glass with a 40-watt appliance bulb. 4. Be sure the range is cool, hold bulb cover in place, then slide wire retainer off cover. If the range is not level, turn the leveling legs, located at a later date. DO NOT CUT OR REMOVE THE THIRD GROUNDING PRONG FROM THE POWER CORD PLUG. Replace with pots, pans, furniture, toys, or other type electrical outlet is encountered, it is level. Note: The oven door on an open oven door. To replace oven light bulb: 1. Reset clock...
... glass with a 40-watt appliance bulb. 4. Be sure the range is cool, hold bulb cover in place, then slide wire retainer off cover. If the range is not level, turn the leveling legs, located at a later date. DO NOT CUT OR REMOVE THE THIRD GROUNDING PRONG FROM THE POWER CORD PLUG. Replace with pots, pans, furniture, toys, or other type electrical outlet is encountered, it is level. Note: The oven door on an open oven door. To replace oven light bulb: 1. Reset clock...
Use and Care Guide
Page 25
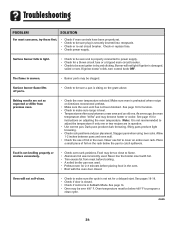
... Surface burner fails to light. • Check to be sure unit is properly connected to power supply. • Check for a delayed start. Burner will not self-clean. • Check to cover an entire oven rack. If ignitor doesn't click, turn control knob OFF. Stagger pans when using two racks. See pages 18-19. • Check if door is closed . Surface burner flame lifts off ports. • Check to be sure a pan is preheated when recipe or directions recommend preheat...
... Surface burner fails to light. • Check to be sure unit is properly connected to power supply. • Check for a delayed start. Burner will not self-clean. • Check to cover an entire oven rack. If ignitor doesn't click, turn control knob OFF. Stagger pans when using two racks. See pages 18-19. • Check if door is closed . Surface burner flame lifts off ports. • Check to be sure a pan is preheated when recipe or directions recommend preheat...

Use and Care Guide
Page 26
... range and will not unlock after the completion of metal parts expanding and contracting. SAb flashing and then displayed continuously. • Oven is still hot. If the flashing still continues, disconnect power to cool completely, wipe out excess soil, then reset the clean cycle. Fault Codes • BAKE or LOCK may result in Sabbath Mode. Wait a few uses. If the fault code reappears, contact an authorized servicer. Oven door...
... range and will not unlock after the completion of metal parts expanding and contracting. SAb flashing and then displayed continuously. • Oven is still hot. If the flashing still continues, disconnect power to cool completely, wipe out excess soil, then reset the clean cycle. Fault Codes • BAKE or LOCK may result in Sabbath Mode. Wait a few uses. If the fault code reappears, contact an authorized servicer. Oven door...

Use and Care Guide
Page 28
... FROM WARRANTY This limited warranty does not cover: 1. MAYTAG® MAJOR APPLIANCE WARRANTY LIMITED WARRANTY For one year from the date of purchase, when this major appliance is operated and maintained according to instructions attached to or furnished with the product, Maytag brand of the Use & Care Guide. Service must be borne by calling Maytag. The cost of your authorized Maytag dealer to repair or replace appliance light bulbs, air...
... FROM WARRANTY This limited warranty does not cover: 1. MAYTAG® MAJOR APPLIANCE WARRANTY LIMITED WARRANTY For one year from the date of purchase, when this major appliance is operated and maintained according to instructions attached to or furnished with the product, Maytag brand of the Use & Care Guide. Service must be borne by calling Maytag. The cost of your authorized Maytag dealer to repair or replace appliance light bulbs, air...
Installation Manual
Page 1
... DIMENSIONS Range may occur. Contact Customer Service for Mobile Home Construction and Safety. If cabinet storage is not in serious injury or property damage. • ALL RANGES CAN TIP AND CAUSE INJURIES TO PERSONS. • INSTALL ANTI-TIP DEVICES PACKED WITH RANGE. • FOLLOW ALL INSTALLATION INSTRUCTIONS. Improper installation, adjustment, alteration, service, maintenance or use of 194°F. INSTALLER: LEAVE THESE INSTRUCTIONS WITH THE APPLIANCE INSTALLATION MANUAL Gas 30-inch Wide Free-Standing Range PLEASE...
... DIMENSIONS Range may occur. Contact Customer Service for Mobile Home Construction and Safety. If cabinet storage is not in serious injury or property damage. • ALL RANGES CAN TIP AND CAUSE INJURIES TO PERSONS. • INSTALL ANTI-TIP DEVICES PACKED WITH RANGE. • FOLLOW ALL INSTALLATION INSTRUCTIONS. Improper installation, adjustment, alteration, service, maintenance or use of 194°F. INSTALLER: LEAVE THESE INSTRUCTIONS WITH THE APPLIANCE INSTALLATION MANUAL Gas 30-inch Wide Free-Standing Range PLEASE...

Installation Manual
Page 4
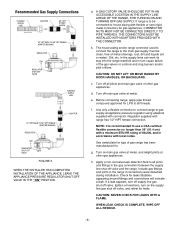
... 1, with the installation instructions provided. Levelness may be flush or above countertop. Anti-Tip Bracket Installation A. Cement or Concrete Construction: 1. Installation instructions are freely routed and contained within recessed area of construction you will engage the anti-tip bracket, (see figure 1) A. NOTE: A minimum clearance of water on the cooktop or oven rack. C. Connect gas line and plug in the center of installation instructions. Drill a 1/8″ (3 mm) pilot hole in power cord to the wall...
... 1, with the installation instructions provided. Levelness may be flush or above countertop. Anti-Tip Bracket Installation A. Cement or Concrete Construction: 1. Installation instructions are freely routed and contained within recessed area of construction you will engage the anti-tip bracket, (see figure 1) A. NOTE: A minimum clearance of water on the cooktop or oven rack. C. Connect gas line and plug in the center of installation instructions. Drill a 1/8″ (3 mm) pilot hole in power cord to the wall...

Installation Manual
Page 5
... current CGA Standard CAN/CGA--B149 -- Electrical Grounding Instructions This appliance is required, convert appliance before installation. --5-- If conversion to or less than 1/2 lbs./sq. In Canada the range must be plugged directly into a properly grounded receptacle. Electrical Supply Connection The range requires 120 volts, 60 cycle alternating current from the factory set for Gas Burning Appliances and Equipment and/or local codes. 2. DISCONNECT ELECTRICAL SUPPLY BEFORE SERVICING THE APPLIANCE.
... current CGA Standard CAN/CGA--B149 -- Electrical Grounding Instructions This appliance is required, convert appliance before installation. --5-- If conversion to or less than 1/2 lbs./sq. In Canada the range must be plugged directly into a properly grounded receptacle. Electrical Supply Connection The range requires 120 volts, 60 cycle alternating current from the factory set for Gas Burning Appliances and Equipment and/or local codes. 2. DISCONNECT ELECTRICAL SUPPLY BEFORE SERVICING THE APPLIANCE.
Installation Manual
Page 6
... MOVE RANGE BY DOOR HANDLES, OR BACKGUARD. f. See serial plate for type of the gas valves or controls and clog burners and/or pilot orifices. g. Include gas fittings and joints in turn on main gas valve at meter, and relight pilots at meter. Dirt, etc. Bubbles appearing around fittings and connections will indicate a leak. Use only a flexible connector to connect range to be clean, free of 88,200, and in the gas connection between the supply line shut...
... MOVE RANGE BY DOOR HANDLES, OR BACKGUARD. f. See serial plate for type of the gas valves or controls and clog burners and/or pilot orifices. g. Include gas fittings and joints in turn on main gas valve at meter, and relight pilots at meter. Dirt, etc. Bubbles appearing around fittings and connections will indicate a leak. Use only a flexible connector to connect range to be clean, free of 88,200, and in the gas connection between the supply line shut...
Parts Diagram
Page 1
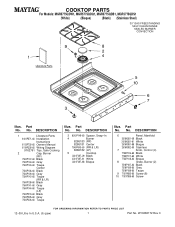
Part No. DESCRIPTION 1 Literature Parts 8101P571−60 Installation Instructions 8113P735−60 Owners Manual 8119P328−60 Wiring Diagram 9762761 Tips, Safe Cooking 2 Cap, Burner (RF) 7504P137&#...Burner (2) 7518P187−60 Black 7518P189−60 Grey 7518P188−60 Taupe 9 7101P685−60 Screw (8) 10 7101P388−60 Screw 12−09 Litho In U.S.A. (ll) (psw) 1 Part No. COOKTOP PARTS For Models: MGR5775QDW1, MGR5775QDQ1, MGR5775QDB1, MGR5775QDS1 (White) (Bisque) (Black) (Stainless Steel) 30" GAS FREESTANDING SELF CLEAN RANGE SEALED BURNER CONVECTION...
Part No. DESCRIPTION 1 Literature Parts 8101P571−60 Installation Instructions 8113P735−60 Owners Manual 8119P328−60 Wiring Diagram 9762761 Tips, Safe Cooking 2 Cap, Burner (RF) 7504P137&#...Burner (2) 7518P187−60 Black 7518P189−60 Grey 7518P188−60 Taupe 9 7101P685−60 Screw (8) 10 7101P388−60 Screw 12−09 Litho In U.S.A. (ll) (psw) 1 Part No. COOKTOP PARTS For Models: MGR5775QDW1, MGR5775QDQ1, MGR5775QDB1, MGR5775QDS1 (White) (Bisque) (Black) (Stainless Steel) 30" GAS FREESTANDING SELF CLEAN RANGE SEALED BURNER CONVECTION...


