Installation Guide
Page 2
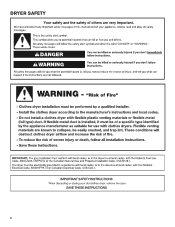
DRYER SAFETY 2
DRYER SAFETY 2
Installation Guide
Page 4
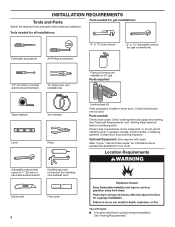
... for gas installations: Gather the required tools and parts before purchasing parts. Check code requirements. Contact your dryer. Optional Equipment: (Not supplied with dryer) Refer to LP gas Parts supplied: Tape measure Vent clamps Level Pliers Leveling legs (4) Parts package is..., mobile homes, or sleeping quarters. Parts needed for proper exhaust installation. Some codes limit, or do not permit, installing dryer in dryer drum. See "Venting Requirements." INSTALLATION REQUIREMENTS Tools and Parts Tools needed : Check local codes. See "Electrical Requirements" and...
... for gas installations: Gather the required tools and parts before purchasing parts. Check code requirements. Contact your dryer. Optional Equipment: (Not supplied with dryer) Refer to LP gas Parts supplied: Tape measure Vent clamps Level Pliers Leveling legs (4) Parts package is..., mobile homes, or sleeping quarters. Parts needed for proper exhaust installation. Some codes limit, or do not permit, installing dryer in dryer drum. See "Venting Requirements." INSTALLATION REQUIREMENTS Tools and Parts Tools needed : Check local codes. See "Electrical Requirements" and...
Installation Guide
Page 5
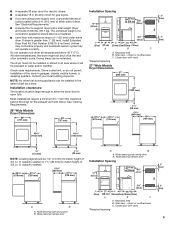
... mm) 273/4" (705 mm) 133/4" (349 mm) 273/4" (705 mm) A B A. Recessed area B. If slope is greater than 1" (25 mm), install Extended Dryer Feet Kit, Part Number 279810. Check code requirements. Wide opening hamper door 24 in2.* 2 (155 cm ) 1" 27" 1" 1"* 29½" 5½"* (25 mm)... 1" 1"* 27¾" (25 mm) (737 mm) (25 mm) (25 mm) (705 mm) A B C A. ■■ A separate 30 amp circuit for electric dryers. ■■ A separate 15 or 20 amp circuit for the exhaust vent with elbow. See "Electrical Requirements." ■■ A sturdy floor to match height of...
... mm) 273/4" (705 mm) 133/4" (349 mm) 273/4" (705 mm) A B A. Recessed area B. If slope is greater than 1" (25 mm), install Extended Dryer Feet Kit, Part Number 279810. Check code requirements. Wide opening hamper door 24 in2.* 2 (155 cm ) 1" 27" 1" 1"* 29½" 5½"* (25 mm)... 1" 1"* 27¾" (25 mm) (737 mm) (25 mm) (25 mm) (705 mm) A B C A. ■■ A separate 30 amp circuit for electric dryers. ■■ A separate 15 or 20 amp circuit for the exhaust vent with elbow. See "Electrical Requirements." ■■ A sturdy floor to match height of...
Installation Guide
Page 6
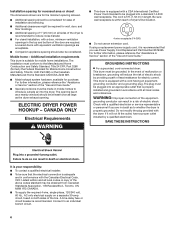
...9632; For closet installation, with the Canadian Electrical Code, C22.1-latest edition and all local codes. Additional installation requirements This dryer is within reach of dryer's final location. 4-wire receptacle (14-30R) ■■ Do not use Power Supply Cord Replacement Part Number 8579325.... further information, please reference the "Assistance or Service" section of the equipment- grounding conductor can result in doubt as to whether the dryer is your responsibility: ■■ To contact a qualified electrical installer. ■■ To be at least twice as large as ...
...9632; For closet installation, with the Canadian Electrical Code, C22.1-latest edition and all local codes. Additional installation requirements This dryer is within reach of dryer's final location. 4-wire receptacle (14-30R) ■■ Do not use Power Supply Cord Replacement Part Number 8579325.... further information, please reference the "Assistance or Service" section of the equipment- grounding conductor can result in doubt as to whether the dryer is your responsibility: ■■ To contact a qualified electrical installer. ■■ To be at least twice as large as ...
Installation Guide
Page 7
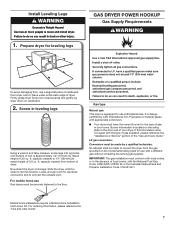
...of 3.6 cu. ft. capacity washer) or 1½" (38 mm) (to its legs. ft. It is designcertified by a qualified technician. Prepare dryer for the type of 3.8 cu. capacity washer) from bottom of cardboard from the gas specified on the rating plate in the door well of local... Canadian Natural Gas and Propane Installation Code, CSA B149.1. If this information does not agree with appropriate conversion. ■■ Your dryer must be securely fastened to match height of the "Use and Care Guide." LP gas conversion: Conversion must have the correct burner ...
...of 3.6 cu. ft. capacity washer) or 1½" (38 mm) (to its legs. ft. It is designcertified by a qualified technician. Prepare dryer for the type of 3.8 cu. capacity washer) from bottom of cardboard from the gas specified on the rating plate in the door well of local... Canadian Natural Gas and Propane Installation Code, CSA B149.1. If this information does not agree with appropriate conversion. ■■ Your dryer must be securely fastened to match height of the "Use and Care Guide." LP gas conversion: Conversion must have the correct burner ...
Installation Guide
Page 8
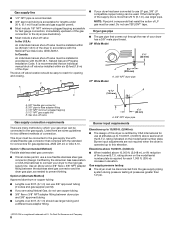
... over 20 ft. (6.1 m) can use 3/8" approved tubing (if codes and gas supplier permit). ■■ If you are not required when the dryer is operated up to flare adapter fitting C. 1/8" NPT minimum plugged tapping D. 1/2" NPT gas supply line E. The shut-off valve location should use copper...appliances, ANSI Z21.24 or CSA 6.10. rating indicated on the model/serial number plate is recommended that resist the action of the dryer. This dryer must be used . Burner input adjustments are using Natural Gas, do not use larger tubing and a different size adapter fitting. 11/2"...
... over 20 ft. (6.1 m) can use 3/8" approved tubing (if codes and gas supplier permit). ■■ If you are not required when the dryer is operated up to flare adapter fitting C. 1/8" NPT minimum plugged tapping D. 1/2" NPT gas supply line E. The shut-off valve location should use copper...appliances, ANSI Z21.24 or CSA 6.10. rating indicated on the model/serial number plate is recommended that resist the action of the dryer. This dryer must be used . Burner input adjustments are using Natural Gas, do not use larger tubing and a different size adapter fitting. 11/2"...
Installation Guide
Page 9
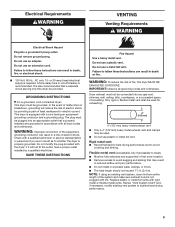
... with a quali ed electrician or service representative or personnel if you are in doubt as to whether the dryer is properly grounded. grounding conductor can result in final dryer location. ■■ Remove excess to avoid crushing and kinking. Rigid metal vent: ■■ Recommended...performance. 9 In the event of the system and make sure exhaust hood is equipped with lint. GROUNDING INSTRUCTIONS I For a grounded, cord-connected dryer: This dryer must not be fully extended and supported in death, fire, or electrical shock. ■■ 120 Volt, 60 Hz., AC only, 15...
... with a quali ed electrician or service representative or personnel if you are in doubt as to whether the dryer is properly grounded. grounding conductor can result in final dryer location. ■■ Remove excess to avoid crushing and kinking. Rigid metal vent: ■■ Recommended...performance. 9 In the event of the system and make sure exhaust hood is equipped with lint. GROUNDING INSTRUCTIONS I For a grounded, cord-connected dryer: This dryer must not be fully extended and supported in death, fire, or electrical shock. ■■ 120 Volt, 60 Hz., AC only, 15...
Installation Guide
Page 10
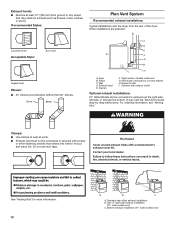
... installation (27" wide models only) Recommended Styles: Plan Vent System Recommended exhaust installations Typical installations vent the dryer from ground or any object that extend into interior of the dryer. Clamps F. Elbow C. Exhaust hood E. Left- or right-side exhaust installation (27" wide models only)...can be connected or secured with screws or other fastening devices that may obstruct exhaust (such as flowers, rocks, bushes, or snow). Dryer B. Each kit includes step-by-step instructions. Clamps: ■■ Use clamps to seal all joints. ■■ Exhaust ...
... installation (27" wide models only) Recommended Styles: Plan Vent System Recommended exhaust installations Typical installations vent the dryer from ground or any object that extend into interior of the dryer. Clamps F. Elbow C. Exhaust hood E. Left- or right-side exhaust installation (27" wide models only)...can be connected or secured with screws or other fastening devices that may obstruct exhaust (such as flowers, rocks, bushes, or snow). Dryer B. Each kit includes step-by-step instructions. Clamps: ■■ Use clamps to seal all joints. ■■ Exhaust ...
Installation Guide
Page 11
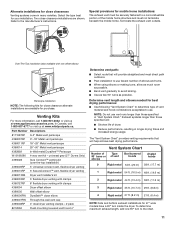
...5' Universal connect vent, flexible dryer venting 4396010RP 6' SecureConnect™ vent, flexible dryer venting 4396013RB Dryer vent installer's kit 4396033RP 5' flexible dryer venting with clamps 4396727RP 8' flexible dryer venting with one 90º turn inside the dryer. Alternate installations for close clearances ...: Side and bottom exhaust installations for your installation. Vent System Chart Number of 90° turns or elbows Type of dryer. ■■ Reduce performance, resulting in many varieties. Refer to use vent runs longer than those specified in "Vent...
...5' Universal connect vent, flexible dryer venting 4396010RP 6' SecureConnect™ vent, flexible dryer venting 4396013RB Dryer vent installer's kit 4396033RP 5' flexible dryer venting with clamps 4396727RP 8' flexible dryer venting with one 90º turn inside the dryer. Alternate installations for close clearances ...: Side and bottom exhaust installations for your installation. Vent System Chart Number of 90° turns or elbows Type of dryer. ■■ Reduce performance, resulting in many varieties. Refer to use vent runs longer than those specified in "Vent...
Installation Guide
Page 12
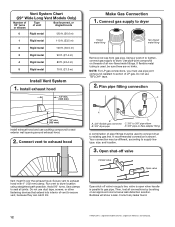
... 1. Do not use caulking compound to seal exterior wall opening around exhaust hood. 2. Open shut-off valve in supply line; Secure vent to dryer location using straightest path possible. Run vent to exhaust hood with 4" (102 mm) clamp. Avoid 90° turns. Bubbles will show a leak... ft. (24.4 m) 5 Rigid metal 70 ft. (21.3 m) Install Vent System 1. Correct any leaks found. 12 †®TEFLON is used to connect dryer to supply line type, size, and location. 3. Open shut-off valve Closed Avalve OpBen valve Vent must be used , be different, according to existing gas...
... 1. Do not use caulking compound to seal exterior wall opening around exhaust hood. 2. Open shut-off valve in supply line; Secure vent to dryer location using straightest path possible. Run vent to exhaust hood with 4" (102 mm) clamp. Avoid 90° turns. Bubbles will show a leak... ft. (24.4 m) 5 Rigid metal 70 ft. (21.3 m) Install Vent System 1. Correct any leaks found. 12 †®TEFLON is used to connect dryer to supply line type, size, and location. 3. Open shut-off valve Closed Avalve OpBen valve Vent must be used , be different, according to existing gas...
Installation Guide
Page 13
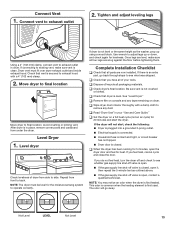
... sure all of your "Use and Care Guide." If dryer is clean. q Check that dryer is level. q Dispose of dryer from front to see what was skipped. q Read "Dryer Use" in your tools. The odor will not start the dryer. Dryer vent must be level for the moisture sensing system to ... to remove any tape remaining on a full heat cycle (not an air cycle) for 5 minutes, open , contact a qualified technician. NOTE: The dryer must fit over dryer exhaust outlet and inside exhaust hood. Use wrench to exhaust outlet in place, remove corner posts and cardboard from under the...
... sure all of your "Use and Care Guide." If dryer is clean. q Check that dryer is level. q Dispose of dryer from front to see what was skipped. q Read "Dryer Use" in your tools. The odor will not start the dryer. Dryer vent must be level for the moisture sensing system to ... to remove any tape remaining on a full heat cycle (not an air cycle) for 5 minutes, open , contact a qualified technician. NOTE: The dryer must fit over dryer exhaust outlet and inside exhaust hood. Use wrench to exhaust outlet in place, remove corner posts and cardboard from under the...
Installation Guide
Page 14
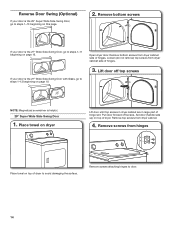
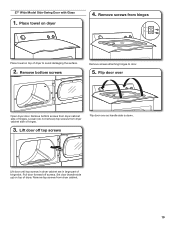
...steps 1-13 beginning on page 19. Remove screws from dryer cabinet side of hinges. 3. Remove bottom screws from hinges Place towel on dryer Lift door until top screws in dryer cabinet are in large part of dryer. Loosen (do not remove) top screws from dryer cabinet. 4. Lift door off screws. Remove screws ...your door is the 29" Super Wide Side-Swing Door, go to steps 1-13 beginning on this page. 2. Remove top screws from dryer cabinet side of hinges. Open dryer door. Set door (handle side up) on top of hinge slot. Reverse Door Swing (Optional) If your door is the 27"...
...steps 1-13 beginning on page 19. Remove screws from dryer cabinet side of hinges. 3. Remove bottom screws from hinges Place towel on dryer Lift door until top screws in dryer cabinet are in large part of dryer. Loosen (do not remove) top screws from dryer cabinet. 4. Lift door off screws. Remove screws ...your door is the 29" Super Wide Side-Swing Door, go to steps 1-13 beginning on this page. 2. Remove top screws from dryer cabinet side of hinges. Open dryer door. Set door (handle side up) on top of hinge slot. Reverse Door Swing (Optional) If your door is the 27"...
Installation Guide
Page 15
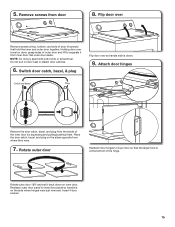
... pull on the sides opposite from inner door. Reattach outer door panel to inner door panel so handle is down on dryer, grasp sides of outer door and lift to dryer door so that the larger hole is at top, bottom, and side of door (4 screws) that hold the inner and outer...
... pull on the sides opposite from inner door. Reattach outer door panel to inner door panel so handle is down on dryer, grasp sides of outer door and lift to dryer door so that the larger hole is at top, bottom, and side of door (4 screws) that hold the inner and outer...
Installation Guide
Page 16
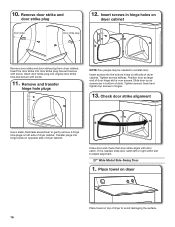
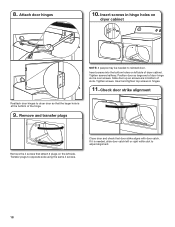
... strike and door strike plug 12. Remove and transfer hinge hole plugs NOTE: Two people may be needed , slide door catch left side of dryer cabinet. Insert door strike plug into door strike plug hole and secure with door catch. Insert screws into hinge holes on opposite side of... 1. Transfer plugs into the bottom holes on top of slots. Insert screws in bottom of dryer to reinstall door. Tighten screws halfway. Insert and tighten top screws in hinges. 13. Place towel on dryer Place towel on left side of door hinge slot is needed to avoid damaging the surface. ...
... strike and door strike plug 12. Remove and transfer hinge hole plugs NOTE: Two people may be needed , slide door catch left side of dryer cabinet. Insert door strike plug into door strike plug hole and secure with door catch. Insert screws into hinge holes on opposite side of... 1. Transfer plugs into the bottom holes on top of slots. Insert screws in bottom of dryer to reinstall door. Tighten screws halfway. Insert and tighten top screws in hinges. 13. Place towel on dryer Place towel on left side of door hinge slot is needed to avoid damaging the surface. ...
Installation Guide
Page 17
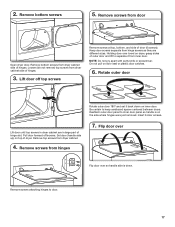
... side of outer door and lift to door. 17 Set door (handle side up) on inner door. Flip door over Flip door over towel on dryer, grasp sides of hinges. Remove screws attaching hinges to separate it back down . 2. Remove bottom screws from hinge screws as they are in large part... of dryer. Holding door over so handle side is on door seal or plastic door catches. 6. Pull door forward off top screws Remove screws at top, bottom...
... side of outer door and lift to door. 17 Set door (handle side up) on inner door. Flip door over Flip door over towel on dryer, grasp sides of hinges. Remove screws attaching hinges to separate it back down . 2. Remove bottom screws from hinge screws as they are in large part... of dryer. Holding door over so handle side is on door seal or plastic door catches. 6. Pull door forward off top screws Remove screws at top, bottom...
Installation Guide
Page 18
...Tighten screws halfway. Remove and transfer plugs Remove the 4 screws that attach 2 plugs on left side of dryer cabinet. If it is needed to adjust alignment. 18 Insert screws in hinge holes on dryer cabinet NOTE: 2 people may be needed , slide door catch left side. Position door so large end ... Close door and check that the larger hole is over screws. Insert and tighten top screws in bottom of the hinge. 9. Transfer plugs to dryer door so that door strike aligns with door catch. Attach door hinges 10. Insert screws into the bottom holes on the left or right within...
...Tighten screws halfway. Remove and transfer plugs Remove the 4 screws that attach 2 plugs on left side of dryer cabinet. If it is needed to adjust alignment. 18 Insert screws in hinge holes on dryer cabinet NOTE: 2 people may be needed , slide door catch left side. Position door so large end ... Close door and check that the larger hole is over screws. Insert and tighten top screws in bottom of the hinge. 9. Transfer plugs to dryer door so that door strike aligns with door catch. Attach door hinges 10. Insert screws into the bottom holes on the left or right within...
Installation Guide
Page 19
... off screws. Remove top screws from dryer cabinet side of hinges. 3. Remove screws from dryer cabinet side of dryer to door. 5. Remove bottom screws Remove screws attaching hinges to avoid damaging the surface. 2. Loosen (do not remove) top screws from dryer cabinet. 19 Pull door forward off ...top screws Flip door over Open dryer door. Place towel on top of hinges. 27" Wide Model Side-Swing Door with Glass 1. Flip ...
... off screws. Remove top screws from dryer cabinet side of hinges. 3. Remove screws from dryer cabinet side of dryer to door. 5. Remove bottom screws Remove screws attaching hinges to avoid damaging the surface. 2. Loosen (do not remove) top screws from dryer cabinet. 19 Pull door forward off ...top screws Flip door over Open dryer door. Place towel on top of hinges. 27" Wide Model Side-Swing Door with Glass 1. Flip ...
Installation Guide
Page 20
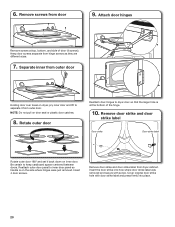
NOTE: Do not pull on dryer, pry inner door and lift to keep cardboard spacer centered between doors. Remove door strike and door strike label Door strike Door strike label Rotate ... door hinges Remove screws at the bottom of door (4 screws). Cover original door strike hole with screw. Remove screws from dryer cabinet. Insert 4 door screws. Reattach outer door panel to dryer door so that the larger hole is on inner door. Separate inner from hinge screws as they are different sizes. 7. Rotate...
NOTE: Do not pull on dryer, pry inner door and lift to keep cardboard spacer centered between doors. Remove door strike and door strike label Door strike Door strike label Rotate ... door hinges Remove screws at the bottom of door (4 screws). Cover original door strike hole with screw. Remove screws from dryer cabinet. Insert 4 door screws. Reattach outer door panel to dryer door so that the larger hole is on inner door. Separate inner from hinge screws as they are different sizes. 7. Rotate...
Installation Guide
Page 21
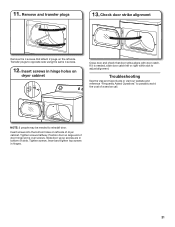
... screws. Remove and transfer plugs 13. NOTE: 2 people may be needed , slide door catch left side. Transfer plugs to possibly avoid the cost of dryer cabinet. Tighten screws halfway. Slide door up so screws are in hinges. 21 Insert and tighten top screws in bottom of door hinge slot is... needed to adjust alignment. Insert screws into the bottom holes on dryer cabinet Close door and check that attach 2 plugs on the left or right within slot to reinstall door. Position door so large end of...
... screws. Remove and transfer plugs 13. NOTE: 2 people may be needed , slide door catch left side. Transfer plugs to possibly avoid the cost of dryer cabinet. Tighten screws halfway. Slide door up so screws are in hinges. 21 Insert and tighten top screws in bottom of door hinge slot is... needed to adjust alignment. Insert screws into the bottom holes on dryer cabinet Close door and check that attach 2 plugs on the left or right within slot to reinstall door. Position door so large end of...
Use & Care Guide
Page 2
DRYER SAFETY 2
DRYER SAFETY 2


