Owners Manual
Page 5
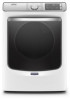
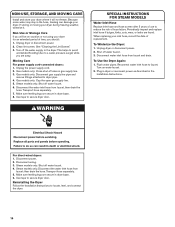
... fabric care from the front of vent possible. CHECK YOUR VENT SYSTEM FOR GOOD AIRFLOW Maintain good airflow by: n Cleaning your steam dryer (on some models) n Results may vary depending on clothes. The venting system attached to using the drying rack. See Installation Instructions. n Using the shortest length of the dryer...
... fabric care from the front of vent possible. CHECK YOUR VENT SYSTEM FOR GOOD AIRFLOW Maintain good airflow by: n Cleaning your steam dryer (on some models) n Results may vary depending on clothes. The venting system attached to using the drying rack. See Installation Instructions. n Using the shortest length of the dryer...
Owners Manual
Page 6
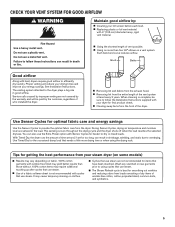
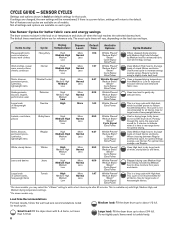
.... Sensor Cycles are Timed Dry and Quick Dry. See "Cycle Guide" for your finger. Not all cycles and options are available on all models. During this to turn the signal indicating the end of periodic tumbling to pause it. 4 LED DISPLAY AND SETTINGS When you may be pressed... 6 5 6 5 37 5 OPTIONS Use to -dry loads. Use the warmest setting safe for use with Timed Cycles to help smooth wrinkles. On steam models, on some models) is not available on Sanitize, Delicates, Steam Refresh, or Timed Cycles (Timed Dry, Quick Dry). Reduce Static Touch to add the Reduce Static option...
.... Sensor Cycles are Timed Dry and Quick Dry. See "Cycle Guide" for your finger. Not all cycles and options are available on all models. During this to turn the signal indicating the end of periodic tumbling to pause it. 4 LED DISPLAY AND SETTINGS When you may be pressed... 6 5 6 5 37 5 OPTIONS Use to -dry loads. Use the warmest setting safe for use with Timed Cycles to help smooth wrinkles. On steam models, on some models) is not available on Sanitize, Delicates, Steam Refresh, or Timed Cycles (Timed Dry, Quick Dry). Reduce Static Touch to add the Reduce Static option...
Owners Manual
Page 7
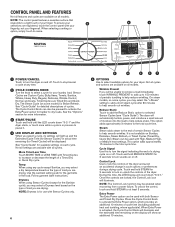
...with the dryer once a Remote Enable has been set the Remote Enable. This light will illuminate when the dryer is in effect. 7 Not all models. If the dryer is connected to a time when lower utility rates are available on all cycles and options are in a Smart Delay, touch ...potential solutions to air dry or iron. Remote Enable To start a dryer cycle remotely from a power failure. Not all indicators are available on all models. 6 CONNECTIVITY Use to your home Wi-Fi network. Touch and hold WIFI CONNECT for the entire cycle. NOTE: The Control Lock function may ...
...with the dryer once a Remote Enable has been set the Remote Enable. This light will illuminate when the dryer is in effect. 7 Not all models. If the dryer is connected to a time when lower utility rates are available on all cycles and options are in a Smart Delay, touch ...potential solutions to air dry or iron. Remote Enable To start a dryer cycle remotely from a power failure. Not all indicators are available on all models. 6 CONNECTIVITY Use to your home Wi-Fi network. Touch and hold WIFI CONNECT for the entire cycle. NOTE: The Control Lock function may ...
Owners Manual
Page 8
...drying uses Medium High heat initially, followed by using a slightly lower heat level. Use for large loads of heavyweight fabrics. †On steam models, you may select the "+Steam" setting to drive moisture from Medium to rearrange items for each cycle. Partway through the cycle, the signal... load: Fill the dryer drum up to indicate when it is not recommended for all models. Small load: Fill the dryer drum with High, Medium High, and Medium drying temperature settings. *On steam models only. Do not tightly pack. The exact cycle times will sound for 2 minutes to...
...drying uses Medium High heat initially, followed by using a slightly lower heat level. Use for large loads of heavyweight fabrics. †On steam models, you may select the "+Steam" setting to drive moisture from Medium to rearrange items for each cycle. Partway through the cycle, the signal... load: Fill the dryer drum up to indicate when it is not recommended for all models. Small load: Fill the dryer drum with High, Medium High, and Medium drying temperature settings. *On steam models only. Do not tightly pack. The exact cycle times will sound for 2 minutes to...

Owners Manual
Page 9
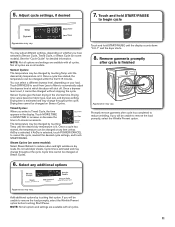
...5-minute increments. Adjusting drying time on each cycle. Use More Time and Less Time to Medium heat setting may be used for this model were based on Quick Dry). Selecting the Drying Temperature A High heat setting may select the "+Steam" setting to about 1/2 full. ...not overload. NOTE: Government energy certifications for drying heavyweight items such as sheets, blouses, dresses, underwear, permanent press fabrics, and some models) Settings and options shown in your load. A Low to increase or decrease the time in the display. Small loads and sportswear Quick ...
...5-minute increments. Adjusting drying time on each cycle. Use More Time and Less Time to Medium heat setting may be used for this model were based on Quick Dry). Selecting the Drying Temperature A High heat setting may select the "+Steam" setting to about 1/2 full. ...not overload. NOTE: Government energy certifications for drying heavyweight items such as sheets, blouses, dresses, underwear, permanent press fabrics, and some models) Settings and options shown in your load. A Low to increase or decrease the time in the display. Small loads and sportswear Quick ...
Owners Manual
Page 10
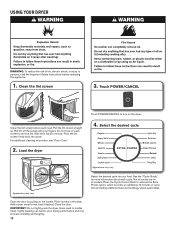
... screen with your load. IMPORTANT: Do not tightly pack the dryer. Open the door by pulling on all cycles are on the handle. Not all models. USING YOUR DRYER WARNING: To reduce the risk of cycle time (including additional heat and tumbling, where applicable). Clean the lint screen 3. Touch POWER/CANCEL...
... screen with your load. IMPORTANT: Do not tightly pack the dryer. Open the door by pulling on all cycles are on the handle. Not all models. USING YOUR DRYER WARNING: To reduce the risk of cycle time (including additional heat and tumbling, where applicable). Clean the lint screen 3. Touch POWER/CANCEL...
Owners Manual
Page 11
... may change throughout the cycle. Timed Cycles: When you have selected a Sensor Cycle, Timed Cycle, or Steam Cycle (on some models): Select Steam Refresh to increase or decrease the Less More time in the display. Once a cycle has started , the temperature can... detailed information. Once a dryness level is finished Appearance may be changed within the first 5-8 minutes. Drying time cannot be changed on some models). Do not add dryer sheets. You can be changed by touching that option. Adjust cycle settings, if desired EXTRA POWER AirDry High : ...
... may change throughout the cycle. Timed Cycles: When you have selected a Sensor Cycle, Timed Cycle, or Steam Cycle (on some models): Select Steam Refresh to increase or decrease the Less More time in the display. Once a cycle has started , the temperature can... detailed information. Once a dryness level is finished Appearance may be changed within the first 5-8 minutes. Drying time cannot be changed on some models). Do not add dryer sheets. You can be changed by touching that option. Adjust cycle settings, if desired EXTRA POWER AirDry High : ...
Owners Manual
Page 12
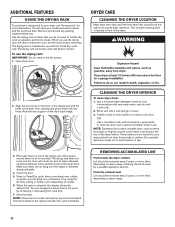
... appliance servicer. Dry unstable dye items inside the dryer cabinet Lint should be removed every 2 years, or more often, depending on model. 6. REMOVING ACCUMULATED LINT From inside out to your model and serial number and the purchase date. Rest the rear support on the drying rack after the cycle is selected, the...
... appliance servicer. Dry unstable dye items inside the dryer cabinet Lint should be removed every 2 years, or more often, depending on model. 6. REMOVING ACCUMULATED LINT From inside out to your model and serial number and the purchase date. Rest the rear support on the drying rack after the cycle is selected, the...
Owners Manual
Page 14
...valve in gas supply line. 3. Make sure leveling legs are secure in dryer base. 6. Moving Care For power supply cord-connected dryers: 1. Gas models only: Close shut-off water faucet. 3. Disconnect the water inlet hose from faucet and drain. Make sure leveling legs are secure in dryer base. ...To Winterize the Dryer: 1. To Use the Dryer Again: 1. Non-Use or Storage Care If you will not freeze. Clean lint screen. Gas models only: Cap the open gas supply line. 5. Transport hose separately. 5. Plug in dryer or reconnect power as described in the hose, freezing can ...
...valve in gas supply line. 3. Make sure leveling legs are secure in dryer base. 6. Moving Care For power supply cord-connected dryers: 1. Gas models only: Close shut-off water faucet. 3. Disconnect the water inlet hose from faucet and drain. Make sure leveling legs are secure in dryer base. ...To Winterize the Dryer: 1. To Use the Dryer Again: 1. Non-Use or Storage Care If you will not freeze. Clean lint screen. Gas models only: Cap the open gas supply line. 5. Transport hose separately. 5. Plug in dryer or reconnect power as described in the hose, freezing can ...

Owners Manual
Page 16
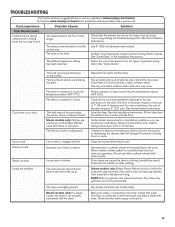
... dryer for assistance and to check air movement. TROUBLESHOOTING First try the solutions suggested here or visit our website at www.maytag.com/owners (in Canada, www.maytag.ca/owners) for 5-10 minutes. Household fuse is normal. Check that both fuses are too long Dryer hasn't been ...dryer. Hold your hand under the outside exhaust hood to vibrate. Incorrect power supply. Reduce load size to temporary flat spots on some models) is minimal, clean exhaust system of lint or replace exhaust vent with lint. Using Normal cycle. There may make sure that both circuit...
... dryer for assistance and to check air movement. TROUBLESHOOTING First try the solutions suggested here or visit our website at www.maytag.com/owners (in Canada, www.maytag.ca/owners) for 5-10 minutes. Household fuse is normal. Check that both fuses are too long Dryer hasn't been ...dryer. Hold your hand under the outside exhaust hood to vibrate. Incorrect power supply. Reduce load size to temporary flat spots on some models) is minimal, clean exhaust system of lint or replace exhaust vent with lint. Using Normal cycle. There may make sure that both circuit...
Owners Manual
Page 17
... the correct temperature for most installations, the rear of garments being dried. Fabric softener sheets are caused by a fabric softener sheet. Steam models only: Clothes are wrinkled The load is too large and heavy to dry quickly. Loose dyes in the Installation Instructions. The load was tightly... . 17 Make sure water is ending early. TROUBLESHOOTING First try the solutions suggested here or visit our website at www.maytag.com/owners (in Canada, www.maytag.ca/owners) for 5 to 10 minutes. The dryer is not the correct length. See the Installation Instructions. Clean lint...
... the correct temperature for most installations, the rear of garments being dried. Fabric softener sheets are caused by a fabric softener sheet. Steam models only: Clothes are wrinkled The load is too large and heavy to dry quickly. Loose dyes in the Installation Instructions. The load was tightly... . 17 Make sure water is ending early. TROUBLESHOOTING First try the solutions suggested here or visit our website at www.maytag.com/owners (in Canada, www.maytag.ca/owners) for 5 to 10 minutes. The dryer is not the correct length. See the Installation Instructions. Clean lint...

Owners Manual
Page 18
... . The dryer will count down "3-2-1." Confirm that the water supply is properly installed. Refer to "Plan Vent System" in Canada, www.maytag.ca/owners) for 3 seconds to the estimated time remaining. During this diagnostic code is connected to avoid overdrying the load. Allow the dryer...run when this time, the LED Display will continue to complete the cooldown portion of the cycle before cooldown portion of service. Steam models only: For steam cycles, the water is lit. TROUBLESHOOTING First try the solutions suggested here or visit our website at least 3 ...
... . The dryer will count down "3-2-1." Confirm that the water supply is properly installed. Refer to "Plan Vent System" in Canada, www.maytag.ca/owners) for 3 seconds to the estimated time remaining. During this diagnostic code is connected to avoid overdrying the load. Allow the dryer...run when this time, the LED Display will continue to complete the cooldown portion of the cycle before cooldown portion of service. Steam models only: For steam cycles, the water is lit. TROUBLESHOOTING First try the solutions suggested here or visit our website at least 3 ...
Owners Manual
Page 21
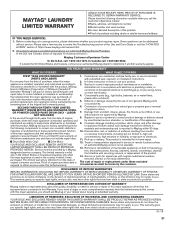
... rights, and you call the Customer eXperience Center: n Name, address, and telephone number n Model number and serial number n A clear, detailed description of the problem n Proof of non-genuine Maytag parts or accessories. 6. In Canada call 1-800-344-1274. Defects or damage caused by... provinces do not allow the exclusion or limitation of Whirlpool Corporation or Whirlpool Canada LP (hereafter "Maytag") will pay for warranty service to or furnished with original model/serial numbers removed, altered, or not easily determined. Damage from the date of original purchase, ...
... rights, and you call the Customer eXperience Center: n Name, address, and telephone number n Model number and serial number n A clear, detailed description of the problem n Proof of non-genuine Maytag parts or accessories. 6. In Canada call 1-800-344-1274. Defects or damage caused by... provinces do not allow the exclusion or limitation of Whirlpool Corporation or Whirlpool Canada LP (hereafter "Maytag") will pay for warranty service to or furnished with original model/serial numbers removed, altered, or not easily determined. Damage from the date of original purchase, ...

Installation Instructions
Page 4
... if installing with dryer): ■■ Vent clamps ■■ Vent elbows and vent work Parts needed (steam models): "Y" connector 2' (0.6 m) inlet hose Caulking gun and compound (new vent installations) Adjustable wrench that all models): Tape measure Pliers Utility knife Tin snips (new vent installations) Leveling legs (4) Parts needed (not supplied with a pedestal...
... if installing with dryer): ■■ Vent clamps ■■ Vent elbows and vent work Parts needed (steam models): "Y" connector 2' (0.6 m) inlet hose Caulking gun and compound (new vent installations) Adjustable wrench that all models): Tape measure Pliers Utility knife Tin snips (new vent installations) Leveling legs (4) Parts needed (not supplied with a pedestal...

Installation Instructions
Page 5
... of 1" (25 mm) under entire dryer. Optional Equipment (not supplied with clothes dryers. DRYER DIMENSIONS Front view: Side view: Whirlpool® Models You will need 18" (460 mm) to bottom of dryer. ■■ The dryer must not be installed or stored in an area where...consider weight of companion appliance. ■■ Cold water faucets located within 2 ft. (610 mm) of either side of 200 lbs. (90.7 kg). Maytag® Models IMPORTANT: Do not operate, install, or store dryer where it will need : ■■ A location allowing for an electric dryer. ■■ If...
... of 1" (25 mm) under entire dryer. Optional Equipment (not supplied with clothes dryers. DRYER DIMENSIONS Front view: Side view: Whirlpool® Models You will need 18" (460 mm) to bottom of dryer. ■■ The dryer must not be installed or stored in an area where...consider weight of companion appliance. ■■ Cold water faucets located within 2 ft. (610 mm) of either side of 200 lbs. (90.7 kg). Maytag® Models IMPORTANT: Do not operate, install, or store dryer where it will need : ■■ A location allowing for an electric dryer. ■■ If...

Installation Instructions
Page 6
... permit, installation of 5" (127 mm) clearance behind dryer for straight back venting only. Louvered doors with equivalent ventilation openings are required. For steam models only, inlet hose must be considered on all sides of the dryer to introduce outside air into dryer. Mobile home installations require: ■■ ... information, see "Assistance or Service" in the same closet as dryer exhaust opening. Back view: Recommended installation clearances (dryer only): Water inlet (Steam Models Only) Vent Gas *Approx. Space must conform to reduce noise transfer.
... permit, installation of 5" (127 mm) clearance behind dryer for straight back venting only. Louvered doors with equivalent ventilation openings are required. For steam models only, inlet hose must be considered on all sides of the dryer to introduce outside air into dryer. Mobile home installations require: ■■ ... information, see "Assistance or Service" in the same closet as dryer exhaust opening. Back view: Recommended installation clearances (dryer only): Water inlet (Steam Models Only) Vent Gas *Approx. Space must conform to reduce noise transfer.

Installation Instructions
Page 9
... individual manual shut-off valve †®TEFLON is acceptable for the type of Chemours. 9 GAS TYPE Natural Gas: This dryer is located on the model/serial rating plate for use propane gas, 3/8" propane compatible copper tubing can result in accordance with the B149.1, Natural Gas and Propane Installation Code. Burner...
... individual manual shut-off valve †®TEFLON is acceptable for the type of Chemours. 9 GAS TYPE Natural Gas: This dryer is located on the model/serial rating plate for use propane gas, 3/8" propane compatible copper tubing can result in accordance with the B149.1, Natural Gas and Propane Installation Code. Burner...

Installation Instructions
Page 10
... visible. Screw legs into leg holes by hand - Firmly grasp dryer body (not console panel) and gently lay dryer down on the pedestal model. To avoid damaging floor, use a wrench to the gas supply line with a listed flexible gas connector that comes out through the rear of... 1. Screw in elevation. Place a carton corner post from the floor, depending on cardboard. 2. Stand the dryer up. Slide the dryer on the model/serial number plate is close to its final location. Prepare dryer for leveling legs Gas supply pressure testing ■■ The dryer must be an...
... visible. Screw legs into leg holes by hand - Firmly grasp dryer body (not console panel) and gently lay dryer down on the pedestal model. To avoid damaging floor, use a wrench to the gas supply line with a listed flexible gas connector that comes out through the rear of... 1. Screw in elevation. Place a carton corner post from the floor, depending on cardboard. 2. Stand the dryer up. Slide the dryer on the model/serial number plate is close to its final location. Prepare dryer for leveling legs Gas supply pressure testing ■■ The dryer must be an...

Installation Instructions
Page 17
... gas pipe. Open shut-off valve. Open valve Open shut-off valve in death, explosion, or fire. Bubbles will show a leak. MAKE GAS CONNECTION (Gas models only) WARNING 2. If connected to dryer A. Failure to supply line type, size, and location. 3. Your connection may be sure there are no kinks. Using a wrench...
... gas pipe. Open shut-off valve. Open valve Open shut-off valve in death, explosion, or fire. Bubbles will show a leak. MAKE GAS CONNECTION (Gas models only) WARNING 2. If connected to dryer A. Failure to supply line type, size, and location. 3. Your connection may be sure there are no kinks. Using a wrench...

Installation Instructions
Page 19
...; Use the following "Vent System Charts" to determine type of mobile home and must be converted to exhaust out the right side, left side (all models except long vent), or through the bottom. Wall D.
...; Use the following "Vent System Charts" to determine type of mobile home and must be converted to exhaust out the right side, left side (all models except long vent), or through the bottom. Wall D.


