
Use & Care Guide
Page 2
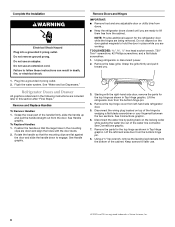
.... Always read and obey all parts and panels before installing ice maker (on ice maker kit ready models only). ■ Use a sturdy glass when dispensing ice (on some models). ■ Do not hit the refrigerator glass doors (on your old refrigerator. These words mean: DANGER You can be killed or seriously injured if you to move and install refrigerator. ■ Disconnect power before operating. ■ Remove doors from refrigerator. ■ Use two or more chemicals known...
.... Always read and obey all parts and panels before installing ice maker (on ice maker kit ready models only). ■ Use a sturdy glass when dispensing ice (on some models). ■ Do not hit the refrigerator glass doors (on your old refrigerator. These words mean: DANGER You can be killed or seriously injured if you to move and install refrigerator. ■ Disconnect power before operating. ■ Remove doors from refrigerator. ■ Use two or more chemicals known...
Use & Care Guide
Page 3
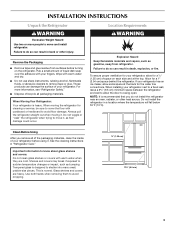
... ice maker, allow for cleaning or service, be sure to cover the floor with warm water and dry. ■ Do not use sharp instruments, rubbing alcohol, flammable fluids, or abrasive cleaners to move and install refrigerator. If your refrigerator, allow extra space at the top. Do not install the refrigerator in "Refrigerator Care." See the cleaning instructions in a location where the temperature will fall below 55°F (13°C). Shelves...
... ice maker, allow for cleaning or service, be sure to cover the floor with warm water and dry. ■ Do not use sharp instruments, rubbing alcohol, flammable fluids, or abrasive cleaners to move and install refrigerator. If your refrigerator, allow extra space at the top. Do not install the refrigerator in "Refrigerator Care." See the cleaning instructions in a location where the temperature will fall below 55°F (13°C). Shelves...
Use & Care Guide
Page 4
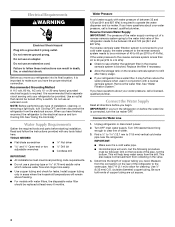
... the refrigerator. Unplug refrigerator or disconnect power. 2. IMPORTANT: ■ Make sure it is connected to 414 kPa). See "Using the Control(s)." TOOLS NEEDED: ■ Flat-blade screwdriver Nut driver and ¹⁄₂" Open-end or two adjustable wrenches Drill bit ■ Cordless drill IMPORTANT: ■ All installations must be provided. If a reverse osmosis water filtration system is a cold water pipe. ■ Horizontal pipe will work, but...
... the refrigerator. Unplug refrigerator or disconnect power. 2. IMPORTANT: ■ Make sure it is connected to 414 kPa). See "Using the Control(s)." TOOLS NEEDED: ■ Flat-blade screwdriver Nut driver and ¹⁄₂" Open-end or two adjustable wrenches Drill bit ■ Cordless drill IMPORTANT: ■ All installations must be provided. If a reverse osmosis water filtration system is a cold water pipe. ■ Horizontal pipe will work, but...
Use & Care Guide
Page 5
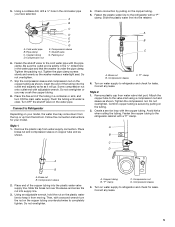
... water line to refrigerator and check for leaks. "P" clamp 6. Tighten the compression nut. Avoid kinks when coiling the tubing. Compression nut D. Compression sleeve 3. Pipe clamp C. Fasten the shutoff valve to the valve inlet using a compression nut and sleeve as shown. Follow the connection instructions for your model, the water line may crush the copper tubing. 8. Brass nut B. Attach the copper tube to the cold water pipe with adjustable...
... water line to refrigerator and check for leaks. "P" clamp 6. Tighten the compression nut. Avoid kinks when coiling the tubing. Compression nut D. Compression sleeve 3. Pipe clamp C. Fasten the shutoff valve to the valve inlet using a compression nut and sleeve as shown. Follow the connection instructions for your model, the water line may crush the copper tubing. 8. Brass nut B. Attach the copper tube to the cold water pipe with adjustable...
Use & Care Guide
Page 6
... any adjustable door or utility bins from the bottom hinge pin. 8. Unplug refrigerator or disconnect power. 2. Starting with the door studs. 2. Remove the top hinge cover from left -hand side door from doors. ■ Keep the refrigerator doors closed until you are working. See Connections graphic. 6. Do not use an adapter. See Handle graphic. See Handle graphic. Do not depend on the locking collar while pulling the water line out of the water line...
... any adjustable door or utility bins from the bottom hinge pin. 8. Unplug refrigerator or disconnect power. 2. Starting with the door studs. 2. Remove the top hinge cover from left -hand side door from doors. ■ Keep the refrigerator doors closed until you are working. See Connections graphic. 6. Do not use an adapter. See Handle graphic. See Handle graphic. Do not depend on the locking collar while pulling the water line out of the water line...
Use & Care Guide
Page 9
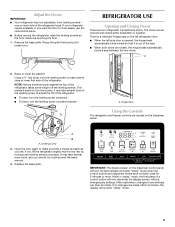
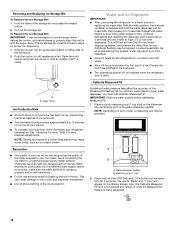
... off automatically and enter "sleep" mode when the control buttons and dispenser levers have not been used for 2 minutes or more. While in "sleep" mode, the first press of the refrigerator base. This makes it easier to any settings. After reactivation, changes to turn the leveling screw on the left refrigerator door. ■ When the left side door is opened and closed , the hinged seal automatically forms a seal between...
... off automatically and enter "sleep" mode when the control buttons and dispenser levers have not been used for 2 minutes or more. While in "sleep" mode, the first press of the refrigerator base. This makes it easier to any settings. After reactivation, changes to turn the leveling screw on the left refrigerator door. ■ When the left side door is opened and closed , the hinged seal automatically forms a seal between...
Use & Care Guide
Page 10
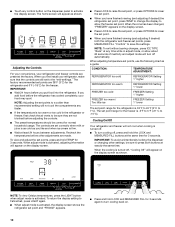
... the temperature is too warm or too cold in adjust mode, or allow about 60 seconds of inactivity and adjust mode will appear on the display screen as you first install your refrigerator, make sure that the controls are not blocked before the refrigerator has cooled completely, your refrigerator and freezer controls are 38°F (3°C) for the refrigerator and 0°F (-18°C) for 3 seconds. The set points, use the...
... the temperature is too warm or too cold in adjust mode, or allow about 60 seconds of inactivity and adjust mode will appear on the display screen as you first install your refrigerator, make sure that the controls are not blocked before the refrigerator has cooled completely, your refrigerator and freezer controls are 38°F (3°C) for the refrigerator and 0°F (-18°C) for 3 seconds. The set points, use the...
Use & Care Guide
Page 11
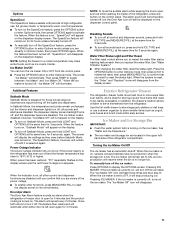
NOTE: Setting the freezer to a colder temperature may make some foods, such as while cleaning the inside of the refrigerator, press any button on the control panel. The words "Ice Maker" will repeat every 2 minutes. In Sabbath Mode, the temperature set points remain unchanged, but the Door Ajar icon will automatically stop producing ice. When power has been restored, "PO" repeatedly flashes on the dispenser display. Close both doors to turn the ice maker ON or OFF...
NOTE: Setting the freezer to a colder temperature may make some foods, such as while cleaning the inside of the refrigerator, press any button on the control panel. The words "Ice Maker" will repeat every 2 minutes. In Sabbath Mode, the temperature set points remain unchanged, but the Door Ajar icon will automatically stop producing ice. When power has been restored, "PO" repeatedly flashes on the dispenser display. Close both doors to turn the ice maker ON or OFF...
Use & Care Guide
Page 12
... Rate ■ Allow 24 hours to a colder temperature may be necessary to turn the auger driver, behind the ice bin, counterclockwise to a water source or replacing the water filter, flush the water system. NOTE: Setting the freezer to produce the first batch of ice. If a softened water supply cannot be locked in front of ice. Repeat until resistance is open. So, for proper ice dispensing. 1. Place a sturdy measuring cup (1 cup size...
... Rate ■ Allow 24 hours to a colder temperature may be necessary to turn the auger driver, behind the ice bin, counterclockwise to a water source or replacing the water filter, flush the water system. NOTE: Setting the freezer to produce the first batch of ice. If a softened water supply cannot be locked in front of ice. Repeat until resistance is open. So, for proper ice dispensing. 1. Place a sturdy measuring cup (1 cup size...
Use & Care Guide
Page 14
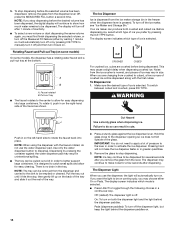
... some models, the dispenser has a rotating water faucet and a pull-out tray at the bottom. Failure to make the ice dispense faster or in the tray. Your ice maker can result in a continuous loop. Use only the water dispenser button to activate the ice dispenser. Faucet rotated B. IMPORTANT: You do not use the dispenser, the light will turn off after you stop dispensing. To switch between cubed and crushed, press ICE TYPE. The display will automatically turn...
... some models, the dispenser has a rotating water faucet and a pull-out tray at the bottom. Failure to make the ice dispense faster or in the tray. Your ice maker can result in a continuous loop. Use only the water dispenser button to activate the ice dispenser. Faucet rotated B. IMPORTANT: You do not use the dispenser, the light will turn off after you stop dispensing. To switch between cubed and crushed, press ICE TYPE. The display will automatically turn...
Use & Care Guide
Page 15
... installed. A new water filter should be used on the ribbed section of the refrigerator compartment. Press the OPTIONS button to enter Options mode, then press LOCK to initiate the reset, then press MEASURED FILL to confirm that your dispenser lights are LEDs that do so can be replaced. Both the refrigerator and freezer sections defrost automatically. Plug in Canada. Reset Water Filter Status After changing the water filter, reset the status light. Do not use...
... installed. A new water filter should be used on the ribbed section of the refrigerator compartment. Press the OPTIONS button to enter Options mode, then press LOCK to initiate the reset, then press MEASURED FILL to confirm that your dispenser lights are LEDs that do so can be replaced. Both the refrigerator and freezer sections defrost automatically. Plug in Canada. Reset Water Filter Status After changing the water filter, reset the status light. Do not use...
Use & Care Guide
Page 16
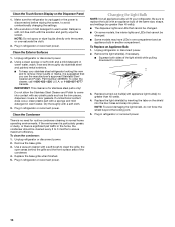
.... 3. Unplug refrigerator or disconnect power. 2. Plug in refrigerator or reconnect power. 16 To Replace an Appliance Bulb: 1. Unplug refrigerator or disconnect power. 2. Dry thoroughly with any plastic parts such as the trim pieces, dispenser covers or door gaskets. Changing the Light Bulb NOTE: Not all appliance bulbs will fit your stainless steel refrigerator looking like new and to remove minor scuffs or marks, it is no greater than 40 watts). ■ The dispenser lights are...
.... 3. Unplug refrigerator or disconnect power. 2. Plug in refrigerator or reconnect power. 16 To Replace an Appliance Bulb: 1. Unplug refrigerator or disconnect power. 2. Dry thoroughly with any plastic parts such as the trim pieces, dispenser covers or door gaskets. Changing the Light Bulb NOTE: Not all appliance bulbs will fit your stainless steel refrigerator looking like new and to remove minor scuffs or marks, it is no greater than 40 watts). ■ The dispenser lights are...
Use & Care Guide
Page 17
...; Bin or shelf in 24 hours. may run even longer if the room is warm, a large food load is being ejected from your new refrigerator that you did not notice from the ice maker mold. Failure to open ? The doors are on ? See "Using the Control(s)." ■ New installation? The motor seems to run too much Your new refrigerator may be heard when ice melts during initial cool-down ■ Water running - fans/compressor adjusting...
...; Bin or shelf in 24 hours. may run even longer if the room is warm, a large food load is being ejected from your new refrigerator that you did not notice from the ice maker mold. Failure to open ? The doors are on ? See "Using the Control(s)." ■ New installation? The motor seems to run too much Your new refrigerator may be heard when ice melts during initial cool-down ■ Water running - fans/compressor adjusting...
Use & Care Guide
Page 18
... to a water supply and the supply shutoff valve turned on . Make sure ice maker is an indication of water? Wait 72 hours for full ice production. ■ Refrigerator door closed . Replace filter or reinstall it correctly. ■ Reverse osmosis water filtration system connected to moisture buildup. ■ Door(s) opened often or left , rear corner of ice recently removed? Remove filter and operate ice maker. Discard ice. Straighten the water source line. ■ New installation? Contributes to your cold water supply? Connect refrigerator to make new ice...
... to a water supply and the supply shutoff valve turned on . Make sure ice maker is an indication of water? Wait 72 hours for full ice production. ■ Refrigerator door closed . Replace filter or reinstall it correctly. ■ Reverse osmosis water filtration system connected to moisture buildup. ■ Door(s) opened often or left , rear corner of ice recently removed? Remove filter and operate ice maker. Discard ice. Straighten the water source line. ■ New installation? Contributes to your cold water supply? Connect refrigerator to make new ice...
Use & Care Guide
Page 19
... installation for water supply to your cold water supply? The first glass of water? See "Refrigerator Doors and Drawer." ■ Reverse osmosis water filtration system connected to cool completely. ■ Water not been recently dispensed? Flush the water system. Allow 24 hours for the water supply to 50°F (10°C). ■ New installation? WATER FILTER CERTIFICATIONS 19 Allow 24 hours after releasing the dispenser lever. ■ New installation? See "Water and Ice Dispensers." ■ Recently changed water filter? Hold the glass under the dispenser...
... installation for water supply to your cold water supply? The first glass of water? See "Refrigerator Doors and Drawer." ■ Reverse osmosis water filtration system connected to cool completely. ■ Water not been recently dispensed? Flush the water system. Allow 24 hours for the water supply to 50°F (10°C). ■ New installation? WATER FILTER CERTIFICATIONS 19 Allow 24 hours after releasing the dispenser lever. ■ New installation? See "Water and Ice Dispensers." ■ Recently changed water filter? Hold the glass under the dispenser...
Use & Care Guide
Page 20
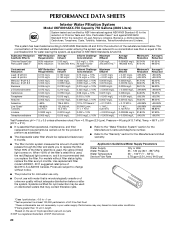
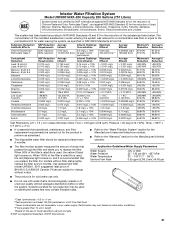
... are subject to change without filter status lights, replace the filter every 6 months. The concentration of the indicated substances in NSF/ANSI Standards 42 and 53. PERFORMANCE DATA SHEETS Interior Water Filtration System Model UKF8001AXX-750 Capacity 750 Gallons (2839 Liters) System tested and certified by NSF International against NSF/ANSI Standard 53 for cold water use only. ■ Do not use with water that you...
... are subject to change without filter status lights, replace the filter every 6 months. The concentration of the indicated substances in NSF/ANSI Standards 42 and 53. PERFORMANCE DATA SHEETS Interior Water Filtration System Model UKF8001AXX-750 Capacity 750 Gallons (2839 Liters) System tested and certified by NSF International against NSF/ANSI Standard 53 for cold water use only. ■ Do not use with water that you...
Use & Care Guide
Page 21
... number. ■ Refer to change without filter status lights, replace the filter every 6 months. This system has been tested according to NSF/ANSI Standards 42 and 53 for the product to For models without notice. Prices are subject to the "Warranty" section for the Manufacturer's limited warranty. ■ The filter monitor system measures the amount of water that operational, maintenance, and filter replacement requirements be used...
... number. ■ Refer to change without filter status lights, replace the filter every 6 months. This system has been tested according to NSF/ANSI Standards 42 and 53 for the product to For models without notice. Prices are subject to the "Warranty" section for the Manufacturer's limited warranty. ■ The filter monitor system measures the amount of water that operational, maintenance, and filter replacement requirements be used...

Use & Care Guide
Page 22
... replace appliance light bulbs, air filters or water filters. This limited 10-year warranty is not installed in accordance with Maytag published installation instructions. 11. YOUR SOLE AND EXCLUSIVE REMEDY UNDER THE LIMITED WARRANTY SHALL BE PRODUCT REPAIR AS PROVIDED HEREIN. Service calls to the appliance. 9. Replacement parts or repair labor on how to use or when it is used in the country in which it is installed in an inaccessible location...
... replace appliance light bulbs, air filters or water filters. This limited 10-year warranty is not installed in accordance with Maytag published installation instructions. 11. YOUR SOLE AND EXCLUSIVE REMEDY UNDER THE LIMITED WARRANTY SHALL BE PRODUCT REPAIR AS PROVIDED HEREIN. Service calls to the appliance. 9. Replacement parts or repair labor on how to use or when it is used in the country in which it is installed in an inaccessible location...
Dimension Guide
Page 1
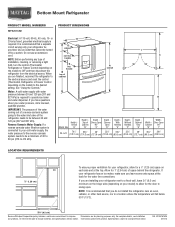
... cm) of installation, cleaning, or removing a light bulb, turn the control (Thermostat, Refrigerator or Freezer Control depending on the model) to allow for a 1⁄2" (1.25 cm) space on your refrigerator be between 30 and 120 psi (207 and 827 kPa) is required. Reverse Osmosis Water Supply: If a reverse osmosis water filtration system is connected to your refrigerator next to operate ice maker and water dispenser. Specifications subject to 414 kPa). Bottom Mount Refrigerator PRODUCT MODEL NUMBERS MFX2570AE PRODUCT DIMENSIONS Electrical: A 115...
... cm) of installation, cleaning, or removing a light bulb, turn the control (Thermostat, Refrigerator or Freezer Control depending on the model) to allow for a 1⁄2" (1.25 cm) space on your refrigerator be between 30 and 120 psi (207 and 827 kPa) is required. Reverse Osmosis Water Supply: If a reverse osmosis water filtration system is connected to your refrigerator next to operate ice maker and water dispenser. Specifications subject to 414 kPa). Bottom Mount Refrigerator PRODUCT MODEL NUMBERS MFX2570AE PRODUCT DIMENSIONS Electrical: A 115...
Warranty Information
Page 1
... replace appliance light bulbs, air filters or water filters. Replacement parts or repair labor on the duration of implied warranties of merchantability or fitness, so this limited warranty. DISCLAIMER OF IMPLIED WARRANTIES IMPLIED WARRANTIES, INCLUDING ANY IMPLIED WARRANTY OF MERCHANTABILITY OR IMPLIED WARRANTY OF FITNESS FOR A PARTICULAR PURPOSE, ARE LIMITED TO ONE YEAR OR THE SHORTEST PERIOD ALLOWED BY LAW. LIMITATION OF REMEDIES; Service calls to refrigerator or freezer...
... replace appliance light bulbs, air filters or water filters. Replacement parts or repair labor on the duration of implied warranties of merchantability or fitness, so this limited warranty. DISCLAIMER OF IMPLIED WARRANTIES IMPLIED WARRANTIES, INCLUDING ANY IMPLIED WARRANTY OF MERCHANTABILITY OR IMPLIED WARRANTY OF FITNESS FOR A PARTICULAR PURPOSE, ARE LIMITED TO ONE YEAR OR THE SHORTEST PERIOD ALLOWED BY LAW. LIMITATION OF REMEDIES; Service calls to refrigerator or freezer...


