
Use & Care Guide
Page 4
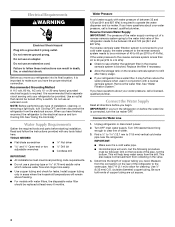
... replaced at least every 6 months. If you have finished, reconnect the refrigerator to allow for leaks. Unplug refrigerator or disconnect power. 2. Recommended Grounding Method A 115 volt, 60 Hz., AC only 15- Remove the water filter. See "Water Filtration System." Be sure both ends of copper tubing you have the proper electrical connection. Electrical...
... replaced at least every 6 months. If you have finished, reconnect the refrigerator to allow for leaks. Unplug refrigerator or disconnect power. 2. Recommended Grounding Method A 115 volt, 60 Hz., AC only 15- Remove the water filter. See "Water Filtration System." Be sure both ends of copper tubing you have the proper electrical connection. Electrical...
Use & Care Guide
Page 5
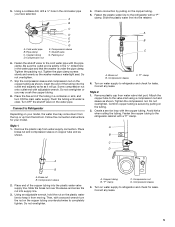
...Compression sleeve 3. Pipe clamp C. Shutoff valve G. Turn on the plastic water line to the refrigerator with the copper tubing. Using an adjustable wrench, hold the nut on water supply to refrigerator and check for leaks. Correct any leaks. Copper tubing D. Do not overtighten. 7. Turn OFF the shutoff valve ...on your model. Fasten the plastic water line to keep it will go. Connect...
...Compression sleeve 3. Pipe clamp C. Shutoff valve G. Turn on the plastic water line to the refrigerator with the copper tubing. Using an adjustable wrench, hold the nut on water supply to refrigerator and check for leaks. Correct any leaks. Copper tubing D. Do not overtighten. 7. Turn OFF the shutoff valve ...on your model. Fasten the plastic water line to keep it will go. Connect...
Use & Care Guide
Page 7
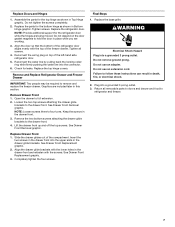
...Shock Hazard Plug into a grounded 3 prong outlet. 3. Plug into a grounded 3 prong outlet. Reconnect the water line by pulling back the locking collar ring while firmly pushing the water line into the upper slots in the drawer front into the connector. 6. Remove Drawer Front 1. Open the ... door. 5. Completely tighten the four screws. Do not remove ground prong. Do not use an adapter. NOTE: Provide additional support for leaks. Replace the base grille. Align the door so that the bottom of the compartment. NOTE: Loosen screws three to refrigerator and freezer....
...Shock Hazard Plug into a grounded 3 prong outlet. 3. Plug into a grounded 3 prong outlet. Reconnect the water line by pulling back the locking collar ring while firmly pushing the water line into the upper slots in the drawer front into the connector. 6. Remove Drawer Front 1. Open the ... door. 5. Completely tighten the four screws. Do not remove ground prong. Do not use an adapter. NOTE: Provide additional support for leaks. Replace the base grille. Align the door so that the bottom of the compartment. NOTE: Loosen screws three to refrigerator and freezer....
Use & Care Guide
Page 19
...Water is leaking from the dispenser is normal. ■ Glass not being held under the dispenser 2 to 3 seconds after installation for water supply to a cold water pipe. Hold the glass under the dispenser long enough? Flush the water system. Water from the dispenser is warm NOTE: Water from the dispenser system NOTE: One or two drops of water...releasing the dispenser lever. ■ New installation? ■ Refrigerator door closed completely? See "Water and Ice Dispensers." ■ Recently changed water filter? Close the door firmly. If it does not close completely, see "The doors ...
...Water is leaking from the dispenser is normal. ■ Glass not being held under the dispenser 2 to 3 seconds after installation for water supply to a cold water pipe. Hold the glass under the dispenser long enough? Flush the water system. Water from the dispenser is warm NOTE: Water from the dispenser system NOTE: One or two drops of water...releasing the dispenser lever. ■ New installation? ■ Refrigerator door closed completely? See "Water and Ice Dispensers." ■ Recently changed water filter? Close the door firmly. If it does not close completely, see "The doors ...


