
Installation Guide
Page 2
... "Electrical Requirements" section. ■ Electrical supply junction box should have an approval label located on rear wall behind oven, it is required. Tools needed ■ Phillips screwdriver ■ Measuring tape ■ Hand or electric drill (for wall cabinet installations) ■ 1" (2.5 cm) drill bit (for 30" models (76.2 cm). ■ Floor must be located...
... "Electrical Requirements" section. ■ Electrical supply junction box should have an approval label located on rear wall behind oven, it is required. Tools needed ■ Phillips screwdriver ■ Measuring tape ■ Hand or electric drill (for wall cabinet installations) ■ 1" (2.5 cm) drill bit (for 30" models (76.2 cm). ■ Floor must be located...
Installation Guide
Page 12
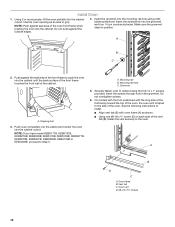
... vent securely to Step 5. A B C 2. Do not overtighten screws. 6. Insert the screwdriver into the cabinet cutout. A. Mounting rail hole C. Oven vent D. #8-18 x ³⁄₈" screws 12 NOTE: If you have model KEBK171B, KEBK101B, KEBK276B, KEBK206B, KEBS179B, KEBS109B, KEBS277B, KEBS279B...the screws through hole in position. A. A B D C A. Install Oven 1. Using 2 or more people, lift the oven partially into the cabinet until the back surface of the front frame touches the front wall of the front frame to cabinet using a flatblade screwdriver. Push against ...
... vent securely to Step 5. A B C 2. Do not overtighten screws. 6. Insert the screwdriver into the cabinet cutout. A. Mounting rail hole C. Oven vent D. #8-18 x ³⁄₈" screws 12 NOTE: If you have model KEBK171B, KEBK101B, KEBK276B, KEBK206B, KEBS179B, KEBS109B, KEBS277B, KEBS279B...the screws through hole in position. A. A B D C A. Install Oven 1. Using 2 or more people, lift the oven partially into the cabinet until the back surface of the front frame touches the front wall of the front frame to cabinet using a flatblade screwdriver. Push against ...
Use & Care Guide
Page 10
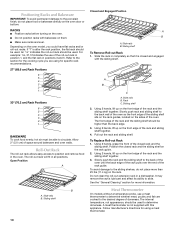
...and 5. The internal temperature, not appearance, should be used. RACKS ■ Position racks before turning on the oven. ■ Do not position racks with bakeware on them. ■ Make sure racks are cooked to the desired.... Roll-Out Rack The roll-out rack allows easy access to the back wall of the oven so the front edge of the sliding shelf sits on the rack guides, located on the ...front edge of the oven. The roll-out rack will fit in the oven. Using 2 hands, lift up on the front edge of space around bakeware and oven walls. Slowly push rack and sliding shelf to...
...and 5. The internal temperature, not appearance, should be used. RACKS ■ Position racks before turning on the oven. ■ Do not position racks with bakeware on them. ■ Make sure racks are cooked to the desired.... Roll-Out Rack The roll-out rack allows easy access to the back wall of the oven so the front edge of the sliding shelf sits on the rack guides, located on the ...front edge of the oven. The roll-out rack will fit in the oven. Using 2 hands, lift up on the front edge of space around bakeware and oven walls. Slowly push rack and sliding shelf to...


