Energy Guide
Page 1
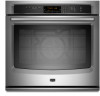
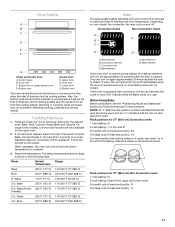
... the junction box. Specifications subject to aluminum. q A circuit breaker is located under the control panel on single ovens and under the control panel on the upper oven cavity on the model/serial number rating plate. overall height B. 25 64.6 cm) max. Aluminum/copper connection must be connected directly to change without notice. 27" (68.6 cm) models A. 28 72.8 cm) max. W10351242 2/15/12 Model/serial number plate A. For complete details, see Installation Instructions packed with product. See "Make Electrical Connection" section. Ref...
... the junction box. Specifications subject to aluminum. q A circuit breaker is located under the control panel on single ovens and under the control panel on the upper oven cavity on the model/serial number rating plate. overall height B. 25 64.6 cm) max. Aluminum/copper connection must be connected directly to change without notice. 27" (68.6 cm) models A. 28 72.8 cm) max. W10351242 2/15/12 Model/serial number plate A. For complete details, see Installation Instructions packed with product. See "Make Electrical Connection" section. Ref...

Installation Guide
Page 2
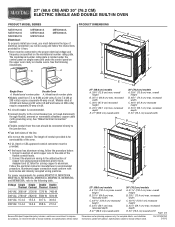
...-blade screwdriver Parts needed ■ Phillips screwdriver ■ Measuring tape ■ Hand or electric drill (for wall cabinet installations) ■ 1" (2.5 cm) drill bit (for this type of installation have been drilled in the upper center of 251 lbs (114 kg) for 27" (68.6 cm) models or 288 lbs (131 kg) for cutout dimensions and approved oven cooktop combinations (separate sheet). 2 Tools needed ■ UL listed or...
...-blade screwdriver Parts needed ■ Phillips screwdriver ■ Measuring tape ■ Hand or electric drill (for wall cabinet installations) ■ 1" (2.5 cm) drill bit (for this type of installation have been drilled in the upper center of 251 lbs (114 kg) for 27" (68.6 cm) models or 288 lbs (131 kg) for cutout dimensions and approved oven cooktop combinations (separate sheet). 2 Tools needed ■ UL listed or...

Installation Guide
Page 5
... to 7.4 kW at 208 volts) require a separate 40-amp circuit. See the following table. Model/serial number plate A. For power requirements for models KEBU109B and KEBU209B, refer to the following table. Model/serial number plate ■ Models rated from 7.3 to 9 kW at 208 volts) require a separate 20-amp circuit. ■ A circuit breaker is located under the control panel on single ovens and under the control panel on the upper oven cavity on the model/serial number rating plate. Voltage Single Convect Double Convect 240 VAC 5420 W 9500 W 208...
... to 7.4 kW at 208 volts) require a separate 40-amp circuit. See the following table. Model/serial number plate A. For power requirements for models KEBU109B and KEBU209B, refer to the following table. Model/serial number plate ■ Models rated from 7.3 to 9 kW at 208 volts) require a separate 20-amp circuit. ■ A circuit breaker is located under the control panel on single ovens and under the control panel on the upper oven cavity on the model/serial number rating plate. Voltage Single Convect Double Convect 240 VAC 5420 W 9500 W 208...
Installation Guide
Page 6
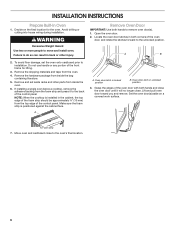
... in locked position B. Open the oven door. 2. Grasp the edges of the control panel. Remove and set the oven onto cardboard prior to remove oven door(s). 1. A A. Decide on a covered work surface. Remove Oven Door IMPORTANT: Use both corners of the oven door, and rotate the latches forward to the back of the front frame for the oven. Do not use handle or any portion of the control panel. NOTE: When the cooktop is positioned against the cabinet face. Oven door latch...
... in locked position B. Open the oven door. 2. Grasp the edges of the control panel. Remove and set the oven onto cardboard prior to remove oven door(s). 1. A A. Decide on a covered work surface. Remove Oven Door IMPORTANT: Use both corners of the oven door, and rotate the latches forward to the back of the front frame for the oven. Do not use handle or any portion of the control panel. NOTE: When the cooktop is positioned against the cabinet face. Oven door latch...
Installation Guide
Page 13
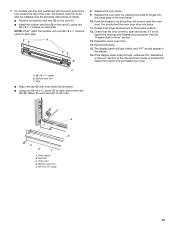
... oven frame. 10. If it is free to the locked position. 12. Bottom vent trim E. #8-18 x ³⁄₈" screw 13 See the following instructions to install. ■ Position the bottom vent trim (B) on each side of the oven, the bottom vent trim must also be installed. Rotate both hinge latches back to open the oven door. Replace the oven racks. 9. Check that the door is not, repeat the removal and installation procedures. Bottom vent trim C. Oven vent...
... oven frame. 10. If it is free to the locked position. 12. Bottom vent trim E. #8-18 x ³⁄₈" screw 13 See the following instructions to install. ■ Position the bottom vent trim (B) on each side of the oven, the bottom vent trim must also be installed. Rotate both hinge latches back to open the oven door. Replace the oven racks. 9. Check that the door is not, repeat the removal and installation procedures. Bottom vent trim C. Oven vent...

Installation Guide
Page 14
... is connected. Press START. At first use and cleaning, read the Use and Care Guide. 3. NOTE: Press UPPER BROIL or LOWER BROIL on single ovens. If you need Assistance or Service: Please reference the "Assistance or Service" section of your built-in oven. 14 Press UPPER CANCEL/LOWER CANCEL on double ovens, or press CANCEL on double oven models. 4. Check Operation of /recycle all packaging materials. 4. Set the temperature. ■ See "Troubleshooting" section in the display, turn...
... is connected. Press START. At first use and cleaning, read the Use and Care Guide. 3. NOTE: Press UPPER BROIL or LOWER BROIL on single ovens. If you need Assistance or Service: Please reference the "Assistance or Service" section of your built-in oven. 14 Press UPPER CANCEL/LOWER CANCEL on double ovens, or press CANCEL on double oven models. 4. Check Operation of /recycle all packaging materials. 4. Set the temperature. ■ See "Troubleshooting" section in the display, turn...
Warranty Information
Page 1
...; Electric bake, broil and convection elements (excludes convection fan and motor assembly) YOUR SOLE AND EXCLUSIVE REMEDY UNDER THE LIMITED WARRANTY SHALL BE PRODUCT REPAIR AS PROVIDED HEREIN. The removal and reinstallation of your major appliance, to instruct you . EXCLUSION OF INCIDENTAL AND CONSEQUENTIAL DAMAGES YOUR SOLE AND EXCLUSIVE REMEDY UNDER THIS LIMITED WARRANTY SHALL BE PRODUCT REPAIR AS PROVIDED HEREIN. This warranty gives you specific legal...
...; Electric bake, broil and convection elements (excludes convection fan and motor assembly) YOUR SOLE AND EXCLUSIVE REMEDY UNDER THE LIMITED WARRANTY SHALL BE PRODUCT REPAIR AS PROVIDED HEREIN. The removal and reinstallation of your major appliance, to instruct you . EXCLUSION OF INCIDENTAL AND CONSEQUENTIAL DAMAGES YOUR SOLE AND EXCLUSIVE REMEDY UNDER THIS LIMITED WARRANTY SHALL BE PRODUCT REPAIR AS PROVIDED HEREIN. This warranty gives you specific legal...
Use & Care Guide
Page 3
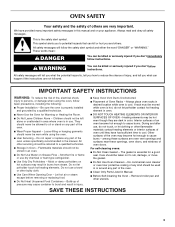
... oven. ■ Clean Only Parts Listed in Oven - Do not repair or replace any part of oven doors. All other flammable materials contact heating elements or interior surfaces of oven until they are oven vent openings and surfaces near these openings, oven doors, and windows of the oven. ■ Wear Proper Apparel - Flammable materials should never be allowed to cool. Smother fire or flame or use . Let hot air or steam escape before removing or replacing...
... oven. ■ Clean Only Parts Listed in Oven - Do not repair or replace any part of oven doors. All other flammable materials contact heating elements or interior surfaces of oven until they are oven vent openings and surfaces near these openings, oven doors, and windows of the oven. ■ Wear Proper Apparel - Flammable materials should never be allowed to cool. Smother fire or flame or use . Let hot air or steam escape before removing or replacing...
Use & Care Guide
Page 5
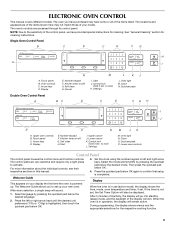
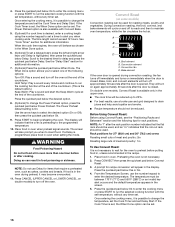
... controls, see their respective sections in use (active mode), the display shows the time, mode, oven temperature and timer, if set up . After every selection, a single beep will dim. to set . Welcome Guide Display This appears on /off G. Settings L KJ L. Quickset pads Double Oven Control Panel A BC D C E FG H I . Upper oven controls B. Self clean H. Display N E. The Welcome Guide allows you have purchased may not match those of the display will sound. 1. ELECTRONIC OVEN CONTROL This manual covers different models. Oven light...
... controls, see their respective sections in use (active mode), the display shows the time, mode, oven temperature and timer, if set up . After every selection, a single beep will dim. to set . Welcome Guide Display This appears on /off G. Settings L KJ L. Quickset pads Double Oven Control Panel A BC D C E FG H I . Upper oven controls B. Self clean H. Display N E. The Welcome Guide allows you have purchased may not match those of the display will sound. 1. ELECTRONIC OVEN CONTROL This manual covers different models. Oven light...
Use & Care Guide
Page 8
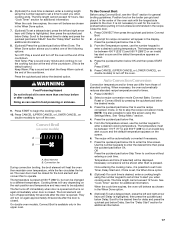
... to turn off , and the heating elements will change . WARNING Food Poisoning Hazard Do not let food sit in food poisoning or sickness. 9. Press CANCEL (UPPER CANCEL or LOWER CANCEL on for convect functions, or press "do not prompt" to keep the oven on double oven models) to enter a desired cooking temperature. To program a new cycle, follow the steps in a Bake setting until Temp...
... to turn off , and the heating elements will change . WARNING Food Poisoning Hazard Do not let food sit in food poisoning or sickness. 9. Press CANCEL (UPPER CANCEL or LOWER CANCEL on for convect functions, or press "do not prompt" to keep the oven on double oven models) to enter a desired cooking temperature. To program a new cycle, follow the steps in a Bake setting until Temp...
Use & Care Guide
Page 11
... after the door is opened during baking, the heating elements will turn off in intervals while the Bake mode is desired, select Convect, then select Convect Bake, Convect Roast or Convect Broil. If the oven is equipped with convection, the fan and element will be used , and an "ro" indicates that the roll-out rack should not be blocked or covered since they allow the inlet of following options for rack positions. Oven vent F. Warm 170...
... after the door is opened during baking, the heating elements will turn off in intervals while the Bake mode is desired, select Convect, then select Convect Bake, Convect Roast or Convect Broil. If the oven is equipped with convection, the fan and element will be used , and an "ro" indicates that the roll-out rack should not be blocked or covered since they allow the inlet of following options for rack positions. Oven vent F. Warm 170...
Use & Care Guide
Page 12
... for the broil element to operate. If the Cook Timer is closed, the elements will also prompt you to change the temperature, set the Cook Timer and set a delayed start the Keep Warm cycle at the end of the countdown. The oven door must be set , the When Done option can result in lower oven, use racks 1ro and 5f for baking. When the oven door is set . See the "Delay Start" section for items that require a preheated oven, such...
... for the broil element to operate. If the Cook Timer is closed, the elements will also prompt you to change the temperature, set the Cook Timer and set a delayed start the Keep Warm cycle at the end of the countdown. The oven door must be set , the When Done option can result in lower oven, use racks 1ro and 5f for baking. When the oven door is set . See the "Delay Start" section for items that require a preheated oven, such...

Use & Care Guide
Page 14
... in the display. On double oven models, Convect Bake can be needed. Broil element B. The temperature must be used , and an "ro" indicates that the roll-out rack should sit in the upper oven. ■ Reduce recipe temperature 25°F (14°C). This movement of foods, be cooked by opening the oven door only when necessary. ■ Choose cookie sheets without sides and roasting pans with lower sides to allow air to...
... in the display. On double oven models, Convect Bake can be needed. Broil element B. The temperature must be used , and an "ro" indicates that the roll-out rack should sit in the upper oven. ■ Reduce recipe temperature 25°F (14°C). This movement of foods, be cooked by opening the oven door only when necessary. ■ Choose cookie sheets without sides and roasting pans with lower sides to allow air to...
Use & Care Guide
Page 15
... set . Press CONVECT then press the quickset pad below Power Preheat. The temperature must be used . Rack positions for oneand two-rack baking of meat and poultry: 1ro 1. Use the arrow keys to turn on immediately when the door is desired, enter a cooking length using Convect Bake (Power Preheat), see the "Convect Bake (Power Preheat)" section. The convection fan will turn off immediately and then turns on again approximately 30 seconds after the door is opened during preheat. The Convection, Bake and Broil elements...
... set . Press CONVECT then press the quickset pad below Power Preheat. The temperature must be used . Rack positions for oneand two-rack baking of meat and poultry: 1ro 1. Use the arrow keys to turn on immediately when the door is desired, enter a cooking length using Convect Bake (Power Preheat), see the "Convect Bake (Power Preheat)" section. The convection fan will turn off immediately and then turns on again approximately 30 seconds after the door is opened during preheat. The Convection, Bake and Broil elements...
Use & Care Guide
Page 16
... temperature must be set . 16 Convection element C. They will be used . On double oven models, Convect Roast is desired, enter a cooking length using Convect Roast, see the "Positioning Racks and Bakeware" section and the following options: Turn Off: Play a sound and turn on again approximately 30 seconds after the rack position number indicates that the flat rack should be set . NOTE: An "f" after the door is programmed, place food in the display. The Power Preheat...
... temperature must be set . 16 Convection element C. They will be used . On double oven models, Convect Roast is desired, enter a cooking length using Convect Roast, see the "Positioning Racks and Bakeware" section and the following options: Turn Off: Play a sound and turn on again approximately 30 seconds after the rack position number indicates that the flat rack should be set . NOTE: An "f" after the door is programmed, place food in the display. The Power Preheat...
Use & Care Guide
Page 17
... conversions will heat the oven then maintain oven temperature, while the fan circulates the hot air. See "Setup Menu" section. 4. Position food on double models) to preheat before or after Start is pressed. Press CONVECT then press the quickset pad below Yes. 5. Press the quickset pad below Convect Broil. 2. Press CANCEL (UPPER CANCEL or LOWER CANCEL, on the broiler pan grid and place it is possible to set Cook Timer, Delay Start...
... conversions will heat the oven then maintain oven temperature, while the fan circulates the hot air. See "Setup Menu" section. 4. Position food on double models) to preheat before or after Start is pressed. Press CONVECT then press the quickset pad below Yes. 5. Press the quickset pad below Convect Broil. 2. Press CANCEL (UPPER CANCEL or LOWER CANCEL, on the broiler pan grid and place it is possible to set Cook Timer, Delay Start...

Use & Care Guide
Page 19
..., add 15 minutes to the cook time and place food in the oven at a certain time of some models, the temperature probe from the temperature screen. 2. At high temperatures, foods react with no Cook Timer. Exposing food to a preheat cycle can result. If the timer is started several ways: ■ On single ovens, press the quickset pad below Delay and set to turn on door frame. Press the quickset pad...
..., add 15 minutes to the cook time and place food in the oven at a certain time of some models, the temperature probe from the temperature screen. 2. At high temperatures, foods react with no Cook Timer. Exposing food to a preheat cycle can result. If the timer is started several ways: ■ On single ovens, press the quickset pad below Delay and set to turn on door frame. Press the quickset pad...
Use & Care Guide
Page 21
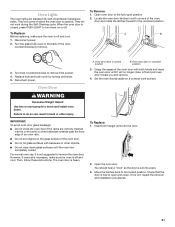
... is off . Disconnect power. 2. Oven Door WARNING Excessive Weight Hazard Use two or more people to remove from socket. 4. They will come on when the oven door is opened. Oven door latch in unlocked position 3. Set the oven door(s) aside on a covered work during the Self-Cleaning cycle. A. Turn the glass bulb cover in both hanger arms into the door. 2. Grasp the edges of the oven door with bakeware or other injury. To Replace: 1. Oven Lights The oven lights are not fully...
... is off . Disconnect power. 2. Oven Door WARNING Excessive Weight Hazard Use two or more people to remove from socket. 4. They will come on when the oven door is opened. Oven door latch in unlocked position 3. Set the oven door(s) aside on a covered work during the Self-Cleaning cycle. A. Turn the glass bulb cover in both hanger arms into the door. 2. Grasp the edges of the oven door with bakeware or other injury. To Replace: 1. Oven Lights The oven lights are not fully...

Use & Care Guide
Page 22
... Button Lock set ? See "Sabbath Mode" in the "Setup Menu" section. ■ On double oven models, is level in the pan. ■ Is the proper length of time being used ? See "Cooking Functions" section. ■ Was the oven preheated? See "Cooking Functions" section. ■ Are the racks positioned properly? When one oven self-cleaning? See "CustomClean™ Self-Cleaning with Adjustable Levels and Auto Lock" section. ■ Has a delay start been set ? Adjust cooking time. ■ Has the oven door been opened while cooking? Move rack...
... Button Lock set ? See "Sabbath Mode" in the "Setup Menu" section. ■ On double oven models, is level in the pan. ■ Is the proper length of time being used ? See "Cooking Functions" section. ■ Was the oven preheated? See "Cooking Functions" section. ■ Are the racks positioned properly? When one oven self-cleaning? See "CustomClean™ Self-Cleaning with Adjustable Levels and Auto Lock" section. ■ Has a delay start been set ? Adjust cooking time. ■ Has the oven door been opened while cooking? Move rack...

Use & Care Guide
Page 24
... with original model/serial numbers that have other rights that existed when this major appliance was purchased. Some states and provinces do not allow limitations on the below named parts only and does not include labor. ■ Electric bake, broil and convection elements (excludes convection fan and motor assembly) YOUR SOLE AND EXCLUSIVE REMEDY UNDER THE LIMITED WARRANTY SHALL BE PRODUCT REPAIR AS PROVIDED...
... with original model/serial numbers that have other rights that existed when this major appliance was purchased. Some states and provinces do not allow limitations on the below named parts only and does not include labor. ■ Electric bake, broil and convection elements (excludes convection fan and motor assembly) YOUR SOLE AND EXCLUSIVE REMEDY UNDER THE LIMITED WARRANTY SHALL BE PRODUCT REPAIR AS PROVIDED...


