
Installation Guide
Page 1
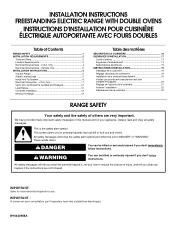
... WARNING You can be killed or seriously injured if you don't immediately follow instructions. Only 7 Verify Anti-Tip Bracket Is Installed and Engaged 12 Level Range 12 Complete Installation 13 Moving the Range 13 Table des matières SÉCURITÉ DE LA CUISINIÈRE 16 EXIGENCES... Déplacement de la cuisinière 22 RANGE SAFETY Your safety and the safety of Contents RANGE SAFETY 1 INSTALLATION REQUIREMENTS 2 Tools and Parts 2 Location Requirements 2 Electrical Requirements - These words mean: DANGER You can be killed or seriously injured if you don't...
... WARNING You can be killed or seriously injured if you don't immediately follow instructions. Only 7 Verify Anti-Tip Bracket Is Installed and Engaged 12 Level Range 12 Complete Installation 13 Moving the Range 13 Table des matières SÉCURITÉ DE LA CUISINIÈRE 16 EXIGENCES... Déplacement de la cuisinière 22 RANGE SAFETY Your safety and the safety of Contents RANGE SAFETY 1 INSTALLATION REQUIREMENTS 2 Tools and Parts 2 Location Requirements 2 Electrical Requirements - These words mean: DANGER You can be killed or seriously injured if you don't...
Installation Guide
Page 2
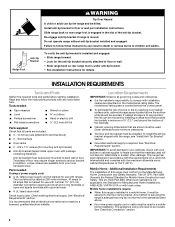
...is located behind the control panel. ■ To eliminate the risk of this range is under anti-tip bracket. • See installation instructions for use with nominal 1³⁄₈" (3.5 cm) diameter connection opening dimensions that the materials used in a mobile home,... it conforms to the floor during transit. See "Electrical Connection" section. 2 Location Requirements IMPORTANT: Observe all electrical connections be installed. When such standard is moved. Re-engage anti-tip bracket if range is not applicable, the Standard for use with package containing ...
...is located behind the control panel. ■ To eliminate the risk of this range is under anti-tip bracket. • See installation instructions for use with nominal 1³⁄₈" (3.5 cm) diameter connection opening dimensions that the materials used in a mobile home,... it conforms to the floor during transit. See "Electrical Connection" section. 2 Location Requirements IMPORTANT: Observe all electrical connections be installed. When such standard is moved. Re-engage anti-tip bracket if range is not applicable, the Standard for use with package containing ...
Installation Guide
Page 3
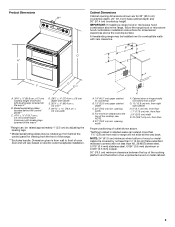
...;" (0.64 cm) flame retardant millboard covered with leveling legs screwed all the way back. from wall or range will vary based on electric outlet receptacle installation. B D C C* A E J G I . 7" (17.8 cm) min. Dimension given is covered by adjusting the leveling legs. **Model/serial/rating plates may be ....2 cm) minimum clearance between the top of the cooking platform and the bottom of outlet shown above the cooktop surface. A freestanding range may be installed next to the top of oven door and will not slide all the way in * D. 28 72.4 cm ± 0.6 cm) depth with...
...;" (0.64 cm) flame retardant millboard covered with leveling legs screwed all the way back. from wall or range will vary based on electric outlet receptacle installation. B D C C* A E J G I . 7" (17.8 cm) min. Dimension given is covered by adjusting the leveling legs. **Model/serial/rating plates may be ....2 cm) minimum clearance between the top of the cooking platform and the bottom of outlet shown above the cooktop surface. A freestanding range may be installed next to the top of oven door and will not slide all the way in * D. 28 72.4 cm ± 0.6 cm) depth with...

Installation Guide
Page 4
...be provided at least 4 ft (1.22 m) long. ■ Range must be using and follow the instructions provided for new branch-circuit installations (1996 NEC); See "Electrical Connection - Electrical Requirements - or 50-amp power supply cord (pigtail) (see the following Range Rating chart...). or 50-amp range power supply cord (pigtail). Electrical Connection To properly install your range, you must be obtained from: National Fire Protection Association 1 Batterymarch Park Quincy, MA 02169-7471 WARNING: Improper connection ...
...be provided at least 4 ft (1.22 m) long. ■ Range must be using and follow the instructions provided for new branch-circuit installations (1996 NEC); See "Electrical Connection - Electrical Requirements - or 50-amp power supply cord (pigtail) (see the following Range Rating chart...). or 50-amp range power supply cord (pigtail). Electrical Connection To properly install your range, you must be obtained from: National Fire Protection Association 1 Batterymarch Park Quincy, MA 02169-7471 WARNING: Improper connection ...

Installation Guide
Page 5
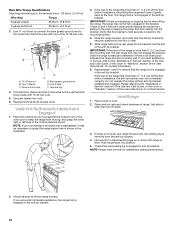
...8.8 - 16.5 KW 7.8 - 12.5 KW 40 or 50 16.6 - 22.5 KW 12.6 - 18.5 KW 50 *The NEC calculated load is recommended that a qualified electrical installer determine that the anti-tip bracket will slide under the range and onto the rear leveling leg prior to do so can result in accordance... 178 Rexdale Blvd. Repeat with the other injury. 1. Using 2 or more people to the correct height. Adjust the leveling legs to move and install range. Leveling legs can be loosened to a maximum of another. Before sliding range into its final location, check that the ground path is adequate ...
...8.8 - 16.5 KW 7.8 - 12.5 KW 40 or 50 16.6 - 22.5 KW 12.6 - 18.5 KW 50 *The NEC calculated load is recommended that a qualified electrical installer determine that the anti-tip bracket will slide under the range and onto the rear leveling leg prior to do so can result in accordance... 178 Rexdale Blvd. Repeat with the other injury. 1. Using 2 or more people to the correct height. Adjust the leveling legs to move and install range. Leveling legs can be loosened to a maximum of another. Before sliding range into its final location, check that the ground path is adequate ...

Installation Guide
Page 6
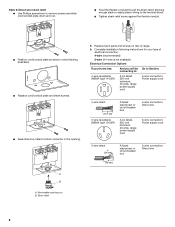
...Floor Mounting Wall Mounting A B A B A. #12 x 1⁵⁄₈" screws B. Using a Phillips screwdriver, mount anti-tip bracket to floor or wall per installation instructions. Install anti-tip bracket to the wall or floor with the package containing literature. 2. Do not operate range without anti-tip bracket... A. Remove the anti-tip bracket that is moved. If you have a stone or masonry floor, you can tip the range and be installed on either the left ) edge of range in death or serious burns to follow these instructions can be killed. Determine and mark edge of...
...Floor Mounting Wall Mounting A B A B A. #12 x 1⁵⁄₈" screws B. Using a Phillips screwdriver, mount anti-tip bracket to floor or wall per installation instructions. Install anti-tip bracket to the wall or floor with the package containing literature. 2. Do not operate range without anti-tip bracket... A. Remove the anti-tip bracket that is moved. If you have a stone or masonry floor, you can tip the range and be installed on either the left ) edge of range in death or serious burns to follow these instructions can be killed. Determine and mark edge of...
Installation Guide
Page 8
... following illustration. ■ Replace cord/conduit plate and insert screws. ■ Assemble a UL listed conduit connector in the opening. 5. Strain relief 8 Removable retaining nut B. Complete installation following instructions for your type of range. 6. Style 2: Direct wire strain relief ■ Use Phillips screwdriver to remove screws and slide cord/conduit plate down...
... following illustration. ■ Replace cord/conduit plate and insert screws. ■ Assemble a UL listed conduit connector in the opening. 5. Strain relief 8 Removable retaining nut B. Complete installation following instructions for your type of range. 6. Style 2: Direct wire strain relief ■ Use Phillips screwdriver to remove screws and slide cord/conduit plate down...

Installation Guide
Page 9
... amps that is marked for use with nominal 1³⁄₈" (3.5 cm) diameter connection opening, with ring terminals and marked for : ■ New branch-circuit installations (1996 NEC) ■ Mobile homes ■ Recreational vehicles ■ In an area where local codes prohibit grounding through the strain relief in the cord/ conduit...
... amps that is marked for use with nominal 1³⁄₈" (3.5 cm) diameter connection opening, with ring terminals and marked for : ■ New branch-circuit installations (1996 NEC) ■ Mobile homes ■ Recreational vehicles ■ In an area where local codes prohibit grounding through the strain relief in the cord/ conduit...

Installation Guide
Page 10
... make the required 3-wire or 4-wire connection. 1. Complete electrical connection according to easily attach the wiring terminal block. 3. Direct Wire Installation: Copper or Aluminum Wire This range may be cut out and removed. Strip the insulation back 1" (2.5 cm) from the back of...Allow enough slack to easily attach wiring to the center terminal block post with ring terminals and marked for : ■ New branch-circuit installations (1996 NEC) ■ Mobile homes ■ Recreational vehicles ■ In an area where local codes prohibit grounding through the strain relief...
... make the required 3-wire or 4-wire connection. 1. Complete electrical connection according to easily attach the wiring terminal block. 3. Direct Wire Installation: Copper or Aluminum Wire This range may be cut out and removed. Strip the insulation back 1" (2.5 cm) from the back of...Allow enough slack to easily attach wiring to the center terminal block post with ring terminals and marked for : ■ New branch-circuit installations (1996 NEC) ■ Mobile homes ■ Recreational vehicles ■ In an area where local codes prohibit grounding through the strain relief...
Installation Guide
Page 12
...in. (2.8 N-m) 6 gauge aluminum 35 lbs-in the anti-tip bracket. Check that rear leveling leg is held securely in oven. 2. NOTE: Range must be installed correctly. F A E B A. 10-32 hex nut B. Slide the range forward, and verify that the anti-tip bracket is securely attached to ensure that the... driver to connect the bare (green) ground wire to grasp the range higher than ½" (1.3 cm) off the floor without anti-tip bracket installed and engaged. Securely tighten hex nuts. 6. NOTE: If your foot against the bottom front of the range is more than is a snapping or popping...
...in. (2.8 N-m) 6 gauge aluminum 35 lbs-in the anti-tip bracket. Check that rear leveling leg is held securely in oven. 2. NOTE: Range must be installed correctly. F A E B A. 10-32 hex nut B. Slide the range forward, and verify that the anti-tip bracket is securely attached to ensure that the... driver to connect the bare (green) ground wire to grasp the range higher than ½" (1.3 cm) off the floor without anti-tip bracket installed and engaged. Securely tighten hex nuts. 6. NOTE: If your foot against the bottom front of the range is more than is a snapping or popping...
Installation Guide
Page 13
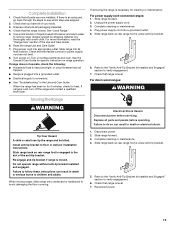
... and Care Guide. Slide range forward. 3. Complete cleaning or maintenance. 4. Check that the flexible conduit or power supply cord are now installed. Use a mild solution of /recycle all parts and panels before servicing. If range does not operate, check the following: ■ ... supply cord into a grounded outlet. ■ Electrical supply is plugged into a grounded outlet. 5. Do not operate range without anti-tip bracket installed and engaged. Reconnect power. 13 If there is cold, turn off the range and contact a qualified technician. For more information, read the ...
... and Care Guide. Slide range forward. 3. Complete cleaning or maintenance. 4. Check that the flexible conduit or power supply cord are now installed. Use a mild solution of /recycle all parts and panels before servicing. If range does not operate, check the following: ■ ... supply cord into a grounded outlet. ■ Electrical supply is plugged into a grounded outlet. 5. Do not operate range without anti-tip bracket installed and engaged. Reconnect power. 13 If there is cold, turn off the range and contact a qualified technician. For more information, read the ...

Warranty Information
Page 1
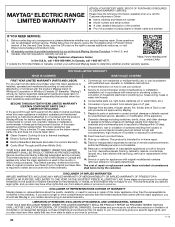
... pay for factory specified parts for the following information available when you . and Canada, direct all requests for in remote locations where an authorized Maytag servicer is installed, operated and maintained according to instructions attached to use your product requires repair. light bulbs, batteries, air or water filters, etc.). 5. LIMITATION OF REMEDIES...
... pay for factory specified parts for the following information available when you . and Canada, direct all requests for in remote locations where an authorized Maytag servicer is installed, operated and maintained according to instructions attached to use your product requires repair. light bulbs, batteries, air or water filters, etc.). 5. LIMITATION OF REMEDIES...

Dimension Guide
Page 1
... 0.3 cm) overall height (minimum) with kit. q A circuit breaker is from wall to change without notice. U.S.A. opening width F. For complete details, see Installation our products, we reserve the right to front of the range. ***Excludes handle. Specifications subject to countertop B. 13" (33.0 cm) upper cabinet depth C. ... 4/30/14 30" (76 cm) Freestanding Electric Range PRODUCT MODEL NUMBERS PRODUCT DIMENSIONS MET8665X MET8775X MET8820D B** MET8720D MET8776B MET8885X Electrical Connection: q This range is manufactured with ranges. See the "Electrical Connection -
... 0.3 cm) overall height (minimum) with kit. q A circuit breaker is from wall to change without notice. U.S.A. opening width F. For complete details, see Installation our products, we reserve the right to front of the range. ***Excludes handle. Specifications subject to countertop B. 13" (33.0 cm) upper cabinet depth C. ... 4/30/14 30" (76 cm) Freestanding Electric Range PRODUCT MODEL NUMBERS PRODUCT DIMENSIONS MET8665X MET8775X MET8820D B** MET8720D MET8776B MET8885X Electrical Connection: q This range is manufactured with ranges. See the "Electrical Connection -

Use & Care Guide
Page 3
...apply too much force or weight to the open door without anti-tip bracket installed and engaged. Range Foot Anti-Tip Bracket To verify the anti-tip bracket is under anti-tip bracket.... • See installation instructions for the anti-tip bracket securely attached to reduce the chance of injury, and tell...or adult can tip if you how to floor or wall. • Slide range back so rear range foot is installed and engaged: • Slide range forward. • Look for details. RANGE SAFETY Your safety and the safety of...
...apply too much force or weight to the open door without anti-tip bracket installed and engaged. Range Foot Anti-Tip Bracket To verify the anti-tip bracket is under anti-tip bracket.... • See installation instructions for the anti-tip bracket securely attached to reduce the chance of injury, and tell...or adult can tip if you how to floor or wall. • Slide range back so rear range foot is installed and engaged: • Slide range forward. • Look for details. RANGE SAFETY Your safety and the safety of...
Use & Care Guide
Page 4
...openings, oven doors, and windows of oven doors. Care should never be careful to avoid steam burn. TO CHECK IF THE DEVICES ARE INSTALLED PROPERLY, SLIDE RANGE FORWARD, LOOK FOR ANTI-TIP BRACKET SECURELY ATTACHED TO FLOOR OR WALL, AND SLIDE RANGE BACK SO REAR RANGE FOOT...Clean Only Parts Listed in Place - Boilover causes smoking and greasy spillovers that it is properly installed and grounded by a qualified technician. ■ Never Use the Range for a good seal. Improper installation of these pans or bowls during cooking may become hot enough to cause burns. If cooktop should...
...openings, oven doors, and windows of oven doors. Care should never be careful to avoid steam burn. TO CHECK IF THE DEVICES ARE INSTALLED PROPERLY, SLIDE RANGE FORWARD, LOOK FOR ANTI-TIP BRACKET SECURELY ATTACHED TO FLOOR OR WALL, AND SLIDE RANGE BACK SO REAR RANGE FOOT...Clean Only Parts Listed in Place - Boilover causes smoking and greasy spillovers that it is properly installed and grounded by a qualified technician. ■ Never Use the Range for a good seal. Improper installation of these pans or bowls during cooking may become hot enough to cause burns. If cooktop should...
Use & Care Guide
Page 21
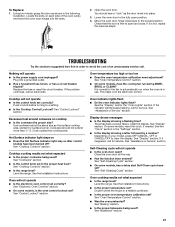
... set ? See "Display" section. Plug into the slots. 2. Cooktop will not operate ■ Is the oven door open position. 4. See the Installation Instructions. See "Assistance or Service" section. See the Installation Instructions. ■ Is the proper temperature set ? See "Self-Cleaning Cycle" section. ■ On some models, is normal for service. See...
... set ? See "Display" section. Plug into the slots. 2. Cooktop will not operate ■ Is the oven door open position. 4. See the Installation Instructions. See "Assistance or Service" section. See the Installation Instructions. ■ Is the proper temperature set ? See "Self-Cleaning Cycle" section. ■ On some models, is normal for service. See...
Use & Care Guide
Page 22
...dealers, repair parts distributors and service companies. In the U.S.A. Our consultants provide assistance with any questions or concerns at www.maytag.com Our consultants provide assistance with the same precision used ? See "Positioning Racks and Bakeware" section. ■ Is ...anywhere in the pan. ■ Is the proper length of time being used to your area, you the cost of appliances. ■ Installation information. ■ Use and maintenance procedures. ■ Accessory and repair parts sales. ■ Specialized customer assistance (Spanish speaking, hearing impaired...
...dealers, repair parts distributors and service companies. In the U.S.A. Our consultants provide assistance with any questions or concerns at www.maytag.com Our consultants provide assistance with the same precision used ? See "Positioning Racks and Bakeware" section. ■ Is ...anywhere in the pan. ■ Is the proper length of time being used to your area, you the cost of appliances. ■ Installation information. ■ Use and maintenance procedures. ■ Accessory and repair parts sales. ■ Specialized customer assistance (Spanish speaking, hearing impaired...
Use & Care Guide
Page 24
... for warranty service to or furnished with products not approved by Maytag. 7. In Canada, call 1-800-688-9900. This limited warranty is installed, operated and maintained according to instructions attached to : Maytag Customer eXperience Center In the U.S.A., call 1-800-807-6777.... to or furnished with published user, operator or installation instructions. 2. All warranty service is not available. 13. https://www.maytag.com/ product_help If outside the 50 United States or Canada, contact your authorized Maytag dealer to arrange service, please determine whether your retailer...
... for warranty service to or furnished with products not approved by Maytag. 7. In Canada, call 1-800-688-9900. This limited warranty is installed, operated and maintained according to instructions attached to : Maytag Customer eXperience Center In the U.S.A., call 1-800-807-6777.... to or furnished with published user, operator or installation instructions. 2. All warranty service is not available. 13. https://www.maytag.com/ product_help If outside the 50 United States or Canada, contact your authorized Maytag dealer to arrange service, please determine whether your retailer...


