Maytag MGR8674AS Support and Manuals
Get Help and Manuals for this Maytag item
View All Support Options Below
Free Maytag MGR8674AS manuals!
Problems with Maytag MGR8674AS?
Ask a Question
Free Maytag MGR8674AS manuals!
Problems with Maytag MGR8674AS?
Ask a Question
Popular Maytag MGR8674AS Manual Pages
Use & Care Guide - Page 4

... settings.
1. Refer to set the time of the items listed. The oven light will turn the light on when the oven door is not pressed within 5 seconds, "PUSH" appears in 5° increments between 170°F and 500°F (75°C and 260°C). 3. If Start is opened.
Press CANCEL when finished.
4 FEATURE GUIDE
This manual covers several models...
Use & Care Guide - Page 5
... lockout
INSTRUCTIONS
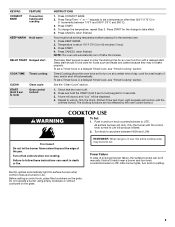
1. The cooktop functions are turned to LITE.
Before setting a control knob, place filled cookware on the grate.
5 Press Temp/Time "+" or "-" keypads to set a Timed Cook or a Delayed Timed Cook, see "Timed Cooking" section. Press START for an oven function with the
controls locked.
Press CANCEL when finished.
Repeat to setting. REMEMBER: When range is...
Use & Care Guide - Page 10
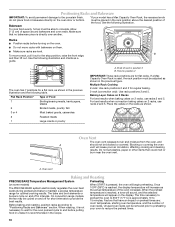
... prior to preheating your model has a Max Capacity Oven Rack, the recessed ends must be blocked or covered. Use the following illustration and charts as a
guide.
7
6 5 4 3
2 1
The oven has 7 positions for optimal...and then lift out. Do not set plastics, paper or other items that have an impact on the display. When roasting, it is pressed, the oven will cause poor air circulation, ...
Use & Care Guide - Page 13

... racks that storage drawer is a standard 40-watt appliance bulb.
Do not use . Unplug range or disconnect power.
4. In Canada, reference the Customer Service section at www.maytag.com. These spills may affect the finish. CONTROL PANEL AND OVEN DOOR EXTERIOR
STAINLESS STEEL (on cleaning products.
STORAGE DRAWER
PORCELAIN-COATED GRATES AND CAPS
Food...
Use & Care Guide - Page 14

... of the pan. See the Installation Instructions. www.maytag.com
In Canada, reference the Customer Service section at www.maytag.ca
WARNING
Electrical Shock Hazard Plug into a grounded 3 prong outlet. Do not use an extension cord. See "Sealed Surface Burners" section. Level the range. If the problem continues, call . Contact a trained repair specialist or see cover for 3 seconds...
Use & Care Guide - Page 15

... service.
See the "Accessories" and "Clean Cycle" sections for contact information. Then use a cloth soaked with water to higher position in longer cooking times. Mineral deposits will start running approximately 5 minutes into the cycle. See the Installation Instructions. To remove deposits, use a cloth dampened with vinegar. Level the range.
Adjust cooking time. Oven...
Use & Care Guide - Page 16

... Rack Oven Rack Order Part Number W10289145
Porcelain Broiler Pan and Grid Order Part Number 4396923
Premium Broiler Pan and Roasting Rack Order Part Number W10123240 www.maytag.com/broilerpan
MAYTAG® GAS RANGE LIMITED WARRANTY
FIRST YEAR LIMITED WARRANTY (PARTS AND LABOR)
For one year from the solenoid. These are some models).
This is normal.
Noises PROBLEM Surface burner...
Installation Guide - Page 4

... Product Dimensions
■ Recessed installations must conform with local codes. When such standard is required. In Canada, the installation of the oven door. Model/serial rating plate (located on ...HUD Part 280). F
BC
■ Proper gas supply connection must be secured according to the instructions in the "Level Range" section. The model/serial rating plate is the installer's ...
Installation Guide - Page 6

... gas company personnel, and authorized service personnel. This valve should be in death, explosion, or fire.
■ A ½" (1.3 cm) male pipe thread is needed for use with a manual shutoff valve. The valve is for turning on the model/serial rating plate for connection to the female pipe threads of the range must be equipped with Natural gas...
Installation Guide - Page 7
...
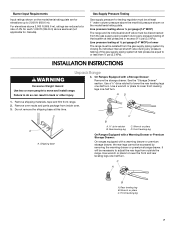
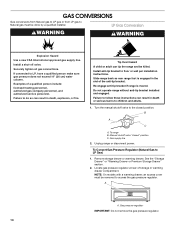
Gas supply pressure for Canada). INSTALLATION INSTRUCTIONS
Unpack Range
WARNING
Excessive Weight Hazard Use two or more people to adjust the rear legs from the gas supply piping system during any pressure testing of that system at this time.
Failure to lower front leveling legs one -half turn . A
A. Remove shipping materials, tape and film from inside oven...
Installation Guide - Page 14
Do not operate range without anti-tip bracket installed and engaged. Manual shutoff valve "closed position. Gas supply line
2. Remove storage drawer or warming drawer.
Install a shut-off valve.
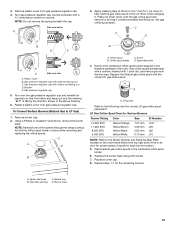
Turn the manual shutoff valve to LP, have a qualified person make sure gas pressure does not exceed 14" (36 cm) water column. To range B.
NOTE: On models with a warming drawer, an ...
Installation Guide - Page 15
... by turning it . Plastic cover B. Gas pressure regulator cap with 1 color dot, and have a groove in place while removing and replacing the orifice spuds. Replace plastic cover over the gas pressure regulator cap and reinstall on the oven frame behind the top right side of the oven door for proper sizing of the screws through the range cooktop to the Model...
Installation Guide - Page 16
... burner B. Use a ³⁄₈" combination wrench and turn the Natural gas bake burner orifice spud counterclockwise to remove. Orifice spud
16
A. Replace the oven racks. Remove the screw from the bake burner. 5. NOTE: The broil burner will hang in the rear of the bake burner off the oven orifice, and set it aside on a covered surface. Lift the back of...
Installation Guide - Page 17

... the burner
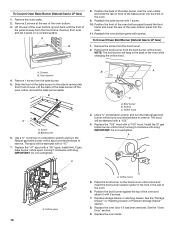
base. Slide range back so rear range foot is facing the direction shown in place while removing and replacing the orifice spuds.
Side view before
A
LP
Tip Over Hazard A child or adult can result in the "Installation Instructions" section of storage or warming drawer compartment. Gas supply line
2. Replace plastic cover over the gas pressure regulator cap and...
Installation Guide - Page 18

...the front of oven. Replace the "56" spud with a number on a covered surface. Install the Natural gas bake burner orifice spud, turning it . A
A. A. Use a ³⁄₈" nut driver or combination wrench and turn the LP gas bake burner orifice spud counterclockwise to remove tab
from the bake burner. 5. Press nut driver down onto the gas orifice spud and remove by turning it aside on...
Maytag MGR8674AS Reviews
We have not received any reviews for Maytag yet.