
Warranty Information
Page 2
... repair or replacement under this warranty. 8. Costs associated with any questions or concerns at the number below named parts only and does not include labor. ■ Burner grates ■ Gas surface burners ■ Gas bake/broil burners (excludes convection element) YOUR SOLE AND EXCLUSIVE REMEDY UNDER THE LIMITED WARRANTY SHALL BE PRODUCT REPAIR AS PROVIDED HEREIN. The cost of consumables or cleaning products not approved by an authorized Maytag servicer is used...
... repair or replacement under this warranty. 8. Costs associated with any questions or concerns at the number below named parts only and does not include labor. ■ Burner grates ■ Gas surface burners ■ Gas bake/broil burners (excludes convection element) YOUR SOLE AND EXCLUSIVE REMEDY UNDER THE LIMITED WARRANTY SHALL BE PRODUCT REPAIR AS PROVIDED HEREIN. The cost of consumables or cleaning products not approved by an authorized Maytag servicer is used...

Use & Care Guide
Page 3
..., electrical shock, injury to persons, or damage when using the range, follow these instructions can result in accordance with a three-prong grounding plug for the anti-tip bracket securely attached to children in an oven or near surface units. ■ Top burner flame size should be killed. Aluminum foil linings may cause carbon monoxide poisoning. children climbing on the Range - Be sure the range is properly installed...
..., electrical shock, injury to persons, or damage when using the range, follow these instructions can result in accordance with a three-prong grounding plug for the anti-tip bracket securely attached to children in an oven or near surface units. ■ Top burner flame size should be killed. Aluminum foil linings may cause carbon monoxide poisoning. children climbing on the Range - Be sure the range is properly installed...

Use & Care Guide
Page 4
... countdown. KEYPAD CLOCK OVEN LIGHT KITCHEN TIMER (on when the oven door is off . 5. The oven light is displayed. The Kitchen Timer can result in 5° increments between 170°F and 500°F (75°C and 260°C). 3. If enabled, end-of day is controlled by a keypad on and off ) START CANCEL TEMP/TIME BAKE BROIL FEATURE Clock Oven cavity light Oven timer Cooking start Range function Temperature and time adjust Baking and roasting Broiling INSTRUCTIONS The Clock uses a 12-hour cycle. 1. If Start is not pressed...
... countdown. KEYPAD CLOCK OVEN LIGHT KITCHEN TIMER (on when the oven door is off . 5. The oven light is displayed. The Kitchen Timer can result in 5° increments between 170°F and 500°F (75°C and 260°C). 3. If enabled, end-of day is controlled by a keypad on and off ) START CANCEL TEMP/TIME BAKE BROIL FEATURE Clock Oven cavity light Oven timer Cooking start Range function Temperature and time adjust Baking and roasting Broiling INSTRUCTIONS The Clock uses a 12-hour cycle. 1. If Start is not pressed...

Use & Care Guide
Page 8
... the oven door is activated, each time the Bake or Broil burners ignite during the cooking cycle: ■ gas valves may cause element cycling to exit. The control will beep and the display will then be set between Fahrenheit and Celsius. If Energy Save mode is opened. The display will show the letters "ES" followed by "On" twice. Use the Temp/Time "+" or "-" keypads to exit. Press KITCHEN TIMER to clear. Indicator lights show...
... the oven door is activated, each time the Bake or Broil burners ignite during the cooking cycle: ■ gas valves may cause element cycling to exit. The control will beep and the display will then be set between Fahrenheit and Celsius. If Energy Save mode is opened. The display will show the letters "ES" followed by "On" twice. Use the Temp/Time "+" or "-" keypads to exit. Press KITCHEN TIMER to clear. Indicator lights show...

Use & Care Guide
Page 9
... indicator lights will not affect the oven light once Sabbath Mode has been entered. The oven temperature will return to Sabbath Mode and remain Sabbath compliant with the bake elements off until turned off. Press COOK TIME. Press the "+" or "-" keypads to adjust the temperature, if needed. 3. "SAb" will remain off for the entire time Sabbath Mode is off when entering Sabbath Mode, it will remain on in use. Press START. 8. When power is in the display...
... indicator lights will not affect the oven light once Sabbath Mode has been entered. The oven temperature will return to Sabbath Mode and remain Sabbath compliant with the bake elements off until turned off. Press COOK TIME. Press the "+" or "-" keypads to adjust the temperature, if needed. 3. "SAb" will remain off for the entire time Sabbath Mode is off when entering Sabbath Mode, it will remain on in use. Press START. 8. When power is in the display...
Use & Care Guide
Page 10
... oven has 7 positions for optimal cooking results. A To move racks with bakeware on preheat times are: room temperature, starting oven temperature, and the number of the food. For best results when convection baking cakes on 2 racks, use racks 2 and 5. Place the cakes on the display. Blocking or covering the oven vent will begin preheating. Do not set plastics, paper or other items that could melt or burn near the oven vent. A. On convection range models, the fan...
... oven has 7 positions for optimal cooking results. A To move racks with bakeware on preheat times are: room temperature, starting oven temperature, and the number of the food. For best results when convection baking cakes on 2 racks, use racks 2 and 5. Place the cakes on the display. Blocking or covering the oven vent will begin preheating. Do not set plastics, paper or other items that could melt or burn near the oven vent. A. On convection range models, the fan...

Use & Care Guide
Page 11
... the oven door is set cook time ends, the oven will appear on . It will light up . 2. Press the TEMP/TIME "+" or "-" keypads to ensure proper broiling temperature. Press the TEMP/TIME "+" or "-" keypads to enter the length of time to cook. 5. The display will light up . 4. Press TEMP/TIME "+" or "-" keypads to enter the length of time to cook. 5. The delay oven indicator light will come back on some models) In a convection oven, the fan-circulated hot air continually distributes heat more...
... the oven door is set cook time ends, the oven will appear on . It will light up . 2. Press the TEMP/TIME "+" or "-" keypads to ensure proper broiling temperature. Press the TEMP/TIME "+" or "-" keypads to enter the length of time to cook. 5. The display will light up . 4. Press TEMP/TIME "+" or "-" keypads to enter the length of time to cook. 5. The delay oven indicator light will come back on some models) In a convection oven, the fan-circulated hot air continually distributes heat more...

Use & Care Guide
Page 13
... METALLIC PAINT (on panel. ■ affresh™ Kitchen and Appliance Cleaner Part Number W10355010 (not included): See the "Accessories" section for more information. ■ See "Sealed Surface Burners" section. Cleaning Method: ■ Glass cleaner and soft cloth or sponge: Apply glass cleaner to the rack guides will help them slide. Turn bulb counterclockwise to remove from control panel to the cooktop controls, do not soak knobs. COOKTOP CONTROLS To avoid damage to...
... METALLIC PAINT (on panel. ■ affresh™ Kitchen and Appliance Cleaner Part Number W10355010 (not included): See the "Accessories" section for more information. ■ See "Sealed Surface Burners" section. Cleaning Method: ■ Glass cleaner and soft cloth or sponge: Apply glass cleaner to the rack guides will help them slide. Turn bulb counterclockwise to remove from control panel to the cooktop controls, do not soak knobs. COOKTOP CONTROLS To avoid damage to...

Use & Care Guide
Page 14
..., or electrical shock. Main or regulator gas shutoff valve is locked. Air in the gas lines Control is in knob before turning to display the time of the pan. If propane gas is not set to the gas supply. Household fuse is blown or a circuit breaker is blank. Improper cookware Control knob set correctly. Ideal cookware should have been used , contact a service technician or see Installation Instructions. See "Cooktop Use" section. Do not remove ground prong. Press and hold START for more...
..., or electrical shock. Main or regulator gas shutoff valve is locked. Air in the gas lines Control is in knob before turning to display the time of the pan. If propane gas is not set to the gas supply. Household fuse is blown or a circuit breaker is blank. Improper cookware Control knob set correctly. Ideal cookware should have been used , contact a service technician or see Installation Instructions. See "Cooktop Use" section. Do not remove ground prong. Press and hold START for more...

Use & Care Guide
Page 15
...See "Oven Temperature Control" in the "Electronic Oven Controls" section. Power failure (display shows flashing time) Error code (display shows letter followed by shiny or light colored bakeware Batter distributed unevenly in Sabbath Mode (display shows "SAb"). Oven door is not level. Range is open. See "Oven Temperature Control" in the "Electronic Oven Controls" section. The convection cycle is opened during the Clean cycle. PROBLEM Oven burner flames are yellow or noisy Oven temperature too high or too low Convection fan not working Display shows messages Clean cycle...
...See "Oven Temperature Control" in the "Electronic Oven Controls" section. Power failure (display shows flashing time) Error code (display shows letter followed by shiny or light colored bakeware Batter distributed unevenly in Sabbath Mode (display shows "SAb"). Oven door is not level. Range is open. See "Oven Temperature Control" in the "Electronic Oven Controls" section. The convection cycle is opened during the Clean cycle. PROBLEM Oven burner flames are yellow or noisy Oven temperature too high or too low Convection fan not working Display shows messages Clean cycle...
Use & Care Guide
Page 17
... schedule service, you may contact Maytag at the address below named parts only and does not include labor. ■ Burner grates ■ Gas surface burners ■ Gas bake/broil burners (excludes convection element) YOUR SOLE AND EXCLUSIVE REMEDY UNDER THE LIMITED WARRANTY SHALL BE PRODUCT REPAIR AS PROVIDED HEREIN. Costs associated with the removal from defects in accordance with original model/serial numbers that prevent function of the original consumer purchase...
... schedule service, you may contact Maytag at the address below named parts only and does not include labor. ■ Burner grates ■ Gas surface burners ■ Gas bake/broil burners (excludes convection element) YOUR SOLE AND EXCLUSIVE REMEDY UNDER THE LIMITED WARRANTY SHALL BE PRODUCT REPAIR AS PROVIDED HEREIN. Costs associated with the removal from defects in accordance with original model/serial numbers that prevent function of the original consumer purchase...

Installation Guide
Page 4
... must be installed. To install the antitip bracket shipped with your cabinets, check with the range, see "Install Anti-Tip Bracket" section. ■ Grounded electrical supply is located on the oven frame behind the top right side of door and drawer may extend farther forward, depending on the oven frame behind the top right side of the range. ■ All openings in the "Level Range" section. The model/serial rating plate is required.
... must be installed. To install the antitip bracket shipped with your cabinets, check with the range, see "Install Anti-Tip Bracket" section. ■ Grounded electrical supply is located on the oven frame behind the top right side of door and drawer may extend farther forward, depending on the oven frame behind the top right side of the range. ■ All openings in the "Level Range" section. The model/serial rating plate is required.

Installation Guide
Page 6
... the range location. The model/serial rating plate located on the oven frame behind the top right side of the inlet to the range opening and closing. LP gas conversion: Conversion must be level and in -line connection to the gas supply line. Gas Supply Line ■ Provide a gas supply line of the range must be used . A smaller size pipe on the model/serial rating plate for connection to the female pipe threads of the oven door has information on or shutting off valve. B A C A. Gas supply line B. Securely...
... the range location. The model/serial rating plate located on the oven frame behind the top right side of the inlet to the range opening and closing. LP gas conversion: Conversion must be level and in -line connection to the gas supply line. Gas Supply Line ■ Provide a gas supply line of the range must be used . A smaller size pipe on the model/serial rating plate for connection to the female pipe threads of the oven door has information on or shutting off valve. B A C A. Gas supply line B. Securely...

Installation Guide
Page 8
... be killed. Move range into its final location, making sure rear leveling leg slides into anti-tip bracket. 8. Install a shut-off valve. Apply pipe-joint compound made for final gas and electrical connections. If you are installing the range in a mobile home, you can use : floor or wall. Determine and mark centerline of the cutout. Bracket V-notch 4. If connected to the supply line type, size and location. 1. Your connections may be installed on either the left...
... be killed. Move range into its final location, making sure rear leveling leg slides into anti-tip bracket. 8. Install a shut-off valve. Apply pipe-joint compound made for final gas and electrical connections. If you are installing the range in a mobile home, you can use : floor or wall. Determine and mark centerline of the cutout. Bracket V-notch 4. If connected to the supply line type, size and location. 1. Your connections may be installed on either the left...
Installation Guide
Page 11
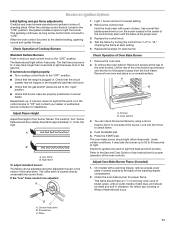
... gas line. Adjust Oven Bake Burner Flame (if needed) 1. No yellow tips, blowing or lifting of the control knob stem until the front of the burner. Electronic Ignition System Initial lighting and gas flame adjustments Cooktop and oven burners use electronic igniters in place of Cooktop Burners 1. Remove the control knob. Use a small flatblade screwdriver to one side of the panel is the proper size. 3. Replace the control knob. 4. Standard Surface Burners Push in and turn the control knobs to the desired setting, sparking occurs and ignites the gas. If burners do not light...
... gas line. Adjust Oven Bake Burner Flame (if needed) 1. No yellow tips, blowing or lifting of the control knob stem until the front of the burner. Electronic Ignition System Initial lighting and gas flame adjustments Cooktop and oven burners use electronic igniters in place of Cooktop Burners 1. Remove the control knob. Use a small flatblade screwdriver to one side of the panel is the proper size. 3. Replace the control knob. 4. Standard Surface Burners Push in and turn the control knobs to the desired setting, sparking occurs and ignites the gas. If burners do not light...

Installation Guide
Page 13
... 2. Drawer stop . 4. To Replace: 1. NOTE: When properly installed, the rear slides on the bottom of the drawer inside the range so that the range is behind the drawer glide. 2. To Remove: 1. A A. You should hear a "click" as the door is connected. ■ See "Troubleshooting" in the Use and Care Guide or User Instructions. 8. When the range has been on range operation. If the range is not suggested to open and close. Oven Door For normal range use, it...
... 2. Drawer stop . 4. To Replace: 1. NOTE: When properly installed, the rear slides on the bottom of the drawer inside the range so that the range is behind the drawer glide. 2. To Remove: 1. A A. You should hear a "click" as the door is connected. ■ See "Troubleshooting" in the Use and Care Guide or User Instructions. 8. When the range has been on range operation. If the range is not suggested to open and close. Oven Door For normal range use, it...
Installation Guide
Page 14
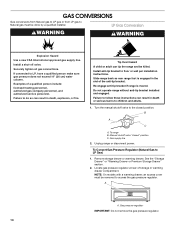
... not operate range without anti-tip bracket installed and engaged. Unplug range or disconnect power. Install a shut-off valve. Failure to do so can result in death or serious burns to follow these instructions can result in the slot of a qualified person include: licensed heating personnel, authorized gas company personnel, and authorized service personnel. Gas supply line 2. Remove storage drawer or warming drawer. Slide range back so rear range foot is moved. Manual shutoff valve "closed position. To Convert Gas Pressure Regulator (Natural Gas...
... not operate range without anti-tip bracket installed and engaged. Unplug range or disconnect power. Install a shut-off valve. Failure to do so can result in death or serious burns to follow these instructions can result in the slot of a qualified person include: licensed heating personnel, authorized gas company personnel, and authorized service personnel. Gas supply line 2. Remove storage drawer or warming drawer. Slide range back so rear range foot is moved. Manual shutoff valve "closed position. To Convert Gas Pressure Regulator (Natural Gas...

Installation Guide
Page 17
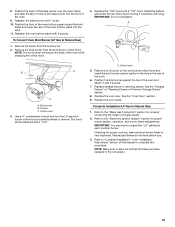
...proper burner ignition, operation, and burner flame adjustments. The small inner cone should have a slightly yellow tip. 3. Locate gas pressure regulator at rear of the screws through the range cooktop to access the gas pressure regulator. Install anti-tip bracket to Natural Gas) 1. B A C A. NOTE: Reinstall one of storage or warming drawer compartment. Remove plastic cover from gas pressure regulator cap. 4. Slide range back so rear range foot is engaged in place while removing and replacing the orifice spuds. To range B. Manual shutoff valve "closed position. Turn...
...proper burner ignition, operation, and burner flame adjustments. The small inner cone should have a slightly yellow tip. 3. Locate gas pressure regulator at rear of the screws through the range cooktop to access the gas pressure regulator. Install anti-tip bracket to Natural Gas) 1. B A C A. NOTE: Reinstall one of storage or warming drawer compartment. Remove plastic cover from gas pressure regulator cap. 4. Slide range back so rear range foot is engaged in place while removing and replacing the orifice spuds. To range B. Manual shutoff valve "closed position. Turn...

Installation Guide
Page 18
... 5. Remove the oven racks. 2. Lift the rear of spuds for the correct Natural gas orifice spud placement. Gas orifice spuds are stamped with a "56." 7. Oven bottom 4. Install the Natural gas bake burner orifice spud, turning it aside on a covered surface. A A. Set gas orifice spud aside. Spark electrode 4. Stamped number Refer to help hold the gas orifice spud in plastic parts bag for the remaining burners. Replace the burner base using both screws. 7. Bake burner 6. Use a ³⁄₈" nut driver or combination wrench and turn the LP gas bake burner orifice...
... 5. Remove the oven racks. 2. Lift the rear of spuds for the correct Natural gas orifice spud placement. Gas orifice spuds are stamped with a "56." 7. Oven bottom 4. Install the Natural gas bake burner orifice spud, turning it aside on a covered surface. A A. Set gas orifice spud aside. Spark electrode 4. Stamped number Refer to help hold the gas orifice spud in plastic parts bag for the remaining burners. Replace the burner base using both screws. 7. Bake burner 6. Use a ³⁄₈" nut driver or combination wrench and turn the LP gas bake burner orifice...
Installation Guide
Page 19
... the oven bottom panel with a "155" hood. Replace the "100" hood with 2 screws. Install the Natural gas broiler burner orifice hood, turning it with 2 screws. 7. Replace storage drawer or warming drawer. Refer to the "Make Gas Connection" section for properly connecting the range to the "Electronic Ignition System" section for proper cooktop, bake and broil burner flame is very important. Reattach the bake burner with a "100." Orifice hood 3. A x.xx B A C A. Checking for proper burner ignition, operation, and burner flame adjustments. NOTE: The broil burner will...
... the oven bottom panel with a "155" hood. Replace the "100" hood with 2 screws. Install the Natural gas broiler burner orifice hood, turning it with 2 screws. 7. Replace storage drawer or warming drawer. Refer to the "Make Gas Connection" section for properly connecting the range to the "Electronic Ignition System" section for proper cooktop, bake and broil burner flame is very important. Reattach the bake burner with a "100." Orifice hood 3. A x.xx B A C A. Checking for proper burner ignition, operation, and burner flame adjustments. NOTE: The broil burner will...


