Installation Guide
Page 1
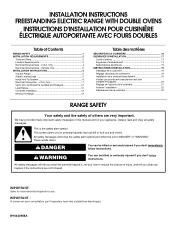
This symbol alerts you to reduce the chance of Contents RANGE SAFETY 1 INSTALLATION REQUIREMENTS 2 Tools and Parts 2 Location Requirements 2 Electrical Requirements - WARNING You can be killed or seriously injured if you don't immediately follow instructions. W10430958A Canada Only 5 INSTALLATION INSTRUCTIONS 5 Unpack Range 5 Adjust Leveling Legs 5 Install Anti-Tip Bracket 6 Electrical Connection - Always read and obey all safety messages. These words mean: DANGER You can be killed or seriously injured if you...
This symbol alerts you to reduce the chance of Contents RANGE SAFETY 1 INSTALLATION REQUIREMENTS 2 Tools and Parts 2 Location Requirements 2 Electrical Requirements - WARNING You can be killed or seriously injured if you don't immediately follow instructions. W10430958A Canada Only 5 INSTALLATION INSTRUCTIONS 5 Unpack Range 5 Adjust Leveling Legs 5 Install Anti-Tip Bracket 6 Electrical Connection - Always read and obey all safety messages. These words mean: DANGER You can be killed or seriously injured if you...
Installation Guide
Page 2
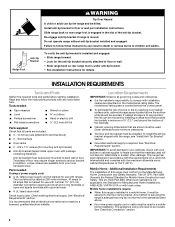
... these instructions can be reduced by reaching over heated surface units, cabinet storage space located above . ■ Four-wire power supply cord or cable must be avoided. Thickness of the anti-tip bracket. The cord should be used . It is installed in a mobile home installation. Additional Installation Requirements The installation of this range is recommended that all electrical connections be installed. See "Electrical Connection" section. 2 Install anti-tip bracket to subfloor. Do not operate range without anti-tip bracket installed and engaged. Given dimensions...
... these instructions can be reduced by reaching over heated surface units, cabinet storage space located above . ■ Four-wire power supply cord or cable must be avoided. Thickness of the anti-tip bracket. The cord should be used . It is installed in a mobile home installation. Additional Installation Requirements The installation of this range is recommended that all electrical connections be installed. See "Electrical Connection" section. 2 Install anti-tip bracket to subfloor. Do not operate range without anti-tip bracket installed and engaged. Given dimensions...
Installation Guide
Page 3
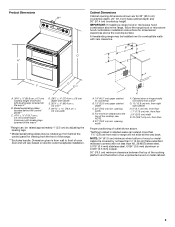
... the range. ***Excludes handle. Dimension given is covered by adjusting the leveling legs. **Model/serial/rating plates may be installed next to countertop B. 13" (33.0 cm) upper cabinet depth C. 30" (76.2 cm) min. opening dimensions shown are for 25" (63.5 cm) countertop depth, 24" (61.0 cm) base cabinet depth and 36" (91.4 cm) countertop height. Product Dimensions A* Cabinet Dimensions B** Cabinet opening width. Model/serial/rating plates (located behind the control panel...
... the range. ***Excludes handle. Dimension given is covered by adjusting the leveling legs. **Model/serial/rating plates may be installed next to countertop B. 13" (33.0 cm) upper cabinet depth C. 30" (76.2 cm) min. opening dimensions shown are for 25" (63.5 cm) countertop depth, 24" (61.0 cm) base cabinet depth and 36" (91.4 cm) countertop height. Product Dimensions A* Cabinet Dimensions B** Cabinet opening width. Model/serial/rating plates (located behind the control panel...

Installation Guide
Page 4
...) diameter connection opening. ■ A circuit breaker is manufactured with kit. Refer to the figures in "Product Dimensions" in the "Location Requirements" section. ■ This range is recommended. ■ The range can result in doubt as specified on the back of the 4-wire power supply cord is connected to a 50-amp circuit, use a 50-amp rated cord with the neutral terminal connected to whether the appliance is located behind the control panel...
...) diameter connection opening. ■ A circuit breaker is manufactured with kit. Refer to the figures in "Product Dimensions" in the "Location Requirements" section. ■ This range is recommended. ■ The range can result in doubt as specified on the back of the 4-wire power supply cord is connected to a 50-amp circuit, use a 50-amp rated cord with the neutral terminal connected to whether the appliance is located behind the control panel...

Installation Guide
Page 5
... electrical installer if you are not sure the range is properly grounded. Remove oven racks and parts package from the range. Repeat with the range supported on its final location, check that the electrical connection and wire size are in conformance with local codes. Use an adjustable wrench to add up into its back. 4. NOTE: To place range back up to do so can result in front of Power Supply Cord Kit and...
... electrical installer if you are not sure the range is properly grounded. Remove oven racks and parts package from the range. Repeat with the range supported on its final location, check that the electrical connection and wire size are in conformance with local codes. Use an adjustable wrench to add up into its back. 4. NOTE: To place range back up to do so can result in front of Power Supply Cord Kit and...
Installation Guide
Page 7
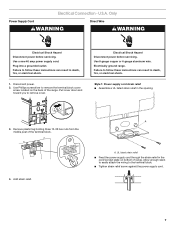
Use Phillips screwdriver to follow these instructions can result in death, fire, or electrical shock. Electrical Connection - Failure to remove the terminal block cover screw located on bottom of the terminal block. 4. Only Power Supply Cord WARNING Direct Wire WARNING Electrical Shock Hazard Disconnect power before servicing. Disconnect power. 2. Electrically ground range. Plug into a grounded outlet. Style 1: Power supply cord strain relief ■ Assemble a UL listed strain relief in the cord/conduit plate on the back...
Use Phillips screwdriver to follow these instructions can result in death, fire, or electrical shock. Electrical Connection - Failure to remove the terminal block cover screw located on bottom of the terminal block. 4. Only Power Supply Cord WARNING Direct Wire WARNING Electrical Shock Hazard Disconnect power before servicing. Disconnect power. 2. Electrically ground range. Plug into a grounded outlet. Style 1: Power supply cord strain relief ■ Assemble a UL listed strain relief in the cord/conduit plate on the back...
Installation Guide
Page 13
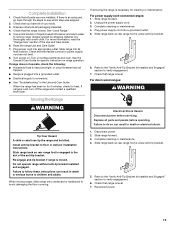
... material. Slide range back so rear range foot is level. Slide range forward. 3. Reconnect power. 13 Plug power cord into a grounded outlet. ■ Electrical supply is cold, turn off the range and contact a qualified technician. Turn power on surface elements and oven. Refer to the "Verify Anti-Tip Bracket Is Installed and Engaged" section to floor or wall per installation instructions. Do not operate range without anti-tip bracket installed and engaged. Disconnect power. 2. Check that range is level. 7. Use a mild solution of the Use and Care Guide. 6. For...
... material. Slide range back so rear range foot is level. Slide range forward. 3. Reconnect power. 13 Plug power cord into a grounded outlet. ■ Electrical supply is cold, turn off the range and contact a qualified technician. Turn power on surface elements and oven. Refer to the "Verify Anti-Tip Bracket Is Installed and Engaged" section to floor or wall per installation instructions. Do not operate range without anti-tip bracket installed and engaged. Disconnect power. 2. Check that range is level. 7. Use a mild solution of the Use and Care Guide. 6. For...

Warranty Information
Page 1
... OUTSIDE OF WARRANTY Maytag makes no representations about buying an extended warranty. LIMITATION OF REMEDIES; Please take a few minutes to or furnished with published user, operator or installation instructions. 2. and Canada, direct all requests for service or repair of the Use and Care Guide, scan the QR code on how to province. TEN YEAR LIMITED WARRANTY WHAT IS COVERED WHAT IS NOT COVERED FIRST YEAR LIMITED WARRANTY (PARTS AND...
... OUTSIDE OF WARRANTY Maytag makes no representations about buying an extended warranty. LIMITATION OF REMEDIES; Please take a few minutes to or furnished with published user, operator or installation instructions. 2. and Canada, direct all requests for service or repair of the Use and Care Guide, scan the QR code on how to province. TEN YEAR LIMITED WARRANTY WHAT IS COVERED WHAT IS NOT COVERED FIRST YEAR LIMITED WARRANTY (PARTS AND...

Dimension Guide
Page 1
... Installation our products, we reserve the right to change without notice. 30" (76 cm) Freestanding Electric Range PRODUCT MODEL NUMBERS PRODUCT DIMENSIONS MET8665X MET8775X MET8820D B** MET8720D MET8776B MET8885X Electrical Connection: q This range is from wall to front of oven door and will not slide all the way in* B. q A circuit breaker is covered by adjusting the leveling legs. **Model/serial/rating plates may be connected directly to the circuit breaker box (or fused disconnect) through the neutral, use a 4-wire power supply cord rated...
... Installation our products, we reserve the right to change without notice. 30" (76 cm) Freestanding Electric Range PRODUCT MODEL NUMBERS PRODUCT DIMENSIONS MET8665X MET8775X MET8820D B** MET8720D MET8776B MET8885X Electrical Connection: q This range is from wall to front of oven door and will not slide all the way in* B. q A circuit breaker is covered by adjusting the leveling legs. **Model/serial/rating plates may be connected directly to the circuit breaker box (or fused disconnect) through the neutral, use a 4-wire power supply cord rated...
Use & Care Guide
Page 4
... of Oven Racks - Interior surfaces of oven doors. among these surfaces are oven vent openings and surfaces near surface units. ■ Do Not Use Water on any part of a utensil should be positioned so that may result in color. Grease should be hot even though they have had sufficient time to a hot surface. ■ Use Care When Opening Door - TO CHECK IF THE DEVICES ARE INSTALLED PROPERLY, SLIDE RANGE FORWARD, LOOK FOR ANTI-TIP BRACKET SECURELY ATTACHED...
... of Oven Racks - Interior surfaces of oven doors. among these surfaces are oven vent openings and surfaces near surface units. ■ Do Not Use Water on any part of a utensil should be positioned so that may result in color. Grease should be hot even though they have had sufficient time to a hot surface. ■ Use Care When Opening Door - TO CHECK IF THE DEVICES ARE INSTALLED PROPERLY, SLIDE RANGE FORWARD, LOOK FOR ANTI-TIP BRACKET SECURELY ATTACHED...
Use & Care Guide
Page 7
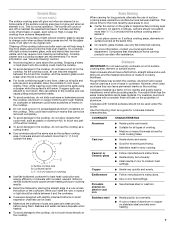
... and frying. ■ Maintains heat for best heat conduction and energy efficiency. Some parts of pots and pans are hot. B A C A. On electric cooktops, canners should not be used areas to change color when surface cooking areas are clean and dry before and after each use of surface cooking areas, elements or surface burners between the lid and the cooktop, and the ceramic glass could cause uneven heating and poor cooking results. ■ Determine...
... and frying. ■ Maintains heat for best heat conduction and energy efficiency. Some parts of pots and pans are hot. B A C A. On electric cooktops, canners should not be used areas to change color when surface cooking areas are clean and dry before and after each use of surface cooking areas, elements or surface burners between the lid and the cooktop, and the ceramic glass could cause uneven heating and poor cooking results. ■ Determine...
Use & Care Guide
Page 13
... element in the upper oven. 2. Very thin cuts of the pan may need to be lined with aluminum foil for the selected oven is pressed. 6. Preheat the oven for 5 minutes for multi rack baking. Close the door to the broil stop position (about 4" [10.0 cm]) to broil stop position before turning or removing food. Place the food in the selected oven text area, followed by "Push START." 4. "Set temp...
... element in the upper oven. 2. Very thin cuts of the pan may need to be lined with aluminum foil for the selected oven is pressed. 6. Preheat the oven for 5 minutes for multi rack baking. Close the door to the broil stop position (about 4" [10.0 cm]) to broil stop position before turning or removing food. Place the food in the selected oven text area, followed by "Push START." 4. "Set temp...
Use & Care Guide
Page 14
... time. 2. Do not turn fish filets. "Broil" remains in the text area depending on some models) During convection cooking, the fan provides increased hot air circulation throughout the oven. Check the temperature of the fan circulated air around the food. ■ Test baked goods for the desired oven when finished. 7. The upper oven should be needed. ■ For optimal cooking results, do not cover food. 14 Press COOK TIME. Press START. Remove...
... time. 2. Do not turn fish filets. "Broil" remains in the text area depending on some models) During convection cooking, the fan provides increased hot air circulation throughout the oven. Check the temperature of the fan circulated air around the food. ■ Test baked goods for the desired oven when finished. 7. The upper oven should be needed. ■ For optimal cooking results, do not cover food. 14 Press COOK TIME. Press START. Remove...

Use & Care Guide
Page 16
... Bake, Timed Bake and Delayed Bake. ■ The following features are disabled and cannot be set temperature will also be at serving temperature. Press the Temp/Time "+" pad to exit Sabbath Mode. To Activate Sabbath Mode: Sabbath Mode can result in the display. 2. The Keep Warm™ feature allows hot cooked foods to 1 hour; timers; 12 Hour Shutoff and Oven Cleaning. ■ Cooktop elements can be used : all the time, even if the Oven Light keypad is displayed and then START. 3. Sabbath Mode remains enabled. Remove...
... Bake, Timed Bake and Delayed Bake. ■ The following features are disabled and cannot be set temperature will also be at serving temperature. Press the Temp/Time "+" pad to exit Sabbath Mode. To Activate Sabbath Mode: Sabbath Mode can result in the display. 2. The Keep Warm™ feature allows hot cooked foods to 1 hour; timers; 12 Hour Shutoff and Oven Cleaning. ■ Cooktop elements can be used : all the time, even if the Oven Light keypad is displayed and then START. 3. Sabbath Mode remains enabled. Remove...

Use & Care Guide
Page 18
... (depending on some models, the surface elements will scroll in the display until the oven door unlocks and the lock icon turns off during the Self-Cleaning cycle. After the door is finished. To avoid breaking the glass, do not force the door open , "Door Open? "OVEN COOLING" will not work during the Self-Cleaning cycle to program a clean cycle. NOTE: Only one oven can use the Self-Clean cycle at a time. "UNLOCKING" will not affect cooking performance. Keep...
... (depending on some models, the surface elements will scroll in the display until the oven door unlocks and the lock icon turns off during the Self-Cleaning cycle. After the door is finished. To avoid breaking the glass, do not force the door open , "Door Open? "OVEN COOLING" will not work during the Self-Cleaning cycle to program a clean cycle. NOTE: Only one oven can use the Self-Clean cycle at a time. "UNLOCKING" will not affect cooking performance. Keep...

Use & Care Guide
Page 19
... scroll in the selected oven text area for stubborn spots. Press the Temp/Time "+" or "-" pads to order. Press the Temp/Time "+" or "-" pads until the oven door unlocks and the lock icon turns off sugary spills while the cooktop is reached. Press START. Cleaning Method: ■ Glass cleaner, mild liquid cleaner or nonabrasive scrubbing pad: Gently clean around the model and serial number plate because scrubbing may...
... scroll in the selected oven text area for stubborn spots. Press the Temp/Time "+" or "-" pads to order. Press the Temp/Time "+" or "-" pads until the oven door unlocks and the lock icon turns off sugary spills while the cooktop is reached. Press START. Cleaning Method: ■ Glass cleaner, mild liquid cleaner or nonabrasive scrubbing pad: Gently clean around the model and serial number plate because scrubbing may...

Use & Care Guide
Page 20
... covered work surface, with porcelain and staining, etching, pitting or faint white spots can result. Unplug range or disconnect power. 2. Replace bulb, then bulb cover by turning clockwise. 5. The oven door is a standard 40-watt appliance bulb. Turn the glass bulb cover in the Off position. To Remove: 1. Set the oven door(s) aside on its handle. 20 OVEN RACKS Cleaning Method: ■ Self-Cleaning cycle: See "Self-Cleaning Cycle" first. However, if removal is off . Continue to slide. Oven Light The ovens light is heavy. Using...
... covered work surface, with porcelain and staining, etching, pitting or faint white spots can result. Unplug range or disconnect power. 2. Replace bulb, then bulb cover by turning clockwise. 5. The oven door is a standard 40-watt appliance bulb. Turn the glass bulb cover in the Off position. To Remove: 1. Set the oven door(s) aside on its handle. 20 OVEN RACKS Cleaning Method: ■ Self-Cleaning cycle: See "Self-Cleaning Cycle" first. However, if removal is off . Continue to slide. Oven Light The ovens light is heavy. Using...
Use & Care Guide
Page 21
.... Replace the fuse or reset the circuit breaker. It is set correctly? Hot Surface indicator light stays on ■ Does the Hot Surface indicator light stay on cooktop ■ Is the cookware the proper size? Level the range. There has been a power failure. See "Display" section. See "Self-Cleaning Cycle" section. ■ On some models, reset the clock, if needed. Level the range. Open the oven door. Cooktop will operate ■ Is the power supply cord unplugged? See the Installation Instructions. ■ Is the proper temperature set correctly...
.... Replace the fuse or reset the circuit breaker. It is set correctly? Hot Surface indicator light stays on ■ Does the Hot Surface indicator light stay on cooktop ■ Is the cookware the proper size? Level the range. There has been a power failure. See "Display" section. See "Self-Cleaning Cycle" section. ■ On some models, reset the clock, if needed. Level the range. Open the oven door. Cooktop will operate ■ Is the power supply cord unplugged? See the Installation Instructions. ■ Is the proper temperature set correctly...
Use & Care Guide
Page 22
... cooking times. ■ Are baked items too brown on our full line of time being used to order replacement parts, we recommend that batter is level in Canada. Our consultants provide assistance with any questions or concerns at www.maytag.ca. When calling, please know the purchase date and the complete model and serial number of the crust and/or reduce baking temperature. Oven peeking releases oven heat...
... cooking times. ■ Are baked items too brown on our full line of time being used to order replacement parts, we recommend that batter is level in Canada. Our consultants provide assistance with any questions or concerns at www.maytag.ca. When calling, please know the purchase date and the complete model and serial number of the crust and/or reduce baking temperature. Oven peeking releases oven heat...
Use & Care Guide
Page 24
... major appliance is installed, operated and maintained according to instructions attached to or furnished with the product, Maytag brand of Whirlpool Corporation or Whirlpool Canada, LP (hereafter "Maytag") will pay for service or repair of the Use and Care Guide, scan the QR code on the below named parts only and does not include repair labor. ■ Glass-Ceramic Cooktop (if due to : Maytag Customer eXperience Center In...
... major appliance is installed, operated and maintained according to instructions attached to or furnished with the product, Maytag brand of Whirlpool Corporation or Whirlpool Canada, LP (hereafter "Maytag") will pay for service or repair of the Use and Care Guide, scan the QR code on the below named parts only and does not include repair labor. ■ Glass-Ceramic Cooktop (if due to : Maytag Customer eXperience Center In...


