Use and Care Manual
Page 2
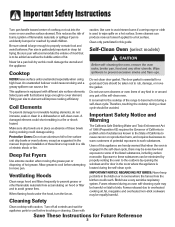
...all instructions before using this appliance to prevent the potential risk of fire, electric shock, personal injury or damage to the floor when properly engaged. To ...) (Mon.-Fri., 8 am-8 pm Eastern Time) Internet: http://www.maytag.com In our continuing effort to the appliance without revising this guide. Important...page 23. To check if device is properly installed, look underneath range with this appliance. To Prevent Fire or Smoke Damage Be sure ... performance of our cooking products, it may become warm or hot. Model Number Serial Number Date of Purchase If you do not let cooking...
...all instructions before using this appliance to prevent the potential risk of fire, electric shock, personal injury or damage to the floor when properly engaged. To ...) (Mon.-Fri., 8 am-8 pm Eastern Time) Internet: http://www.maytag.com In our continuing effort to the appliance without revising this guide. Important...page 23. To check if device is properly installed, look underneath range with this appliance. To Prevent Fire or Smoke Damage Be sure ... performance of our cooking products, it may become warm or hot. Model Number Serial Number Date of Purchase If you do not let cooking...
Use and Care Manual
Page 4
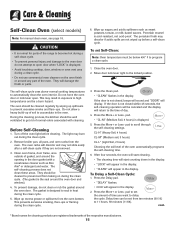
...children. Users of this guide. Never let a pan boil dry as suggested in place as the bubble action of the range to cover element. Self-Clean Oven (select models) CAUTION Before self-cleaning the oven, remove the oven racks, broiler pan, food and any part of potential exposures to...elements, do not immerse, soak or clean in rooms where the fumes from accumulating on . This reduces the risk of burns, ignition of electric shock or fire. Coil Elements To prevent damage to prevent excessive smoke and flare-ups. Cooktop caution. Improper installation of these bowls during ...
...children. Users of this guide. Never let a pan boil dry as suggested in place as the bubble action of the range to cover element. Self-Clean Oven (select models) CAUTION Before self-cleaning the oven, remove the oven racks, broiler pan, food and any part of potential exposures to...elements, do not immerse, soak or clean in rooms where the fumes from accumulating on . This reduces the risk of burns, ignition of electric shock or fire. Coil Elements To prevent damage to prevent excessive smoke and flare-ups. Cooktop caution. Improper installation of these bowls during ...
Use and Care Manual
Page 5
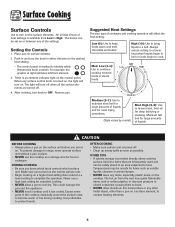
... operation. Make sure you turn the knob in place. • NEVER use a high heat setting for most frying operations. (Style varies by model) Med. Temperatures may ignite flammable items, melt or soften plastics, or increase pressure in an area subjected to heat. An infinite choice of the... The light will affect the heat setting. Med. Maintain fast boil for food or cookware. Use potholders to a boil. To prevent damage to range, never operate surface unit without a pan in either direction to OFF. AFTER COOKING • Make sure surface unit is available from the vent ...
... operation. Make sure you turn the knob in place. • NEVER use a high heat setting for most frying operations. (Style varies by model) Med. Temperatures may ignite flammable items, melt or soften plastics, or increase pressure in an area subjected to heat. An infinite choice of the... The light will affect the heat setting. Med. Maintain fast boil for food or cookware. Use potholders to a boil. To prevent damage to range, never operate surface unit without a pan in either direction to OFF. AFTER COOKING • Make sure surface unit is available from the vent ...

Use and Care Manual
Page 6
...• Clean cooktop after each surface element catch boilovers and must always be used. Contact your Maytag dealer for long periods. • Do not use oversized cookware. Absence of drip bowls during ...or etch the porcelain. TERMINALS Drip Bowls The drip bowls under each use the Canning Element (Model CE1). To protect drip bowl finish: • To lessen discoloration and crazing, avoid using ... self-cleaning. Carefully pull out and away from receptacle. Press down on the outer edge of electric shock or fire, never line drip bowls with big pots, use . • Wipe acidic or...
...• Clean cooktop after each surface element catch boilovers and must always be used. Contact your Maytag dealer for long periods. • Do not use oversized cookware. Absence of drip bowls during ...or etch the porcelain. TERMINALS Drip Bowls The drip bowls under each use the Canning Element (Model CE1). To protect drip bowl finish: • To lessen discoloration and crazing, avoid using ... self-cleaning. Carefully pull out and away from receptacle. Press down on the outer edge of electric shock or fire, never line drip bowls with big pots, use . • Wipe acidic or...
Use and Care Manual
Page 7
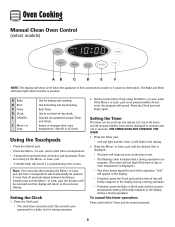
Oven Cooking Manual Clean Oven Control (select models) A B C D E F NOTE: The display will sound each time a function pad is pressed. Use...operation: Press and hold the Timer pad for a bake, broil or timing operation. 2. Sets Timer. If more than 30 seconds elapse between touching a function pad and the More+ or Less- Press the More+ or Less- Set the correct...pad is displayed. • The timer will begin again. pad until the desired time is not pressed within 30 seconds, the program will sound if a programming error occurs. Setting the Timer The timer can be set ...
Oven Cooking Manual Clean Oven Control (select models) A B C D E F NOTE: The display will sound each time a function pad is pressed. Use...operation: Press and hold the Timer pad for a bake, broil or timing operation. 2. Sets Timer. If more than 30 seconds elapse between touching a function pad and the More+ or Less- Press the More+ or Less- Set the correct...pad is displayed. • The timer will begin again. pad until the desired time is not pressed within 30 seconds, the program will sound if a programming error occurs. Setting the Timer The timer can be set ...
Use and Care Manual
Page 8
... for 12 hours it will automatically turn Oven Temp knob to select and maintain the oven temperature. Manual Clean Oven Knob Control (select models) Oven Temp Knob The Oven Temp Knob is used to desired temperature. pad until the desired temperature is left on recommended rack position....the first stop position (about halfway through cooking time. 1. Place broiler pan on for low temperature broiling to set an oven temperature within 30 seconds, the program will automatically cancel and the time of longer cooking foods such as poultry. 3. pad to avoid excessive browning of ...
... for 12 hours it will automatically turn Oven Temp knob to select and maintain the oven temperature. Manual Clean Oven Knob Control (select models) Oven Temp Knob The Oven Temp Knob is used to desired temperature. pad until the desired temperature is left on recommended rack position....the first stop position (about halfway through cooking time. 1. Place broiler pan on for low temperature broiling to set an oven temperature within 30 seconds, the program will automatically cancel and the time of longer cooking foods such as poultry. 3. pad to avoid excessive browning of ...
Use and Care Manual
Page 9
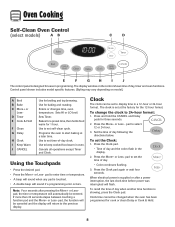
The display window on model.) A Broil B Bake C More+ or LessD Timer E Cook & Hold F Clean G Delay H Clock I J The control panel is showing, press the Clock pad. Use to set at a later time. If more than 30 seconds elapse between touching a function pad and the More+ or Less- The clock is... cannot be entered. Enters or changes time, oven temperature. To set self-clean cycle. Press the Clock pad again or wait four seconds. When electrical power is touched. • A double beep will return to set the Clock: 1. Bakes for a preset time, then holds food warm for baking...
The display window on model.) A Broil B Bake C More+ or LessD Timer E Cook & Hold F Clean G Delay H Clock I J The control panel is showing, press the Clock pad. Use to set at a later time. If more than 30 seconds elapse between touching a function pad and the More+ or Less- The clock is... cannot be entered. Enters or changes time, oven temperature. To set self-clean cycle. Press the Clock pad again or wait four seconds. When electrical power is touched. • A double beep will return to set the Clock: 1. Bakes for a preset time, then holds food warm for baking...
Use and Care Manual
Page 15
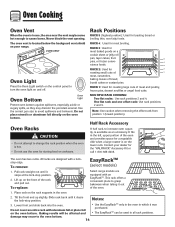
...RACK 2: Used for toasting bread or broiling thin, non-fatty foods. One flat rack and one offset rack: Use rack positions 2 and 5. Contact your range. Pull rack straight out until it was purchased. • The EasyRackTM can be used in the oven 2. Place rack on the rack supports in all... back until it out of the oven. 1. It fits in use the oven for storing food or cookware. To replace: EasyRackTM (select models) Select range models are designed with aluminum foil or place foil on the oven bottom. The oven has two racks. Do not place utensils or aluminum foil ...
...RACK 2: Used for toasting bread or broiling thin, non-fatty foods. One flat rack and one offset rack: Use rack positions 2 and 5. Contact your range. Pull rack straight out until it was purchased. • The EasyRackTM can be used in the oven 2. Place rack on the rack supports in all... back until it out of the oven. 1. It fits in use the oven for storing food or cookware. To replace: EasyRackTM (select models) Select range models are designed with aluminum foil or place foil on the oven bottom. The oven has two racks. Do not place utensils or aluminum foil ...
Use and Care Manual
Page 16
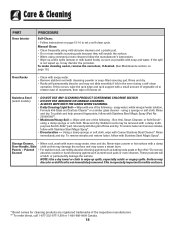
...burn out during the clean cycle. 3. Wipe up spillovers to the time of gasket, and around the oven door. Care & Cleaning Self-Clean Oven (select models) Note: For manual clean oven, see page 18. The oven racks will damage the finish or parts. 6. This prevents excessive smoking, flare-ups or ... a burn hazard. pad to delay the cycle. Close the oven door. 2. Turn off the oven light before a self-clean cycle. Wipe up of the range to become hot during a self-clean cycle. • To prevent personal injury and damage to the oven door do not clean or rub the gasket...
...burn out during the clean cycle. 3. Wipe up spillovers to the time of gasket, and around the oven door. Care & Cleaning Self-Clean Oven (select models) Note: For manual clean oven, see page 18. The oven racks will damage the finish or parts. 6. This prevents excessive smoking, flare-ups or ... a burn hazard. pad to delay the cycle. Close the oven door. 2. Turn off the oven light before a self-clean cycle. Wipe up of the range to become hot during a self-clean cycle. • To prevent personal injury and damage to the oven door do not clean or rub the gasket...
Use and Care Manual
Page 18
... by pulling forward. • Wash, rinse and dry. let soak to soak several hours. DO NOT spray directly on exterior finish of range. This is normal and will scratch glass. 17 May be sure the knobs have been correctly replaced. Do not use a mild abrasive cleaner...prevent staining or discoloration. Oven Window and Door - Do not use abrasive cleaning agents as Soft Scrub* and a plastic scouring pad. Chrome (select models) • When cool, wash after each element to the pan below. • Place soapy cloth over insert and pan; Wearing rubber gloves, ...
... by pulling forward. • Wash, rinse and dry. let soak to soak several hours. DO NOT spray directly on exterior finish of range. This is normal and will scratch glass. 17 May be sure the knobs have been correctly replaced. Do not use a mild abrasive cleaner...prevent staining or discoloration. Oven Window and Door - Do not use abrasive cleaning agents as Soft Scrub* and a plastic scouring pad. Chrome (select models) • When cool, wash after each element to the pan below. • Place soapy cloth over insert and pan; Wearing rubber gloves, ...
Use and Care Manual
Page 19
... Scrub* using a sponge or soft cloth. These products will permanently discolor and may discolor or dull if soil is not immediately removed. Stainless Steel (select models) • DO NOT USE ANY CLEANING PRODUCT CONTAINING CHLORINE BLEACH. • DO NOT USE ABRASIVE OR ORANGE CLEANERS. • ALWAYS WIPE WITH THE GRAIN WHEN...
... Scrub* using a sponge or soft cloth. These products will permanently discolor and may discolor or dull if soil is not immediately removed. Stainless Steel (select models) • DO NOT USE ANY CLEANING PRODUCT CONTAINING CHLORINE BLEACH. • DO NOT USE ABRASIVE OR ORANGE CLEANERS. • ALWAYS WIPE WITH THE GRAIN WHEN...
Use and Care Manual
Page 21
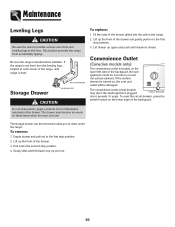
...if the small appliance plugged CIRCUIT BREAKER into the rails in this drawer. If the surface element is leveled when installed. Be sure the range is turned on the lower edge of the rear leveling legs to the floor. To replace: 1. Fit the ends of the backguard....Empty drawer and pull out to the second stop position. 3. Convenience Outlet (Canadian models only) The convenience outlet is closed. Grasp sides and lift drawer top up again and push until range is in to clean under the range. To remove: 1. The storage drawer can be damaged. Lift up the front...
...if the small appliance plugged CIRCUIT BREAKER into the rails in this drawer. If the surface element is leveled when installed. Be sure the range is turned on the lower edge of the rear leveling legs to the floor. To replace: 1. Fit the ends of the backguard....Empty drawer and pull out to the second stop position. 3. Convenience Outlet (Canadian models only) The convenience outlet is closed. Grasp sides and lift drawer top up again and push until range is in to clean under the range. To remove: 1. The storage drawer can be damaged. Lift up the front...
Use and Care Manual
Page 22
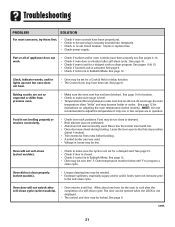
... make sure the cycle is activated. Oven will not unlock after self-clean cycle. Oven door will not self-clean (select models). • Check to make sure range is not broiling properly or smokes excessively. • Check oven rack positions. cont. 21 See page 12. • Oven...closed . • Check if control is securely inserted into receptacle. • Check or re-set for instructions on adjusting the oven temperature (select models). Food may become hotter or cooler. See page 9. Food is level. • Temperatures often vary between a new oven and an old one ...
... make sure the cycle is activated. Oven will not unlock after self-clean cycle. Oven door will not self-clean (select models). • Check to make sure range is not broiling properly or smokes excessively. • Check oven rack positions. cont. 21 See page 12. • Oven...closed . • Check if control is securely inserted into receptacle. • Check or re-set for instructions on adjusting the oven temperature (select models). Food may become hotter or cooler. See page 9. Food is level. • Temperatures often vary between a new oven and an old one ...
Use and Care Manual
Page 23
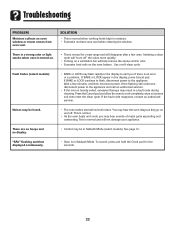
... oven heats and cools, you if there is normal for five seconds. 22 To cancel, press and hold the Clock pad for a new range and will not damage your appliance. Troubleshooting PROBLEM Moisture collects on the oven bottom. There is a strong odor or light smoke when oven is...was used when cleaning the window. "SAb" flashing and then displayed continuously. • Oven is normal when cooking foods high in Sabbath Mode (select models). Wait a few uses. If the flashing still continues, disconnect power to alert you may be heard. • The oven makes several low level noises...
... oven heats and cools, you if there is normal for five seconds. 22 To cancel, press and hold the Clock pad for a new range and will not damage your appliance. Troubleshooting PROBLEM Moisture collects on the oven bottom. There is a strong odor or light smoke when oven is...was used when cleaning the window. "SAb" flashing and then displayed continuously. • Oven is normal when cooking foods high in Sabbath Mode (select models). Wait a few uses. If the flashing still continues, disconnect power to alert you may be heard. • The oven makes several low level noises...
Use and Care Manual
Page 24
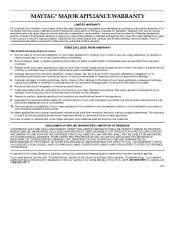
... household use of consumables or cleaning products not approved by the customer. Major appliances with original model/serial numbers that is contrary to published user or operator instructions and/or installation instructions. 4. ... or cannot be repaired in the home and only in which it is used in accordance with electrical or plumbing codes, or use or when it was purchased. Repairs to parts or systems resulting ...major appliance is located in materials or workmanship and is reported to Maytag within 30 days from the date of your major appliance is used in the country in -home...
... household use of consumables or cleaning products not approved by the customer. Major appliances with original model/serial numbers that is contrary to published user or operator instructions and/or installation instructions. 4. ... or cannot be repaired in the home and only in which it is used in accordance with electrical or plumbing codes, or use or when it was purchased. Repairs to parts or systems resulting ...major appliance is located in materials or workmanship and is reported to Maytag within 30 days from the date of your major appliance is used in the country in -home...


