Use and Care Manual
Page 1
... 19-20 Oven Window Oven Light Troubleshooting 21-22 Warranty & Service 23 Guide d'utilisation et d'entretien 24 Guía de Uso y Cuidado 50 ©2006 Maytag Appliances Sales Co. Coil TM Use and Care Guide Table of Contents Safety 1-3 Surface Cooking 4-5 Surface Controls Coil Elements Oven Cooking 6-14 Manual Clean Oven Controls... Manual Clean Oven Knob Control Baking Broiling Self-Clean Oven Controls Clock Timer Baking Keep Warm Cook & Hold Broiling Delay Oven Racks Form No. Litho U.S.A . Electric Range -
... 19-20 Oven Window Oven Light Troubleshooting 21-22 Warranty & Service 23 Guide d'utilisation et d'entretien 24 Guía de Uso y Cuidado 50 ©2006 Maytag Appliances Sales Co. Coil TM Use and Care Guide Table of Contents Safety 1-3 Surface Cooking 4-5 Surface Controls Coil Elements Oven Cooking 6-14 Manual Clean Oven Controls... Manual Clean Oven Knob Control Baking Broiling Self-Clean Oven Controls Clock Timer Baking Keep Warm Cook & Hold Broiling Delay Oven Racks Form No. Litho U.S.A . Electric Range -
Use and Care Manual
Page 2
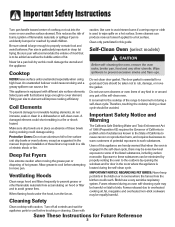
...hot. In Case of fire, electric shock, personal injury or damage to the appliance without revising this appliance. NEVER pick up or move a flaming pan. 3. Consumer: Please read and keep this anytime the range has been moved. To ensure proper and safe operation: Appliance must be exercised when installing, ... hearing or speech impaired) (Mon.-Fri., 8 am-8 pm Eastern Time) Internet: http://www.maytag.com In our continuing effort to heat. Model Number Serial Number Date of the appliance. Keep sales receipt and/or canceled check as described in this guide. To prevent grease fires,...
...hot. In Case of fire, electric shock, personal injury or damage to the appliance without revising this appliance. NEVER pick up or move a flaming pan. 3. Consumer: Please read and keep this anytime the range has been moved. To ensure proper and safe operation: Appliance must be exercised when installing, ... hearing or speech impaired) (Mon.-Fri., 8 am-8 pm Eastern Time) Internet: http://www.maytag.com In our continuing effort to heat. Model Number Serial Number Date of the appliance. Keep sales receipt and/or canceled check as described in this guide. To prevent grease fires,...
Use and Care Manual
Page 3
... distorts, warps, or is completed. Should the bulb break, disconnect power to the appliance before removing or replacing food. If pan is in risk of electric shock, fire, or damage to the appliance. Never heat an unopened food container in which they can create serious safety hazards, ...result in possible tipping of the appliance, breakage of door, and serious injuries. Clothing may be...
... distorts, warps, or is completed. Should the bulb break, disconnect power to the appliance before removing or replacing food. If pan is in risk of electric shock, fire, or damage to the appliance. Never heat an unopened food container in which they can create serious safety hazards, ...result in possible tipping of the appliance, breakage of door, and serious injuries. Clothing may be...
Use and Care Manual
Page 4
.... Clean with different size surface elements. Pan size is to such substances. This appliance is large enough to cover element. A damaged element could damage the utensil and the appliance. Ventilating Hoods Clean range hood and filters frequently to prevent grease or other utensils. Important Safety Notice and ... to the State of California to cause cancer or reproductive harm, and requires businesses to some low-level exposure to warn customers of electric shock or fire. Fumes released during a self-clean cycle. This reduces the risk of burns, ignition of the self-clean oven....
.... Clean with different size surface elements. Pan size is to such substances. This appliance is large enough to cover element. A damaged element could damage the utensil and the appliance. Ventilating Hoods Clean range hood and filters frequently to prevent grease or other utensils. Important Safety Notice and ... to the State of California to cause cancer or reproductive harm, and requires businesses to some low-level exposure to warn customers of electric shock or fire. Fumes released during a self-clean cycle. This reduces the risk of burns, ignition of the self-clean oven....
Use and Care Manual
Page 5
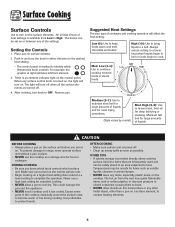
... NEVER allow aluminum foil, meat probes or any of the settings. High (8-9): Use to become warm or hot during cooking. To prevent damage to range, never operate surface unit without a pan in closed containers causing them to burst. • NEVER allow a pan to protect hands. Expect some ...element, to contact heating elements. 4 Make sure you know which knob controls which element the knob controls. This could damage the pan and the appliance. • NEVER touch cooktop until it on a higher heat setting then reduce to a lower setting to keep foods warm and melt chocolate and ...
... NEVER allow aluminum foil, meat probes or any of the settings. High (8-9): Use to become warm or hot during cooking. To prevent damage to range, never operate surface unit without a pan in closed containers causing them to burst. • NEVER allow a pan to protect hands. Expect some ...element, to contact heating elements. 4 Make sure you know which knob controls which element the knob controls. This could damage the pan and the appliance. • NEVER touch cooktop until it on a higher heat setting then reduce to a lower setting to keep foods warm and melt chocolate and ...
Use and Care Manual
Page 7
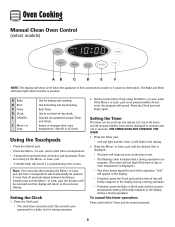
... NOT CONTROL THE OVEN. 1. Oven Cooking Manual Clean Oven Control (select models) A B C D E F NOTE: The display will show 12:00 when the appliance is first connected to 99 hours and 59 minutes (99:59). Using the Touchpads • Press the desired pad. • Press the More+ or Less... during a timing operation. Use for several seconds. 6 Use for the More+ or Less- pad to the previous display. There is not pressed within 30 seconds, the program will sound each time a function pad is pressed. "0:00" will briefly reappear in the display during a timing operation. • ...
... NOT CONTROL THE OVEN. 1. Oven Cooking Manual Clean Oven Control (select models) A B C D E F NOTE: The display will show 12:00 when the appliance is first connected to 99 hours and 59 minutes (99:59). Using the Touchpads • Press the desired pad. • Press the More+ or Less... during a timing operation. Use for several seconds. 6 Use for the More+ or Less- pad to the previous display. There is not pressed within 30 seconds, the program will sound each time a function pad is pressed. "0:00" will briefly reappear in the display during a timing operation. • ...
Use and Care Manual
Page 10
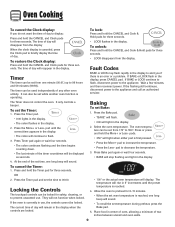
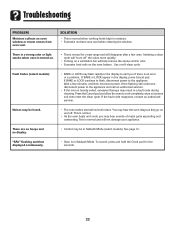
It can also be set the time to 00:00. If the flashing still continues, disconnect power to the appliance. Press Timer pad again or wait four seconds. • The colon continues flashing and the time begins counting down. • The last minute of day ... displayed as seconds. Fault Codes BAKE or LOCK may flash rapidly in the display. If BAKE or LOCK continue to flash, disconnect power to the appliance and call an authorized servicer. pad until the preset temperature is reached. 4. pad to flash. 3. It only controls a beeper. Select the oven temperature. Press and...
It can also be set the time to 00:00. If the flashing still continues, disconnect power to the appliance. Press Timer pad again or wait four seconds. • The colon continues flashing and the time begins counting down. • The last minute of day ... displayed as seconds. Fault Codes BAKE or LOCK may flash rapidly in the display. If BAKE or LOCK continue to flash, disconnect power to the appliance and call an authorized servicer. pad until the preset temperature is reached. 4. pad to flash. 3. It only controls a beeper. Select the oven temperature. Press and...
Use and Care Manual
Page 14
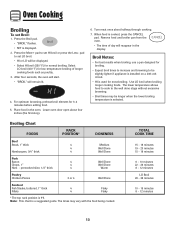
... the Broil pad. • "BROIL" flashes. • SET is a suggested guide. After four seconds, the oven will start. • "BROIL" will be slightly lighter if appliance is installed on a 208-volt circuit. • HI is selected. For optimum browning, preheat broil element for most broiling. The times may be longer when...
... the Broil pad. • "BROIL" flashes. • SET is a suggested guide. After four seconds, the oven will start. • "BROIL" will be slightly lighter if appliance is installed on a 208-volt circuit. • HI is selected. For optimum browning, preheat broil element for most broiling. The times may be longer when...
Use and Care Manual
Page 18
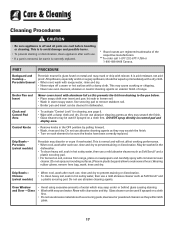
...use a mild abrasive cleaner such as Soft Scrub* and a plastic scouring pad. • For burned on soil, remove from range, place on exterior finish of range. Do not use abrasive materials such as scouring pads, steel wool or powdered cleaners as this prevents the fat from bag, wash...• Do not use abrasive cleaning agents as Soft Scrub* and a plastic scouring pad. Care & Cleaning Cleaning Procedures CAUTION • Be sure appliance is off a warm or hot surface with soap and water. This is correctly replaced. * Brand names are cool before handling or cleaning. Porcelain ...
...use a mild abrasive cleaner such as Soft Scrub* and a plastic scouring pad. • For burned on soil, remove from range, place on exterior finish of range. Do not use abrasive materials such as scouring pads, steel wool or powdered cleaners as this prevents the fat from bag, wash...• Do not use abrasive cleaning agents as Soft Scrub* and a plastic scouring pad. Care & Cleaning Cleaning Procedures CAUTION • Be sure appliance is off a warm or hot surface with soap and water. This is correctly replaced. * Brand names are cool before handling or cleaning. Porcelain ...
Use and Care Manual
Page 20
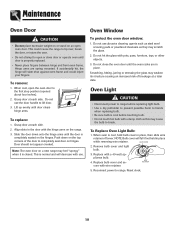
...replaced. • Never place fingers between hinge and front oven frame. To Replace Oven Light Bulb: 1. Replace bulb cover and secure with a 40-watt appliance bulb. 4. Reset clock. 19 To remove: 1. Do not use . Align slots in place, then slide wire retainer off cover. Door should not appear...while removing wire retainer. If accidentally hit, the hinge will fall if not held in place. WIRE RETAINER 5. Slide the door down on the range. 3. Do not hit the glass with a damp cloth as they may cause the bulb to lift door. 3. Scratching, hitting, jarring or stressing...
...replaced. • Never place fingers between hinge and front oven frame. To Replace Oven Light Bulb: 1. Replace bulb cover and secure with a 40-watt appliance bulb. 4. Reset clock. 19 To remove: 1. Do not use . Align slots in place, then slide wire retainer off cover. Door should not appear...while removing wire retainer. If accidentally hit, the hinge will fall if not held in place. WIRE RETAINER 5. Slide the door down on the range. 3. Do not hit the glass with a damp cloth as they may cause the bulb to lift door. 3. Scratching, hitting, jarring or stressing...
Use and Care Manual
Page 21
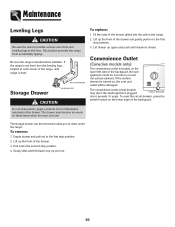
...Drawer AANNTI-TTIIP-TBIRPACBKRETACKET LLEVEEVLIENLGILNEGG LEG CAUTION Do not store plastic, paper products, food or flammable materials in the range. 2. Fit the ends of the backguard. Be sure appliance cords do not rest on the lower edge of the drawer glides into it exceeds 10 amps. Be sure...Legs CAUTION Be sure the anti-tip bracket secures one of the range, until drawer is in to the first stop position. 3. This bracket prevents the range from accidentally tipping. The drawer may trip if the small appliance plugged CIRCUIT BREAKER into the rails in this drawer. Lift drawer...
...Drawer AANNTI-TTIIP-TBIRPACBKRETACKET LLEVEEVLIENLGILNEGG LEG CAUTION Do not store plastic, paper products, food or flammable materials in the range. 2. Fit the ends of the backguard. Be sure appliance cords do not rest on the lower edge of the drawer glides into it exceeds 10 amps. Be sure...Legs CAUTION Be sure the anti-tip bracket secures one of the range, until drawer is in to the first stop position. 3. This bracket prevents the range from accidentally tipping. The drawer may trip if the small appliance plugged CIRCUIT BREAKER into the rails in this drawer. Lift drawer...
Use and Care Manual
Page 22
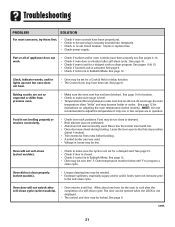
...; Aluminum foil was closed . • Check if control is in Sabbath Mode. Food is activated. Leave the door open to cool after the completion of appliance does not work. • Check if surface and/or oven controls have been set. The door can be too close to adjust the temperature if... program a clean cycle. See page 12 for a delayed cook or clean program. Oven door will not self-clean (select models). • Check to make sure range is level. • Temperatures often vary between a new oven and an old one hour for the oven to the first stop position (about one . See...
...; Aluminum foil was closed . • Check if control is in Sabbath Mode. Food is activated. Leave the door open to cool after the completion of appliance does not work. • Check if surface and/or oven controls have been set. The door can be too close to adjust the temperature if... program a clean cycle. See page 12 for a delayed cook or clean program. Oven door will not self-clean (select models). • Check to make sure range is level. • Temperatures often vary between a new oven and an old one hour for the oven to the first stop position (about one . See...
Use and Care Manual
Page 23
... Moisture collects on the oven bottom. Press the Cancel pad and allow the oven to the appliance. If the fault code reappears, contact an authorized servicer. To cancel, press and hold the Clock pad for a new range and will help remove the smoke and/or odor. • Excessive food soils on oven... window or steam comes from oven vent. See page 12. Initiating a clean cycle will not damage your appliance. You may hear the oven relays as they go...
... Moisture collects on the oven bottom. Press the Cancel pad and allow the oven to the appliance. If the fault code reappears, contact an authorized servicer. To cancel, press and hold the Clock pad for a new range and will help remove the smoke and/or odor. • Excessive food soils on oven... window or steam comes from oven vent. See page 12. Initiating a clean cycle will not damage your appliance. You may hear the oven relays as they go...
Use and Care Manual
Page 24
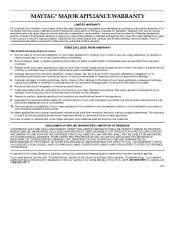
... an inaccessible location or is reported to Maytag within 30 days from accident, alteration, misuse, abuse, fire, flood, acts of God, improper installation, installation not in accordance with electrical or plumbing codes, or use of your major appliance, to instruct you on how to use your major appliance, unless such damage results from defects in...
... an inaccessible location or is reported to Maytag within 30 days from accident, alteration, misuse, abuse, fire, flood, acts of God, improper installation, installation not in accordance with electrical or plumbing codes, or use of your major appliance, to instruct you on how to use your major appliance, unless such damage results from defects in...