
Use and Care Guide
Page 3
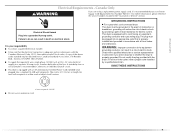
... each load. ■ Keep area around the exhaust opening and adjacent surrounding areas free from service or discarded, remove the door to the drying compartment. ■ Do not reach into the dryer if the drum is moving. ■ Do not install or store the dryer where it will tell you what can be cleaned periodically by qualified service personnel. ■ See installation instructions for grounding requirements. These...
... each load. ■ Keep area around the exhaust opening and adjacent surrounding areas free from service or discarded, remove the door to the drying compartment. ■ Do not reach into the dryer if the drum is moving. ■ Do not install or store the dryer where it will tell you what can be cleaned periodically by qualified service personnel. ■ See installation instructions for grounding requirements. These...

Use and Care Guide
Page 4
... use leveling legs if installing the dryer on a pedestal? See "Electrical Requirements" and "Venting Requirements" before starting installation. The pedestal will need to the "Assistance or Service" section. You have the option of purchasing pedestals of approximately 46" (116.8 cm) or 51.5" (130.8 cm), respectively. Check that opens to the "Assistance or Service" section. You may select a 10" (25.4 cm) pedestal or a 15.5" (39.4 cm) pedestal with any tools listed...
... use leveling legs if installing the dryer on a pedestal? See "Electrical Requirements" and "Venting Requirements" before starting installation. The pedestal will need to the "Assistance or Service" section. You have the option of purchasing pedestals of approximately 46" (116.8 cm) or 51.5" (130.8 cm), respectively. Check that opens to the "Assistance or Service" section. You may select a 10" (25.4 cm) pedestal or a 15.5" (39.4 cm) pedestal with any tools listed...

Use and Care Guide
Page 5
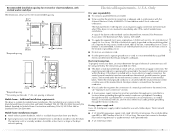
... might not shut off at temperatures below 45ºF (7ºC). See "Venting Requirements." WARNING Location Requirements Dryer Dimensions 50" (128.27 cm) Explosion Hazard Keep flammable materials and vapors, such as gasoline, away from dryer. You will need ■ A location that allows for wall, door and floor moldings. ■ Additional spacing should be considered for the following spacing dimensions are required. If using a power supply cord, a grounded electrical outlet located within...
... might not shut off at temperatures below 45ºF (7ºC). See "Venting Requirements." WARNING Location Requirements Dryer Dimensions 50" (128.27 cm) Explosion Hazard Keep flammable materials and vapors, such as gasoline, away from dryer. You will need ■ A location that allows for wall, door and floor moldings. ■ Additional spacing should be considered for the following spacing dimensions are required. If using a power supply cord, a grounded electrical outlet located within...
Use and Care Guide
Page 7
... the terminal block. If using and follow the instructions provided for homes built after 1996, dryer circuits involved in a location where grounding through the neutral conductors. Recommended installation spacing for recessed or closet installation, with clothes dryers. The National Electric Code requires a 4-wire power supply connection for it is adequate and in mobile homes to the dryer must determine the type of a neutral ground wire to install with a 3-wire electrical supply connection. The cord should...
... the terminal block. If using and follow the instructions provided for homes built after 1996, dryer circuits involved in a location where grounding through the neutral conductors. Recommended installation spacing for recessed or closet installation, with clothes dryers. The National Electric Code requires a 4-wire power supply connection for it is adequate and in mobile homes to the dryer must determine the type of a neutral ground wire to install with a 3-wire electrical supply connection. The cord should...
Use and Care Guide
Page 9
... the outlet, have a proper outlet installed by providing a path of dryer's final location. Do not modify the plug provided with a CSA International Certified Power Cord intended to do so can result in length. Electrical Requirements - The cord is within reach of least resistance for electric current. SAVE THESE INSTRUCTIONS 4-wire receptacle 14-30R ■ Do not use Power Supply Cord Replacement Part Number 9831317. Canada Only WARNING If you are using a replacement power supply cord...
... the outlet, have a proper outlet installed by providing a path of dryer's final location. Do not modify the plug provided with a CSA International Certified Power Cord intended to do so can result in length. Electrical Requirements - The cord is within reach of least resistance for electric current. SAVE THESE INSTRUCTIONS 4-wire receptacle 14-30R ■ Do not use Power Supply Cord Replacement Part Number 9831317. Canada Only WARNING If you are using a replacement power supply cord...
Use and Care Guide
Page 12
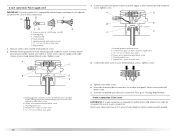
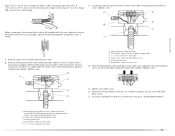
... - Insert tab of terminal block cover into slot of 3-wire connections. Direct wire cable must have completed your electrical connection. 4-wire connection: Power supply cord IMPORTANT: A 4-wire connection is required for mobile homes and where local codes do not permit the use of extra length so dryer can be moved if needed. 12 Ring terminals 1. Neutral wire (white or center wire) 4. down screw. 7. Neutral prong E. Remove center silver-colored terminal block screw. 2. Remove neutral ground wire from external ground conductor...
... - Insert tab of terminal block cover into slot of 3-wire connections. Direct wire cable must have completed your electrical connection. 4-wire connection: Power supply cord IMPORTANT: A 4-wire connection is required for mobile homes and where local codes do not permit the use of extra length so dryer can be moved if needed. 12 Ring terminals 1. Neutral wire (white or center wire) 4. down screw. 7. Neutral prong E. Remove center silver-colored terminal block screw. 2. Remove neutral ground wire from external ground conductor...
Use and Care Guide
Page 13
... line shows position of direct wire cable to the terminal block, place the hooked end of the wire under the center screw of the terminal block. Center silver-colored terminal block screw C. Connect ground wire (green or bare) of NEUTRAL ground wire before being moved to "Venting Requirements." Insert tab of terminal block cover into a hook shape. 1" (2.5 cm) 3. You have completed your electrical connection. Strip 5" (12.7 cm) of outer covering from end of dryer rear panel...
... line shows position of direct wire cable to the terminal block, place the hooked end of the wire under the center screw of the terminal block. Center silver-colored terminal block screw C. Connect ground wire (green or bare) of NEUTRAL ground wire before being moved to "Venting Requirements." Insert tab of terminal block cover into a hook shape. 1" (2.5 cm) 3. You have completed your electrical connection. Strip 5" (12.7 cm) of outer covering from end of dryer rear panel...

Use and Care Guide
Page 15
... terminal block cover into slot of dryer rear panel. Secure cover with hold- A. Center silver-colored terminal block screw C. Secure cover with holddown screw. 6. 2. C A B D E Optional 3-wire connection Use for direct wire or power supply cord where local codes do not permit connecting cabinet-ground conductor to outer terminal block screws. Neutral ground wire C. Neutral ground wire D. Grounding path determined by a qualified electrician 3. Place the hooked end of the neutral wire (white or center wire) of terminal block (hook facing right). Remove...
... terminal block cover into slot of dryer rear panel. Secure cover with hold- A. Center silver-colored terminal block screw C. Secure cover with holddown screw. 6. 2. C A B D E Optional 3-wire connection Use for direct wire or power supply cord where local codes do not permit connecting cabinet-ground conductor to outer terminal block screws. Neutral ground wire C. Neutral ground wire D. Grounding path determined by a qualified electrician 3. Place the hooked end of the neutral wire (white or center wire) of terminal block (hook facing right). Remove...

Use and Care Guide
Page 16
... system and make sure exhaust hood is recommended to seal all governing codes and ordinances. If this dryer MUST BE EXHAUSTED OUTDOORS. Do not use a plastic vent. ■ Do not install flexible metal vent in enclosed walls, ceilings or floors. Venting Requirements WARNING Rigid metal vent ■ For best drying performance, rigid metal vents are acceptable only if accessible for cleaning. Elbows Failure to avoid...
... system and make sure exhaust hood is recommended to seal all governing codes and ordinances. If this dryer MUST BE EXHAUSTED OUTDOORS. Do not use a plastic vent. ■ Do not install flexible metal vent in enclosed walls, ceilings or floors. Venting Requirements WARNING Rigid metal vent ■ For best drying performance, rigid metal vents are acceptable only if accessible for cleaning. Elbows Failure to avoid...

Use and Care Guide
Page 18
... provides venting requirements that will : ■ Shorten the life of the dryer. ■ Reduce performance, resulting in longer drying times and increased energy usage. Periscope installation NOTE: The following Vent system chart to determine type of the mobile home structure and must be converted to have the dryer converted. Contact your installation. Standard rear offset exhaust installation B. A B A. Special provisions for best drying performance ■ Use the following kits for...
... provides venting requirements that will : ■ Shorten the life of the dryer. ■ Reduce performance, resulting in longer drying times and increased energy usage. Periscope installation NOTE: The following Vent system chart to determine type of the mobile home structure and must be converted to have the dryer converted. Contact your installation. Standard rear offset exhaust installation B. A B A. Special provisions for best drying performance ■ Use the following kits for...

Use and Care Guide
Page 19
... ft (4.6 m) 2. Number of 90º turns or elbows Type of the dryer. Install exhaust hood. Use caulking compound to connect the exhaust vent. Leave enough room to seal exterior wall opening around exhaust hood. 2. Check that there are no longer visible. 5. Place cardboard under each of the vent to secure vent. Check levelness first side to side, then front to back. To protect the floor, use duct tape...
... ft (4.6 m) 2. Number of 90º turns or elbows Type of the dryer. Install exhaust hood. Use caulking compound to connect the exhaust vent. Leave enough room to seal exterior wall opening around exhaust hood. 2. Check that there are no longer visible. 5. Place cardboard under each of the vent to secure vent. Check levelness first side to side, then front to back. To protect the floor, use duct tape...
Use and Care Guide
Page 22
... a Timed Dry heated cycle, and start , check the following: ■ Controls are set in a running for 5 minutes, open the dryer door and feel heat, turn on . ■ Household fuse is intact and tight, or circuit breaker has not tripped. ■ Dryer door is an extra part, go away. 22 Do not select the Air Only Temperature setting. 2. In Canada ■ Plug into a grounded outlet. Remove any dust. If the dryer will go back through the steps to remove...
... a Timed Dry heated cycle, and start , check the following: ■ Controls are set in a running for 5 minutes, open the dryer door and feel heat, turn on . ■ Household fuse is intact and tight, or circuit breaker has not tripped. ■ Dryer door is an extra part, go away. 22 Do not select the Air Only Temperature setting. 2. In Canada ■ Plug into a grounded outlet. Remove any dust. If the dryer will go back through the steps to remove...

Use and Care Guide
Page 25
... Sensor Dry Cycles or Timed Dry Cycles Preset Settings chart (in handling. Laundry cools for ease in the "Cycles" section) for a guide to run for the length of an Auto Cycle if a wet item is detected. ■ In an Sensor Dry Cycle, if a wet item is a reminder to check to see whether the lint screen needs to handle and reduces wrinkling. Clean Lint Screen The Clean Lint Screen light is not detected after approximately 5 minutes, the dryer goes directly into Cool...
... Sensor Dry Cycles or Timed Dry Cycles Preset Settings chart (in handling. Laundry cools for ease in the "Cycles" section) for a guide to run for the length of an Auto Cycle if a wet item is detected. ■ In an Sensor Dry Cycle, if a wet item is a reminder to check to see whether the lint screen needs to handle and reduces wrinkling. Clean Lint Screen The Clean Lint Screen light is not detected after approximately 5 minutes, the dryer goes directly into Cool...

Use and Care Guide
Page 28
.... Rack Dry Setting Temp. A A. Actual drying time will depend on a clothesline or by pressing Timed Dry Cycle Adjust Up or Down arrow buttons. Changing Options and Modifiers after pressing Start You can change the cycle time by using the Air Fluff temperature setting. 7. Restart the selection process. Time* Wool Sweaters Timed Dry Low 60 Block to press Pause/Cancel twice, the program clears and your model. Do not use the dryer rack Do not remove the lint screen. 1. If...
.... Rack Dry Setting Temp. A A. Actual drying time will depend on a clothesline or by pressing Timed Dry Cycle Adjust Up or Down arrow buttons. Changing Options and Modifiers after pressing Start You can change the cycle time by using the Air Fluff temperature setting. 7. Restart the selection process. Time* Wool Sweaters Timed Dry Low 60 Block to press Pause/Cancel twice, the program clears and your model. Do not use the dryer rack Do not remove the lint screen. 1. If...

Use and Care Guide
Page 29
... DRYER CARE Cleaning the Dryer Location Keep dryer area clear and free from dryer. Roll lint off while the screen is completely dry. IMPORTANT: ■ Do not run the dryer with hot water. 5. See "Venting Requirements." 4. Cleaning the Dryer Interior To clean dryer drum 1. Apply paste to remove lint. NOTE: Garments that contain unstable dyes, such as gasoline, away from items that would obstruct the flow of clothes. These stains are removed. 3. Rinse screen with the lint screen loose, damaged, blocked...
... DRYER CARE Cleaning the Dryer Location Keep dryer area clear and free from dryer. Roll lint off while the screen is completely dry. IMPORTANT: ■ Do not run the dryer with hot water. 5. See "Venting Requirements." 4. Cleaning the Dryer Interior To clean dryer drum 1. Apply paste to remove lint. NOTE: Garments that contain unstable dyes, such as gasoline, away from items that would obstruct the flow of clothes. These stains are removed. 3. Rinse screen with the lint screen loose, damaged, blocked...

Use and Care Guide
Page 30
... circuit breakers for the dryer. Clean out pockets before servicing. Replace all parts and panels before operating. Check that both fuses are secure in dryer base. 4. Check the front and rear edges of the drum for 1 second. Make sure leveling legs are at home. Use masking tape to secure dryer door. Disconnect power. 2. Disconnect wiring. 3. Unplug the power supply cord. 2. Failure to do so can result in dryer base. 3. Replace the fuse or reset the circuit breaker. The drum...
... circuit breakers for the dryer. Clean out pockets before servicing. Replace all parts and panels before operating. Check that both fuses are secure in dryer base. 4. Check the front and rear edges of the drum for 1 second. Make sure leveling legs are at home. Use masking tape to secure dryer door. Disconnect power. 2. Disconnect wiring. 3. Unplug the power supply cord. 2. Failure to do so can result in dryer base. 3. Replace the fuse or reset the circuit breaker. The drum...
Use and Care Guide
Page 31
... load. Dryer displaying code message ■ "PF" (power failure), check the following: Was the drying cycle interrupted by a power failure? Lint screen should be contacting the sensor strips. Do not use a plastic vent. See "Plan Vent System." ■ Is the exhaust vent diameter the correct size? Failure to vibrate. Select the right temperature for most installations, the rear of lint or replace exhaust vent with heavy metal or flexible metal vent. When balled up ? Proper operation of drying time...
... load. Dryer displaying code message ■ "PF" (power failure), check the following: Was the drying cycle interrupted by a power failure? Lint screen should be contacting the sensor strips. Do not use a plastic vent. See "Plan Vent System." ■ Is the exhaust vent diameter the correct size? Failure to vibrate. Select the right temperature for most installations, the rear of lint or replace exhaust vent with heavy metal or flexible metal vent. When balled up ? Proper operation of drying time...

Use and Care Guide
Page 32
... precision used ? Stains on our full line of the cycle? ■ Was the dryer overloaded? Dry smaller loads that you the cost of the cycle. The odor will fit right and work right because they are trained to local dealers, repair parts distributors and service companies. Add dryer fabric softener sheets at the end of appliances. ■ Installation information. ■ Use and maintenance procedures. ■ Accessory and repair parts sales...
... precision used ? Stains on our full line of the cycle? ■ Was the dryer overloaded? Dry smaller loads that you the cost of the cycle. The odor will fit right and work right because they are trained to local dealers, repair parts distributors and service companies. Add dryer fabric softener sheets at the end of appliances. ■ Installation information. ■ Use and maintenance procedures. ■ Accessory and repair parts sales...

Use and Care Guide
Page 33
... is used for Factory Specified Parts and repair labor to correct defects in accordance with the product, Maytag Corporation or Maytag Limited (hereafter "Maytag") will need to know your complete model number and serial number. Service calls to correct the installation of your sales slip together for units operated outside the United States or Canada. 7. Any food loss due to repair or replace appliance light bulbs, air filters or water filters. DISCLAIMER...
... is used for Factory Specified Parts and repair labor to correct defects in accordance with the product, Maytag Corporation or Maytag Limited (hereafter "Maytag") will need to know your complete model number and serial number. Service calls to correct the installation of your sales slip together for units operated outside the United States or Canada. 7. Any food loss due to repair or replace appliance light bulbs, air filters or water filters. DISCLAIMER...

Parts Catalog
Page 6
..., 8−18 x 1/2 3 W10153413 Door, Lint Screen 4 3406653 Harness, Sensor 5 697354 Air Duct Assembly 6 697813 Seal, Outlet Housing 7 697814 Seal, Drum Front 8 3934666 Nut,3/8 x 16(R.H.) 10 3402841 Lens, Drum Light 11 693995 Screw, 8−18 x 3/8 12 8533971 Screw, 8−18 x 5/16 13 8066208 Clip−Spring 14 3387747 Heater Element 15 279457 Terminal Wire Kit (For Heater Element Wiring Harness Repair) Illus. No. No. Part No. BULKHEAD PARTS For Model: MEDZ400TQ2 (Designer White) Illus...
..., 8−18 x 1/2 3 W10153413 Door, Lint Screen 4 3406653 Harness, Sensor 5 697354 Air Duct Assembly 6 697813 Seal, Outlet Housing 7 697814 Seal, Drum Front 8 3934666 Nut,3/8 x 16(R.H.) 10 3402841 Lens, Drum Light 11 693995 Screw, 8−18 x 3/8 12 8533971 Screw, 8−18 x 5/16 13 8066208 Clip−Spring 14 3387747 Heater Element 15 279457 Terminal Wire Kit (For Heater Element Wiring Harness Repair) Illus. No. No. Part No. BULKHEAD PARTS For Model: MEDZ400TQ2 (Designer White) Illus...


