
Owners Manual
Page 5
...select for the specified time on the control. Timed Dry (for use with Timed Cycles only) Will run the dryer for a load, select the lower setting rather than the higher setting. Depending on model, temperature may be selected on the cycle knob or may vary. 1 POWER/CANCEL BUTTON Press to turn the... dryer on the fabrics in process to pause it stops, wrinkles can form. Press END SIGNAL until DRUM LIGHT is ...
...select for the specified time on the control. Timed Dry (for use with Timed Cycles only) Will run the dryer for a load, select the lower setting rather than the higher setting. Depending on model, temperature may be selected on the cycle knob or may vary. 1 POWER/CANCEL BUTTON Press to turn the... dryer on the fabrics in process to pause it stops, wrinkles can form. Press END SIGNAL until DRUM LIGHT is ...
Owners Manual
Page 6
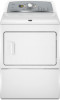
...level. Drying time varies based on the fabrics in bold are default settings for that cycle. This cycle should be run the dryer for the specified time on all models. TIMED DRY - Will run to completion to a damp level for foam, rubber, plastic, or heat-sensitive fabrics. Wrinkle...and options shown in your load. TIMED DRY CYCLES Not all cycles and settings are available on cycle knob or be selected on all models. Use the NORMAL dryness level to medium-weight fabrics. Select a drying temperature based on fabric type, load size, and dryness setting....
...level. Drying time varies based on the fabrics in bold are default settings for that cycle. This cycle should be run the dryer for the specified time on all models. TIMED DRY - Will run to completion to a damp level for foam, rubber, plastic, or heat-sensitive fabrics. Wrinkle...and options shown in your load. TIMED DRY CYCLES Not all cycles and settings are available on cycle knob or be selected on all models. Use the NORMAL dryness level to medium-weight fabrics. Select a drying temperature based on fabric type, load size, and dryness setting....
Owners Manual
Page 8
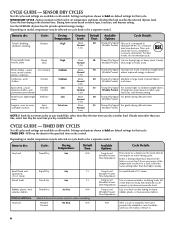
...cycles, you may select alternate settings by pressing the button for more information about each cycle. Temp Level (for that cycle is used for models with all modifiers are available with only one choice of heat-free, periodic tumbling at the end of a cycle. Dryness Level (for ...use with Sensor Cycles only) Normal dryness level is a good starting point for optimal energy savings. Drying time varies based on the dryer. 4. Normal Dry is selected. 8 3. Select the desired cycle Select the desired cycle for your load, by pressing the button for use with ...
...cycles, you may select alternate settings by pressing the button for more information about each cycle. Temp Level (for that cycle is used for models with all modifiers are available with only one choice of heat-free, periodic tumbling at the end of a cycle. Dryness Level (for ...use with Sensor Cycles only) Normal dryness level is a good starting point for optimal energy savings. Drying time varies based on the dryer. 4. Normal Dry is selected. 8 3. Select the desired cycle Select the desired cycle for your load, by pressing the button for use with ...
Owners Manual
Page 9
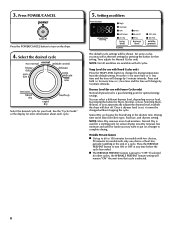
... to avoid wrinkling when you are available with all options and settings are unable to remove a load from the dryer as soon as it stops. 9. Select Drum Light to turn on some models) Press the START/PAUSE button to reduce wrinkling. When pressed during a cycle or not running, the Drum Light turns...
... to avoid wrinkling when you are available with all options and settings are unable to remove a load from the dryer as soon as it stops. 9. Select Drum Light to turn on some models) Press the START/PAUSE button to reduce wrinkling. When pressed during a cycle or not running, the Drum Light turns...
Owners Manual
Page 11
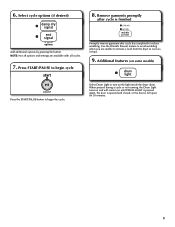
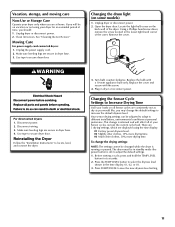
...to increase the default dryness level. Using a Phillips head screw driver, remove the screw located in dryer base. 3. Press START/PAUSE to Increase Drying Time If all your loads on some models) 1. Make sure leveling legs are displayed using your Sensor cycles, not just the current cycle/load.... Before starting a cycle, press and hold the TEMP LEVEL button for an extended period of the dryer. Unplug the power supply cord. 2. For...
...to increase the default dryness level. Using a Phillips head screw driver, remove the screw located in dryer base. 3. Press START/PAUSE to Increase Drying Time If all your loads on some models) 1. Make sure leveling legs are displayed using your Sensor cycles, not just the current cycle/load.... Before starting a cycle, press and hold the TEMP LEVEL button for an extended period of the dryer. Unplug the power supply cord. 2. For...


